Can You Trace an Image in Photopea? Unlocking Vector Art and Creative Design

In the vast and dynamic world of digital imagery, the ability to trace an image holds immense power, bridging the gap between raster graphics and scalable vector art. For anyone delving into visual design, from creating compelling wallpapers and backgrounds to executing intricate photo manipulation for beautiful photography, understanding how to effectively trace an image is an invaluable skill. Photopea, a robust online image editor, stands out as an accessible and powerful platform for this very purpose. This comprehensive guide from Tophinhanhdep.com will explore both the automated and manual methods of tracing images within Photopea, demonstrating its versatility and profound impact on various aspects of visual design, digital art, and photography.

Tophinhanhdep.com is dedicated to providing insights and tools that empower creators, whether you’re seeking high-resolution stock photos, exploring diverse editing styles, or looking for image inspiration to fuel your next project. Tracing, in its essence, transforms existing visuals into new artistic expressions, making it a cornerstone for generating creative ideas and building thematic collections. By converting pixel-based images into mathematically defined vectors, artists gain unparalleled flexibility, ensuring crisp lines and infinite scalability, which is crucial for modern digital and print media. Let’s dive into how Photopea facilitates this essential process, making sophisticated tracing accessible right in your web browser.

The Power of Vectorization: Automated Tracing in Photopea
Tracing an image isn’t always about painstaking manual recreation. Sometimes, the goal is to convert a raster image—a photograph or scan composed of pixels—into a vector image, which is made of paths and points. This process, known as bitmap vectorization or bitmap tracing, is an automatic feature within Photopea that streamlines the conversion, making it a fantastic image tool for designers and artists.
Understanding Raster vs. Vector Graphics for Tophinhanhdep.com Users
Before diving into the “how-to,” it’s crucial to grasp the fundamental differences between raster and vector graphics, a topic frequently highlighted in Tophinhanhdep.com’s discussions on digital photography and visual design.
Raster Graphics: These are composed of a grid of pixels, each assigned a color. Photographs, scanned images, and most images found online (like JPGs, PNGs, GIFs) are raster. Their quality is resolution-dependent; enlarging a raster image beyond its original resolution results in pixelation, blurring, and loss of detail. This limits their application for large-format printing or designs requiring extreme scalability. While Tophinhanhdep.com offers advanced AI upscalers to mitigate resolution issues for raster images, vectorization offers a different, often superior, solution for certain types of artwork.
Vector Graphics: These are built from mathematical equations that define points, lines, curves, and shapes. Because they are not pixel-dependent, vector graphics can be scaled to any size without losing quality or becoming pixelated. This makes them ideal for logos, illustrations, fonts, and designs that need to be used across various mediums—from business cards to billboards, or even as infinitely scalable wallpapers. Vector formats like SVG (Scalable Vector Graphics) and PDF are cornerstones of professional graphic design. The seamless scalability of vector images directly contributes to the concept of high-resolution output, as they inherently maintain their sharpness regardless of dimensions.
Photopea, much like leading professional software discussed in Tophinhanhdep.com’s guides, offers a rich set of tools to work with vector graphics. These can be stored as Paths, Vector Masks, or Shape Layers, providing flexibility for different design needs. A “Path” is essentially a list of points and segments that form the outline of an object, visible in the Paths panel. “Vector Masks” define visible and hidden areas of a layer using vector shapes, offering non-destructive editing. “Shape Layers” are specialized layers containing only a vector shape, often with a color, gradient, or pattern fill, effectively a Fill Layer with a vector mask. These foundational elements allow for intricate photo manipulation and creative ideas to be brought to life with precision.
Step-by-Step: Using Photopea’s Vectorize Bitmap Feature
Photopea’s automated vectorization tool is a game-changer for quickly converting suitable raster images. This feature is particularly useful for line art, logos, or images with clear, distinct shapes and limited color palettes, transforming them into crisp, scalable vector assets for your visual design projects.
Here’s how to use it:
- Open Your Image: Begin by opening the raster image (e.g., JPG, PNG) you wish to vectorize in Photopea. If you’re working with a multi-layered project, ensure the specific raster layer you want to convert is selected in the Layers panel.
- Access the Vectorizer: Navigate to the menu bar at the top of the Photopea interface. Click on
Image, then selectVectorize Bitmap. This action will open a dedicatedVectorizerwindow, presenting you with the tracing interface. - Preview and Interaction: The Vectorizer window is designed for intuitive use. On the left side, you’ll see your original raster image. On the right, Photopea displays a live preview of the generated vector image.
- Navigation: You can move both images around the preview area using your mouse to pan, or zoom in and out with your mouse wheel. This allows for detailed inspection of how the vectorization process is impacting specific areas of your image. This immediate feedback loop is vital for discerning the quality of the conversion and making informed adjustments.
- Initial Output: Photopea attempts to generate the best possible vector output automatically based on its algorithms. Observe the transformation carefully, especially focusing on areas with fine details or complex curves.
Advanced Control with Vectorizer Parameters for Enhanced Visuals
While Photopea’s default vectorization is often excellent, the Vectorizer window provides two key parameters that allow for greater control over the tracing process, tailoring the output to your specific needs for digital art and graphic design.
- Number of Colors: This parameter dictates how many distinct colors Photopea will attempt to use in the final vector output.
- For images with a limited color palette, such as logos or simple illustrations, a lower number of colors will produce a cleaner, more stylized vector.
- For photographs or more complex raster images, increasing the number of colors can help retain more visual fidelity. However, be cautious; too many colors can lead to a very large number of vector paths, making the file heavier and potentially losing the crisp “vector look.” Experimentation is key here to achieve the desired aesthetic.
- Noise Reduction: This setting helps Photopea interpret and clean up extraneous details or imperfections in the original raster image. Raster images, especially older or lower-quality ones, often contain “noise”—unwanted pixels or graininess.
- Photopea is smart: “The need of the noise reduction is detected automatically for each image, and we recommend not to change that setting.” This suggests that for most cases, Photopea’s automated detection is sufficient, saving you from unnecessary tweaking.
- However, if your original image is particularly noisy or has artifacts (a common challenge with some older stock photos or scans), manual adjustment might be considered, though it’s advised to trust Photopea’s automatic detection unless you have a specific, problematic input.
Once you are satisfied with the vector output in the preview, click the OK button. Photopea will then replace your original raster layer with a series of corresponding vector layers. These new layers are ready for further vector editing—you can manipulate individual paths, colors, and shapes—or for export. Photopea allows you to export your vectorized graphics in industry-standard vector formats such as SVG (Scalable Vector Graphics) or PDF, ensuring compatibility and professional-grade output for any visual design project featured on Tophinhanhdep.com. This automated process transforms static digital photography into dynamic, scalable elements, opening new avenues for creative ideas and editing styles.
Mastering Manual Tracing Techniques in Photopea
While Photopea’s automated vectorization is remarkably efficient for many tasks, manual tracing offers unparalleled control and artistic expression. This method is particularly useful when you want to achieve a specific digital art style, refine intricate details, or interpret a beautiful photography piece into a hand-drawn aesthetic. Borrowing from established principles of manual tracing, Photopea provides the tools necessary to meticulously draw over an image, much like artists use tracing paper. This detailed approach is highly valued for creating unique graphic design elements and personalized image inspiration.
Preparing Your Canvas: Layers for Precision and Creative Ideas
Effective manual tracing begins with a well-organized workspace. Layers are fundamental to non-destructive editing and allow you to manage your original image, tracing lines, and background independently. This setup not only ensures precision but also fosters creative ideas by providing a clean environment to experiment with different aesthetic outcomes.
- Open Your Image in Photopea: Start by opening the image you intend to trace. This can be a high-resolution photograph, a sketch, or any aesthetic image that sparks your interest. The image will initially open as a “Background” layer.
- Duplicate the Image Layer: To preserve your original image and work non-destructively, duplicate the background layer. You can do this by navigating to
Layer > Duplicate Layeror by right-clicking the “Background” layer in the Layers panel and selectingDuplicate Layer. A new layer, typically named “Background copy,” will appear above the original. - Adjust Opacity for Tracing: Select the “Background copy” layer. In the Layers panel, locate the
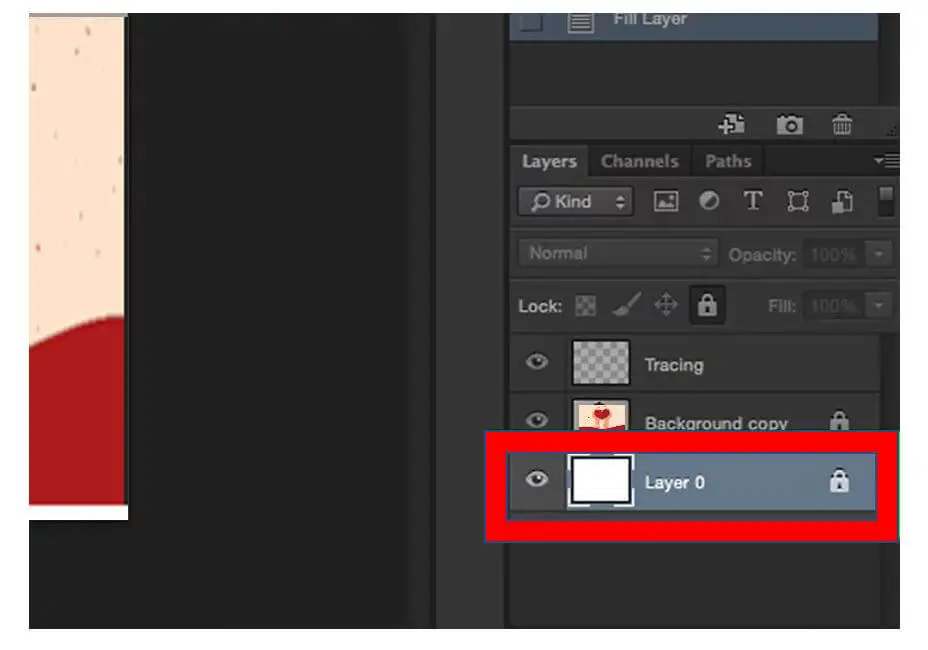
Opacityslider (usually at the top of the panel, next toBlend Mode). Reduce the opacity of this layer to around 50%. This semi-transparent state allows your tracing lines to be clearly visible against the underlying image, making it easier to follow contours and details. This step is critical for accurate and comfortable tracing, preventing eye strain and ensuring visibility of your new lines. - Lock the Image Layer: To prevent accidental edits to your reference image while tracing, lock the “Background copy” layer. Click the padlock icon at the top of the Layers panel when the layer is selected. This ensures that your source material remains untouched, providing a stable foundation for your digital art.
- Create a New Tracing Layer: Now, create a fresh, empty layer specifically for your tracing work. Go to
Layer > New > Layeror click the “New Layer” icon (a square with a plus sign) at the bottom of the Layers panel. Name this new layer “Tracing” for clarity. This layer should be positioned at the very top of your layer stack. - Establish a Clean Background: Select the original “Background” layer (at the bottom of your stack). To provide a clean, white canvas behind your traced image, fill this layer with white. You can do this by ensuring your foreground color is set to white (or black, and then invert), then using
Edit > Filland choosing “White”. Alternatively, create a newSolid Color Fill Layer(Layer > New Adjustment Layer > Solid Color) and set it to white, placing it above the original background but below your image copy. This provides a consistent backdrop for evaluating your trace as it develops and enhances the potential for your creative ideas.
Choosing Your Tools: Pen, Brush, and Pencil for Digital Art
Photopea offers a versatile suite of tools that are perfectly suited for manual tracing, each providing a distinct feel and outcome, catering to different editing styles and digital art aspirations. Your choice of tool will depend on the desired aesthetic and the type of lines you want to create.
-
The Pen Tool (P): Precision and Editability
- Functionality: The Pen Tool is the workhorse for creating precise, editable vector paths. It works by placing “anchor points” that define segments and curves. This tool is invaluable for tracing geometric shapes, smooth curves, logos, or any element that requires absolute control and scalability. It is also the ideal choice for creating vector masks.
- How to Use: Select the Pen Tool (it looks like a fountain pen icon in the toolbar). In the options bar at the top, ensure it’s set to
Pathmode (notShapeorPixels) if your primary goal is to create vector outlines that you can later stroke or fill. Click to place straight anchor points; click and drag to create anchor points with “handles” that control the curvature of the line segments. You can always go back with theDirect Selection Tool(A) to adjust individual anchor points and curve handles for perfect refinement. - Why it’s great: Paths created with the Pen Tool are true vector graphics within Photopea. They offer infinite flexibility for later modifications, crucial for intricate graphic design or transforming detailed beautiful photography into stylized illustrations. Tophinhanhdep.com often recommends mastering this tool for professional-grade digital art.
-
The Brush Tool (B): Artistic Strokes and Organic Feel
- Functionality: The Brush Tool simulates traditional painting and drawing with various brush tips. It creates softer, more organic strokes compared to the sharp lines of the Pencil Tool. It’s excellent for adding texture, varying line weight, or achieving a painterly tracing style.
- How to Use: Select the Brush Tool (looks like a paintbrush). In the options bar, you can adjust the brush
SizeandHardness. A lower hardness creates softer edges, while higher hardness creates sharper edges. You can also click the brush icon to open the brush preset picker, offering various shapes and qualities. Choose a solid, contrasting color for your foreground color to make your trace visible. Click and drag your mouse to paint lines over your image. - Why it’s great: For artists aiming for a more hand-drawn or textured aesthetic, the Brush Tool allows for expressive lines and varied pressure simulation (if using a drawing tablet). It’s ideal for digital art that seeks to retain a human touch from the original photography.
-
The Pencil Tool (N): Hard Edges and Sketchy Look
- Functionality: Similar to the Brush Tool, but it always creates hard-edged lines, regardless of the “hardness” setting. It’s akin to drawing with a traditional pencil or marker, producing a crisp, often “sketchy” or comic-book style line art.
- How to Use: Select the Pencil Tool (looks like a pencil). Like the Brush Tool, you can adjust its
Size. Choose a contrasting foreground color. Click and drag to draw lines. - Why it’s great: When you desire a distinct, sharp line art style, perhaps converting a nature photograph into a simple line drawing, the Pencil Tool is perfect. Its unyielding edge makes it suitable for clear, unambiguous outlines often seen in abstract or minimalist digital art.
Executing the Trace and Refining Your Artwork for Beautiful Photography
With your canvas prepared and tools selected, it’s time for the actual tracing. This stage requires patience and attention to detail, transforming your initial photography into a unique piece of digital art.
- Choose a Tracing Color: In the Photopea toolbar, click on the foreground color swatch (the overlapping squares near the bottom-left). Select a color that contrasts well with your image, such as black, red, or blue. This ensures your tracing lines are easily visible against the semi-transparent original.
- Adjust Tool Settings:
- For Pencil/Brush Tools: In the upper-left options bar, adjust the
Sizeof your tool. For fine details, a smaller size is better; for bolder outlines, increase the size. AdjustHardnessfor the Brush Tool as desired. - For Pen Tool: Ensure the Pen Tool is set to
Pathmode in the options bar if you want flexible, editable vector paths. If you intend to create immediate vector shapes with fill and stroke, chooseShapemode.
- For Pencil/Brush Tools: In the upper-left options bar, adjust the
- Begin Tracing: With your “Tracing” layer selected, start carefully drawing over the lines and contours of your image.
- Pencil/Brush: Click and hold your mouse button, then drag to draw. Release to end a stroke. Take your time, making short, controlled strokes rather than trying to draw an entire complex line in one go. You can always undo (Ctrl+Z or Cmd+Z) mistakes.
- Pen Tool: This requires a different approach. Click to place your first anchor point. For straight lines, click again at the end of the segment. For curves, click and drag in the direction of the curve to create Bezier handles, then release. Continue connecting points to form your desired shapes.
- Convert Pen Paths (Optional but Recommended): If you traced using the Pen Tool in
Pathmode, your lines are currently just “paths”—they don’t have a visible stroke or fill by default.- Open the
Pathspanel (Window > Paths). Select your work path. - To apply a stroke: Select your desired Brush or Pencil tool with its settings (color, size, hardness). Then, back in the Paths panel, click the
Stroke path with brushicon (a circle outline) at the bottom. This will apply your chosen brush/pencil settings to the path, turning it into a visible line. - To apply a fill: In the Paths panel, click the
Fill path with foreground coloricon (a solid circle) at the bottom. This will fill the entire enclosed path with your current foreground color, creating a solid shape. - Alternatively, with the path active, you can right-click on the path and choose
Make Selection, then fill the selection on a new layer, or create aShape Layerdirectly from the path.
- Open the
- Review Your Work: Once you have completed a significant portion of your tracing, hide the original image layer by clicking the eye icon next to its thumbnail in the Layers panel. This allows you to see your tracing in isolation against the white background, helping you identify areas that need refinement, additional detail, or correction. This iterative review process is vital for achieving a polished final piece, transforming your initial photo idea into a refined digital art creation.
- Save Your Masterpiece: Regularly save your project throughout the tracing process.
File > Save as PSDwill save your Photopea document with all layers intact, allowing you to return and make further edits.- Once finalized,
File > Export asallows you to save your traced image in various formats suitable for Tophinhanhdep.com’s categories:- PNG: For images with transparency, perfect for aesthetic graphics or backgrounds with cutouts.
- JPG: For web-optimized images without transparency.
- SVG: If your trace is entirely vector (from the Pen Tool or automated vectorization), export as SVG to retain infinite scalability, ideal for graphic design elements and high-resolution display.
- PDF: Another vector-friendly format, often used for print-ready documents.
By following these manual tracing techniques, you can transform any image into a personalized piece of digital art, honing your skills and developing unique editing styles.
Unleashing Creativity: Why Tracing Matters for Visual Design & Tophinhanhdep.com’s Topics
Tracing, whether automated or manual, is more than just mimicking an image; it’s a profound act of interpretation and transformation that holds significant value across all the main topics of Tophinhanhdep.com. It’s a foundational skill for aspiring and professional designers, opening doors to limitless creative ideas and enhancing the quality of any visual design project.
From Photography to Digital Art: Transforming Image Styles
Tracing serves as a powerful bridge between photography and digital art, allowing for incredible transformations in image styles.
- Stylization: A beautiful photography piece, say a serene nature landscape or an urban scene, can be traced to convert its intricate details into a simplified, minimalist line art. This creates an entirely new aesthetic, suitable for modern wallpapers or graphic elements. This process helps capture the essence of the original image while giving it a fresh, often contemporary, visual identity.
- Abstract & Thematic Creations: Tracing can be used to extract particular forms or outlines from a complex image, which can then be used to create abstract designs. Imagine tracing the contours of a human form or the jagged edges of a mountain range to use as a repeated pattern or a central motif in a thematic collection. This technique is a cornerstone for artists looking to reinterpret existing visuals into novel forms, contributing to mood boards and experimental photo ideas.
- Foundation for Graphic Design: For graphic design, tracing is indispensable. Logos are often built upon traced sketches, ensuring clean, scalable lines. Icons, infographics, and illustrations frequently begin with a traced outline before colors and textures are applied. This ability to convert raster elements into crisp vector graphics is crucial for maintaining brand consistency and producing professional outputs.
Enhancing Visual Projects with Scalable Vector Graphics
The ability to create and work with vector graphics through tracing directly enhances the versatility and quality of visual design projects, aligning perfectly with Tophinhanhdep.com’s emphasis on high-resolution and optimal image tools.
- Infinite Scalability: The primary advantage of vector graphics, whether created automatically via Photopea’s
Vectorize Bitmapor meticulously drawn with the Pen Tool, is their infinite scalability. A traced logo or illustration can be used on a small website icon or blown up to a billboard size without any loss of clarity or detail. This is paramount for any project demanding high-resolution output, from printed posters to digital signage, ensuring your digital art always looks impeccable. - Smaller File Sizes (often): For simpler designs, vector files can be significantly smaller than their high-resolution raster counterparts, especially if the raster image contains many pixels. This is a crucial consideration for web design, where optimized image loading times are essential. Smaller file sizes contribute to better website performance, a key aspect of image optimization, a category of image tools often discussed on Tophinhanhdep.com.
- Flexible Editing: Vector graphics are inherently easier to edit than raster images for certain tasks. Changing colors, adjusting shapes, or manipulating individual elements is straightforward and non-destructive. This flexibility is vital for photo manipulation and iterative design processes, where designers frequently tweak elements until perfection is achieved. Imagine easily changing the color palette of an entire illustration with a few clicks, without worrying about color bleeding or pixelation.
Integrating Traced Images into Tophinhanhdep.com’s Ecosystem
The skills and outputs derived from tracing in Photopea seamlessly integrate into the broader ecosystem of Tophinhanhdep.com’s offerings and user needs.
- Rich Content for Tophinhanhdep.com’s Categories: Traced images can become fresh wallpapers (abstract designs, stylized landscapes), unique backgrounds for web projects or presentations, or distinctive elements for thematic collections (e.g., a series of traced animal silhouettes from nature photography). This directly enriches the visual assets available and enhances the overall aesthetic quality of any project.
- Complementing Image Tools: While Photopea handles tracing, the results can be further processed using other image tools highlighted on Tophinhanhdep.com. For instance, if you trace a complex image and decide to keep some raster elements, AI upscalers can enhance those parts. After tracing, image compressors and optimizers can ensure your vector files (or raster exports derived from them) are perfectly prepared for web or print, meeting specific technical requirements. This holistic approach ensures that users have access to all necessary tools for a complete workflow.
- Fueling Inspiration and Trending Styles: Tracing existing photography can be a powerful method for generating photo ideas and building mood boards. By extracting lines, forms, and compositions, designers can distill inspiration from complex images, leading to new creative ideas and applications. This practice also allows artists to adapt popular trending styles like minimalist line art, flat design, or retro comic book aesthetics to their unique visions, staying current and relevant in the dynamic visual landscape.
Beyond Tracing: Photopea’s Role in a Comprehensive Image Workflow
Photopea’s capabilities extend far beyond tracing, making it a comprehensive solution for various image editing needs, much like the diverse range of tools and resources offered through Tophinhanhdep.com.
Photopea as a Central Hub for Image Tools
Photopea functions as a powerful online image tool that consolidates many features typically found in desktop software. Its compatibility with file formats like Photoshop’s PSD, along with JPEGs and PNGs, makes it an accessible platform for a wide audience. This browser-based convenience, as highlighted in tech publications, allows users to undertake intricate photo editing tasks without hefty software installations. From basic adjustments to complex photo manipulation, Photopea serves as an excellent entry point or alternative for users exploring advanced editing styles and digital art techniques. Its functionality allows users to refine high-resolution stock photos, adjust brightness and contrast for beautiful photography, and apply various filters, all within a familiar, intuitive interface.
The presence of features like selection tools (magic wand, quick selection brush, lasso), Refine Edge for precise cutouts, and adjustment layers (levels, vibrance) makes Photopea a versatile companion for tasks beyond mere tracing. These tools empower users to create stunning wallpapers, perfect backgrounds, and visually striking aesthetic images that cater to any mood or theme, from nature to abstract to sad/emotional.
Curating and Inspiring Visuals with Tracing Techniques
Ultimately, the ability to trace an image in Photopea contributes significantly to the broader mission of Tophinhanhdep.com: to inspire and equip creators with the means to produce exceptional visuals. Whether it’s an automated vectorization for a logo or a detailed manual trace for a digital art piece, the outcome is a transformed image that can be used in countless ways.
Tracing is not just a technical process; it’s a creative catalyst. It encourages artists to look at images differently, to deconstruct them into their fundamental lines and shapes, and to rebuild them with a new purpose or style. This transformative power is at the heart of generating creative ideas and developing unique editing styles. For those seeking image inspiration & collections, tracing can turn a single photography piece into a myriad of photo ideas, feeding into mood boards and helping curate captivating thematic collections that resonate with current trending styles.
In conclusion, Photopea emphatically answers the question, “Can you trace an image in Photopea?” with a resounding yes, offering both automated and manual tracing methods that are powerful, precise, and user-friendly. These capabilities are indispensable for anyone involved in visual design, digital art, or advanced photography, allowing them to unlock new dimensions of creativity and produce high-quality, scalable graphics. As a core image tool in Tophinhanhdep.com’s comprehensive suite of resources, Photopea empowers you to transform your vision into reality, one traced line at a time.