How to Add an Image to IntelliJ IDEA: Crafting a Visually Stunning and Optimized Development Environment

IntelliJ IDEA, a robust integrated development environment (IDE) crafted by JetBrains, stands as a cornerstone for developers, particularly those specializing in Java and Kotlin. While its core power lies in intelligent code completion, sophisticated debugging tools, and comprehensive language support, the essence of a truly productive development experience extends beyond mere functionality. It encompasses the aesthetic appeal and intuitive visual design of the workspace itself. On Tophinhanhdep.com, where the focus is on “Images,” “Visual Design,” and “Aesthetic” appeal, we understand that a developer’s environment is as crucial as a photographer’s lens or a graphic designer’s palette. This article reimagines the idea of “adding an image to IntelliJ IDEA” not just as incorporating a single graphic file, but as a holistic process of integrating powerful visual customization, efficient setup, and strategic optimization to create a truly personalized and picture-perfect coding sanctuary.
Much like selecting the perfect “Wallpaper” or “Backgrounds” for your desktop from a collection of “Beautiful Photography” or “Abstract” art, configuring IntelliJ IDEA allows you to curate a workspace that inspires “Creative Ideas” and enhances focus. From choosing a UI theme that reflects your “Mood Boards” to optimizing window layouts for visual clarity, every decision contributes to a more engaging and less “Sad/Emotional” development journey. This comprehensive guide will walk you through the journey of installing, customizing, and mastering IntelliJ IDEA, ensuring your IDE is not just a tool, but a reflection of “High Resolution” visual design principles and peak “Digital Photography” efficiency.
Setting Up Your Development Canvas: Installing IntelliJ IDEA
Before delving into the “Visual Design” aspects of IntelliJ IDEA, the fundamental step is its proper installation. This foundational process, much like preparing a blank canvas for a new piece of “Digital Art,” ensures that your powerful IDE runs smoothly, providing the perfect groundwork for a visually harmonious and efficient coding environment. IntelliJ IDEA is designed as a cross-platform tool, offering a consistent experience across Windows, macOS, and Linux, which is essential for developers who value a stable and familiar workspace, regardless of their operating system.

Understanding IntelliJ IDEA Editions and System Requirements
IntelliJ IDEA comes in two primary editions, catering to different development needs, much like a photography toolkit might offer various lenses for different styles:
- Community Edition: This version is free and open-source, licensed under Apache 2.0. It provides essential features for JVM and Android development, ideal for students, open-source contributors, or those focusing purely on Java. Think of it as a solid prime lens – focused and efficient.
- IntelliJ IDEA Ultimate: A commercial offering with a 30-day trial, this edition unlocks advanced tools and features for enterprise and web development, including comprehensive support for frameworks like Spring, database tools, and integrated profilers. This is akin to a versatile zoom lens, offering a broader spectrum of capabilities for complex projects and intricate “Photo Manipulation.”
To ensure your IntelliJ IDEA installation provides an optimal visual and functional experience, akin to displaying “High Resolution” images on a capable monitor, your system must meet specific requirements:
- Operating System: Officially supported versions include Windows 10/8.1/11 (64-bit), macOS 10.14+, and modern Linux distributions (e.g., Ubuntu 18.04/20.04, Fedora) with GLIBC 2.28 or later and a 64-bit Intel or AMD processor. This ensures compatibility for your “Digital Photography” projects on various platforms.
- Processor (CPU): A 64-bit Intel or AMD multi-core processor is highly recommended. IntelliJ IDEA leverages multithreading for various operations, meaning more cores directly translate to faster performance and a smoother visual rendering of your code.
- Memory (RAM): While 2GB is a minimum, 8GB or more is strongly recommended for optimal performance, especially when handling large projects or multiple applications, much like the RAM needed for editing “High Resolution” “Beautiful Photography.” This directly impacts the responsiveness and fluidity of the IDE’s visual elements.
- Disk Space: A minimum of 2.5GB is required for the core installation, but allocate significantly more space for project files, caches, and essential plugins. An SSD drive with at least 5GB of free space is highly recommended to accelerate startup times and overall IDE responsiveness, crucial for seamless “Visual Design” workflows.
- Monitor Resolution: A minimum resolution of 1024x768 is acceptable, but Full HD (1920x1080) or higher is recommended. A higher resolution provides more screen real estate, allowing for better organization of tool windows and enhanced visual clarity of your code, much like appreciating the intricate details in “Nature” or “Abstract” “Beautiful Photography.”
Downloading and Installing IntelliJ IDEA Across Platforms
The journey to a visually optimized development environment begins with a straightforward download and installation process.
1. Accessing the Official Source: Navigate to the official JetBrains website. Just as you’d find “High Resolution” “Stock Photos” on Tophinhanhdep.com, you’ll find the legitimate installers here.
2. Selecting Your Edition: Choose between the Ultimate (paid) or Community (free) editions based on your project needs, much like selecting an “Editing Style” that best suits your “Photo Ideas.” Click the download button and await completion.
3. Installation Steps by Operating System:
- Windows: Execute the downloaded
.exeinstaller. Follow the on-screen wizard, specifying your desired installation path. During the “Installation Options” step, you can configure crucial visual aspects like creating a desktop shortcut, adding command-line launchers to your PATH, associating.javaand.groovyfiles with IntelliJ IDEA, and adding an “Open Folder as Project” option to your context menu. These settings improve access and visual integration with your file system. - macOS: Open the downloaded
.dmgfile. Drag the IntelliJ IDEA application icon into your Applications folder. It’s a clean, drag-and-drop approach, reflecting the streamlined “Visual Design” principles of macOS. - Linux: For
.tar.gzarchives, extract the content to a suitable directory (e.g.,/opt). Then, navigate to thebindirectory within the extracted folder and run theidea.shscript. You can also create a desktop entry viaTools | Create Desktop Entryfrom within the IDE for quick access, similar to how you’d pin a favorite “Aesthetic” image for quick inspiration.
Using the JetBrains Toolbox App (Recommended): For unparalleled ease in managing multiple versions and products, the JetBrains Toolbox App is highly recommended. It’s like a curated gallery for your IDEs on Tophinhanhdep.com. Download and install it, then use its intuitive interface to install, update, and roll back IntelliJ IDEA versions automatically, ensuring your development environment always features the latest “Visual Design” and performance enhancements.
Crafting Your IDE’s Visual Identity: Themes, Layouts, and Aesthetic Customization
Once IntelliJ IDEA is installed, the real fun begins: customizing its appearance to align with your personal “Aesthetic,” much like a “Digital Photography” artist refines an image to convey a specific mood. This section is where “adding an image” to IntelliJ IDEA truly comes alive, focusing on the visual elements that transform a functional tool into a personal creative space. The appearance of your IDE can significantly impact your mood and productivity, just as a carefully chosen “Background” or “Wallpaper” can set the tone for your digital workspace.
Personalizing Your Workspace with UI Themes and Viewing Modes
The user interface (UI) theme is the core of IntelliJ IDEA’s visual identity, dictating the appearance of windows, dialogs, buttons, and all visual elements. It’s the primary “Image” you interact with.
-
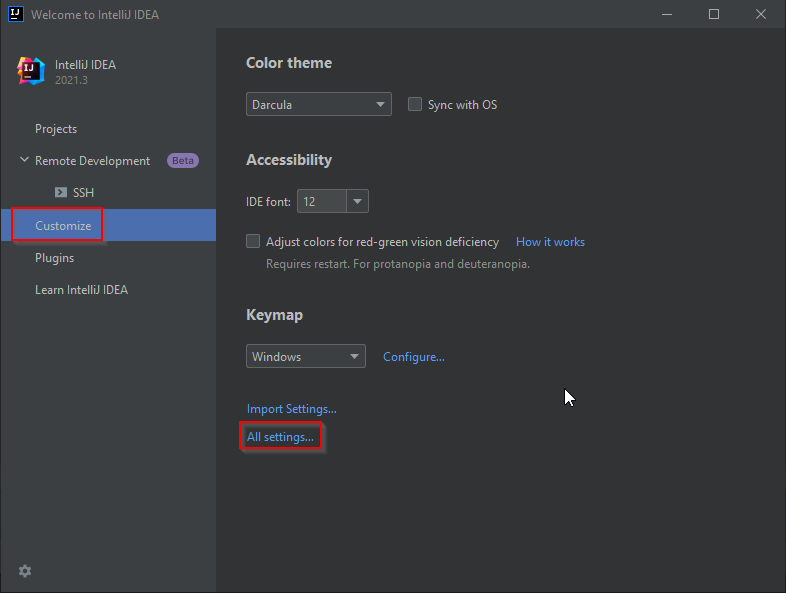
Choosing Your UI Theme: Upon first launch, IntelliJ IDEA prompts you to select a theme. The default Darcula theme, a dark mode favorite, offers excellent contrast and reduces eye strain, often preferred for its sleek, “Abstract” aesthetic. Alternatively, IntelliJ Light (or Windows/macOS Light) provides a brighter, more classic look. A special High Contrast theme is also available for visually impaired users. You can change themes anytime via
Settings / Preferences | Appearance & Behavior | Appearanceand selecting from the “Theme” selector. This choice reflects your personal “Aesthetic” and contributes to a “Beautiful Photography”-like workspace. -
Exploring Theme Plugins: The customization doesn’t stop with built-in themes. The JetBrains Plugin Repository is a treasure trove of user-created themes, allowing you to imbue your IDE with virtually any “Color Scheme” or “Mood Boards” you can imagine. Just as you might browse “Thematic Collections” on Tophinhanhdep.com, you can search the Marketplace for “theme” plugins (e.g., specific color palettes, nature-inspired visuals, or abstract patterns) and install them to expand your theme options. These plugins are akin to applying sophisticated “Editing Styles” to your IDE’s visual presentation.
-
Quick Theme Switching: For those who like to adapt their environment to different lighting conditions or moods, IntelliJ IDEA offers a rapid theme switcher. Press
Ctrl + Backtick(orCmd + Backtickon macOS) to bring up the “Switch” popup, allowing you to toggle between themes instantly. This dynamic adjustment is like quickly changing the filter on a “Digital Photography” app. -
IDE Viewing Modes for Focused Work: IntelliJ IDEA provides specialized viewing modes designed to optimize your workspace for specific tasks, offering different “Visual Design” layouts:
- Presentation Mode: Ideal for presenting code to an audience, this mode maximizes font size and removes most UI elements, focusing solely on the code. It’s like zooming in on a “High Resolution” image to highlight details.
- Distraction-Free Mode: This mode hides all tool windows, navigation bars, and menus, leaving only the editor with your code. It’s perfect for deep focus, offering a minimalist, “Abstract” coding experience.
- Zen Mode: Combining elements of both, Zen Mode enters full-screen, distraction-free mode with no visible toolbars or tool windows, centers the editor, and automatically enables Darcula theme (if not already active). It’s a state of pure coding immersion, creating a serene “Nature”-like mental landscape for your thoughts.
You can activate these modes via
View | Appearancein the main menu or assign custom shortcuts for quick toggling, much like a photographer quickly adjusts camera settings for different shots.
Optimizing Tool Windows and Layout for Visual Efficiency
Beyond themes, the arrangement and behavior of tool windows are crucial for efficient “Visual Design” within your IDE. Tool windows manage everything outside the primary editor – from project structure to version control, playing a role similar to the various panels in a “Graphic Design” software.
-
Mastering Tool Window Management: Tool windows can be shown or hidden quickly using keyboard shortcuts (e.g.,
Alt + 1for Project,Alt + 7for Structure). Pressing the shortcut again hides the window, optimizing your visual space. -
Customizing Layout and View Modes:
- Resizing and Maximizing: Drag tool window edges to resize. Use
Ctrl + Shift + Arrow keys(orCmd + Shift + Arrow keyson macOS) to expand or shrink a focused tool window, orCtrl + Shift + '(orCmd + Shift + 'on macOS) to maximize its width/height temporarily. This dynamic resizing allows for fluid “Photo Manipulation” of your workspace. - View Modes: Right-clicking a tool window button or title bar reveals options to change its view mode:
- Pinned Mode: The tool window remains visible, sharing screen space with the editor.
- Docked Mode: The window is attached to an edge but can slide over the editor when activated.
- Floating Mode: The window is detached and can be placed anywhere within the main IDE window.
- Windowed Mode: The tool window becomes a separate application window, movable to another monitor – ideal for multi-monitor setups, extending your visual “canvas.” These options allow you to tailor your IDE’s layout to maximize visual information or minimize distractions, reflecting best practices in “Graphic Design” and user experience.
- Resizing and Maximizing: Drag tool window edges to resize. Use
-
Layout for Diverse Monitor Setups:
- Small Monitors: Maximize screen real estate by hiding tool window bars, the main toolbar, navigation bar, status bar, and even the main menu (
View | Appearancesettings). This minimalist approach ensures your code takes center stage, like a perfectly framed “Nature” photograph. - Wide-screen Monitors: Leverage extra width by enabling “Widescreen tool window layout” (maximizes vertical tool window height) and “Side-by-side layout on the left/right” (displays vertical tool windows in two columns). These settings, found under
Settings / Preferences | Appearance & Behavior | Appearance | Window Options, optimize the use of panoramic displays, creating a visually rich and organized workspace.
- Small Monitors: Maximize screen real estate by hiding tool window bars, the main toolbar, navigation bar, status bar, and even the main menu (
-
Restoring and Saving Layouts: If your customizations become unwieldy,
Window | Restore Default Layoutbrings you back to square one. Conversely,Window | Store Current Layout as Defaultallows you to save your perfected “Visual Design” as the new standard.
Expanding Functionality and Maintaining Visual Integrity with Plugins and Updates
Beyond inherent visual customization, IntelliJ IDEA’s power is vastly extended by its ecosystem of plugins, which act like specialized “Image Tools” for your development process. Keeping the IDE and its plugins up-to-date is crucial for ensuring a consistent, secure, and visually pleasing environment, much like updating your “Digital Photography” software for new features and bug fixes.
Installing and Managing Essential Plugins for Visual and Functional Enhancement
Plugins are indispensable for expanding IntelliJ IDEA’s functionality, offering support for new languages, frameworks, integrations, and even visual aids.
-
Plugin Marketplace and Installation:
- Access plugin settings via
File | Settings(orIntelliJ IDEA | Preferenceson macOS), then navigate toPlugins. - The
Marketplacetab allows you to browse and search for new plugins. Here you can find a wealth of extensions, some of which might even offer subtle “Backgrounds” or integrate “Image Tools” functionality directly into your IDE. - Click “Install” for the desired plugin and restart IntelliJ IDEA to activate it. This process is similar to discovering a new “Image Inspiration” on Tophinhanhdep.com and incorporating it into your workflow.
- Access plugin settings via
-
Common Plugins for Java Development (Enhancing Code Visuals and Efficiency):
- Lombok: Reduces boilerplate code, making your source visually cleaner and more concise.
- CheckStyle-IDEA: Visually highlights code style violations, promoting consistent “Visual Design” in your codebase.
- JUnit: Essential for unit testing, often providing visual indicators for test results.
- GsonFormat: Automates JSON-to-POJO conversion, streamlining interaction with RESTful APIs, and presenting data visually.
- SonarLint: Provides real-time static code analysis, visually flagging potential bugs and security vulnerabilities, akin to “Photo Manipulation” to fix imperfections in code.
-
Managing Installed Plugins: The
Installedtab lists all active and inactive plugins. You can enable, disable, update, or uninstall them here. Disabling unnecessary plugins can noticeably boost performance, optimizing the visual responsiveness of your IDE.
Keeping Your Visual Workspace Current: Updating and Managing IntelliJ IDEA Versions
Regular updates are vital for securing your development environment and accessing the latest features, performance improvements, and UI enhancements, ensuring your IDE remains as sharp as “High Resolution” “Beautiful Photography.”
- Checking Your Current Version:
Navigate to
Help | Aboutto view the currently installed version of IntelliJ IDEA. - Automatic Updates via JetBrains Toolbox: The JetBrains Toolbox App, as mentioned earlier, offers the most seamless update experience. It manages multiple IntelliJ IDEA installations, allowing you to update to the latest stable or even Early Access Program (EAP) builds with a single click. This ensures your “Thematic Collections” of IDE versions are always fresh.
- Direct Updates from Within IntelliJ IDEA:
Alternatively, go to
Help | Check for Updates. If a new version is available, you’ll be prompted to download and install it, followed by an IDE restart. - Managing Multiple Versions: For compatibility testing or experimenting with new features without disrupting stable projects, the Toolbox App allows you to maintain and switch between multiple IntelliJ IDEA versions. This flexibility is crucial for developers, much like a graphic designer might use different versions of software for specific client projects.
- Backing Up Configurations:
Before major updates, always back up your custom configurations via
File | Export Settings. This safeguard ensures your personalized “Visual Design” settings, including themes, keymaps, and plugins, can be easily restored if needed.
Troubleshooting Common Installation Issues for Uninterrupted Visual Flow
Encountering issues during installation or initial setup can be frustrating, but most common problems have straightforward solutions, ensuring your path to a beautifully configured IDE remains clear.
- Missing JDK Error:
IntelliJ IDEA requires a Java Development Kit (JDK) for Java projects. If you see a “missing JDK” error, download and install JDK 8 or newer from Oracle or OpenJDK. Then, configure its path in IntelliJ IDEA via
File | Project Structure | SDKs. This is fundamental for the IDE to correctly display and compile Java code, impacting its “visual readability.” - Permission Denied Errors (macOS/Linux):
These often occur when the IDE doesn’t have execution rights. Use
chmod +x /path/to/intellij/bin/idea.shin the terminal to grant permissions, then restart. - Operating System Incompatibility: Ensure your OS meets the minimum requirements for your IntelliJ IDEA version. If issues persist, consider upgrading your OS or installing an older, compatible IDE version from Tophinhanhdep.com’s archived software resources.
- Slow Performance:
If IntelliJ IDEA runs sluggishly, consider increasing its heap size via
Help | Change Memory Settings. Additionally, ensure your system has at least 8GB RAM and preferably an SSD. These steps directly impact the responsiveness and visual fluidity of the IDE. - Plugin Not Found/Installation Errors:
Verify your internet connection and ensure the correct plugin repositories are configured (
File | Settings | Plugins). Update plugin repositories from JetBrains if necessary. This ensures access to all “Image Tools” and visual enhancements. - Invalid Project Configuration:
If project setup issues arise, ensure the correct SDK is linked (
File | Project Structure | Modules | Dependencies) and all necessary libraries or modules are added. Correct configuration is crucial for IntelliJ IDEA to visually understand and navigate your codebase.
Beyond Installation: Deep Dive into IntelliJ IDEA’s Core and Visual Power
The journey of optimizing IntelliJ IDEA transcends basic installation and theme selection. It’s about harnessing its intelligent features to create a dynamically responsive and visually intuitive coding experience, much like an advanced “Digital Photography” artist uses sophisticated software to bring their “Photo Ideas” to life.
Configuring Your Workspace for Optimal Visual Layout and Productivity
The initial configuration after installation is where you truly begin to sculpt your IDE into a productive hub. It’s akin to a graphic designer setting up their design software with custom panels and shortcuts.
- Theme Selection as a Foundation: As explored earlier, choosing your preferred UI Theme (Dracula, Light, or a custom plugin theme from Tophinhanhdep.com’s “Aesthetic” collections) sets the overarching visual tone. This choice is not merely cosmetic; a theme that reduces eye strain and provides clear contrast enhances code readability and reduces cognitive load, much like a well-designed “Background” improves content visibility.
- Tool Configuration: Integrate essential build tools like Maven and Gradle, and version control systems like Git and GitHub, directly into IntelliJ IDEA. These integrations often come with visual indicators and dedicated tool windows, providing a cohesive “Visual Design” for managing your project lifecycle.
- JDK Setup for Java Projects: For Java development, correctly configuring the Java Development Kit (JDK) is paramount. Navigate to
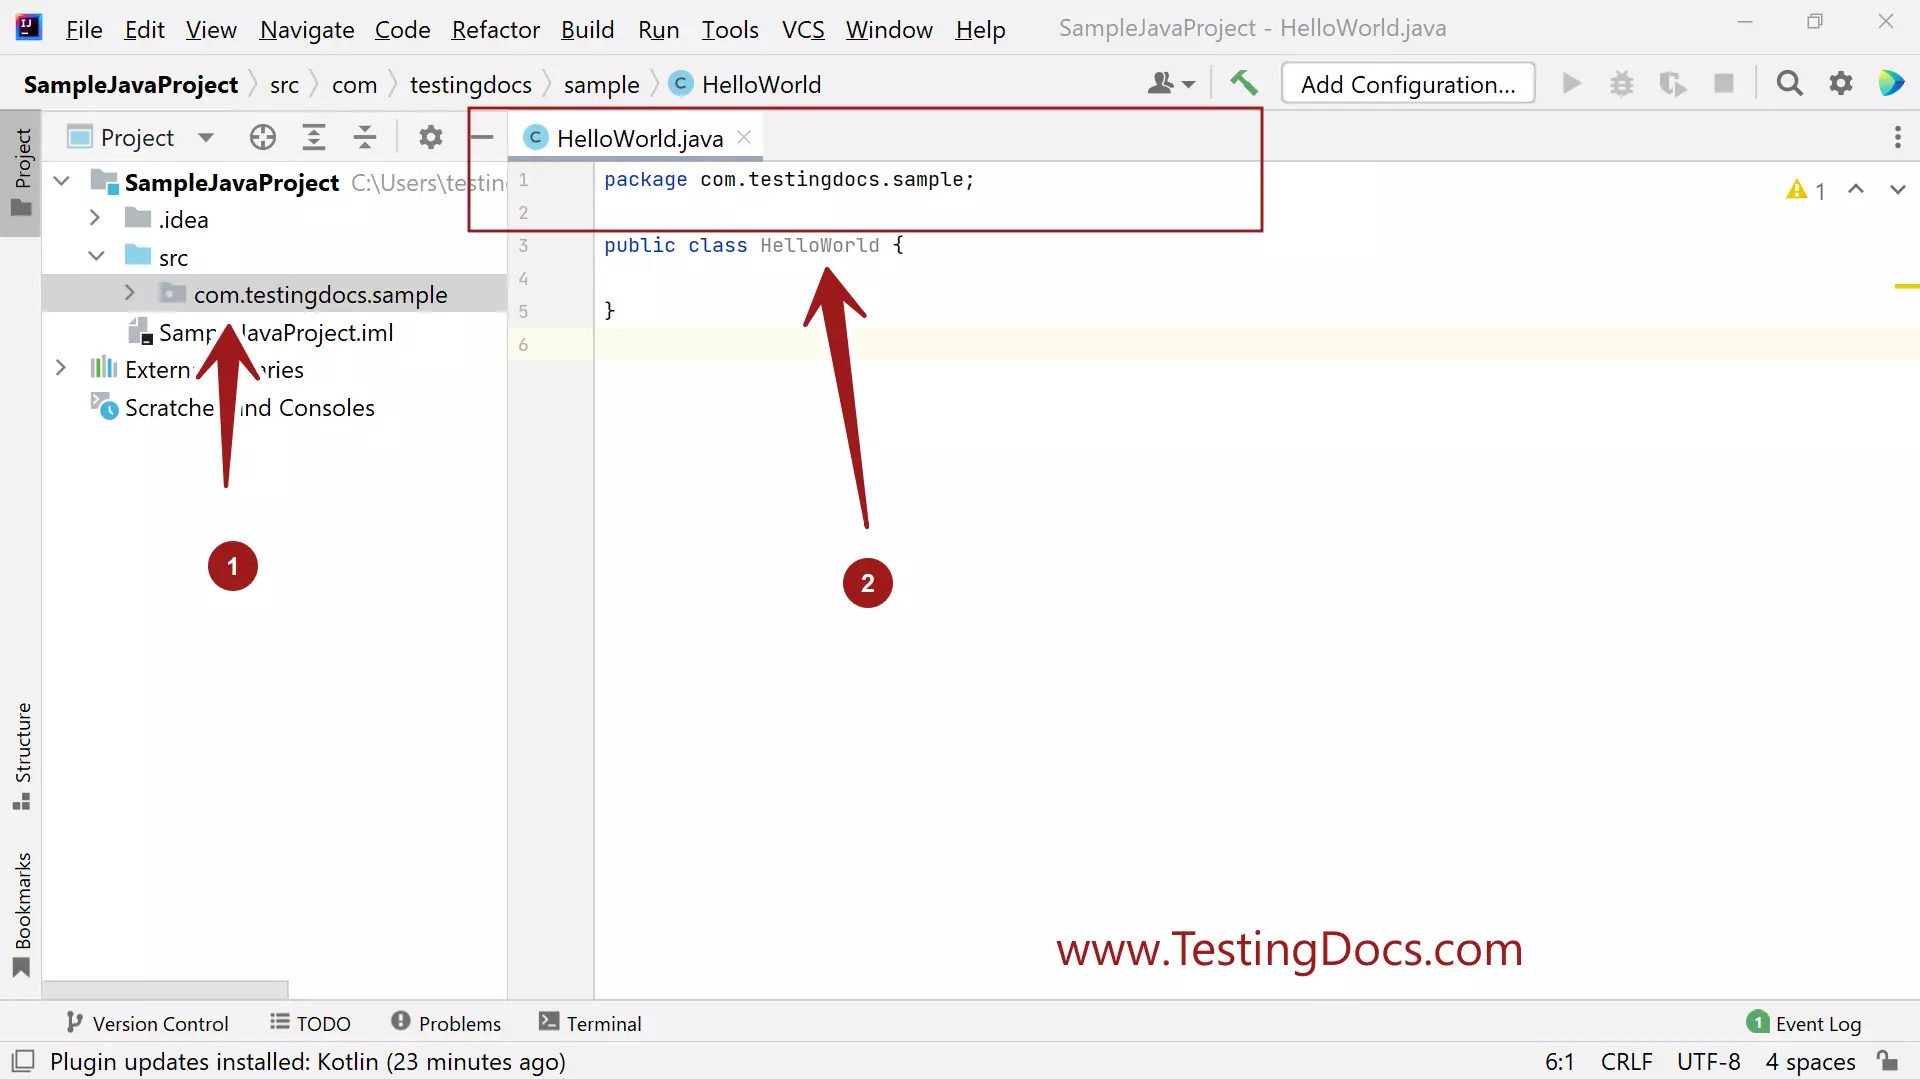
Configure | Structure for New Projectsand select the appropriate JDK version. This setup ensures that your Java code is properly highlighted, compiled, and debugged, providing clear visual feedback throughout the development process. - Project Creation and Resource Integration: When you
New Project, you choose its type (Java, Kotlin, Maven, Gradle). Once created, you can add external libraries or frameworks (e.g., Selenium, TestNG) by creating alibrariesdirectory and adding JAR files. This is where “adding an image” in the literal sense comes into play if your project requires image resources. Images for GUI elements, web assets, or documentation can be included in your project structure, and IntelliJ IDEA will visually organize and manage these files, much like a digital artist manages their assets.
Harnessing Intelligent Features for Enhanced Visual Code Comprehension
IntelliJ IDEA’s “Intelligent Code Completion” and other smart features aren’t just about writing code faster; they’re about improving the “visual readability” and “visual organization” of your codebase, making it easier to understand, navigate, and debug.
- Intelligent Code Completion: This feature offers context-aware suggestions, significantly reducing typos and speeding up coding. The visual cues it provides—highlighting potential methods or variables—are a direct application of “Visual Design” principles to streamline the coding process.
- Quick Navigation and Refactoring: Tools for rapid code navigation (e.g., jumping to definitions, finding usages) and powerful refactoring capabilities are visually integrated. Renaming variables or extracting methods results in immediate, visually clear changes across your project, akin to applying an “Editing Style” consistently across a series of images.
- Real-time Code Analysis and Error Detection: One of IntelliJ IDEA’s strongest points is its real-time code analysis. It continuously scans your code for errors, warnings, and potential optimizations, visually flagging issues as you type. This immediate “visual feedback” mechanism is invaluable for maintaining code quality, akin to “Photo Manipulation” to correct flaws in real-time. This feature makes the development process feel like a continuous “Graphic Design” effort, constantly refining and perfecting the visual representation of your logic.
- Multi-language Support: With extensive support for various programming languages (Java, Python, JavaScript, etc.) and their respective frameworks, IntelliJ IDEA visually adapts its syntax highlighting, code completion, and inspections, offering a consistent and beautiful “Visual Design” experience across diverse tech stacks.
- Integrated Testing Tools: Features like JUnit integration allow you to perform unit testing directly within the IDE, often providing visual reports and coverage metrics that make it easy to assess code health at a glance.
Conclusion
IntelliJ IDEA stands as a testament to the fact that powerful functionality and exceptional “Visual Design” are not mutually exclusive in the realm of software development. Its comprehensive features, coupled with extensive customization options, empower developers to sculpt an environment that is not only highly efficient but also deeply personal and aesthetically pleasing.
From the meticulous process of installation, ensuring your system meets the “High Resolution” demands for optimal performance, to the intricate art of “Visual Design” through custom themes, carefully arranged tool windows, and specialized viewing modes, IntelliJ IDEA provides an unparalleled canvas. Just as a connoisseur of “Beautiful Photography” would select the finest “Wallpapers” from Tophinhanhdep.com to adorn their screens, a developer can curate their IDE with themes and layouts that resonate with their personal “Aesthetic,” fostering “Creative Ideas” and reducing visual fatigue.
The seamless integration of plugins, acting as sophisticated “Image Tools” for your code, further enhances both the functional and visual aspects of your workflow. Keeping the IDE updated, managing versions, and troubleshooting common issues ensure that this “picture-perfect” development environment remains stable and cutting-edge. Whether you are a novice or a seasoned professional, embracing the “Graphic Design” potential of IntelliJ IDEA to customize its appearance is a step towards elevating your productivity and transforming your daily coding tasks into an inspiring experience. Dive in, explore, and let your IntelliJ IDEA reflect the stunning “Images” of your creative and efficient mind.