Mastering Image Centering in CSS: Techniques for Visual Harmony on Tophinhanhdep.com

In the dynamic world of web design, the ability to precisely control the placement of elements is paramount to creating visually engaging and user-friendly experiences. Among the myriad of styling challenges, centering an image—whether horizontally, vertically, or both—stands out as a frequent requirement. It’s a technique that, while seemingly straightforward, has evolved significantly with CSS advancements, offering developers a diverse toolkit for achieving pixel-perfect alignment. For Tophinhanhdep.com, a platform dedicated to stunning visual content, including high-resolution wallpapers, aesthetic backgrounds, nature photography, and abstract digital art, mastering image centering is not just a technical skill; it’s an art that enhances the presentation of every single image.

Tophinhanhdep.com thrives on presenting beautiful photography and creative visual designs in their best light. Imagine a breathtaking nature wallpaper or an intricate abstract art piece that isn’t perfectly centered on the screen; its impact could be significantly diminished. From showcasing curated thematic collections and trending styles to optimizing images with converters and AI upscalers, every aspect of Tophinhanhdep.com revolves around visual excellence. Therefore, understanding how to apply CSS centering techniques effectively is crucial for maintaining the high aesthetic standards of the website and ensuring that every image, from a serene landscape to an emotionally resonant photograph, receives the attention it deserves.
This comprehensive guide delves into the various methods of centering images using CSS, covering fundamental concepts, common techniques, advanced strategies, and practical troubleshooting tips. We will explore how different CSS properties interact, enabling designers and developers to choose the most appropriate method for any given scenario. Whether you’re aiming for a simple horizontal center, a precise vertical alignment, or a fully responsive solution that adapts to any screen size, this article will equip you with the knowledge to make your images shine at the heart of your web pages, elevating the visual appeal of your Tophinhanhdep.com projects.
The Fundamentals of CSS Image Alignment
Before diving into the practical code examples, it’s essential to grasp the underlying CSS concepts that dictate how elements behave on a web page. A solid understanding of these fundamentals will not only make centering images easier but also empower you to troubleshoot issues and craft more robust and flexible layouts for Tophinhanhdep.com.
Understanding Element Display Properties: Block vs. Inline
At their core, all HTML elements fit into one of two primary categories regarding their default display behavior: block-level or inline-level. This distinction is fundamental because these two types of elements respond differently to CSS styling, particularly when it comes to layout and alignment.
Block-level elements inherently claim the entire width of their parent container, even if their content doesn’t fill that space. They always start on a new line, effectively creating a “block” of content. Common examples include <div>, <h1> to <h6>, <p>, <section>, and <footer>. When you apply a width to a block-level element, any remaining horizontal space on either side becomes available for margins. This characteristic is crucial for horizontal centering.
Inline-level elements, on the other hand, only occupy as much space as their content requires. They do not force new lines and flow alongside other inline elements within a line of text. Familiar examples include <span>, <a> (for links), <strong>, <em>, and, importantly for our discussion, <img> (images). By default, an <img> tag is an inline element. This means it behaves much like a word in a sentence, and its alignment is often controlled by the text alignment properties of its parent.
The key takeaway here is that an image, being an inline element by default, might not respond to certain centering techniques designed for block-level elements unless its display property is explicitly changed to block. Understanding this distinction is the first step toward effective image positioning on Tophinhanhdep.com.
The Power of Margins in Horizontal Centering
Margins are the invisible spaces that surround an element, pushing other elements away. In the context of centering, the margin property, specifically when set to auto, is an incredibly powerful tool for horizontally aligning block-level elements.
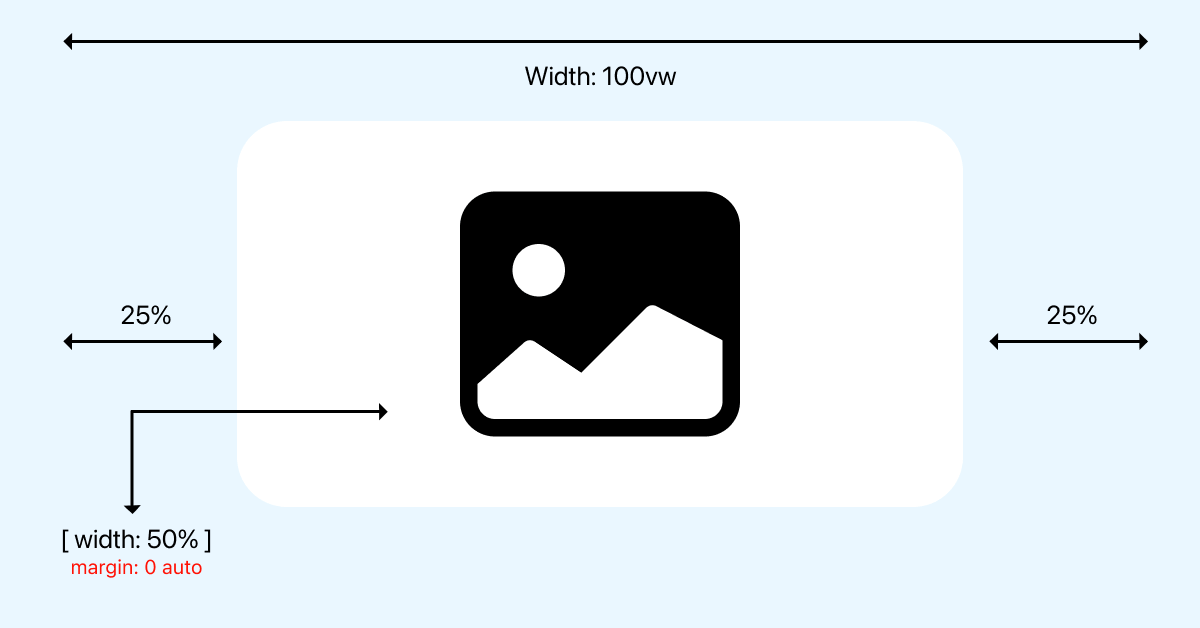
When you apply margin-left: auto; and margin-right: auto; (or the shorthand margin: 0 auto;) to a block-level element that has a defined width, the browser automatically calculates and distributes the available horizontal space equally between the left and right margins. This effectively pushes the element to the center of its containing block. The 0 in margin: 0 auto; sets the top and bottom margins to zero, preventing unwanted vertical spacing, while auto handles the horizontal centering.
For instance, if you have a <div> element containing a beautiful landscape wallpaper from Tophinhanhdep.com, and you want that <div> (and thus the image within it, if it’s the only content) to be centered, setting margin: 0 auto; on the <div> will do the trick. However, since <img> tags are inline by default, this margin: auto; technique won’t directly work on the image itself unless its display property is changed to block. This principle is a cornerstone for many horizontal centering solutions and is especially effective for presenting large, high-resolution stock photos or abstract art pieces that demand a central focus on your Tophinhanhdep.com pages.
Leveraging text-align for Inline Content
While margin: auto; is excellent for block-level elements, what about our default inline images? This is where the text-align property comes into play. Primarily designed to control the horizontal alignment of text within its containing block, text-align: center; also applies to any inline-level content, including images, within that same block.
If you have an <img> tag nestled within a <div>, a <p> tag, or any other block-level container, applying text-align: center; to the parent container will horizontally center all inline elements inside it. This is a simple and effective method for centering individual images or a series of inline images (like a small photo gallery or mood board for Tophinhanhdep.com).
Consider a scenario where Tophinhanhdep.com is showcasing a collection of small aesthetic images. Instead of individually styling each image, you can wrap them in a <div> and apply text-align: center; to the <div>. All images within will align perfectly in the center, maintaining a clean and organized layout. This method is particularly useful when you want to center images while they retain their inline behavior, often alongside other textual content or small interactive elements. It’s a quick tip for achieving horizontal balance without altering the image’s inherent display type, making it a valuable tool in your visual design toolkit for Tophinhanhdep.com.
Core Methods for Centering Images Horizontally and Vertically
With the foundational understanding of display properties and basic alignment tools, we can now explore the most common and robust CSS techniques for centering images. These methods range from simple horizontal alignment to complex, yet highly effective, strategies for achieving perfect vertical and horizontal centering. Each technique has its ideal use cases, and for Tophinhanhdep.com, choosing the right method means presenting your beautiful photography and digital art with precision.
Horizontal Centering with display: block and margin: auto
This combination is arguably the most reliable and widely used method for horizontally centering an image, especially when you want the image to behave as a standalone block. As we discussed, margin: auto; works on block-level elements with a defined width. Therefore, to center an <img> tag using margin: auto;, its default inline display property must first be overridden.
The steps are simple:
- Change
displaytoblock: Setdisplay: block;on the<img>element. This makes the image behave like a<div>or<p>element, taking up its own line and responding to block-level layout properties. - Apply
margin: auto: Setmargin-left: auto;andmargin-right: auto;, or use the shorthandmargin: 0 auto;. This instructs the browser to distribute any available horizontal space equally on both sides of the image, centering it within its parent container. - Define a
width(optional but recommended): Formargin: auto;to work its magic, the block-level element usually needs a specifiedwidththat is less than 100% of its container. If the image itself has an intrinsic width that is less than its container, it will work. However, explicitly setting awidth(e.g.,width: 80%;orwidth: 500px;) gives you more control over the image’s size and ensures consistent centering.
Example Code:
<img class="centered-image" src="https://www.tophinhanhdep.com/images/nature-wallpaper.jpg" alt="Beautiful Nature Wallpaper">.centered-image {
display: block;
margin: 0 auto;
width: 80%; /* Or a fixed pixel value, e.g., 600px */
max-width: 100%; /* Ensures responsiveness */
height: auto; /* Maintains aspect ratio */
}This method is ideal for centering large hero images, prominent abstract art pieces, or high-resolution photography on Tophinhanhdep.com. It’s straightforward, robust, and offers excellent browser compatibility.
Precision Vertical & Horizontal Centering with Absolute Positioning and transform
When the goal is to place an image exactly in the center of its parent container—both horizontally and vertically—absolute positioning combined with the transform property offers a powerful and flexible solution. This technique is particularly useful for overlaying elements, creating splash screens, or placing logos precisely within complex visual designs on Tophinhanhdep.com.
The core idea is to:
- Establish a Positioning Context: The parent container of the image must have
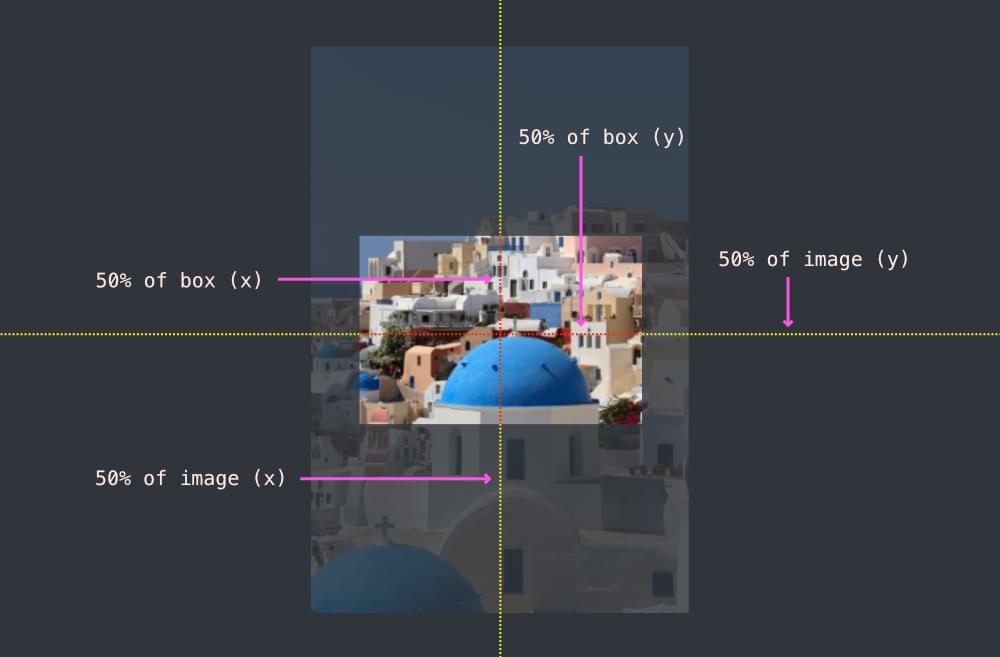
position: relative;(orabsolute,fixed, orsticky). This makes the absolutely positioned image relative to its parent, rather than the document body. - Position the Top-Left Corner: Set the image’s
positiontoabsolute;and then move its top-left corner to the exact center of its parent usingtop: 50%;andleft: 50%;. At this point, the image’s top-left corner will be centered, not the image itself. - Shift the Image Back: Use
transform: translate(-50%, -50%);on the image. This magical property shifts the element back by 50% of its own width horizontally and 50% of its own height vertically. The result is that the image’s true center aligns perfectly with the center of its parent.
Example Code:
<div class="container-absolute">
    <img class="centered-absolute" src="https://www.tophinhanhdep.com/images/aesthetic-background.jpg" alt="Aesthetic Background">
</div>.container-absolute {
position: relative; /* Establishes positioning context */
width: 100%;
height: 400px; /* Example height for demonstration */
background-color: #f0f0f0; /* For visual clarity */
}
.centered-absolute {
position: absolute;
top: 50%;
left: 50%;
transform: translate(-50%, -50%);
max-width: 80%; /* Ensures image fits */
height: auto; /* Maintains aspect ratio */
}This method works irrespective of the image’s dimensions, making it “future-proof” for dynamic content or user-uploaded images where sizes might vary. It’s a go-to for centering digital art compositions or important photography pieces that need to command the screen’s attention on Tophinhanhdep.com.
The Versatility of Flexbox for Dynamic Layouts
Flexbox, or the Flexible Box Layout module, revolutionized CSS layout by providing a more efficient way to arrange, align, and distribute space among items within a container, even when their size is unknown or dynamic. It’s particularly powerful for one-dimensional layouts (either rows or columns) and makes centering a breeze. For Tophinhanhdep.com, Flexbox is invaluable for creating responsive image galleries, mood boards, or visually rich sections that adapt seamlessly to different screen sizes.
To center an image using Flexbox:
- Create a Flex Container: Apply
display: flex;to the parent container of the image. This turns the container into a flex container and its direct children into flex items. - Horizontal Centering: Use
justify-content: center;on the flex container. This property distributes space along the main axis (horizontally, by default) and aligns flex items in the center. - Vertical Centering: Use
align-items: center;on the flex container. This property aligns flex items along the cross-axis (vertically, by default) to the center.
Example Code:
<div class="flex-container">
    <img src="https://www.tophinhanhdep.com/images/abstract-art.jpg" alt="Abstract Digital Art">
</div>.flex-container {
display: flex;
justify-content: center; /* Horizontally centers content */
align-items: center; /* Vertically centers content */
width: 100%;
height: 500px; /* Example height for visual demonstration */
background-color: #e6e6e6; /* For visual clarity */
}
.flex-container img {
max-width: 90%;
height: auto;
}Flexbox excels at accommodating dynamic content, making it perfect for presenting various image types on Tophinhanhdep.com, from high-resolution stock photos to creatively manipulated images. Its intuitive properties allow for easy adjustments to alignment and spacing, ensuring that visual collections maintain their aesthetic appeal across all devices.
Streamlined Centering with CSS Grid
CSS Grid Layout is another powerful two-dimensional layout system that offers unparalleled control over element placement in both rows and columns. While Flexbox is great for distributing items along a single axis, Grid shines when you need to align items within a more complex, structured layout. For Tophinhanhdep.com, CSS Grid can be a game-changer for designing sophisticated layouts for thematic collections or advanced digital photography showcases.
To center an image within a grid container:
- Create a Grid Container: Apply
display: grid;to the parent container of the image. - Center with
place-items: Useplace-items: center;on the grid container. This is a shorthand property that sets bothalign-itemsandjustify-itemstocenter, effectively centering all direct children horizontally and vertically within their respective grid cells.
Example Code:
<div class="grid-container">
    <img src="https://www.tophinhanhdep.com/images/sad-emotional-image.jpg" alt="Emotional Photography">
</div>.grid-container {
display: grid;
place-items: center; /* Centers items both horizontally and vertically */
width: 100%;
height: 600px; /* Example height for visual demonstration */
background-color: #dcdcdc; /* For visual clarity */
}
.grid-container img {
max-width: 90%;
height: auto;
}Alternatively, you can center a single item within a grid cell using margin: auto; directly on the grid item itself, or by applying align-self: center; and justify-self: center;. This versatility makes CSS Grid an excellent choice for Tophinhanhdep.com when building intricate visual designs where specific images need precise placement within a larger grid structure, such as showcasing photo ideas or creative ideas in a structured manner.
Advanced Strategies and Responsive Considerations
In modern web development, simply centering an image isn’t enough. The diverse array of devices and screen sizes means that our centering techniques must be responsive, adaptive, and efficient. For Tophinhanhdep.com, where image quality and presentation are paramount, these advanced strategies ensure that every high-resolution wallpaper, aesthetic background, or piece of digital art looks flawless on any device.
Ensuring Responsive Centering Across All Devices
Responsive design is non-negotiable. An image perfectly centered on a desktop screen might be cropped or misaligned on a mobile device if not handled correctly. Achieving responsive image centering involves a combination of CSS properties and techniques:
-
Fluid Width and Auto Height:
max-width: 100%;: This is a cornerstone of responsive images. It ensures that an image will never exceed the width of its parent container, scaling down proportionally on smaller screens.height: auto;: Paired withmax-width: 100%, this maintains the image’s aspect ratio. As the width scales, the height adjusts automatically, preventing distortion. This is vital for all images on Tophinhanhdep.com, from nature photography to abstract pieces, where maintaining aspect ratio is key to visual integrity.
img { max-width: 100%; height: auto; } -
Media Queries for Fine-Grained Control: While fluid widths handle basic scaling, sometimes you need to adjust centering rules or even the layout itself for specific breakpoints. Media queries allow you to apply CSS only when certain conditions are met (e.g., screen width, device orientation). For example, you might center a hero image on large screens but reduce its padding or switch to a different display method for mobile viewers, ensuring it doesn’t take up too much vertical space.
/* Default centering for larger screens */
.centered-responsive {
    display: block;
    margin: 0 auto;
    width: 800px; /* Specific width for desktop */
    max-width: 100%;
    height: auto;
}

/* Adjustments for smaller screens (e.g., mobile) */
@media (max-width: 768px) {
    .centered-responsive {
        width: 95%; /* Wider on mobile for better visibility */
        /* Maybe change display to flex for a container if elements stack */
    }
}
For Tophinhanhdep.com, integrating image optimizers and AI upscalers with these responsive techniques ensures that images load quickly and look sharp, regardless of device, further enhancing the user experience.
Centering Background Images for Aesthetic Appeal
Sometimes, an image isn’t an <img> tag in your HTML but rather a background image applied to a <div> or <section> via CSS. This is common for hero sections, banners, or decorative elements, especially for displaying stunning aesthetic backgrounds or abstract wallpapers from Tophinhanhdep.com. Centering these background images correctly is crucial for their visual impact.
The key properties for centering background images are:
background-position: center;: This property dictates where the background image is positioned within its container. Setting it tocenteraligns the image both horizontally and vertically in the middle. You can also usecenter center,50% 50%, or specific pixel values.background-size: This property controls how the background image scales.background-size: cover;: This is often used withbackground-position: center;. It scales the image to cover the entire container, cropping any excess while maintaining its aspect ratio. This is ideal for full-bleed hero images.background-size: contain;: This scales the image to fit entirely within the container without cropping, which might leave empty space.background-size: 100% 100%;: Stretches the image to fill the container completely, but can distort the aspect ratio.
Example Code:
<div class="hero-section">
    <h1>Experience Visual Beauty with Tophinhanhdep.com</h1>
</div>.hero-section {
height: 600px; /* Define a height for the container */
background-image: url('https://www.tophinhanhdep.com/images/hero-wallpaper.jpg');
background-position: center; /* Centers the image */
background-size: cover; /* Ensures it covers the entire area */
background-repeat: no-repeat; /* Prevents tiling */
display: flex; /* Using flexbox to center content on top of background */
justify-content: center;
align-items: center;
color: white;
text-align: center;
}This method is perfect for large, impactful visuals like high-resolution wallpapers or dramatic nature photography that serve as visual backdrops on Tophinhanhdep.com.
Handling Images with Unknown Dimensions
In many real-world scenarios, especially when dealing with user-uploaded content, stock photos from various sources, or dynamic content, the exact dimensions of an image might not be known beforehand. This poses a challenge for precise centering, particularly when you want the image to fit within a specific container without distortion.
The object-fit property is a lifesaver for these situations:
object-fitProperty: This CSS property specifies how the content of a<img>or<video>element should be resized to fit its container.object-fit: cover;: Similar tobackground-size: cover;, this scales the image to fill the content box, maintaining its aspect ratio and cropping any parts that don’t fit. The image is centered within its container by default. This is excellent for ensuring images fill a designated space for aesthetic backgrounds or creative photo ideas on Tophinhanhdep.com.object-fit: contain;: The image scales down to fit entirely within the content box, maintaining its aspect ratio. It will leave empty space if the aspect ratios don’t match.object-fit: fill;: Stretches the image to fill the container, potentially distorting its aspect ratio.object-fit: none;: The image is not resized and remains at its intrinsic size, potentially overflowing or being too small.object-fit: scale-down;: The image is sized as ifnoneorcontainwere specified, whichever results in a smaller concrete object size.
Example Code:
<div class="image-wrapper">
    <img src="https://www.tophinhanhdep.com/images/user-uploaded-art.jpg" alt="User-uploaded Digital Art">
</div>.image-wrapper {
width: 300px;
height: 200px;
overflow: hidden; /* Crucial to hide cropped parts */
background-color: #f5f5f5; /* For visual clarity */
display: flex; /* Using flex to center the img tag if needed */
justify-content: center;
align-items: center;
}
.image-wrapper img {
width: 100%; /* Make image fill the width of wrapper */
height: 100%; /* Make image fill the height of wrapper */
object-fit: cover; /* Scale and crop to fit, maintaining aspect ratio and centering */
object-position: center; /* Explicitly center the visible portion */
}By combining object-fit: cover; with width: 100%; and height: 100%; on the image (or a fixed size on the image and using object-fit), you can create containers that uniformly display images of varying dimensions, ensuring a clean and consistent grid of images for Tophinhanhdep.com’s thematic collections. This is especially useful in photography portfolios or mood boards where different aspect ratios are common.
Best Practices, Troubleshooting, and Tophinhanhdep.com Integration
Effectively centering images in CSS involves more than just knowing the code; it requires thoughtful application, an understanding of potential pitfalls, and a strategic approach to web design. For Tophinhanhdep.com, a platform built on visual quality, adhering to best practices and knowing how to troubleshoot is essential for delivering an exceptional user experience, whether users are browsing high-resolution images or utilizing image tools.
When to Center and When to Explore Other Alignments
While you now possess a powerful arsenal of centering techniques, the crucial question is: when should you use them? Not every image needs to be centered. Strategic alignment contributes to visual hierarchy, readability, and overall design aesthetics.
Consider Centering Images When:
- Visual Focus is Key: A centered image naturally draws the eye, making it ideal for hero banners showcasing stunning wallpapers, key product images, or a striking piece of abstract art from Tophinhanhdep.com. It acts as a focal point.
- Symmetry and Balance are Desired: Centering creates a sense of order, stability, and harmony. This is excellent for clean, minimalist layouts, corporate websites, or showcasing curated “beautiful photography” collections where equilibrium is valued.
- Single, Standalone Elements: If an image exists independently within a section, centering often provides the cleanest, most uncluttered presentation, giving the image space to breathe.
- Large-Scale Presentation: For high-resolution images meant to dominate the screen, such as a full-page nature background, centering ensures the entire visual experience is focused and immersive.
Think Twice and Explore Other Alignments When:
- Multiple Images in a Row/Grid: While individual images within a grid can be centered, centering the entire grid or a long row of images can feel monotonous or make the layout appear too static. Consider left-alignment for text-adjacent images, or staggered layouts for dynamic visual interest in thematic collections.
- Text-Heavy Designs: When images are integrated with extensive text, aligning them to the left or right of the text (using properties like
floator modern Flexbox/Grid techniques) often enhances readability and creates a more natural flow. Too much centering can break the connection between text and its accompanying visuals. - Creating Visual Flow and Hierarchy: Sometimes, an image needs to guide the user’s eye to another element or be part of a larger composition that isn’t purely symmetrical. Asymmetrical layouts can be more dynamic and engaging.
- Accessibility Considerations: While centering itself isn’t an accessibility issue, always ensure alt text is present for all images, especially those serving as primary content or navigation, to support users with visual impairments who rely on screen readers.
For Tophinhanhdep.com, balancing centered hero images with intelligently aligned image galleries and informational graphics related to photography or image tools will create a rich and accessible user experience.
Common Troubleshooting Tips for Image Centering
Even seasoned developers encounter moments when an image stubbornly refuses to center. Debugging CSS layout issues often comes down to understanding the Box Model and inspecting element properties.
-
Inspect Element is Your Best Friend: The first step in troubleshooting is always to use your browser’s developer tools (Right-click -> Inspect).
- Examine the Box Model: Hover over the image and its parent container to visualize their respective widths, heights, padding, borders, and margins. This often reveals unexpected widths or inherited styles.
- Check Computed Styles: Look at the “Computed” tab to see all applied CSS properties, including inherited ones. This helps identify conflicting styles or properties that aren’t taking effect as expected.
- Identify Parent Container: Ensure you’re targeting the correct parent container when using
text-align, Flexbox, or Grid properties. The image must be a direct child for these to work on the parent.
-
Overriding CSS Styles: Sometimes, default browser styles, framework styles, or styles from other parts of your stylesheet can override your centering efforts.
- Specificity: If your style isn’t applying, it might be due to lower specificity. Use more specific selectors (e.g.,
body .container .my-imageinstead of just.my-image) or, as a last resort,!important(use sparingly as it can lead to maintenance headaches). - Source Order: Styles declared later in the CSS cascade can override earlier ones. Ensure your custom centering styles are loaded after any potentially conflicting defaults.
- Specificity: If your style isn’t applying, it might be due to lower specificity. Use more specific selectors (e.g.,
-
Conflicting Container Properties: The parent container’s properties can interfere with image centering.
displayProperty: Double-check if the image isinlineorblock. If it’s inline,margin: auto;won’t work directly on it. If the parent isn’tflexorgrid, those properties won’t center its children.overflowProperty: If the container hasoverflow: hidden;and the image is too large or absolutely positioned, parts of the image might be clipped, giving the illusion of misalignment.- Fixed Heights/Widths: Hardcoding
heightorwidthon containers without considering content or responsiveness can lead to issues.
-
Cross-Browser Compatibility: While modern CSS (Flexbox, Grid) has excellent browser support, always test your Tophinhanhdep.com designs across major browsers (Chrome, Firefox, Safari, Edge) and potentially older versions if your audience requires it. Some older browsers might need vendor prefixes (
-webkit-,-moz-, etc.) or fallback methods.
Enhancing Your Tophinhanhdep.com Projects with Perfect Alignment
The techniques outlined in this article are not just theoretical; they are practical tools that directly contribute to the mission of Tophinhanhdep.com: to provide and showcase high-quality visual content. By mastering image centering, you can profoundly impact how users perceive the aesthetics and professionalism of the platform.
- Elevating Visual Content: Whether it’s a high-resolution wallpaper, a piece of digital art, or a stock photo, perfect centering ensures that the image commands attention and communicates its intended mood, be it aesthetic, nature-inspired, abstract, or emotional. It removes distractions and places the artwork squarely in the user’s focus.
- Streamlined User Experience: Consistently centered content creates a sense of predictability and ease, reducing cognitive load for users browsing extensive collections. This applies to mood boards, thematic collections, and pages dedicated to trending styles.
- Effective Use of Image Tools: When showcasing the output of image tools like AI upscalers or optimized images, precise centering reinforces the quality and effectiveness of these enhancements. A beautifully upscaled image, poorly aligned, loses some of its appeal.
- Inspiring Creative Ideas: For sections featuring photo ideas or visual design inspirations, presenting examples with impeccable alignment can itself inspire creativity and demonstrate best practices. It shows a commitment to detail that designers and photographers appreciate.
- Building Professional Credibility: A website where elements are carefully positioned and aligned projects professionalism and attention to detail. This enhances Tophinhanhdep.com’s reputation as a go-to source for premium imagery and visual design resources.
By thoughtfully applying these CSS centering techniques, Tophinhanhdep.com can ensure that every image, every collection, and every piece of content contributes to a coherent, beautiful, and engaging visual narrative. The journey from a basic <img> tag to a perfectly aligned, responsive, and visually impactful element is a testament to the power of well-crafted CSS and a commitment to design excellence. Embrace these methods, experiment with their applications, and watch your Tophinhanhdep.com projects achieve new levels of visual harmony.