How Can I Change the Pixel Size of an Image?
In our increasingly visual world, mastering image manipulation is an indispensable skill, and changing the pixel size of an image is perhaps the most fundamental aspect of digital image management. Whether you’re an artist preparing a portfolio, a photographer optimizing high-resolution shots, a graphic designer crafting compelling visuals, or simply someone looking to create a stunning wallpaper for your device, understanding how to adjust image dimensions is crucial. At Tophinhanhdep.com, we are dedicated to providing not only a vast collection of beautiful images—from nature and abstract art to emotional and aesthetic photography—but also the essential knowledge and tools to manage them effectively. This comprehensive guide will walk you through various methods to change the pixel size of your images, ensuring they always look their best, without compromising quality.
Understanding Image Pixels and Resolution
Before diving into the “how-to,” it’s vital to grasp the core concepts of pixels and resolution, as they are the building blocks of every digital image.
What are Pixels? A pixel (short for “picture element”) is the smallest physical point in a raster image or the smallest unit of programmable color on a computer display or digital image. Images are made up of a grid of these tiny squares, each holding a specific color. When you change the pixel size of an image, you are either adding more pixels (upsampling/enlarging) or removing pixels (downsampling/reducing).
What is Resolution (PPI/DPI)? Resolution refers to the number of pixels per unit of physical space.
- PPI (Pixels Per Inch): This is typically used for digital displays. A higher PPI means more detail and sharpness on a screen. For most web content, 72 PPI is standard, as seen in many requirements for online portfolios.
- DPI (Dots Per Inch): This term is more relevant to printing, referring to the number of ink dots a printer can place within an inch. For high-quality prints, resolutions of 300 DPI or higher are often required.
Why Does Resizing Matter? The reasons for resizing are numerous and varied, touching upon all the core aspects of Tophinhanhdep.com:
- Quality Preservation: Incorrect resizing can lead to pixelation (blurry or blocky images when enlarged) or unnecessary detail loss when reduced. Knowing the right techniques ensures your “High Resolution” photography remains pristine.
- File Size Management: Larger pixel dimensions often mean larger file sizes. Reducing image size is essential for faster loading times on websites, fitting storage limits, and easier sharing of “Stock Photos” or personal “Digital Photography.” Tophinhanhdep.com’s Image Tools, such as compressors and optimizers, are designed to assist with this.
- Platform Requirements: Different platforms (social media, print services, online galleries) have specific dimension and file size requirements. For example, an image for an online art portfolio might need to be “no smaller than 1200 pixels on the longest side” and “5 MB maximum” as a JPEG, as per common guidelines.
- Visual Consistency: For “Visual Design” projects, “Mood Boards,” or “Thematic Collections,” consistent image sizing contributes to a cohesive and professional look.
Essential Tools for Resizing Images Across Platforms
Fortunately, you don’t need expensive software to resize images effectively. Many operating systems come with built-in tools, and Tophinhanhdep.com also recommends a range of free and user-friendly online applications.
Resizing Images on Windows PCs
For users of Windows 11, the native Photos app provides a straightforward way to adjust image dimensions. Tophinhanhdep.com encourages its users to utilize these readily available tools for quick edits, especially when preparing images for “Wallpapers” or “Backgrounds.”
How to Check the Resolution of an Image on a Windows PC: Before you resize, it’s good to know the current dimensions.
- Open a Windows Explorer window and navigate to your image.
- Right-click on the image file and select Properties.
- Click the Details tab.
- Look for the Dimensions field to see the image’s pixel resolution.
How to Resize an Image Using the Photos App: The Photos app is the easiest built-in method for resizing on Windows.
- Open the Image: Locate the image in a Windows Explorer window and double-click it. It should open automatically in the Photos app. If not, right-click, select ‘Open with,’ and then choose ‘Photos.’
- Access Resize Option: Click the three dots (…) icon located in the app’s top-right corner.
- Select ‘Resize Image’: From the drop-down menu, choose Resize image.
- Define Dimensions: A pop-up window will appear. You can select one of the three preset sizes provided (Small, Medium, Large, tailored for sharing or emailing), or for precise control, choose Define custom dimensions.
- Enter Custom Size: If defining custom dimensions, another pop-up appears. Enter your desired width or height in pixels.
- Maintain Aspect Ratio: To prevent distortion, ensure the Maintain aspect ratio box is checked (it usually is by default). As you change one dimension, the other will automatically adjust proportionally. If aspect ratio doesn’t matter (e.g., for specific cropping needs), uncheck this box.
- Adjust Quality (Optional): For “Image Optimization,” you might see a quality slider. Setting it to 100% is often recommended unless you specifically need to reduce file size significantly.
- Save Your Image: Click the Save resized copy button (often purple). You can choose a new location and file name to save the resized image, ensuring your original remains untouched.
For those needing more robust editing capabilities on Windows, Tophinhanhdep.com also recommends Paint.NET. This free-to-download software offers a more advanced feature set than the basic Paint application, providing “professional-level editing and retouching tools” that are beneficial for intricate “Digital Photography” and “Photo Manipulation.”
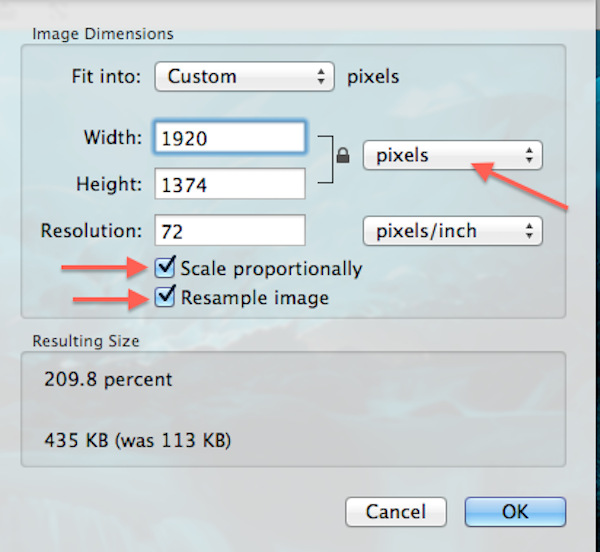
Resizing Images on macOS
Mac users have a powerful and convenient tool already at their disposal: Preview. This native application is perfect for quick adjustments, making it easy to prepare images for sharing or for use in your Tophinhanhdep.com “Image Collections.”
How to Resize an Image Using Preview:
- Open the Image: Right-click on the image file. If Preview isn’t the default viewer, select ‘Open with’ and then ‘Preview.’
- Access Adjust Size: Go to the Tools menu in the menu bar.
- Select ‘Adjust Size’: Choose Adjust size from the drop-down menu.
- Enter Dimensions: A window will appear. Enter your desired width and height values. You might need to change the unit type (e.g., from inches to pixels) using the drop-down menu. You can also select a preset size using the arrows next to ‘Fit into.’
- Maintain Proportions: Ensure Scale proportionally and Resample image are checked to avoid warping and retain the original aspect ratio.
- Confirm and Save: Click the blue OK button to apply the new size. Then, go to File > Save to save the resized image. It’s often a good practice to ‘Save As’ or ‘Duplicate’ first, to preserve your original file.
Resizing Images on ChromeOS
Chromebook users can easily resize images using the built-in Gallery image viewer app. This makes it straightforward to adapt images for different purposes, whether for personal use or for “Image Inspiration & Collections” on Tophinhanhdep.com.
How to Resize an Image Using Gallery:
- Open the Image: Right-click on the image and select ‘Open with Gallery’ (or ‘Open with,’ then ‘Gallery’).
- Access Rescale: Select the Rescale button at the top of the Gallery window.
- Enter Dimensions: Input your desired width and height. Click the Chain icon to unlock or lock the aspect ratio as needed.
- Save Your Changes: Click the blue Save button. Alternatively, use the blue Down arrow to choose ‘Save as’ if you want to create a new file and not alter the original.
Versatile Free Desktop Solutions: GIMP
For users seeking more powerful editing capabilities without the cost of premium software, Tophinhanhdep.com highly recommends GIMP (GNU Image Manipulation Program). Available for both Mac and PC, GIMP is an open-source application that offers “professional-level editing and retouching tools” akin to Photoshop, making it ideal for “Digital Photography,” advanced “Editing Styles,” and intricate “Photo Manipulation” projects that fall under “Visual Design.”
How to Resize an Image in GIMP:
- Open Image: Open your image in GIMP.
- Access Scale Image: Go to Image > Scale Image.
- Adjust Dimensions: In the ‘Scale Image’ dialog box, you can change the Width and Height values.
- Maintain Aspect Ratio: Ensure the chain icon next to the width and height fields is linked to maintain the aspect ratio. If unlinked, you can change dimensions independently.
- Interpolation: For general images, ‘Cubic’ or ‘NoHalo’ interpolation usually provides good results.
- Apply Changes: Click Scale.
- Save: Go to File > Save As to save your resized image.
Quick Online Resizing Tools for Any Device
When you’re in a hurry, don’t have access to your usual software, or prefer not to install anything, online image resizers are invaluable. Tophinhanhdep.com provides access to or information about such “Image Tools” for quick “Image Optimization” and “Compressors.”
1. Simple Image Resizer: This tool lives up to its name. It’s best used when speed is a priority.
- Visit Tophinhanhdep.com’s recommended link for Simple Image Resizer.
- Upload Your Image: Click to upload your image.
- Select Dimensions: Choose “dimensions.”
- Enter Values: Input your desired width or height. The tool automatically adjusts the other dimension to maintain aspect ratio.
- Resize and Download: Click “Resize,” and your proportionate, resized image will be ready for download. This tool is often available as a Google Chrome extension and is mobile-friendly.
2. Pic Resize: For those needing to resize multiple images at once, Pic Resize is a fantastic solution. This is especially useful for artists building a portfolio or photographers preparing “Thematic Collections.”
- Visit Tophinhanhdep.com’s recommended link for Pic Resize.
- Upload Multiple Images: Select and upload your images.
- Choose Size Preference: Select your desired size preferences.
- Submit Batch Job: Click “Submit Batch Job!” Note that advanced features like cropping and special effects might not be available in batch mode and may require individual editing in ‘Normal Mode.’
3. Pixlr X: Tophinhanhdep.com also recommends Pixlr X as a free web app for simple image edits, including resizing. It’s a great option for editing images destined for “Mood Boards” or “Trending Styles” online.
- Go to Tophinhanhdep.com’s recommended link for Pixlr X.
- Open Image: Click the blue Open image button and choose your file.
- Access Layout/Template: Find and select the Layout and Template button (often looks like three rectangles).
- Smart Resize: In the Layout menu, select Smart resize.
- Enter Dimensions: Enter your desired width and height, use the Lock proportions toggle to maintain aspect ratio, or choose from various size presets.
- Apply Changes: Click the blue Apply button.
- Save: Click the blue Save button at the bottom. Enter a file name, select your preferred file type (JPEG, PNG, etc.), and adjust quality as needed. Then, click the final blue Save button. Your image will typically be saved to your Downloads folder. (Note: Some free online tools may have daily save limits).
Advanced Resizing Techniques for Specific Visual Content
While basic resizing is straightforward, certain types of images, especially “Digital Art” like pixel art, require specialized techniques to maintain their unique aesthetic.
Mastering Pixel Art Resizing in Photoshop-like Software
Pixel art is defined by its distinct blocky shapes and crisp edges. Standard image enlargement methods often blur these characteristics, resulting in a soft, undesirable look. When resizing pixel art, screenshots, or any graphic where sharp, hard edges and readable text are paramount, a specific interpolation method is key. This is a vital skill for anyone creating “Digital Art” or “Graphic Design” content.
Let’s look at how this is done in a professional-grade editor like Adobe Photoshop (similar principles apply to GIMP or other advanced editors recommended by Tophinhanhdep.com):
How to Enlarge Pixel Art (Keeping it Crisp):
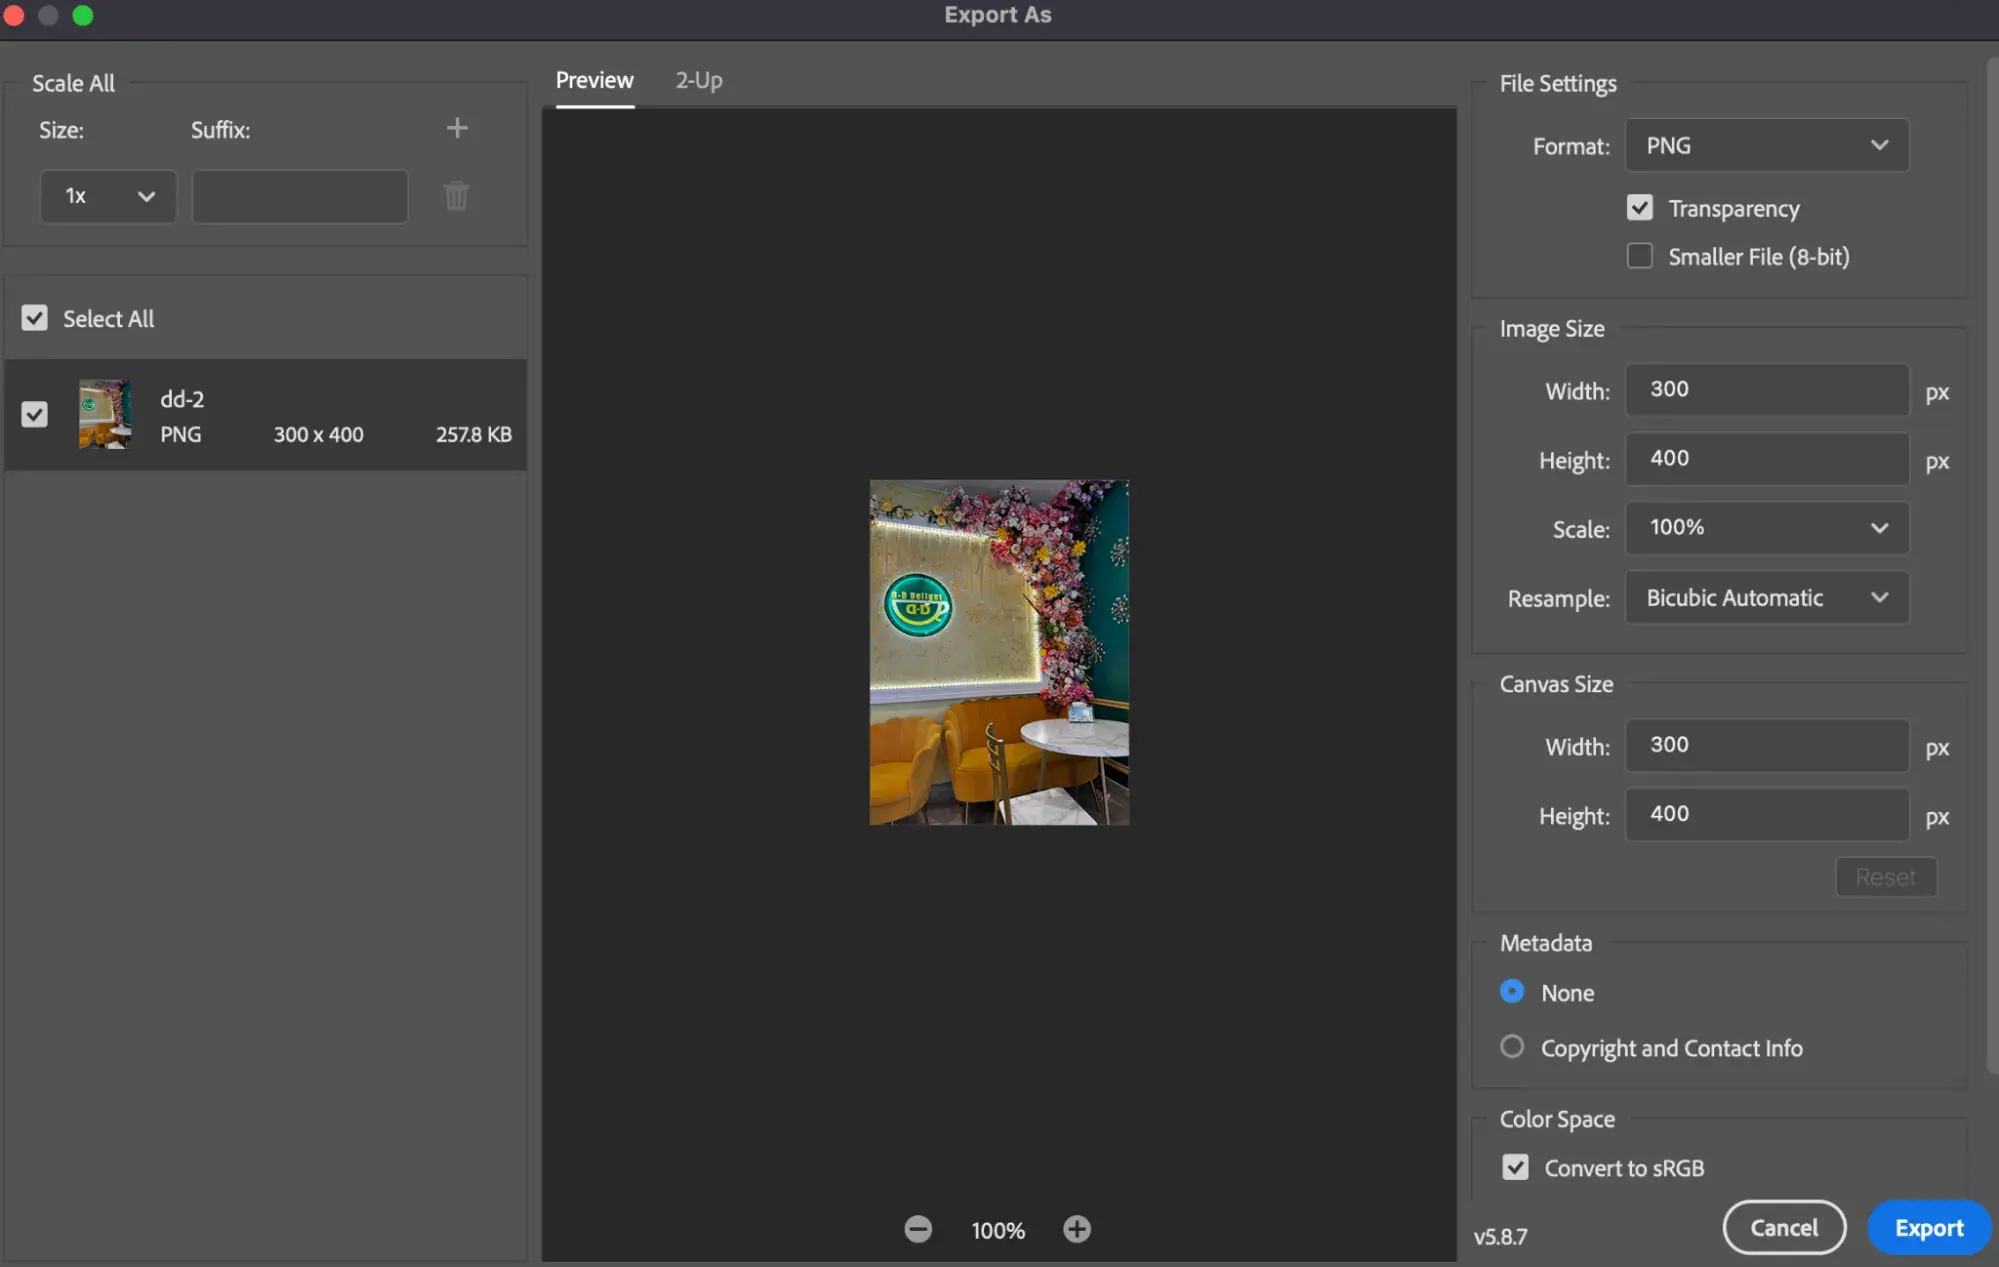
- Open Image Size Dialog Box: Go to Image > Image Size (in Photoshop).
- Ensure Resample is On: Make sure the Resample option is checked. This allows you to add or remove pixels.
- Enter Percentage: For best results, enlarge pixel art by using percentages that are multiples of 100 (e.g., 200%, 300%, 400%). This ensures each original pixel scales perfectly into a block of 4, 9, 16, etc., new pixels, preserving the blocky look. Input this into the Width and Height boxes (set to ‘Percent’ units).
- Crucial Step: Set Interpolation to Nearest Neighbor: This is the most important part. By default, most software uses interpolation methods (like Bicubic Smoother or Preserve Details) that blend pixels to prevent blockiness. This is disastrous for pixel art. Click on the Interpolation option (often found near ‘Resample’) and select Nearest Neighbor. This method simply duplicates existing pixels without averaging them, keeping the edges sharp and clean.
- Click OK: Accept your settings and close the dialog box. Your pixel art will now be larger but retain its characteristic sharp, blocky appearance, crucial for maintaining its unique “Aesthetic.”
How to Resize Pixel Art to an Exact Size (Two-Step Method): Sometimes, you need specific pixel dimensions that aren’t exact multiples of the original. In such cases, a two-step approach ensures optimal quality.
- First, Upsample as a Percentage: Enlarge the pixel art using the ‘Nearest Neighbor’ method and a multiple of 100 (as described above) that makes it larger than your target size. For example, if your original is 500x500px and you need 1600x1600px, upsample to 400% (2000x2000px).
- Re-open Image Size Dialog Box: Go to Image > Image Size again.
- Leave Resample On: Ensure Resample is still checked.
- Set Exact Pixel Dimensions: Enter your precise target width and height (e.g., 1600 pixels) into the fields.
- Change Interpolation to Automatic (or Bicubic Sharper): For downsampling, ‘Nearest Neighbor’ is not ideal. Change the interpolation method back to Automatic (which usually defaults to Bicubic Sharper for reduction) or explicitly select Bicubic Sharper if available. This method will provide the sharpest results for reducing the image without introducing unwanted artifacts.
- Click OK: Close the dialog box. Your pixel art will now be at its exact desired size, with the best possible sharpness.
Optimizing Images for Web and Print
Resizing is not just about changing dimensions; it’s also about preparing images for their intended medium. Tophinhanhdep.com, with its focus on “Images (Wallpapers, Backgrounds, Aesthetic, Nature, Abstract, Sad/Emotional, Beautiful Photography)” and “Photography (High Resolution, Stock Photos, Digital Photography),” emphasizes the importance of proper optimization for both web and print.
For the Web:
- Dimensions: Images for websites and social media typically don’t need to be excessively large. Common widths range from 800px to 1920px for hero images or backgrounds, much smaller for thumbnails or profile pictures.
- Resolution: 72 ppi/dpi is the standard web resolution. Higher resolutions won’t appear sharper on most screens but will increase file size unnecessarily.
- File Size: Smaller file sizes lead to faster loading times, which is crucial for user experience and SEO. Tophinhanhdep.com’s “Compressors” and “Optimizers” are invaluable here, helping you achieve the smallest possible file size without visible quality degradation. JPEG is generally preferred for photographs due to its efficient compression.
- Aspect Ratio: Maintaining a consistent aspect ratio across your website or “Image Collections” creates a more professional and aesthetically pleasing layout.
For Print:
- Dimensions: Print dimensions are physical. A 5x7 inch print at 300 DPI will require an image of 1500x2100 pixels (5 * 300 x 7 * 300).
- Resolution: Higher resolutions are vital for print quality. 300 DPI is the industry standard for most photographic prints, ensuring sharp details. For large-format prints (like billboards), lower DPI might be acceptable as they are viewed from a distance.
- File Format: TIFF or high-quality JPEG are common for print, with TIFF often preferred for professional printing as it’s a lossless format.
- Color Profile: While not directly resizing, ensure your images are in the correct color profile (e.g., CMYK for print, RGB for web) for accurate color reproduction.
The Tophinhanhdep.com Advantage: Resizing for Every Creative Need
At Tophinhanhdep.com, our goal is to empower your creativity by offering both inspiration and practical solutions. Understanding how to change the pixel size of an image is a foundational skill that ties directly into every category we cover:
- Images: Whether you’re downloading “Wallpapers,” curating “Backgrounds,” or sharing “Aesthetic” and “Beautiful Photography,” correct sizing ensures your visuals always look spectacular and fit perfectly wherever they’re displayed. This is true for every type of image, from serene “Nature” shots to profound “Sad/Emotional” art.
- Photography: For “High Resolution” images from your “Digital Photography” collection or professionally acquired “Stock Photos,” precise resizing allows you to adapt them for various “Editing Styles” or usage scenarios without losing their intrinsic quality.
- Image Tools: Tophinhanhdep.com is your hub for discovering and utilizing the best “Converters, Compressors, Optimizers, AI Upscalers, and Image-to-Text” tools. These complement resizing by enhancing quality (AI Upscalers to enlarge images beyond their original pixel count without pixelation) and preparing images for efficient delivery.
- Visual Design: Resizing is a core tenet of “Graphic Design,” “Digital Art,” and “Photo Manipulation.” With the knowledge gained here, you can execute your “Creative Ideas” with precision, ensuring every element is perfectly scaled.
- Image Inspiration & Collections: When building “Photo Ideas,” compiling “Mood Boards,” or putting together “Thematic Collections” reflecting “Trending Styles,” uniform and optimized image sizes contribute significantly to the overall impact and professionalism of your work.
In conclusion, mastering image resizing is an invaluable asset in the digital age. By utilizing the built-in tools on your operating system, exploring the powerful free software like GIMP, or leveraging convenient online resizers recommended by Tophinhanhdep.com, you can effectively manage and optimize your images for any purpose. Remember the specific considerations for different image types, especially pixel art, and always prioritize maintaining aspect ratio and quality. Tophinhanhdep.com is here to support your journey with a wealth of stunning visuals and the essential knowledge to make them shine. Start exploring our resources today and take full control of your digital images!