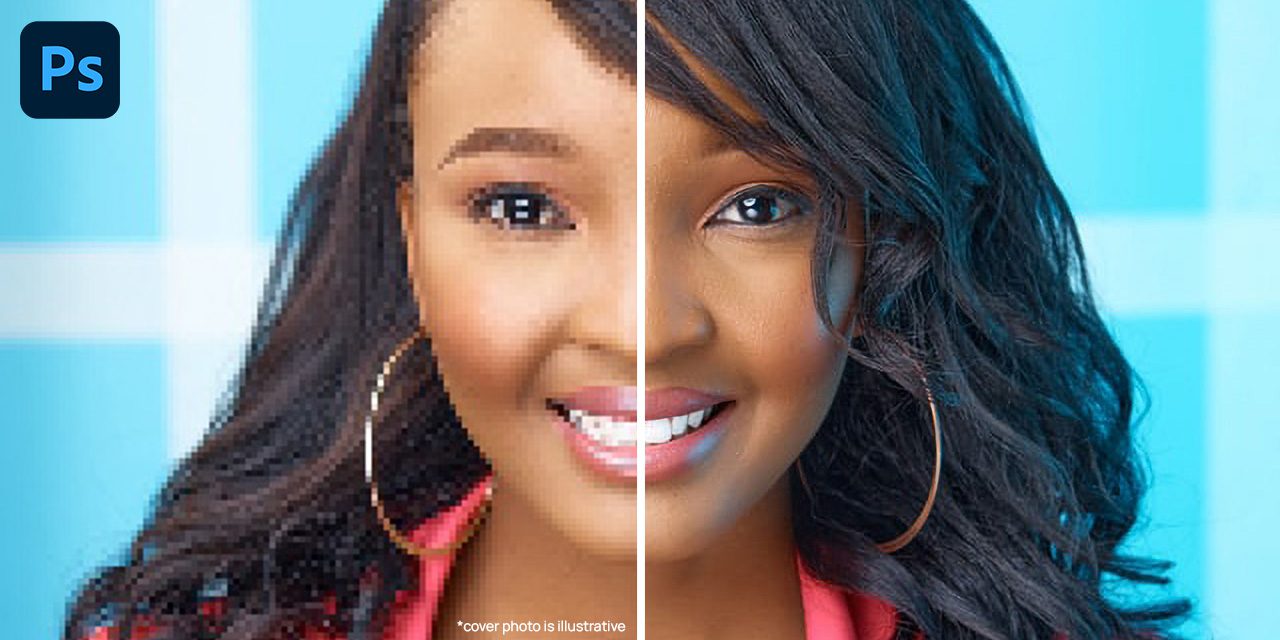
How to Increase the Resolution of an Image

In the vibrant world of digital imagery, where every pixel contributes to the story an image tells, the resolution of a photograph holds paramount importance. Whether you’re a professional photographer, a graphic designer, an artist, or simply someone who cherishes their visual memories, understanding how to enhance image resolution is a crucial skill. On Tophinhanhdep.com, a premier destination for high-resolution images, stunning wallpapers, and innovative visual design ideas, we often emphasize the value of crisp, detailed visuals. This comprehensive guide will delve into the intricacies of image resolution, explore why increasing it matters, and provide you with detailed methods—from cutting-edge AI tools to traditional software techniques—to elevate your images to breathtaking new levels of clarity and detail.

Imagine discovering a cherished old photograph, a captivating landscape shot for a wallpaper, or an abstract digital art piece that you want to transform into a large print or integrate into a sophisticated visual design project. Often, the original image might not possess the resolution required for such applications. Low-resolution images can appear pixelated, blurry, or simply lack the sharpness needed for a professional aesthetic or a captivating background on a high-definition screen. Fortunately, with advancements in image processing and artificial intelligence, the days of resignedly accepting pixelated enlargements are largely behind us. Tophinhanhdep.com is here to guide you through the process, ensuring your images — be they nature scenes, emotional portraits, or bold graphic designs — always look their absolute best.
Understanding Image Resolution and the Need for Upscaling
Before we dive into the “how-to,” let’s establish a clear understanding of what image resolution truly means and why it’s a critical factor in digital imaging and visual design, especially for the high-quality content you expect from Tophinhanhdep.com.
What Exactly is Image Resolution?
At its core, image resolution refers to the amount of detail an image holds. In digital photography and visual arts, this is typically measured in pixels per inch (PPI) or, for print, dots per inch (DPI). A pixel is the smallest individual unit of information that makes up a digital image. When you hear about an image being 1920x1080 pixels, it means it contains 1920 pixels horizontally and 1080 pixels vertically. The total number of pixels in an image is found by multiplying these dimensions (e.g., 1920 * 1080 = 2,073,600 pixels, or approximately 2 megapixels).
- Higher pixel count generally equates to higher resolution. More pixels mean finer details can be captured and displayed, resulting in a sharper, clearer image.
- PPI relates to how pixels are displayed on a screen. A screen might display images at 72 PPI, but for critical viewing on Tophinhanhdep.com, we appreciate higher resolutions.
- DPI pertains specifically to print quality. Standard photographic prints often require 300 DPI for optimal sharpness, while large format prints might be acceptable at lower DPI if viewed from a distance.
Why Increase Image Resolution? The Core Motivations
The desire to increase an image’s resolution stems from several practical and aesthetic needs:
- Larger Prints: One of the most common reasons is to create bigger physical prints. A low-resolution image printed at a large size will look blocky and unappealing. Upscaling ensures your beautiful photography, digital art, or even cherished family photos can be printed at poster size without losing their integrity.
- Cropping Flexibility: Photographers often crop images to improve composition or focus on a specific subject. Cropping inherently reduces the total pixel count. Increasing the resolution post-crop allows for more aggressive cropping without significant quality loss, vital for refining your photo ideas and thematic collections.
- Enhanced Visual Quality: For wallpapers, backgrounds, and aesthetic purposes on platforms like Tophinhanhdep.com, high resolution ensures a sharp, vibrant display on modern high-definition screens. It makes abstract designs, nature shots, or beautiful photography truly pop.
- Professional Use in Visual Design: Graphic designers, digital artists, and those involved in photo manipulation require high-resolution source material for their projects. Upscaling can transform a usable image into a professional-grade asset for creative ideas and digital art.
- Addressing Low-Resolution Sources: Sometimes, the only available version of an image—perhaps an old scan, a downloaded stock photo, or a historical picture—is of low resolution. Upscaling becomes essential to make it fit contemporary visual standards.
The Challenge: Adding Pixels Without Degradation
Historically, simply “stretching” a low-resolution image to a larger size involved adding pixels by simple interpolation, which often led to noticeable blurring, jagged edges, and a general loss of sharpness. This process, known as upsampling or resampling, meant the software had to “guess” what the new pixels should look like based on their neighbors. The challenge has always been to add these new pixels intelligently, without creating artifacts or compromising the original details.
Today, thanks to sophisticated algorithms and the revolutionary power of Artificial Intelligence (AI), upsampling is no longer a compromise. Modern tools can predict and generate new pixel information with remarkable accuracy, making high-quality resolution increases a reality for everyone passionate about visual content on Tophinhanhdep.com.
AI-Powered Solutions: Revolutionizing Image Upscaling
The advent of Artificial Intelligence and machine learning has truly revolutionized the field of image upscaling. Unlike traditional methods that merely interpolate existing pixels, AI upscalers are trained on vast datasets of images, learning how to intelligently add new pixels, reconstruct lost details, and even remove noise and blur. This makes them exceptionally effective for achieving high-resolution outcomes without sacrificing image quality, a perfect fit for the demands of Tophinhanhdep.com’s diverse image collections.
How AI Upscalers Work Their Magic
AI image upscalers use deep learning neural networks. These networks analyze millions of image pairs (low-resolution and their high-resolution counterparts) to understand complex patterns and textures. When you feed a low-resolution image into an AI upscaler, the AI doesn’t just stretch it; it essentially “re-imagines” the image, predicting what it should look like at a higher resolution.
Key benefits of AI upscaling for Tophinhanhdep.com users:
- Detail Reconstruction: AI can often restore fine details that were lost due to low resolution, such as fabric textures, facial features, or intricate patterns in abstract art.
- Noise Reduction: Many AI tools simultaneously reduce digital noise and JPEG compression artifacts, resulting in cleaner, smoother images.
- Sharpening: They can enhance overall sharpness and clarity without creating halo effects or over-sharpening artifacts.
- Face Refinement: Some advanced AI upscalers include specific algorithms for detecting and improving human faces, preserving natural skin textures and facial expressions.
Leading AI Upscaling Tools and How to Use Them
Several powerful AI upscaling tools are available, offering different features and pricing models. Here, we’ll highlight some of the most popular and effective options.
1. Topaz Gigapixel AI: A Benchmark for Quality
Topaz Gigapixel AI is widely regarded as one of the best standalone AI image upscalers on the market. It utilizes machine learning to enlarge images by up to 600% while maintaining, and often improving, perceived image quality. It’s particularly praised for its ability to retain fine details and minimize artifacts.
Step-by-Step Guide with Topaz Gigapixel AI:
Step 1: Download and Install Topaz Gigapixel AI First, acquire a copy of Gigapixel AI. Tophinhanhdep.com recommends exploring free trials offered by software developers to test compatibility and performance with your specific hardware and image types (e.g., nature scenes, abstract art, portraits). Ensure your computer meets the system requirements, as AI software can be resource-intensive.
Step 2: Open Your Image(s) Launch Gigapixel AI. Its interface is designed for simplicity. You can either drag and drop your image files directly into the application window or click the “Open” button to navigate to your files. Gigapixel AI supports common formats like JPEG, PNG, and TIFF. If you have RAW files (common for high-resolution photography), convert them to a supported format first using a RAW converter like Adobe Lightroom.
Step 3: Configure Upscaling and Refinement Settings On the right-hand panel, you’ll find the control options:
- Scale: Choose your desired enlargement factor. You can select presets (e.g., 2x, 4x, 6x) or enter a custom scale, width, or height. Gigapixel AI allows for significant enlargements without noticeable degradation.
- AI Model: Gigapixel AI offers various AI models optimized for different image types (e.g., Standard, Lines, Art & CG, Low Resolution). Experiment to find the best fit for your image (e.g., “Art & CG” for digital art or “Standard” for beautiful photography).
- Suppression and Refinement:
- Suppress Noise: Adjust this slider to reduce graininess.
- Remove Blur: Helps to sharpen soft images.
- Face Refinement: A powerful feature for portrait photography. It intelligently identifies and enhances faces, preserving detail without introducing artificial smoothness. This is crucial for sad/emotional or beautiful photography collections on Tophinhanhdep.com.
As you adjust settings, the software will constantly update a preview window, allowing you to compare the enhanced image with the original side-by-side.
Step 4: Save and Export Your High-Resolution Image Once satisfied with the preview, click the “Save” button. A dialogue box will appear where you can:
- Image Format: Select your preferred output format (JPEG, TIFF, PNG). JPEG is often convenient for sharing, while TIFF is preferred for professional prints due to its lossless nature.
- Filename and Save Directory: Specify where to save your new, high-resolution image.
- Color Profile: Maintain the original color profile or select a custom one.
Click “Save” again, and Gigapixel AI will process your image. The processing time varies depending on the enlargement factor and your computer’s power. After completion, your enhanced image, ready for large prints or high-definition displays, will be in your chosen destination folder.
2. 4DDiG AI Photo Enhancer: User-Friendly AI Upscaling
4DDiG AI Photo Enhancer is another excellent AI-driven tool designed to simplify the photo upscaling process. It’s praised for its user-friendly interface and effectiveness in handling various image types, including old, damaged, or blurry photos, making it ideal for restoring images for Tophinhanhdep.com’s collections.
Step-by-Step Guide with 4DDiG AI Photo Enhancer:
Step 1: Download and Launch the Software Install 4DDiG AI Photo Enhancer on your Windows PC or Mac. Once launched, navigate to the “AI Enhancer” tab on the left and select “Photo Enhancer.”
Step 2: Import Your Low-Resolution Photo Click the prominent “Add Videos” (or “Add Images” depending on the version) button to browse and upload your image file. The software supports multiple common image formats.
Step 3: Choose AI Model and Resolution On the right side of the interface, you’ll find options to customize your enhancement:
- AI Model: Select an AI model tailored to your photo’s style (e.g., general enhancement, noise reduction, face enhancement).
- Resolution: Crucially, select your desired upscale factor, often represented as “X2,” “X4,” or “X8” to signify doubling, quadrupling, or eight times the original resolution. Tophinhanhdep.com always recommends choosing the highest practical resolution for optimal quality.
After making your selections, click the “Enhance” button to begin the AI processing.
Step 4: Preview and Save Once the enhancement is complete, a preview will be displayed. Review the results to ensure they meet your expectations. If satisfied, click “Save” to export your new high-resolution photo to your device.
3. Imglarger / Let’s Enhance: Online AI Solutions
For those who prefer not to download software, online AI upscalers like Imglarger and Let’s Enhance offer powerful, browser-based solutions. These are fantastic for quick enhancements of images for social media, mood boards, or initial design concepts on Tophinhanhdep.com.
Using Imglarger:
- Upload: Visit the Imglarger website and upload your JPG or PNG image.
- Select Enlargement: Choose your desired enlargement (e.g., 200%, 400%, 800%). Note that higher percentages might be part of paid plans.
- Start: Click “Start” and let the AI process your image.
- Download: Preview the enhanced image and download it if satisfied.
Using Let’s Enhance:
- Account Creation: Go to the Let’s Enhance website and create a free account (often granting a few free image credits).
- Upload: Drag and drop or click “Browse” to upload your image.
- Choose Options: Select enhancement options like “Smart Enhance” (for general quality improvement) or “Smart Resize” (for specific dimension changes).
- Process & Download: Click “Start Processing,” and once complete, download your enhanced image.
These online tools are excellent for enhancing images on the fly, making them perfect for quickly updating aesthetic collections or trending styles on Tophinhanhdep.com.
Mastering Manual Upscaling: Adobe Photoshop and Other Software
While AI upscalers offer incredible automation and quality, traditional photo editing software like Adobe Photoshop remains indispensable for those who demand granular control and a deeper understanding of the upscaling process. These tools, requiring a more hands-on approach, are often favored by visual design professionals who frequently engage in photo manipulation and intricate graphic design projects.
The Power of Resampling in Adobe Photoshop
Adobe Photoshop, the industry standard for image editing, provides robust tools for increasing image resolution through a process called resampling. This involves creating new pixels based on existing ones using various interpolation algorithms. While not as “magical” as AI in reconstructing details from scratch, Photoshop’s methods, when applied correctly, can yield excellent results.
Step-by-Step Guide to Increase Resolution in Adobe Photoshop:
Step 1: Obtain and Launch Adobe Photoshop
If you don’t already have it, consider the Adobe Creative Cloud Photography Plan, which includes Photoshop and Lightroom. Tophinhanhdep.com recommends checking Adobe’s system requirements to ensure smooth operation. Open Photoshop and then open your desired image by going to File > Open, or by dragging and dropping the file onto the Photoshop icon. Photoshop supports a wide range of image formats, including RAW files (which are best processed in Adobe Camera Raw or Lightroom first).
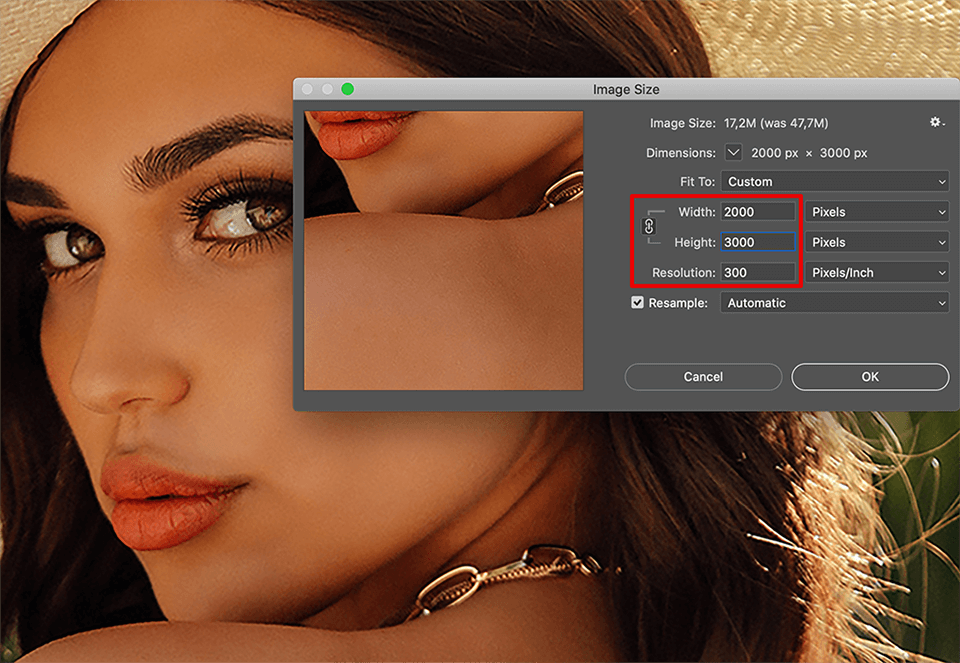
Step 2: Access the Image Size Dialogue Box
To initiate the upscaling process, go to Image > Image Size in the top menu bar. Alternatively, use the shortcut Alt + Ctrl + I (Windows) or Option + Command + I (macOS). This will open the Image Size dialogue box, which is your control center for resolution adjustments.
Step 3: Configure Dimensions and Resolution Inside the Image Size dialogue box:
- Units: By default, dimensions might be in pixels. You can change this to “Percent,” “Inches,” or “Centimeters” depending on your preference. For upscaling, working with “Pixels” or “Percent” is often most intuitive.
- Maintain Aspect Ratio: Ensure the chain-link icon between Width and Height is active. This locks the aspect ratio, preventing distortion when you change one dimension. If you need to adjust them independently (be cautious, as this can stretch the image), click the chain icon to unlink them.
- Enter Desired Dimensions: Input your target width or height. Photoshop will automatically adjust the other dimension if the aspect ratio is locked.
- Resolution (DPI/PPI): For print, a resolution of 300 PPI is standard. For web use (e.g., backgrounds on Tophinhanhdep.com), 72 PPI is typically sufficient, though higher PPI won’t hurt. Changing the PPI will affect the image’s physical print size at a given pixel dimension.
- Resample: This is the crucial setting for increasing resolution. Ensure the “Resample” checkbox is ticked. This tells Photoshop to add new pixels.
Step 4: Select the Appropriate Resampling Method Next to the “Resample” checkbox, you’ll find a dropdown menu with various interpolation methods. The choice here significantly impacts the quality of your upscaled image:
- Automatic: Photoshop attempts to intelligently choose the best method.
- Preserve Details (enlargement): This is often the best choice for upscaling. It includes a “Reduce Noise” slider to minimize artifacts that can appear with enlargement. Tophinhanhdep.com recommends starting with this option for most photography.
- Bicubic Smoother (enlargement): A good option for creating smoother transitions in color and tone, reducing jagged edges. It’s often preferred for continuous-tone images.
- Bicubic Sharper (reduction): Designed for reducing image size, but can sometimes be useful for subtle sharpening effects when upscaling carefully.
- Nearest Neighbor (hard edges): Best for images with clear, hard edges, like line art or typography, as it preserves crispness but can introduce a “blocky” look on continuous tones.
For most photographic images, “Preserve Details (enlargement)” or “Bicubic Smoother” will yield the best results for high-resolution images.
Step 5: Apply and Sharpen (Optional but Recommended) Click “OK” to apply the changes. Photoshop will quickly resample your image. Often, upscaling can slightly soften an image. To counteract this, a subtle sharpening pass is recommended:
- Go to
Filter > Sharpen > Unsharp Mask. - In the Unsharp Mask dialogue box, adjust the Amount (typically 50-150%) and Radius (0.5-1.5 pixels) sliders. Experiment until the image looks sharp without introducing halos or artifacts. For professional photography, this step is key.
Step 6: Save Your Upscaled Image
Once satisfied, save your work. Go to File > Save As to save a new version of the image, preserving your original. Choose an appropriate file format (e.g., JPEG for web, TIFF for print) and quality settings.
Alternative Software: GIMP and ON1 Resize
For those without access to Adobe Photoshop, several other software options provide robust image resizing capabilities suitable for Tophinhanhdep.com’s standards.
GIMP: The Free and Open-Source Solution
GIMP (GNU Image Manipulation Program) is a powerful, free, and open-source alternative to Photoshop. While it has a steeper learning curve, it offers comprehensive tools for image manipulation, including resolution enhancement.
How to Increase Resolution in GIMP:
- Open Image: Launch GIMP and open your image (
File > Open). - Access Scale Image: Go to
Image > Scale Image. - Adjust Dimensions & Interpolation: In the dialogue box, link the width and height (chain icon). Enter your desired new width or height (in pixels, percent, or other units). Under “Quality,” choose an “Interpolation” method;
Cubic (Bicubic)orLoHalooften provide good results for upscaling. - Scale: Click the “Scale” button.
- Save: Save your enhanced image (
File > Save As).
ON1 Resize (formerly Genuine Fractals)
ON1 Resize is a dedicated image enlargement software known for producing high-quality enlargements. It employs proprietary fractal-based algorithms to maintain sharpness and detail during significant upscaling. While not free, it’s a specialized tool for photographers seeking maximum quality for large prints. It’s an excellent choice if your primary need is large-format printing of your beautiful photography.
Convenient Options for Everyday Users: Online Tools and Mobile Apps
Not everyone needs professional-grade software or the most advanced AI solutions for every image. For quick adjustments, social media sharing, or when you’re on the go, a wealth of user-friendly online tools and mobile applications are available. These options are perfect for Tophinhanhdep.com users who want to quickly enhance an image for a background, aesthetic post, or a mood board.
Making a Picture Higher Resolution Online
Online image upscalers provide a convenient, browser-based solution, eliminating the need for software installation. Many utilize AI algorithms, offering impressive results with minimal effort.
1. Let’s Enhance (Revisited for Convenience)
As mentioned in the AI section, Let’s Enhance is a top-tier online AI upscaler. Its ease of use makes it a standout for quick resolution boosts.
Quick Steps for Let’s Enhance:
- Visit Website: Go to the Let’s Enhance website (letsenhance.io).
- Upload: Drag and drop your image or use the upload button.
- Choose Settings: Select “Smart Enhance” for general improvement or “Smart Resize” for specific dimensions. You can often choose an upscale factor (e.g., 2x, 4x).
- Process and Download: Click “Start Processing.” Once finished, download your high-resolution image.
2. FotoJet
FotoJet is an online graphic designer, collage maker, and photo editor that also includes basic resizing capabilities. It’s a good all-in-one for quick visual design tasks.
How to Use FotoJet to Increase Resolution:
- Go to FotoJet: Open fotojet.com in your browser and enter the photo editor.
- Upload Image: Import your image from your computer or social media.
- Access Resize Tool: In the left-hand menu, go to the “Edit” section and find the “Resize” tool.
- Enter Dimensions: Enter your desired new width and height in pixels. You can also increase by percentage.
- Apply: Click “Apply” to implement the changes.
- Save: Save your edited image.
Increasing Resolution on Mobile Devices
For Tophinhanhdep.com users who capture most of their photography (nature, aesthetic shots, casual backgrounds) with their smartphones, mobile apps offer a powerful way to enhance images directly on their device.
1. PicsArt Photo Editor
PicsArt is a feature-rich mobile editing app available on both iOS and Android. It offers a “Resize” tool that can help increase image dimensions.
Steps to Increase Resolution with PicsArt:
- Open PicsArt: Launch the PicsArt app on your phone.
- Upload Image: Tap the purple “+” icon and select the image you want to enhance.
- Access Resize: Go to the “Tools” section in the editing options, then select “Resize.”
- Enter New Dimensions: Input your desired new width and height values. Keep the aspect ratio locked to avoid distortion.
- Adjust (Optional): After resizing, you can use other tools like “Sharpen” to fine-tune the image clarity.
- Save/Share: Tap “Next” to save the enhanced image to your gallery or share it directly.
2. Remini
Remini is another popular AI-powered mobile app specifically designed for enhancing old, blurry, or low-resolution photos. It excels at improving facial details and overall image sharpness. This is particularly useful for Tophinhanhdep.com users looking to restore or improve older photos for their thematic collections.
How to Use Remini:
- Open Remini: Launch the Remini app.
- Select Enhance: Choose the “Enhance” option.
- Upload Image: Select the photo from your gallery.
- Process: Remini’s AI will automatically process the image. This usually involves watching a short ad for free usage.
- Preview and Save: Once processed, you’ll see a side-by-side comparison. Save the enhanced version.
3. Adobe Lightroom Mobile
While primarily a photo management and editing app, Lightroom Mobile (available for free with advanced features via subscription) offers excellent resizing and sharpening tools that can indirectly help improve the perceived resolution of an image, particularly if you start with a RAW mobile photo.
Key features:
- Detailed Edits: Adjust clarity, texture, and sharpness to bring out details.
- Upscaling (Indirect): Exporting at a higher resolution than the current display often utilizes sophisticated internal algorithms to generate a larger, sharper file.
- RAW Support: For mobile photographers, shooting in RAW and then editing in Lightroom provides the most data to work with, leading to better outcomes during any form of enlargement.
These mobile options make it incredibly convenient to maintain high image quality for your Tophinhanhdep.com contributions, ensuring your aesthetic photography is always on point.
Best Practices and Final Considerations for High-Resolution Imagery
Increasing the resolution of an image is more than just hitting a button; it’s an art and a science that benefits from thoughtful application and understanding. For the diverse visual content on Tophinhanhdep.com, from beautiful photography to impactful graphic design, following best practices ensures optimal results.
FAQs About Increasing Image Resolution
Q1: Can you add more pixels to an image? Yes, you absolutely can add more pixels to an image through a process called upsampling or resampling. Modern techniques, especially those powered by AI, are highly effective at intelligently generating these new pixels, reconstructing details, and improving overall clarity.
Q2: Does increasing resolution automatically increase quality? Not always, but often. Simply stretching an image without intelligent algorithms (traditional resampling) can lead to blurriness and pixelation, effectively decreasing perceived quality. However, using advanced AI upscalers or careful manual upsampling with professional software does significantly improve quality by adding detail and sharpness, making the image suitable for larger displays or prints. The initial quality of the image also plays a big role; a very blurry or low-detail source image will have limits, even with the best tools.
Q3: Does changing resolution affect image file size? Yes, directly. Increasing the resolution means adding more pixels, and more pixels mean more data. Therefore, increasing an image’s resolution almost always results in a larger file size (in MB). This is an important consideration for storage, sharing, and website loading times. For Tophinhanhdep.com, optimizing file size while maintaining high resolution for backgrounds and wallpapers is crucial for user experience.
Key Takeaways for Optimal Upscaling
- Start with the Best Possible Source: The golden rule of image editing applies here: garbage in, garbage out. While AI can work wonders, beginning with an image that has as much detail as possible will always yield the best results. A slightly blurry photo will upscale better than a severely pixelated one.
- Choose the Right Tool for the Job:
- For maximum quality and detail reconstruction (especially for printing or professional use): AI upscalers like Topaz Gigapixel AI or 4DDiG AI Photo Enhancer are often superior.
- For precise control and complex edits (when you have Photoshop skills): Adobe Photoshop offers unparalleled flexibility.
- For quick, convenient online enhancements: Services like Let’s Enhance or Imglarger are excellent.
- For on-the-go adjustments: Mobile apps like PicsArt or Remini are highly effective.
- Experiment with Settings: Don’t be afraid to try different AI models, resampling methods, and sharpening parameters. What works best for a nature photograph might differ for a piece of digital art or a portrait.
- Sharpen Judiciously: A little sharpening post-upscaling can enhance perceived detail, but over-sharpening can introduce unsightly artifacts. Always aim for a natural look.
- Consider the Final Application: An image destined for a massive print (like a stunning Tophinhanhdep.com nature background) will require a higher upscale and more meticulous attention to detail than one intended for a small web icon. Always consider the viewing distance and medium.
- Backup Your Originals: Always work on a copy of your image, or save your upscaled version as a new file, ensuring your original remains untouched.
Final Words
The journey to achieve high-resolution imagery has never been more accessible or effective. As the leading authority in providing captivating images and visual inspiration, Tophinhanhdep.com firmly believes that high resolution is fundamental to appreciating the beauty and intricacy of every visual piece.
Whether you’re looking to turn a low-resolution snapshot into a breathtaking wallpaper, prepare a stock photo for a demanding graphic design project, or simply enhance your cherished memories for print, the tools and techniques outlined in this guide empower you to achieve stunning results. Embrace the power of AI upscalers, master the precision of Photoshop, or leverage the convenience of online and mobile apps. By applying these methods, you’re not just increasing pixels; you’re unlocking the full potential of your images, ensuring they stand out with unparalleled clarity, detail, and visual impact. Dive into the world of high-resolution on Tophinhanhdep.com and let your images truly shine.