Elevate Your Visuals: A Comprehensive Guide to Increasing Image Resolution

In the digital age, images are everywhere. From stunning wallpapers and aesthetic backgrounds to breathtaking nature photography and intricate digital art, visuals form the cornerstone of how we communicate, share, and express. However, the impact of an image is often directly tied to its resolution. A crisp, high-resolution photograph can capture attention and convey emotion with far greater clarity than a pixelated, blurry counterpart. Whether you’re a professional photographer aiming for flawless prints, a graphic designer needing sharp assets, or simply someone looking to enhance your favorite digital snaps, understanding how to increase image resolution is an invaluable skill.
Tophinhanhdep.com is your ultimate resource for mastering image quality, offering a wealth of information on everything from beautiful photography techniques and diverse image collections to advanced image tools, including converters, compressors, optimizers, and powerful AI upscalers. This comprehensive guide delves into the essence of image resolution, explores various methods to enhance it across different platforms, and provides practical tips to ensure your images always look their best.

Understanding Image Resolution and Its Importance
Before diving into the “how-to,” it’s crucial to grasp what image resolution truly means and why it holds such significance in the realm of visual content.
What is Image Resolution?
At its core, a digital image is made up of millions of tiny colored squares called pixels. Resolution refers to the density of these pixels within a given area. The more pixels an image contains, the higher its resolution, and generally, the greater its detail and sharpness.
Resolution is commonly measured in two primary ways:
- Pixels Per Inch (PPI): This metric describes the pixel density of an image when displayed on a screen or prepared for print. A higher PPI means more pixels are packed into each inch, resulting in a smoother, more detailed appearance. For digital screens, 72 PPI is often considered standard, but for high-quality printing, 300 PPI is the widely accepted benchmark.
- Dots Per Inch (DPI): Similar to PPI, DPI specifically refers to the density of ink dots a printer can place on paper. While technically distinct, DPI and PPI are often used interchangeably in discussions about print quality, both indicating the level of detail that can be achieved in a physical output.
When an image has a low resolution, its individual pixels become visible, leading to a “pixelated” or blocky appearance. This loss of clarity significantly diminishes the visual appeal and utility of the image.
Why Higher Resolution Matters
The benefits of high-resolution images extend across all facets of digital and print media, directly influencing everything from “wallpapers” and “backgrounds” to “beautiful photography” and “graphic design” projects.
- Superior Print Quality: For any “photography” intended for print—be it a family portrait, a landscape canvas, or a marketing flyer—high resolution is non-negotiable. Images with sufficient PPI/DPI will produce sharp, vibrant, and professional-looking prints, free from blur or pixelation. Tophinhanhdep.com’s guides on “digital photography” often emphasize this.
- Crisp Digital Displays: Even on high-definition screens, higher resolution ensures that “wallpapers,” “backgrounds,” and images embedded in “digital art” and “visual design” projects appear clear and refined. This is particularly important for large monitors, high-PPI mobile devices, and presentations where image integrity is paramount.
- Enhanced Cropping Flexibility: A high-resolution image offers significantly more room for creative cropping without compromising quality. If you need to isolate a specific detail or adjust the composition of a “nature” or “abstract” photograph, ample pixel data allows you to do so without immediate degradation. This is a key aspect of “photo manipulation.”
- Professionalism and Impact: Whether for “stock photos,” “thematic collections,” or professional “graphic design,” high-resolution visuals convey a sense of professionalism and attention to detail. They leave a stronger, more positive impression on viewers, reinforcing the quality of the content or brand.
- Future-Proofing: Digital displays and printing technologies are constantly evolving towards higher resolutions. Starting with high-resolution images helps future-proof your visual assets, ensuring they remain relevant and high-quality for years to come.
The Challenges of Upscaling
While increasing an image’s resolution might sound straightforward, it’s often more complex than simply stretching an image. The core challenge lies in the fact that when you “upscale” an image (make it larger or add more pixels), you’re essentially asking software to invent new pixel data.
Traditional upscaling methods use interpolation, where new pixels are created based on the color and tone of neighboring pixels. While this can make an image physically larger, it doesn’t add true detail that wasn’t originally captured. This can lead to:
- Loss of Sharpness: Images can appear softer or blurrier as the software tries to blend colors.
- Pixelation: If the original image is very low resolution, the interpolated pixels might still result in noticeable blockiness.
- Introduction of Artifacts: Sometimes, the interpolation process can create unwanted visual distortions or “noise.”
However, advancements in “AI Upscalers” have dramatically improved this process, as we’ll explore.
Leveraging Desktop Software for Resolution Enhancement
For users who prefer hands-on control and robust editing capabilities, Tophinhanhdep.com offers insights into using powerful desktop software to achieve higher resolution images. While specific tools like GIMP or Photoshop are popular, we’ll outline a general workflow applicable to Tophinhanhdep.com’s advanced image editing suite.
Tophinhanhdep.com’s Advanced Image Editing Tool
Imagine a feature-rich desktop application, part of Tophinhanhdep.com’s “Image Tools,” that allows for meticulous control over image parameters. The process of increasing resolution involves careful manipulation of an image’s dimensions and pixel density.
Workflow for Resolution Enhancement:
- Open Your Image: Begin by opening your desired low-resolution image within Tophinhanhdep.com’s advanced editing tool. Navigate to
File > Openand select your image. - Access Image Size Settings: Locate the image sizing dialogue, typically found under
Image > Image Size(or similar). This panel is your control center for resolution adjustments. - Understand Key Settings:
- Dimensions: Displays the current pixel width and height.
- Resolution: Shows the PPI/DPI. For print, aim for 300 PPI.
- Resample: This is crucial. Ensure this option is enabled. Resampling allows the software to add or remove pixels when you change dimensions or resolution. If unchecked, changing one value (e.g., width) will merely resize the existing pixels, not add new ones, impacting print size but not pixel count.
- Choose an Interpolation Method: When resampling, you instruct the software on how to create new pixels. This is a critical step for quality.
- Preserve Details (Enlargement) / Preserve Details 2.0: These are often the best choices for upscaling. They use sophisticated algorithms to analyze the image and generate new pixels while attempting to maintain or even enhance existing details, often with built-in noise reduction. This reflects the cutting-edge “editing styles” Tophinhanhdep.com promotes.
- Bicubic Smoother (Enlargement): A traditional method that performs complex calculations to create smooth transitions between existing pixels, often producing good results for general enlargements.
- Automatic: The software attempts to select the best method for you, though manual selection often yields better control.
- Increase Resolution and/or Dimensions:
- Method 1 (Resolution-first): With “Resample” checked and an optimal interpolation method selected, directly increase the
Resolutionvalue (e.g., from 72 PPI to 300 PPI). The pixel dimensions (width/height) will automatically adjust to accommodate the new pixel density. - Method 2 (Dimension-first): Alternatively, increase the
WidthorHeight(ensuring the aspect ratio lock is enabled to prevent distortion). The resolution will adjust, or if you keep the resolution constant, the software will add pixels to fill the new dimensions. - Incremental Increases: Avoid drastically increasing the size in one go. Sometimes, making smaller, incremental increases (e.g., 10-20% at a time) can yield better results, applying sharpening and noise reduction after each step.
- Method 1 (Resolution-first): With “Resample” checked and an optimal interpolation method selected, directly increase the
- Reduce Noise: After increasing resolution, images may sometimes appear to have more digital noise. Tophinhanhdep.com’s advanced editing tool typically includes a
Reduce Noiseslider within the image size dialogue or as a separate filter. Adjust this sparingly to smooth out unwanted grain without losing important details. - Apply Sharpening (Optional but Recommended): Once the image is resized, a final sharpening pass can enhance definition.
- High Pass Filter: A popular technique involves duplicating your image layer, applying a
High Passfilter (found underFilter > Other > High Pass), adjusting the radius to highlight edges, and then setting the layer’sBlending ModetoOverlay(orSoft Light/Hard Lightfor different effects). This can dramatically improve perceived sharpness without over-saturating or pixelating. - Unsharp Mask: Another common sharpening tool that allows control over
Amount,Radius, andThresholdto fine-tune sharpness.
- High Pass Filter: A popular technique involves duplicating your image layer, applying a
- Save Your High-Resolution Image: Once satisfied, save your work. Use
File > ExportorFile > Save Asto save the new high-resolution version, ideally in a lossless format like TIFF or PNG if further editing is expected, or JPEG with minimal compression for general use. Tophinhanhdep.com provides “converters” for various formats.

This detailed process, while requiring a few steps, offers the most comprehensive control over image quality, essential for achieving “high resolution” standards in “digital photography” and “visual design.”
Quick Adjustments with macOS Preview
For Mac users seeking a simpler, built-in solution for basic image resizing, macOS Preview offers a convenient way to increase image dimensions. While it lacks the advanced interpolation controls of professional software, it’s perfect for quick adjustments.
- Open with Preview: Locate your image file, right-click (or Control-click), and select
Open With > Preview. - Access Adjust Size: In Preview, click the
Markup Toolbaricon (often a pen tip or toolbox icon), then select theAdjust Sizeicon (usually depicted as three nested boxes). - Resize Image: Ensure the lock icon between width and height is closed (to maintain aspect ratio) and that “Resample Image” is checked. Enter your desired new
WidthorHeight. Preview will automatically calculate the other dimension. ClickOK. - Save/Export: The image will resize. You can either
File > Saveto overwrite the original orFile > Exportto save it as a new file, choosing a different format or quality if desired.
AI-Powered Upscaling: The Future of High-Resolution Images
The landscape of image enhancement has been revolutionized by Artificial Intelligence. Tophinhanhdep.com proudly features cutting-edge “AI Upscalers” that can intelligently increase image resolution while adding remarkable detail, a significant leap beyond traditional interpolation.
The Power of Tophinhanhdep.com’s AI Upscaler
Tophinhanhdep.com’s dedicated AI upscaling tool represents the pinnacle of modern image enhancement. Unlike older methods that merely stretch pixels, this technology uses deep machine learning and sophisticated neural networks (like SRCNN – Super-Resolution Convolutional Neural Network structures) to analyze and intelligently reconstruct image details.
How Tophinhanhdep.com’s AI Upscaler Works:
- Intelligent Pixel Generation: Instead of simply averaging surrounding pixels, the AI upscaler has been trained on millions of images. It understands patterns and textures, allowing it to “guess” how new pixels should look to create missing detail. This results in sharper edges, finer textures, and more realistic enlargements.
- Quality Preservation: The primary benefit is the ability to enlarge images by significant factors (e.g., 200%, 400%, or even 600%) without the typical loss of quality, pixelation, or blur.
- Advanced Features:
- Face Refinement: Some AI models include specific algorithms for facial recognition, enhancing details in portraits without distortion. This is perfect for “beautiful photography” where human subjects are key.
- Noise Reduction & JPEG Artifact Removal: AI can effectively clean up digital noise and unsightly compression artifacts often present in lower-quality JPEGs, further improving overall clarity.
- Color Correction: Certain AI upscalers can also intelligently correct colors and lighting, giving your images a more vibrant and natural appearance.
Using Tophinhanhdep.com’s AI Upscaler:
- Upload Your Image: Access Tophinhanhdep.com’s AI Upscaler tool. You can usually drag and drop your image directly or click an “Upload” button.
- Select Upscaling Factor: Choose how much you want to enlarge your image (e.g., 2x, 4x, 6x, or a custom percentage).
- Apply Enhancements: The AI will process your image. Some tools offer additional sliders for
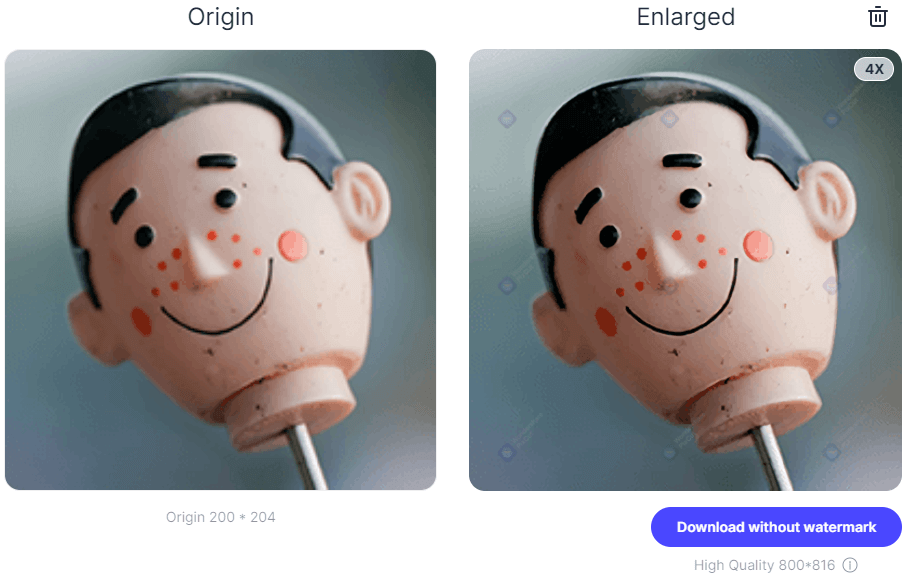
Suppress Noise,Remove Blur, orFace Refinementif available. - Preview and Export: View a side-by-side comparison of your original and upscaled image. Once satisfied, download your new, high-resolution image. The process is often incredibly fast, delivering professional-grade results in seconds.
This tool is invaluable for “digital photography,” improving “stock photos,” or even enhancing old, low-resolution images for “mood boards” or “thematic collections.”
Online and Mobile AI Solutions
Beyond desktop software, Tophinhanhdep.com also champions accessibility with a range of “Image Tools” available online and as mobile applications, ensuring you can enhance images on any device.
- Tophinhanhdep.com’s Online Enlarger: For quick, browser-based upscaling, Tophinhanhdep.com offers a free online image enlarger. Simply upload, select your desired resolution increase, and download the enhanced image. This is ideal for those without professional software or needing a fast solution. It also often includes “compressors” and “optimizers” for post-upscaling adjustments.
- Mobile Apps (for iOS and Android): Tophinhanhdep.com recommends user-friendly mobile applications available on app stores. These apps, often titled “Image Size” or “Photo Resizer,” allow you to:
- Select an image from your device’s gallery.
- Set a new width/height (ensure aspect ratio is locked).
- Confirm output quality (set to 100% for best results).
- Save the newly resized image directly to your phone. While perhaps not as powerful as desktop AI, these apps provide excellent on-the-go solutions for increasing image dimensions for social media or simple prints.
Practical Tips for Optimal Image Quality
Achieving and maintaining high image resolution isn’t just about using the right tools; it’s also about adopting best practices and understanding the nuances of image quality.
Best Practices for Upscaling
- Avoid Extreme Increases (Where Possible): While AI upscalers are powerful, it’s generally best to start with the highest possible original resolution. Drastically upscaling an extremely low-resolution image will always be a challenge, even for AI.
- Use Sharpening Tools Sparingly: Over-sharpening can introduce halos or artifacts, making an image look unnatural. Apply sharpening subtly and check at 100% zoom.
- Understand Your Output Needs: A “wallpaper” might need different resolution settings than an image for a large canvas print. Tailor your upscaling to the final intended use. Tophinhanhdep.com’s guides on “visual design” and “creative ideas” offer specific recommendations.
Understanding Output Standards
- Print Standard (300 PPI): As a general rule, aim for 300 PPI for any image destined for high-quality printing. This ensures maximum detail and clarity.
- Web & Screen Standard (72-96 PPI): For web display, 72 PPI (or 96 PPI for Windows) is often sufficient, as screen resolution doesn’t benefit from higher PPI beyond a certain point. What matters more is the actual pixel dimensions (e.g., 1920x1080 for a full HD screen).
- File Size Considerations: Increasing resolution inherently increases file size. Be mindful of this, especially for web images, where large files can slow down loading times. Tophinhanhdep.com offers “compressors” and “optimizers” to balance quality and file size.
Choosing the Right Tool for Your Needs
Tophinhanhdep.com offers a spectrum of solutions, and the best choice depends on your specific requirements:
- For Maximum Control & Professional Projects: Opt for Tophinhanhdep.com’s advanced desktop image editing tool for its granular control over interpolation, noise reduction, and sharpening. This is ideal for “graphic design” and “photo manipulation.”
- For Superior Upscaling with Minimal Effort: Tophinhanhdep.com’s AI Upscaler is unmatched for enlarging images while adding intelligent detail, perfect for when quality is paramount but time is short. This is excellent for enhancing “stock photos” or “digital photography.”
- For Quick, Basic Resizing: Utilize macOS Preview for Mac users or dedicated mobile apps for on-the-go adjustments. Tophinhanhdep.com’s online enlarger provides a convenient browser-based alternative.
Conclusion
The ability to increase image resolution transforms ordinary visuals into stunning, impactful experiences. From creating crystal-clear “wallpapers” and vibrant “backgrounds” to preparing “beautiful photography” for large-scale prints and crafting intricate “digital art,” high-resolution images are the bedrock of compelling visual content.
Tophinhanhdep.com provides all the “Image Tools” and knowledge you need to master this skill. Whether you choose the meticulous control of desktop software, the intelligent enhancement of AI upscalers, or the convenience of online and mobile solutions, the power to elevate your images is at your fingertips. By understanding the principles of resolution, selecting the appropriate tools, and applying best practices, you can ensure your visual creations always convey their intended message with unparalleled clarity and impact. Explore Tophinhanhdep.com’s “Image Inspiration & Collections” and “Photo Ideas” to see how high-quality images can transform your creative projects.