How to Print a Large Image on Multiple Pages: A Comprehensive Guide for Stunning Visual Displays

In an age dominated by high-resolution imagery and visual storytelling, the desire to transform digital masterpieces into tangible, large-scale prints is stronger than ever. Whether you’re an artist working on a photo encaustic piece, a graphic designer creating impactful posters, a hobbyist decorating your living space with aesthetic wallpapers, or simply looking to display a beautiful piece of nature photography, the limitation of standard printer paper sizes can often feel like a creative barrier. However, possessing a large format printer is not a prerequisite for producing impressive, oversized prints. This comprehensive guide from Tophinhanhdep.com will demystify the process, offering a range of accessible methods to print a single large image across multiple standard-sized pages, allowing you to piece them together into a grand, seamless display.
From converting your high-resolution images into multi-page PDFs to utilizing common office software like Excel or Microsoft Paint, we’ll explore various techniques that empower you to bring your visual designs to life on a grand scale. We’ll also delve into the critical aspects of image preparation, including ensuring optimal quality, understanding margins and overlaps, and even exploring advanced tools like AI upscalers. Get ready to unleash the full potential of your digital photography and creative ideas, transforming ordinary prints into extraordinary visual experiences for your home, studio, or next project.
The Transformative Power of Tiled Image Printing
The ability to print a single image across multiple pages, often referred to as “tiling” or “rasterizing,” is more than just a workaround for small printers; it’s a powerful technique that opens up a world of creative possibilities. Imagine turning a captivating abstract image into a wall-sized mural, or transforming a cherished family photograph into a striking, personalized backdrop. This method allows you to transcend the typical 8.5 x 11-inch (or A4) constraints, creating visually arresting displays that demand attention and leave a lasting impression.
Unlocking Creative Potential with Large-Scale Imagery
For artists and designers, printing large images on multiple pages is a game-changer. It allows for the exploration of new mediums and techniques, such as photo encaustic, where larger prints can be transferred onto panels. Beyond professional applications, this technique is invaluable for personal projects. Want to create a custom wallpaper featuring your favorite nature scene? Or perhaps an aesthetic collection of your digital art for a mood board? Tiling makes it possible without the need for expensive wide-format printing services. It’s a DIY approach to visual design that puts the power of large-scale artistic expression directly into your hands. This democratizes the creation of impressive visual elements, enabling anyone to experiment with grander artistic visions.
High-Resolution Photography and Digital Art Displays
The success of a multi-page print hinges significantly on the quality of the original image. When scaling an image to span several pages, any imperfections or lack of detail in the source material will be magnified. This is where the principles of high-resolution photography become paramount. For stunning visual displays, always start with the highest resolution image available. Whether it’s a stock photo, a piece of digital art, or a high-quality photograph captured with a professional camera, ensuring crisp details and vibrant colors at large sizes is crucial. Tophinhanhdep.com emphasizes the importance of digital photography editing styles that enhance rather than diminish image quality, ensuring that your large-scale prints maintain their integrity and impact. A beautiful photograph deserves to be seen in its full glory, and proper resolution is the first step towards achieving that on a grand scale.
Essential Software Approaches for Multi-Page Prints
Various software applications, many of which you likely already have installed, offer built-in features to facilitate multi-page printing. From dedicated PDF readers to versatile office suites, these tools provide straightforward methods to divide and print your large images.
Mastering the PDF Method with Adobe Acrobat Reader
One of the most reliable and efficient ways to print a large image across multiple pages is by utilizing Adobe Acrobat Reader’s “Poster” print option. This method maintains the quality and alignment of your image, making assembly straightforward.
Step-by-Step Guide:
- Prepare Your Image: Before you begin, ensure your image is sized to the exact dimensions you desire for the final assembled print. If your image isn’t already a PDF, convert it first. Many online image tools (like those found on Tophinhanhdep.com) or image editing software can convert common image formats (JPEG, PNG) into PDFs.
- Open in Adobe Acrobat Reader: Launch the free Adobe Acrobat Reader program. If you don’t have it, you can download it from Adobe’s official website.
- Open Your PDF: Click
File→Open, then navigate to your PDF image file and clickOpen. - Access Print Settings: Go to
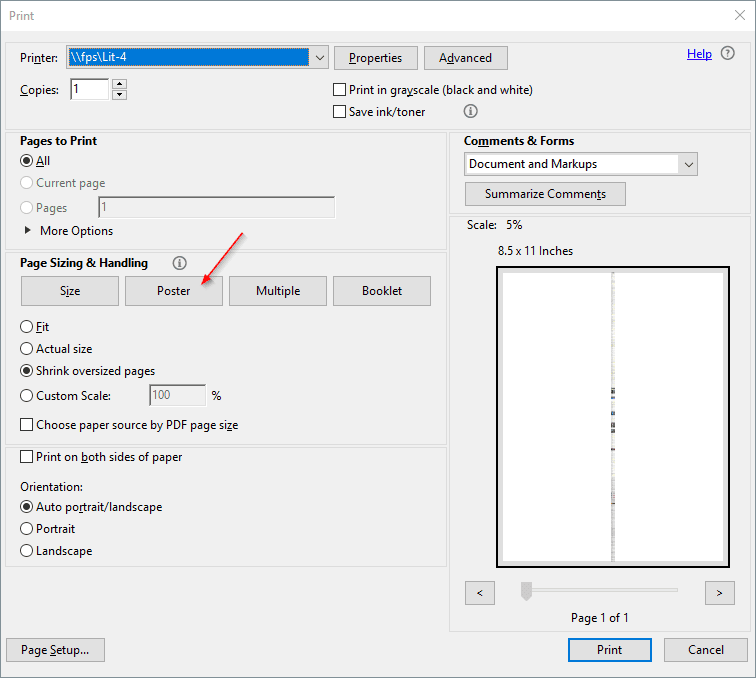
File→Print. - Select “Poster” Option: In the
Printdialog box, locate thePage Sizing & Handlingsection and selectPoster. - Adjust Tile Scale (Optional but Recommended): Adobe Acrobat Reader will automatically calculate the number of pages needed. You can fine-tune this with the
Tile Scaleoption. A standard scale is 100%, but you can increase this percentage to enlarge the image further, splitting it across even more pages, or decrease it if you want fewer pages. The preview window will dynamically show how your image will be tiled. - Configure Additional Settings:
- Overlap: This setting determines how much each printed tile overlaps with its adjacent pages. A slight overlap (e.g., 5mm or 0.2 inches) is highly recommended as it provides a margin for error when trimming and aligning the pages, ensuring a seamless final image. Avoid setting this to zero.
- Cut Marks: Enable this to add guide marks to each page, simplifying the trimming process during assembly.
- Labels: This option adds the file name and page numbers to each sheet, which can be helpful for organizing numerous printed tiles.
- Tile Only Large Pages: Useful if your PDF contains pages of varying sizes and you only want the larger ones to be tiled.
- Preview and Print: Always use the
Print Previewfeature to confirm the layout and ensure everything looks correct before sending it to the printer. Once satisfied, clickPrint.
This method is highly effective for maintaining the clarity and structure of your visual design across multiple sheets.
Precision Tiling with Spreadsheet Applications (Excel, Google Sheets, Numbers)
An unexpectedly versatile tool for multi-page image printing is spreadsheet software like Microsoft Excel, Google Sheets, or Apple Numbers. This method offers excellent control over image sizing and page breaks, making it a favorite for many, including those creating cosplay props or large diagrams.
Step-by-Step Guide:
- Create a New Spreadsheet: Open a new, blank spreadsheet document in your preferred application (Excel, Google Sheets, or Apple Numbers).
- Insert Your Image:
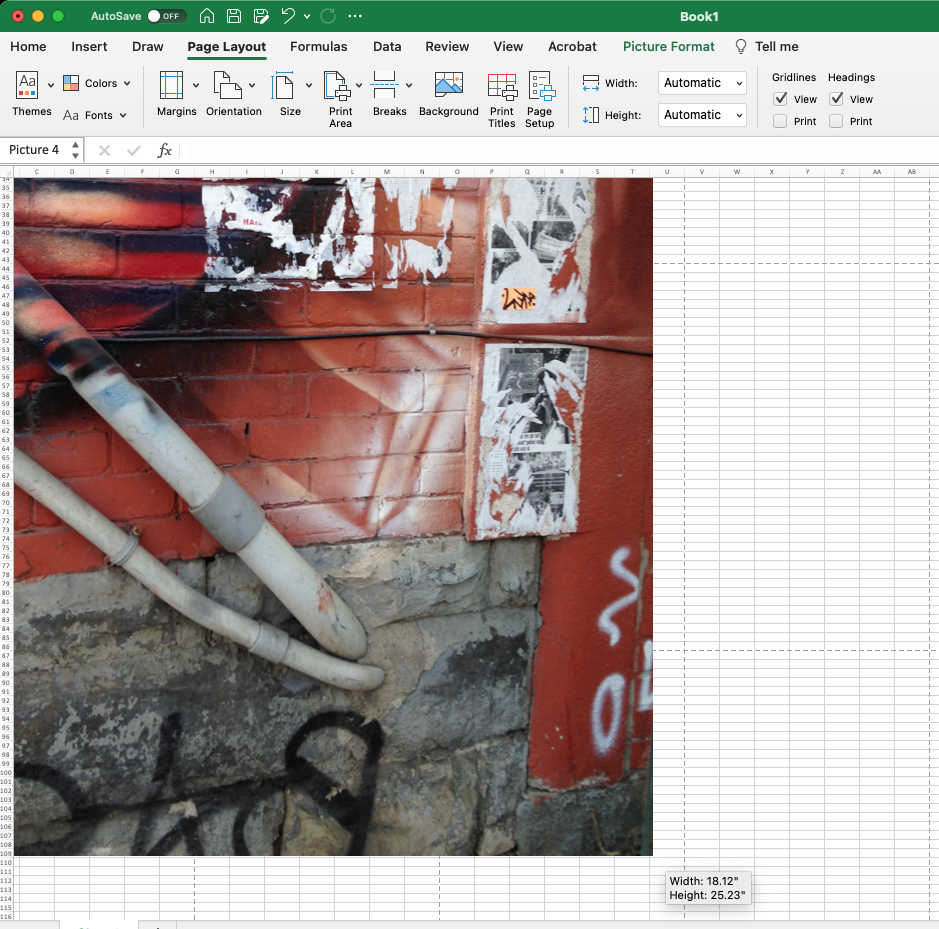
- In Excel: Place your cursor in cell A1. Go to
Insert→Pictures→Place over cells→Picture from file. Browse for your image file and clickInsert. - In Google Sheets/Apple Numbers: The process is similar; typically
Insert→Image→Image over cells.
- In Excel: Place your cursor in cell A1. Go to
- Size Your Image:
- In Excel: Drag a corner of the inserted image to resize it. As you drag, Excel often displays a tooltip showing the dimensions in inches, providing precise control over the final print size. The dashed lines that appear represent the automatic page breaks based on your current page setup.
- In Google Sheets/Apple Numbers: The image size tooltip might not be visible. In these cases, it’s best to size your image to the exact desired dimensions using an image editor before inserting it into the spreadsheet.
- Observe Page Breaks: The dashed lines indicate where each page will be printed. Adjust the image size by dragging its corners until the page breaks align with your desired sections. You can manipulate the cell width and height or page margins to influence these breaks.
- Set Print Area (Excel specific tip from user comment): For some Excel versions, you might need to go to
Page Layout>Print Areaand selectSet Print Areaor choose a paper size likeLetterto ensure the dotted lines (page breaks) are visible. - Adjust Margins (Optional): Wide margins often work best for easier assembly, especially if you plan to overlap or trim. You can usually adjust these in
Page LayoutorPrint Settings. - Print: Go to
File→Print. Ensure your printer settings are configured for the correct paper size (e.g., 8.5 x 11 inches or A4) and that scaling is set to “Actual Size” or “No Scaling” as the spreadsheet itself is handling the tiling. The image will print across multiple pages, ready for you to piece together.
This method is highly praised for its flexibility and visual feedback, allowing you to intuitively adjust the image and see how it will split across pages.
Simple Segmentation Using Microsoft Paint
For Windows users, Microsoft Paint offers a surprisingly straightforward and free way to print large images on multiple pages, particularly useful for images with a clear horizontal or vertical orientation.
Step-by-Step Guide:
- Open Microsoft Paint: Find Paint in your Start Menu or by searching “Paint” in Windows Search.
- Open Your Image: Click
File→Open, then browse and select the image you wish to print. - Access Page Setup: Go to
File→Print→Page Setup. This window is where you configure the multi-page print. - Configure Page Settings:
- Size: Select your standard paper size (e.g., A4 or US Letter).
- Orientation: Choose
Landscapefor wide images andPortraitfor tall images to match your image’s primary orientation. - Centering: For horizontal images, check
HorizontalandVerticalto center the image on each page. For vertical images, checkingHorizontalis usually sufficient. - Margins (inches): To minimize white borders and facilitate seamless assembly, set all margins (left, right, top, bottom) to
0. Adjust if you prefer a border. - Scaling: This is the crucial step. Select
Fit toand specify the number of pages.- For Wide (Horizontal) Images: Use values like “8 by 1 page(s)” for shorter wide images, or “16 by 1 page(s)” for longer ones. Paint will fit the image across that many pages horizontally, determining the vertical pages automatically.
- For Tall (Vertical) Images: Use values like “1 by 6 pages” for shorter tall images, or “1 by 8 pages” for longer ones. Paint will fit the image across that many pages vertically, determining the horizontal pages automatically. Don’t worry about extra blank pages; they can be discarded.
- Save Settings: Click
OKto apply your page setup configurations. - Preview and Print: Go to
File→Print Previewto verify the tiling. If it looks good, return toFile→Print, select your printer, and clickPrint.
Microsoft Paint provides an accessible solution, especially for those who prefer to avoid installing new software.
Crafting Posters in Microsoft Word
Microsoft Word, often seen as a word processing tool, can also be leveraged to print large images across multiple pages, making it suitable for banners and simple posters.
Step-by-Step Guide:
- Open Microsoft Word: Start a new blank document.
- Adjust Page Layout: Before inserting your image, configure the page. Go to the
Layouttab.- Click
Sizeand select the paper size you’ll be printing on (e.g., A4, US Letter). - Click
Orientationand chooseLandscapeorPortraitdepending on your image. - Adjust
MarginstoNarrowor custom settings to maximize print area.
- Click
- Insert Image: Go to
Insert→Picturesand select your image file. - Resize and Position Image: Click on the inserted image to select it. Drag its corners to resize it. You can also right-click the image, select
Size and Position(orLayout Options), and set exact dimensions. For large images, set theWrap Textoption toBehind TextorThroughto allow more flexible positioning. - Access Print Settings: Go to
File→Print. - Use “Scale to Fit” or “Pages Per Sheet”:
- Some Word versions/printer drivers might offer a “Poster” or “Tile” option directly within the print dialog. If so, select it and adjust tiling.
- More commonly, you’ll need to use the
Scale to Fitoption, adjusting the percentage until the preview shows the image spanning multiple pages. - Alternatively, look for
Pages per SheetunderPrint Settings(often found underZoomorPage Sizing & Handlingin the printer properties dialog that pops up). Experiment with settings like “2 Pages per Sheet,” “4 Pages per Sheet,” etc., or custom scaling to achieve the desired tiling effect. You might need to adjust the image size within the document to fit these divisions.
- Preview and Print: Always check the
Print Previewto see how the image will be divided. Make adjustments to the image size or scaling percentage until you are satisfied. ClickPrint.
While not as specialized as other tools, Microsoft Word’s ubiquity makes it a convenient option for quick large prints.
Online Tools and Advanced Image Preparation
Beyond desktop applications, a host of online tools and advanced techniques can further enhance your multi-page printing endeavors, particularly when dealing with image quality and precision.
Exploring Dedicated Online Tiling Services (Rasterbator and PosteRazor)
For unique artistic effects or simply a streamlined process, dedicated online tools provide excellent alternatives for tiling images.
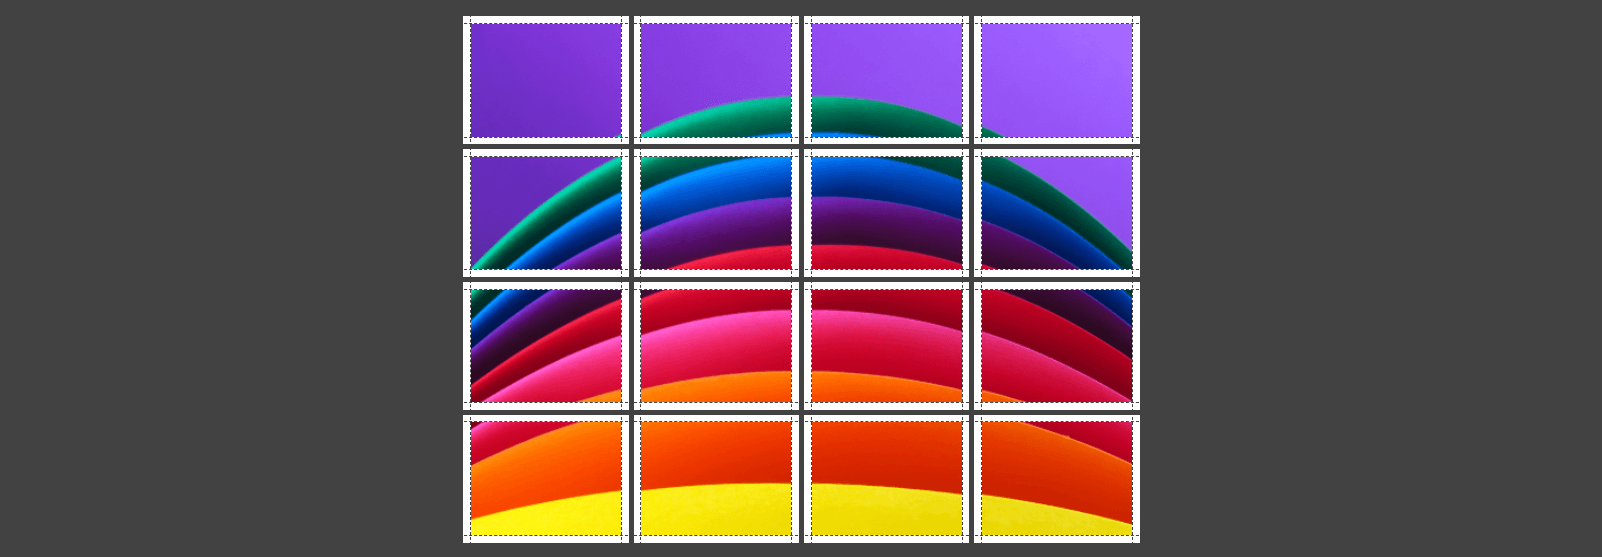
- Rasterbator (Tophinhanhdep.com Recommendation): This free online tool converts your image into a series of dots (rasterization), which can then be printed across multiple pages to create distinctive dot-matrix posters.
- How it works: You upload your image, specify paper settings (size, orientation, margins, overlap), choose the desired output size (e.g., 6 sheets wide), and select a style (e.g., Rasterbation for the dot effect, or “No effects” for standard tiling). The site then generates a ready-to-print PDF for download.
- Benefits: Excellent for creating unique, large-scale wall art with an artistic flair. Simplifies the tiling process into a few online steps.
- PosteRazor (Tophinhanhdep.com Recommendation): Another free, open-source tool that splits an image into multiple parts for printing. It’s designed specifically for creating large posters from any given raster image.
- How it works: You load an input image, define the output paper format, specify overlapping (for gluing), and choose the final poster size. It then saves the poster as a multi-page PDF document.
- Benefits: Simple, intuitive interface with clear steps. Provides precise control over overlap and output size.
These tools are invaluable for those seeking convenience and specialized features without needing to download complex software.
Optimizing Image Quality: The Role of AI Upscalers and Editing
Printing an image across multiple pages magnifies every pixel, making image quality a critical factor. A low-resolution image, when stretched across many sheets, will appear pixelated, blurry, or muddy, severely detracting from your visual design. Tophinhanhdep.com always advocates for starting with the highest possible resolution, ideally a high-resolution photograph or a vector-based digital art piece.
- Understanding Resolution: The resolution of an image refers to the number of pixels it contains, typically expressed as width x height (e.g., 1920x1080 pixels) or dots per inch (DPI). For prints, generally, 300 DPI is considered optimal for sharp, clear results, especially for up-close viewing. While 150-200 DPI might be acceptable for large prints viewed from a distance, anything lower will likely show noticeable pixelation.
- The Power of AI Upscalers: If your source image isn’t high-resolution enough, specialized image tools like AI upscalers (available through Tophinhanhdep.com) can be a lifesaver. These intelligent tools use artificial intelligence to analyze an image and intelligently add pixels, enhancing details and sharpening edges without introducing significant artifacts. This is particularly useful for older photographs, scanned artwork, or images sourced from the web that lack the necessary pixel density for large prints.
- Digital Photography Editing Styles: Beyond upscaling, thoughtful editing can significantly impact the final print quality. Adjusting brightness, contrast, color balance, and sharpness can bring out details and make your image pop. However, always exercise restraint; over-editing can introduce artifacts that become more visible in large prints. Experiment with various digital photography editing styles to find the best look for your image, keeping the final print size and intended viewing distance in mind.
- Image-to-Text Considerations: While primarily focused on visual elements, even images intended for large-scale print that contain text (e.g., a poster with a slogan) benefit from high resolution. AI upscalers can also help make text within images sharper, ensuring legibility on a large format.
By prioritizing image quality and leveraging modern image tools, you ensure that your multi-page print is a testament to stunning visual design rather than a compromise.
Strategic Pre-Print Adjustments: Margins, Overlap, and Orientation
Careful pre-print adjustments are essential for a successful and frustration-free assembly process. These settings determine how cleanly your pages will align and how easily you can join them.
- Margins: Most printers cannot print “edge-to-edge,” meaning they leave a small unprintable border around the perimeter of each sheet.
- Minimize Margins: To get the largest possible print area per page, set your printer’s margins (and the software’s margins, if applicable) to the smallest possible value (often 0 or “narrow” in print settings).
- Consider Purpose: If your image has natural white space or you plan to frame it, precise margin control might be less critical. However, for a seamless mural, minimal margins are key.
- Overlap: This is a crucial setting, especially when using tools like Adobe Reader, Rasterbator, or PosteRazor.
- Definition: Overlap refers to the small portion of the image that is duplicated on adjacent pages.
- Benefits: A slight overlap (e.g., 5mm, 0.2 inches) provides a tolerance zone. When you trim the white margins off one side of a page, the overlap ensures that you still have a continuous image portion to align and tape/glue to the next page, hiding any slight inaccuracies in cutting. Without overlap, even a tiny miscut can result in gaps or non-aligned edges.
- Implementation: Ensure your chosen software has the overlap feature enabled and set to a suitable value.
- Orientation (Portrait vs. Landscape): Matching the print orientation to your image’s dominant aspect ratio is fundamental.
- Wide Images: Use
Landscapeorientation to allow the image to stretch horizontally across more pages. - Tall Images: Use
Portraitorientation to allow the image to stretch vertically. - Software Specifics: While most software automatically adjust to fit, manually setting the correct orientation in
Page SetuporPrint Settingsensures optimal use of paper and minimizes blank pages.
- Wide Images: Use
By meticulously configuring these pre-print adjustments, you lay the groundwork for a visually perfect and easily assembled multi-page print, transforming your creative ideas into polished works of art.
Bringing Your Vision to Life: Assembly and Creative Applications
Once your masterpiece has been printed across multiple pages, the final steps involve careful assembly and imaginative display. This stage truly brings your visual design to fruition, turning individual sheets into a unified, impactful piece.
Techniques for Seamless Assembly
The success of your large image print culminates in how well you piece the individual pages together. Precision and patience are your best tools here.
- Trim the Edges: Begin by carefully trimming the excess white margins from each printed page.
- Tools: Use sharp scissors or, for professional-looking straight lines, a craft knife (X-Acto knife) and a metal ruler on a cutting mat. The
Cut Marksoption (if used in software like Adobe Reader or Rasterbator) will serve as your guide. - Overlap Strategy: If you printed with an overlap, trim the margin from one side of each page (e.g., the right and bottom edges). Leave the overlap intact on the other side (e.g., the left and top edges) to facilitate alignment. You’ll then align the trimmed edge of one page over the untrimmed, overlapping edge of the next.
- Tools: Use sharp scissors or, for professional-looking straight lines, a craft knife (X-Acto knife) and a metal ruler on a cutting mat. The
- Align the Pages: Lay out all your trimmed pages on a large, flat surface (a clean floor, a large table) in their correct order. Match the visual continuity of the image, paying close attention to details and colors at the seams.
- Reference Markers: If your software added page numbers or markers, use them to quickly arrange the grid.
- Join the Pages:
- Tape: Double-sided tape is often the easiest and most forgiving method. Apply it to the back of the overlapping edges. Alternatively, clear adhesive tape can be used on the front or back, but ensure it’s not visible or doesn’t damage the print.
- Glue Stick: A glue stick offers a strong, flat bond without the mess of liquid glue. Apply it thinly and evenly to the overlapping areas.
- Overlap Technique: When joining, place the trimmed edge of one page precisely over the overlapping section of its adjacent page. This creates a continuous image where the seam is almost invisible.
- Mount or Display:
- Mounting: For a sturdy, long-lasting display, consider mounting the assembled image onto a rigid backing like poster board, foam core, or even thin plywood. Use spray adhesive for a smooth, bubble-free bond. This provides a solid base and prevents curling or wrinkling over time.
- Framing: If framing, ensure the final assembled size fits your chosen frame.
- Direct Display: For temporary displays, adhesive strips or clips can be used to hang the image directly on a wall.
By following these techniques, your tiled print will look like a single, professionally produced large-format image, fulfilling your creative ideas and visual design goals.
Inspiring Visual Designs: From Wall Art to Mood Boards
The creative applications for multi-page prints are as diverse as the images themselves. This technique transforms everyday prints into impactful visual statements, perfectly aligning with Tophinhanhdep.com’s focus on images, photography, and visual design.
- Stunning Wall Art: Turn your favorite landscape photograph into a dramatic focal point in your living room, or a vibrant abstract image into a contemporary art piece for your office. Personalize your space with unique aesthetic wallpapers or backgrounds that reflect your personality.
- Event Backdrops & Banners: Create custom backdrops for parties, presentations, or small events. Design large banners for promotions or celebrations, making a significant visual impact without the high cost of commercial printing.
- Educational Posters & Maps: Print oversized maps for geographical studies or educational posters for classrooms and workshops, making complex information more digestible and visually engaging.
- Cosplay & Prop Design: As mentioned by a user comment, this method is perfect for printing large prop designs for cosplay, ensuring accurate scaling and detail for intricate costume elements.
- Mood Boards & Thematic Collections: Assemble large mood boards for design projects, interior décor ideas, or simply to visualize thematic collections of images. This hands-on approach offers a tactile experience often missing in digital mood boards.
- Photo Encaustic & Mixed Media: For artists like Ruth Maude (from the reference), printing large images in tiles is essential for photo encaustic techniques, allowing for large-scale image transfers onto various artistic substrates.
- Digital Art Showcase: Showcase your digital art or photo manipulations on a grander scale, allowing viewers to appreciate finer details and the overall composition in a way a small screen cannot convey.
The possibilities are endless, limited only by your imagination. By mastering the art of multi-page printing, you gain an invaluable tool for expressing your creative ideas and enhancing any space with personalized, high-quality visual displays.
In conclusion, printing a large image on multiple pages is a skill that empowers anyone to tackle ambitious visual projects, regardless of their access to specialized equipment. From the precise control offered by Adobe Acrobat Reader and spreadsheet software to the accessibility of Microsoft Paint and the artistic flair of online tools like Rasterbator, there’s a method for every need and skill level. Remember to prioritize high-resolution photography, optimize your images with editing or AI upscalers, and carefully manage margins and overlaps for a seamless assembly. Tophinhanhdep.com encourages you to experiment with these techniques, transforming your cherished wallpapers, aesthetic backgrounds, nature photography, and abstract art into breathtaking, large-scale displays that truly capture attention and inspire.