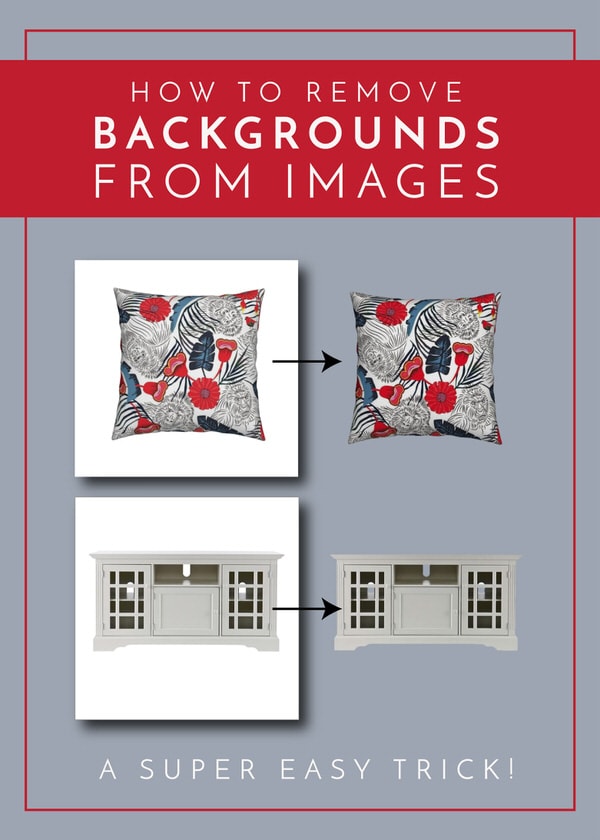
Mastering White Background Removal from Images for Professional and Aesthetic Results

In the dynamic world of digital imagery, the ability to manipulate and enhance photographs is paramount. From creating captivating wallpapers and stunning aesthetic compositions to preparing high-resolution stock photos for visual design projects, the pristine appearance of an image can make all the difference. One of the most fundamental yet transformative photo editing skills is knowing how to effectively remove a white background from an image. This technique is not just about deletion; it’s about unlocking the true potential of your photographs, allowing you to seamlessly integrate subjects into new environments, optimize product displays, and craft truly eye-catching visual narratives.

A white background, while often used for its clean and neutral presentation, can sometimes limit an image’s versatility. Imagine a product shot destined for an intricate graphic design layout, a portrait needing a more thematic backdrop, or a logo that must float transparently over any design. In these scenarios, removing the original white background becomes an essential step in digital photography and photo manipulation. This comprehensive guide will delve into various powerful tools and techniques, predominantly within Adobe Photoshop CC, alongside exploring efficient online and AI-powered alternatives offered by platforms like Tophinhanhdep.com. Whether you’re a seasoned graphic designer or a budding digital artist, mastering these methods will elevate your image editing skills, opening up a world of creative ideas and stunning visual possibilities.
Why Perfect Background Removal is Crucial for Visual Content
The foundation of compelling visual design and photography often lies in precise image manipulation. Removing a background is more than just a technical task; it’s a strategic decision that impacts how your image is perceived, its adaptability across different platforms, and its overall aesthetic appeal. For content creators, marketers, and photographers alike, understanding the implications of a transparent background is key to producing high-quality, professional-grade visuals.
Enhancing Product Shots and E-commerce Appeal
For businesses operating in the digital marketplace, product photography is a cornerstone of success. A clean, removed background allows for unparalleled flexibility in presenting products. It enables uniform display across various e-commerce platforms like Amazon and eBay, which often mandate white backgrounds for consistency, but also empowers sellers to create diverse promotional materials. By isolating the product, graphic designers can easily:
- Create thematic collections and mood boards: Place products against trending styles or seasonal backgrounds to attract different audiences.
- Highlight intricate details: Without a distracting background, every feature of the product, from textiles in garments to the gleam of jewelry, comes into sharper focus.
- Standardize visual branding: Maintain a consistent look and feel across all product images, reinforcing brand identity.
This level of precision in image editing ensures that product images not only meet industry standards but also captivate potential customers, driving engagement and sales.
Unleashing Creative Freedom in Visual Design and Photography
Beyond e-commerce, removing white backgrounds is a gateway to immense creative freedom in digital art and photo manipulation. A transparent background transforms a static image into a versatile asset, enabling photographers and visual designers to craft innovative compositions.
- Composite images: Seamlessly blend multiple elements from different photographs to create entirely new scenes, be it for abstract art, nature-inspired backdrops, or fantastical digital paintings.
- Custom wallpapers and backgrounds: Extract subjects to place them onto personalized backgrounds, whether it’s a breathtaking nature scene, an abstract pattern, or a personalized aesthetic design.
- Photo ideas and collections: Experiment with various thematic collections or adapt images for mood boards without the constraints of their original setting.
- Digital art and photo manipulation: Unleash imagination by combining elements, altering perspectives, and applying unique editing styles to create unique visual narratives.
The ability to easily isolate subjects empowers artists to bring their creative ideas to life, transforming ordinary photographs into extraordinary visual experiences.
The Power of Transparency: PNG and SVG Formats
A critical aspect of background removal is ensuring that the final output preserves transparency. This is where file formats like PNG and SVG become indispensable. Unlike JPEG, which automatically fills transparent areas with white, PNG files retain the alpha channel information, allowing the image to truly “float” on any underlying design. SVG, primarily for vector graphics, offers scalable transparency, perfect for logos and illustrations that need to resize without losing quality. Saving your expertly cut-out images in PNG format is a non-negotiable step to leverage the full benefit of background removal, ensuring your transparent backgrounds are perfectly preserved for subsequent visual design applications.
Comprehensive Photoshop Techniques for White Background Removal
Adobe Photoshop remains the industry standard for professional image editing, offering an arsenal of tools tailored for precise background removal. While the goal is consistent – making the white background transparent – the approach varies depending on the complexity of the subject and its edges. Mastering these tools allows for exceptional flexibility and control, essential for high-resolution photography and detailed graphic design.
To begin any background removal process in Photoshop, always duplicate your original image layer. This “safety net” allows you to revert to the untouched original if any mistakes occur, promoting a non-destructive workflow. Additionally, sometimes adding a temporary high-contrast background layer (e.g., bright red or blue) beneath your working layer can make it easier to see the edges you are cutting, especially when the subject has light colors similar to white.
Achieving Pixel-Perfect Edges with the Pen Tool
The Pen Tool is often hailed as the “king” of selection tools for its unparalleled precision, making it the preferred method for creating pixel-perfect selections, especially for objects with sharp or defined edges like product images, furniture, or architectural elements. This technique is known as “Clipping Path.”
- Open and Prepare: Open your image in Photoshop. In the Layers panel, duplicate your background layer.
- Activate Pen Tool: Select the Pen Tool from the toolbar. Ensure “Path” is selected in the options bar.
- Outline the Subject: Zoom in significantly (e.g., 300%) for meticulous detailing. Click to create anchor points along the outline of your subject. For curves, click and drag to create Bezier handles, adjusting them to perfectly match the contour. Continue until you’ve fully enclosed the subject, connecting back to your starting point.
- Create Selection: Once the path is complete, right-click on the path (or Ctrl-click/Cmd-click on the path thumbnail in the Paths panel) and choose “Make Selection.” Apply a small “Feather Radius” (e.g., 0.3-0.5 pixels) to soften the edges slightly, preventing a harsh, artificial look.
- Remove Background: With the subject selected, you can now remove the background. The most non-destructive way is to add a Layer Mask (click the “Add Layer Mask” icon at the bottom of the Layers panel). This will hide the background, leaving your subject on a transparent background.
- Refine and Replace: You can then add a new solid color layer or a stunning background image beneath your subject layer to complete your composition. This precise method is ideal for images where absolute accuracy is paramount, offering a clean cutout that enhances the quality of your digital photography.
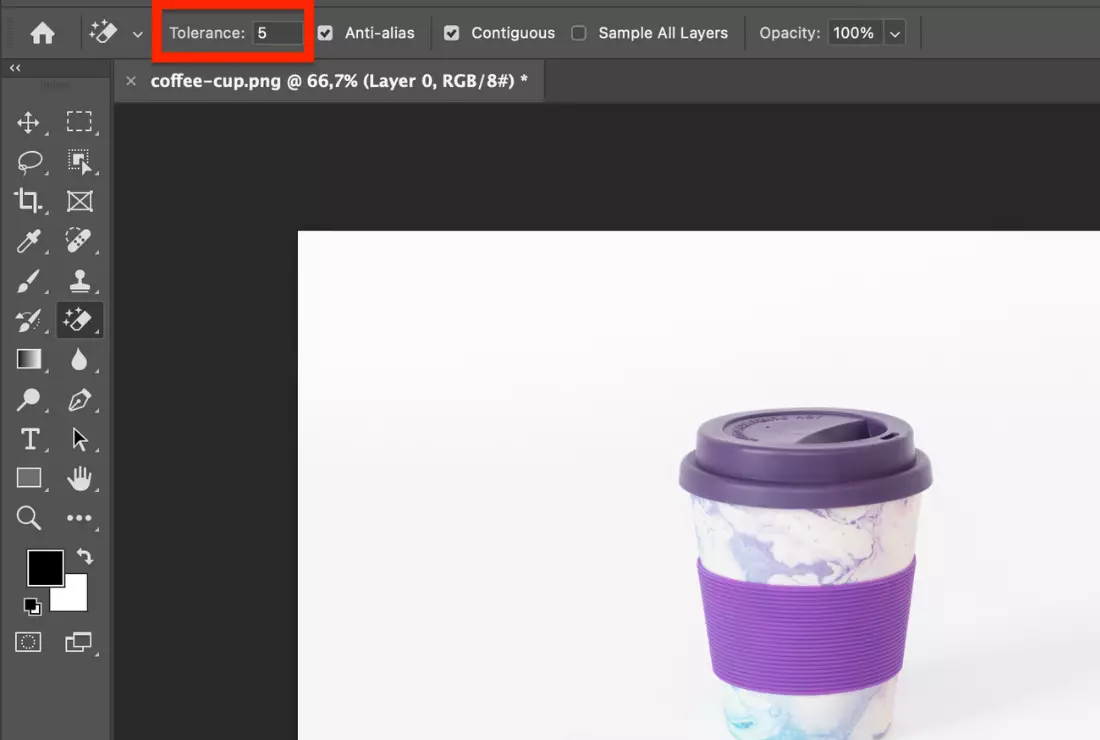
Navigating Complexities with the Background Eraser Tool
For images with intricate, soft, or challenging edges, such as hair, fur, transparent glass, or muslin fabrics, the Background Eraser Tool is invaluable. It’s designed to sample a background color and erase only that color, while attempting to protect the foreground subject. This technique is often associated with “Image Masking Services” due to its ability to handle delicate details that a simple clipping path cannot.
- Duplicate Layer & High-Contrast BG: Start by duplicating your image layer. Create a new layer beneath it, filled with a bright, contrasting color (e.g., red or blue). This temporary background makes erased areas immediately visible.
- Select Background Eraser Tool: Choose the Background Eraser Tool from the toolbar (it’s often nested under the standard Eraser Tool).
- Configure Settings: Adjust the tool’s options in the top bar:
- Size: Adjust brush size as needed.
- Limits: Set to “Find Edges” to prevent erasing into the subject.
- Sampling: Choose “Once” to sample the first color clicked, or “Background Swatch” if you’ve set a specific background color. “Continuous” samples continually as you drag. For a pure white background, “Once” is usually effective.
- Tolerance: This is crucial. A lower tolerance (e.g., 20-30%) is for areas where the background color is very close to the foreground subject color (e.g., fine hair). A higher tolerance (e.g., 50-70%) is for areas with clear contrast. Adjust this on the fly.
- Protect Foreground Color: If your subject has a color you want to preserve, select that color as your foreground color in the toolbar and check this option.
- Erase the Background: Click and drag the crosshairs of the brush over the white background. The tool will intelligently erase the sampled background color while largely preserving your subject. Be especially careful around delicate areas like hair, adjusting tolerance and brush size as you go.
- Refine and Replace: Once the background is mostly removed, delete or hide your temporary high-contrast layer. You can then add a new background of your choice or leave it transparent. This method is essential for achieving a realistic and natural cutout, particularly in portrait photography or images with complex textures.
Swift Solutions: Magic Wand and Object Selection Tools
For quicker, less precise tasks, or images with very uniform white backgrounds and well-defined subjects, Photoshop offers automated and semi-automated selection tools.
Magic Wand Tool for Uniform Backgrounds
The Magic Wand Tool is one of Photoshop’s oldest selection tools, best suited for selecting large, contiguous areas of similar color.
- Unlock Layer: Unlock your image layer.
- Select Magic Wand: Choose the Magic Wand Tool (often nested with Quick Selection).
- Adjust Tolerance: In the options bar, set “Tolerance.” A lower tolerance (e.g., 10-30) selects fewer color variations, while a higher tolerance (e.g., 50-80) selects a broader range. For pure white, a lower tolerance works well. Check “Anti-alias” for smoother edges.
- Click and Select: Click directly on the white background. Photoshop will select all contiguous white pixels within the tolerance range. Hold Shift and click on any missed white areas.
- Inverse Selection & Delete: Once the background is fully selected, inverse the selection (Select > Inverse or Shift+Ctrl+I / Shift+Cmd+I) to select your subject. You can then add a layer mask or press Delete to remove the background. This tool is incredibly fast for simple subjects against a perfectly uniform white backdrop, but can be less effective for nuanced transitions or shadows.
Object Selection Tool for Intelligent Recognition
A newer, AI-powered addition to Photoshop CC, the Object Selection Tool automates the initial selection process, making it very efficient for identifying distinct subjects.
- Select Object Selection Tool: Find it in the toolbar.
- Choose Mode: In the options bar, select either “Rectangle” or “Lasso” mode.
- Draw Selection: Draw a rough rectangle or lasso around your desired object. Photoshop’s AI will analyze the area and automatically generate a selection around the object.
- Refine (if needed): If the initial selection isn’t perfect, use “Add to Selection” or “Subtract from Selection” modes with the same tool, or switch to other tools like the Quick Selection Tool for fine-tuning.
- Mask or Delete: Once satisfied, create a layer mask or delete the background. This tool significantly speeds up the workflow for many types of images, especially when the subject is clearly defined against its white background, offering a balance of speed and accuracy.
Dynamic Selections: Quick Selection and Lasso Tools
These tools offer a more interactive approach to selecting areas, balancing manual control with some automated assistance.
Quick Selection Tool for Intuitive Painting
The Quick Selection Tool acts like a “smart brush,” automatically detecting edges as you paint over an area.
- Select Quick Selection Tool: Choose it from the toolbar.
- Paint over Subject: Click and drag your brush over the subject you want to select. Photoshop will intuitively expand the selection to encompass similar colors and tones, stopping at what it perceives as edges.
- Refine Selection: Use a smaller brush size and switch between “Add to Selection” and “Subtract from Selection” modes (hold Alt/Option to subtract) to fine-tune the edges.
- Feather and Mask/Delete: Once the subject is selected, apply a slight feather and then add a layer mask or delete the background. This is a very fast and intuitive tool for many images, particularly those with some color variation in the subject or background but still good contrast.
Lasso Tool for Freehand Control
The Lasso Tool family (Lasso, Polygonal Lasso, Magnetic Lasso) provides manual selection capabilities, offering direct control over outlining an object. While the Pen Tool is for precision paths, the Lasso Tool is for quick, freehand selections.
- Select Lasso Tool: Choose from the toolbar.
- Outline Subject:
- Lasso Tool: Click and drag to draw a freehand selection around the subject. Best for very simple, irregular shapes.
- Polygonal Lasso Tool: Click to create straight-line segments. Useful for angular or geometric objects.
- Magnetic Lasso Tool: As you drag, it automatically “snaps” to edges with good contrast.
- Refine and Mask/Delete: This tool requires patience for accuracy. After selecting, apply feathering and then mask or delete the background. While less precise than the Pen Tool, it offers quick manual selection when time is of the essence, especially for subjects with straightforward outlines.
Leveraging Automated and AI-Powered Background Removal
While Photoshop provides powerful manual control, the advent of Artificial Intelligence (AI) has revolutionized background removal, offering lightning-fast, highly accurate solutions, especially for repetitive tasks or users without extensive Photoshop expertise. These tools are perfect for optimizing workflows, converting images rapidly, and enhancing image collections.
The Speed and Efficiency of Online Tools
Automated online tools represent a significant leap in efficiency for background removal. They typically require minimal user input, often just an image upload, and can process photos in seconds. This speed is invaluable for photographers and graphic designers handling large volumes of images, such as stock photos or images for mood boards. However, not all automated tools are created equal. Some may struggle with complex edges, transparency (like glass), or very fine details (like wispy hair), leading to less-than-perfect cutouts that still require manual refinement. They are generally excellent for images with clear subject-background contrast and single, well-defined subjects. They streamline the process, allowing users to quickly obtain transparent backgrounds without needing to own or learn complex software.
Tophinhanhdep.com’s Advanced AI for Flawless Cuts
Tophinhanhdep.com stands at the forefront of AI-powered image editing, offering a sophisticated background removal solution that combines speed with exceptional accuracy. Unlike generic online tools that might produce rough edges, Tophinhanhdep.com leverages advanced algorithms to intelligently detect and isolate subjects from their backgrounds, including complex white backdrops.
Here’s how Tophinhanhdep.com’s AI enhances the background removal experience:
- Seamless Integration: Whether you’re working directly on the Tophinhanhdep.com website or utilizing a dedicated plugin within your preferred editing software, the process is designed for maximum ease.
- Intelligent Subject Detection: The AI excels at identifying and cleanly cutting out diverse subjects – from product images with intricate outlines to portraits with delicate hair strands and even tricky elements like glass or reflections. This minimizes the “touch-up” work often associated with automated tools.
- Instant Transparency: With a single click or drag-and-drop, the white background is automatically replaced with a transparent layer, ready for a new backdrop or seamless integration into visual designs.
- Optimized Output: Tophinhanhdep.com ensures that the resulting images are high-quality, suitable for both digital use (e.g., website banners, social media visuals) and print applications (e.g., marketing materials, art prints).
- Efficiency for Scale: For users managing large image collections, such as stock photo libraries or extensive product catalogs, Tophinhanhdep.com’s AI offers unparalleled efficiency, saving countless hours of manual editing.
By choosing Tophinhanhdep.com, you’re not just removing a white background; you’re applying cutting-edge AI to achieve professional, clean cutouts that enhance the overall quality and versatility of your images, aligning perfectly with needs for high-resolution photography and compelling visual design.
Strategic Application: When to Opt for White Background Removal
Deciding whether to remove a white background isn’t always a purely technical choice; it’s often a strategic one, deeply intertwined with the purpose and context of the image. Understanding these nuances helps in effective visual design and photo manipulation, ensuring your images serve their intended goal, whether for aesthetic impact or practical application.
Tailoring Images for Specific Uses: Portraits, Products, and Composites
The decision to remove a white background is frequently driven by the desire to adapt an image to a new context or to accentuate its subject.
- Portrait Photography: While white backgrounds are common in studio portraits for a clean look, removing them opens up possibilities for more evocative and aesthetic imagery. Imagine placing a portrait against a soft nature backdrop, an abstract gradient, or a dramatic cityscape. This transformation can shift the mood and narrative of the portrait, making it suitable for diverse creative ideas, from artistic digital art pieces to personalized social media content. For subjects with intricate details like hair, specialized tools like the Background Eraser or Tophinhanhdep.com’s AI are invaluable for achieving a natural, realistic blend.
- Product Images: For products, especially those with colors similar to white (e.g., white garments, silver jewelry, light-colored electronics), removing the background and placing them against a contrasting solid color dramatically enhances visibility and appeal. A dark or vibrant background can make a white product “pop,” highlighting its features and preventing it from blending into its surroundings. This is a critical step in creating compelling product images for online showcasing and promotional materials, allowing the product to command full attention.
- Image Composites: The core of photo manipulation and visual design lies in creating composites. By removing the white background, subjects become modular elements that can be placed into entirely new scenes or combined with other images to build unique visual stories. This versatility is crucial for creating advertising campaigns, digital art, mood boards, and thematic collections where multiple elements must coexist harmoniously.
Understanding Industry Standards vs. Creative Expression
The choice to remove a white background also navigates a subtle balance between adhering to industry conventions and embracing creative expression.
- When Not to Remove White Backgrounds: In certain scenarios, a white background is not just acceptable but preferred, or even mandated. The most prominent example is e-commerce giants like Amazon and eBay, which often require product images to have a pure white background. This standard ensures consistency across millions of listings, minimizes distraction, and makes products appear clean and professionally presented. In these cases, maintaining the white background is crucial for compliance and optimal customer perception. If a photograph genuinely looks best on a white background, and no creative or practical need for transparency exists, there’s no reason to remove it. Forcing a change can sometimes detract from the image’s original strength.
- When to Remove White Backgrounds: Conversely, for any application where creative freedom, visual impact, or adaptability is prioritized, background removal is indispensable. This includes graphic design projects, marketing collateral, website banners, social media visuals, personal photography portfolios, or any instance where the subject needs to be isolated for flexible use. The ability to swap backgrounds, combine elements, or apply custom editing styles empowers creators to produce unique and trending styles that capture attention.
Ultimately, the decision hinges on the image’s purpose. By thoughtfully considering the context, creators can leverage white background removal to achieve optimal results, whether adhering to strict guidelines or pushing the boundaries of visual innovation.
Optimizing Your Workflow and Choosing the Best Tool
With a multitude of tools and techniques at your disposal, selecting the most appropriate method for white background removal is key to an efficient and high-quality workflow. Each tool offers distinct advantages and limitations, making some more suitable for specific image characteristics than others.
Comparing Photoshop’s Built-in Tools for Different Scenarios
Photoshop provides a versatile toolkit, but a discerning eye helps choose the right one:
- Pen Tool (Clipping Path): Best for: Objects with sharp, well-defined edges (e.g., electronics, furniture, bottles, logos, product images). Advantages: Delivers pixel-perfect precision, resulting in the cleanest, most professional cutouts. Ideal for high-resolution photography and fine graphic design. Considerations: Requires patience and practice to master. Time-consuming for complex or organic shapes.
- Background Eraser Tool (Image Masking): Best for: Complex, soft, or semi-transparent edges (e.g., hair, fur, smoke, glass, trees). Advantages: Intelligently erases background pixels while attempting to protect foreground details, crucial for realistic hair masking. Non-destructive when used with layer masks. Considerations: Can be finicky with similar foreground/background colors. Requires careful adjustment of tolerance and brush settings.
- Magic Wand Tool: Best for: Images with solid, uniform white backgrounds and good contrast with the subject. Advantages: Extremely fast for simple selections. Considerations: Struggles with subtle color variations, shadows, or subjects that blend with the white, often leading to jagged edges or over-selection. Not suitable for complex subjects.
- Object Selection Tool: Best for: Clearly defined, distinct objects against any background, including white. Advantages: AI-powered for quick, smart initial selections. Reduces manual effort significantly. Considerations: May require refinement for intricate areas, but provides a strong starting point.
- Quick Selection Tool: Best for: Subjects with relatively clear edges, where you can “paint” a selection. Advantages: Intuitive and fast for many common scenarios. Good balance between automation and control. Considerations: Can sometimes bleed into the background or miss fine details, requiring manual correction.
- Lasso Tools (Lasso, Polygonal, Magnetic): Best for: Quick, freehand selections for simple shapes, or as a supplementary tool for rough selections. Advantages: Offers direct, manual control. Considerations: Lasso and Polygonal Lasso lack precision for smooth curves. Magnetic Lasso works well only with strong contrast. Generally less accurate than the Pen Tool for professional results.
For optimal results, especially when aiming for high-resolution, professional-grade images, the Pen Tool remains the gold standard for crisp edges, while the Background Eraser (or advanced masking techniques) is indispensable for soft edges like hair. Other tools offer faster, less precise alternatives for suitable images or as initial selection aids.
Tophinhanhdep.com: Your Go-To Resource for Image Editing Excellence
While mastering Photoshop’s diverse tools provides ultimate control, not everyone has the time, expertise, or software access for complex manual editing. This is where Tophinhanhdep.com emerges as a premier solution for all your image editing needs, especially for white background removal and beyond.
Tophinhanhdep.com offers:
- Cutting-Edge AI Tools: Experience rapid and accurate background removal with AI-powered technology that handles even the trickiest edges, minimizing manual effort and saving valuable time. This is particularly beneficial for creating large thematic collections or preparing numerous product images efficiently.
- Professional Quality Services: For projects demanding the absolute highest level of perfection, Tophinhanhdep.com provides access to skilled professionals. Our experienced Photoshoppers meticulously use tools like the Pen Tool and advanced image masking techniques to ensure pixel-perfect results for every image, upholding the standards of beautiful photography and visual design.
- Comprehensive Image Tools: Beyond background removal, Tophinhanhdep.com is a hub for a wide array of image tools including converters, compressors, optimizers, and AI upscalers, catering to all aspects of digital photography and image manipulation.
- Dedicated Support and Inspiration: Explore our resources for creative ideas, mood boards, and trending styles. Have questions? Our platform is designed to support your journey in visual design and digital art.
- Risk-Free Trial: We believe in the quality of our work. Tophinhanhdep.com offers free trials, allowing you to assess the exceptional quality of our services before committing.
Choosing Tophinhanhdep.com means opting for efficiency, precision, and comprehensive support in your quest for perfect images. Whether you’re enhancing aesthetic photography, preparing high-resolution stock photos, or executing intricate graphic design projects, we are committed to delivering outstanding results, on time, every time. Unlock the full potential of your images with Tophinhanhdep.com – your ultimate partner in creating stunning, professional visuals.