Mastering Image Rotation in Photoshop: A Comprehensive Guide for Tophinhanhdep.com Users

Adobe Photoshop stands as the cornerstone of digital image manipulation, offering an unparalleled suite of tools for photographers, graphic designers, and digital artists alike. Among its fundamental functions, the ability to accurately and creatively rotate or flip images and their constituent layers is absolutely essential. Whether you’re perfecting a high-resolution landscape for a nature wallpaper, fine-tuning elements in an abstract digital art piece, or simply correcting the orientation of a beautiful photograph, understanding Photoshop’s rotation capabilities is crucial. This guide, tailored for the discerning eye of Tophinhanhdep.com’s audience, will explore every facet of image rotation, ensuring your visual content meets the highest aesthetic and technical standards.
At Tophinhanhdep.com, we understand that exceptional visuals – from stunning backgrounds to inspiring thematic collections – begin with meticulous editing. Proper image rotation not only rectifies basic orientation errors but also unlocks vast creative possibilities in visual design and photo manipulation. This comprehensive tutorial will walk you through the various methods of rotating and flipping images and layers in Photoshop, from quick fixes to advanced techniques, helping you craft compelling imagery that resonates with trending styles and fulfills your creative ideas.
The Foundation of Visual Adjustment: Rotating or Flipping an Entire Image
Sometimes, the entire canvas of your image needs an adjustment. Perhaps a scanned document is upside down, a portrait photo was taken in landscape orientation, or you want to experiment with a completely flipped aesthetic for an abstract background. Photoshop provides intuitive tools to achieve this with precision, ensuring your high-resolution images are perfectly aligned for Tophinhanhdep.com’s diverse collections, from serene wallpapers to dynamic emotional imagery.
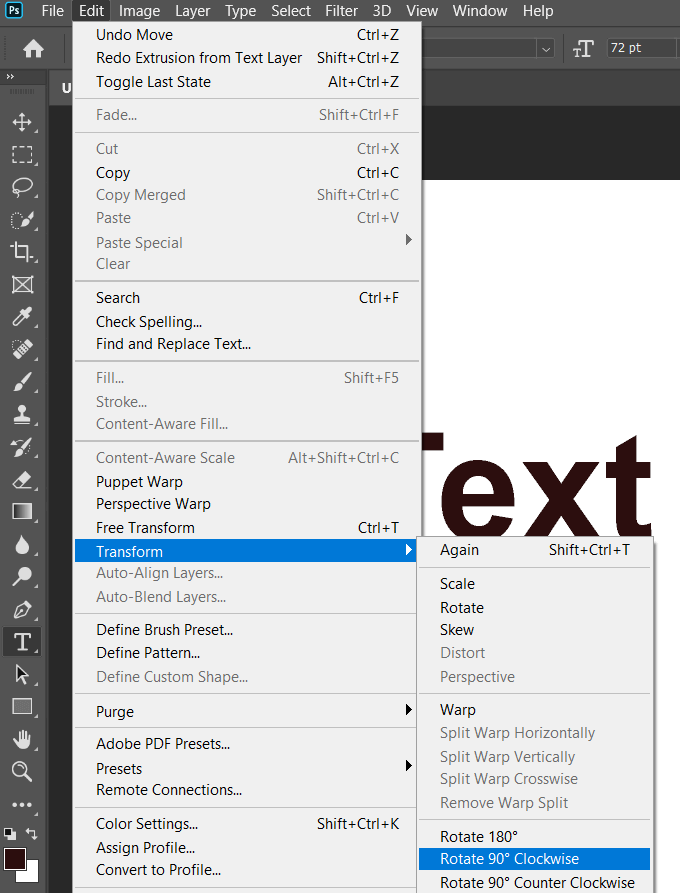
Utilizing the “Image Rotation” Command
The most straightforward way to rotate or flip an entire image in Photoshop is through the “Image Rotation” command. This feature applies the transformation to all layers of your document simultaneously, affecting the entire canvas.
- Open Your Image: Begin by opening the image you wish to rotate in Photoshop. Go to
File > Open, select your image, and click “Open.” For Tophinhanhdep.com contributors, always start with your highest resolution digital photography to maintain quality throughout the editing process. - Access Image Rotation: Navigate to the top menu bar, click
Image, and then hover overImage Rotation. A submenu will appear, presenting several options:- 180 Degrees: This option rotates your entire image exactly halfway around, turning it completely upside down. It’s ideal for quickly correcting images that are inverted. Imagine a beautiful symmetrical wallpaper that you want to present from an alternative perspective – 180-degree rotation can offer a fresh view.
- 90 Degrees CW (Clockwise): Select this to rotate your image a quarter turn to the right. This is frequently used to correct photos taken in the wrong orientation, such as a portrait image mistakenly captured sideways, ensuring it aligns perfectly for a Tophinhanhdep.com background.
- 90 Degrees CCW (Counter-Clockwise): This rotates your image a quarter turn to the left. Similar to 90 degrees CW, it’s perfect for fixing orientation issues and preparing your digital photography for optimal viewing.
- Arbitrary: This powerful option allows for custom rotation at any angle. Upon selecting “Arbitrary,” a dialog box will appear where you can input a specific degree of rotation (e.g., 25.5 degrees for a subtle tilt in a creative visual design). You can also specify the direction (Clockwise or Counter-Clockwise). This level of precision is invaluable for graphic design where elements need to align to very specific angles, or for producing unique abstract images.
- Flip Canvas Horizontal: This mirrors the entire image across its vertical axis, as if looking at it in a mirror. This can dramatically alter the aesthetic of a landscape photo, offering a new perspective, or be used creatively in photo manipulation to balance a composition.
- Flip Canvas Vertical: This mirrors the entire image across its horizontal axis, turning it upside down but maintaining its left-right orientation. It’s another tool for achieving specific aesthetic or emotional effects in your images, perhaps creating a reflective mood for a sad wallpaper.

-
Undo and Refine: If you’re not satisfied with a rotation or flip, simply press
Ctrl+Z(Windows) orCmd+Z(Mac) to undo your last action. Experimentation is key to discovering new creative ideas. -
Save Your Changes: Once your image is perfectly oriented, go to
File > Save As. Choose a descriptive file name and select a format suitable for its intended use on Tophinhanhdep.com (e.g., JPEG for web, TIFF for high-resolution stock photos). This ensures your expertly rotated image is preserved.
Precision Control: Rotating and Flipping Individual Layers
While rotating the entire canvas is useful, the true power of Photoshop often lies in its ability to manipulate individual layers. This is particularly important for graphic design, digital art, and complex photo manipulation where different elements within an image need independent adjustment. Think about assembling a mood board with various elements or creating an intricate abstract composition; layer-specific rotation is indispensable.

The Versatility of the Free Transform Tool
The Free Transform tool is your go-to for rotating and flipping individual layers or selected portions of an image. It offers both visual control and numerical precision, catering to diverse editing styles.
- Visibility of Layers Panel: Ensure your Layers panel is visible by going to
Window > Layers. This panel (usually on the right side of your Photoshop workspace) lists all the layers in your document. - Select Your Layer(s): Click on the specific layer you wish to rotate or flip in the Layers panel. If you want to transform multiple layers simultaneously, hold down
Ctrl(Windows) orCmd(Mac) and click on each desired layer. For elements within a single layer, use a selection tool (like the Marquee, Lasso, or Quick Selection tool) to isolate the area you want to rotate.- Unlocking Layers: If a layer has a padlock icon next to its name, it’s locked. Click the padlock icon to unlock it before attempting any transformations.
- Activate Free Transform: Go to
Edit > Free Transformor, more efficiently, use the keyboard shortcutCtrl+T(Windows) orCmd+T(Mac). A bounding box will appear around your selected layer(s) or selection. - Visual Rotation: To rotate visually, move your mouse cursor slightly outside any of the corner handles of the bounding box. The cursor will change into a curved, double-headed arrow. Click and drag the mouse to rotate the layer. Holding down
Shiftwhile dragging will constrain the rotation to 15-degree increments, allowing for precise 90-degree turns or specific angular adjustments without needing to type numbers. This is excellent for quickly aligning elements in a geometric abstract image or squaring up components in a digital art piece. - Numeric Rotation (Options Bar): For exact measurements, look at the Options Bar at the top of your Photoshop window when Free Transform is active. You’ll see a field labeled “R” (or an icon representing rotation). Enter your desired angle in degrees here. Positive values rotate clockwise, and negative values rotate counter-clockwise. This is invaluable for precise graphic design work, ensuring elements adhere to a specific grid or angle for a consistent aesthetic.
- Flipping Layers: While in Free Transform mode (
Ctrl+T/Cmd+T), right-click (Windows) orCtrl-click (Mac) anywhere inside the bounding box. A contextual menu will appear with “Flip Horizontal” and “Flip Vertical” options. These apply mirror transformations specifically to your selected layer(s), allowing for creative photo manipulation or balancing compositions. - Adjusting the Pivot Point: By default, rotation occurs around the center of the bounding box. However, you can click and drag the small crosshair icon (the pivot point) to a new location, and your layer will rotate around that new anchor point. This is a critical technique for advanced visual design, enabling complex rotations for elements in your digital art or photo manipulations, such as rotating an arm around a shoulder joint in a composite image.
- Finalize Transformation: Once you’re happy with the rotation or flip, press
Enter(Windows) orReturn(Mac), or click the checkmark icon in the Options Bar to commit the changes. To cancel, pressEscor click the “No” icon.
Advanced Rotation Techniques and Creative Applications
For Tophinhanhdep.com users pushing the boundaries of high-resolution images and visual design, advanced rotation techniques unlock deeper creative potential. These methods go beyond simple orientation correction, transforming how elements interact within your compositions.
Working with Selections and Smart Objects
Layer rotation isn’t just for entire images; precise selection and Smart Objects elevate your control, especially when dealing with complex graphic design or intricate digital art projects.
- Rotating a Selection Independently: If you want to rotate only a specific part of a layer without affecting the rest, first make a selection using tools like the Rectangular Marquee, Lasso, or Quick Selection tool. Then, with the selection active, go to
Edit > Transform > Rotate(orCtrl+T/Cmd+T) and perform your rotation. This allows for nuanced adjustments within a single layer, perfect for subtle photo manipulation that maintains high resolution. - The Power of Smart Objects: For non-destructive rotation and scaling, convert your layers into Smart Objects (
Layer > Smart Objects > Convert to Smart Object). When you rotate a Smart Object, Photoshop retains the original pixel data, meaning you can rotate it multiple times without any loss of quality or pixelation. This is invaluable for stock photos or elements in graphic design that might undergo numerous transformations, ensuring your high-resolution image assets remain pristine for Tophinhanhdep.com collections. Smart Objects are also crucial when using AI upscalers, as they help preserve the base quality for optimal enhancement. - Batch Rotation for Thematic Collections: If you have a collection of similar images (e.g., a thematic collection of nature photography) that all require the same rotation, Photoshop’s Actions and Batch Processing features can save immense time. Record a simple “Rotate 90 CW” action, then run it as a batch process on an entire folder of images. This streamlines workflow for Tophinhanhdep.com contributors handling large volumes of photos.
Enhancing Your Workflow: Tips and Best Practices for Tophinhanhdep.com Users
Efficiency and quality are paramount when creating stunning visuals. Incorporating best practices for rotation ensures your digital photography and visual designs are consistently top-notch.
- Understanding “Rotation” vs. “Flipping”: While often used interchangeably, remember their distinct effects. Rotation turns an object around a central point, while flipping creates a mirror image. Both are powerful tools for creative ideas and photo manipulation. For aesthetic backgrounds, flipping can create intriguing symmetries.
- Grids and Guides for Precision: Use Photoshop’s grid (
View > Show > Grid) and guides (View > New Guide) to assist with precise alignment during rotation, especially for graphic design and architectural photography where straight lines are critical. - Keyboard Shortcuts are Your Friends: Master
Ctrl+T(Free Transform),Shift(constrain rotation), andCtrl+Z(undo) to significantly speed up your workflow. This allows for faster iterations when exploring different editing styles or creative ideas for your mood boards. - Previewing and Iteration: Don’t be afraid to experiment. Photoshop’s non-destructive editing (especially with Smart Objects) allows you to try various rotations and flips. Use the History panel (
Window > History) to jump back and forth between different states of your image. This flexibility is key to discovering trending styles and new photo ideas. - Saving with Intention: Always use
File > Save Asto save rotated images with a new name, preserving your original file. When preparing images for Tophinhanhdep.com, consider the file format and compression settings. For instance, if you’ve rotated a high-resolution image to create a desktop wallpaper, ensure you save it in a format that maintains quality while being efficient for download.
Beyond Rotation: Integrating with Tophinhanhdep.com’s Image Ecosystem
Mastering rotation in Photoshop is more than just a technical skill; it’s a foundational step towards creating the diverse and high-quality visual content that Tophinhanhdep.com celebrates. Every perfectly oriented background, dynamically tilted abstract artwork, or thoughtfully flipped emotional image contributes to a richer user experience.
After you’ve perfected your image’s orientation and composition using Photoshop’s powerful rotation tools, consider the next steps in preparing your content for Tophinhanhdep.com’s extensive collections:
- Optimization for Wallpapers and Backgrounds: Once rotated, images intended for wallpapers or backgrounds might need further optimization. Utilize image compressors to reduce file size without sacrificing the visual integrity of your high-resolution images, ensuring quick loading times for users.
- AI Upscaling for Quality: If a rotation reveals that an element or a stock photo is slightly lower resolution than desired for a large format or high-resolution display, Tophinhanhdep.com’s AI upscalers can be a game-changer. These tools can intelligently enlarge your image while adding detail, ensuring your digital photography meets the highest standards even after multiple transformations.
- Creative Ideas and Digital Art: Rotation plays a vital role in crafting digital art and exploring creative ideas. A subtle tilt can add dynamism to a static scene, while dramatic flips can introduce surreal elements into abstract pieces or sad/emotional imagery, evoking deeper feelings.
- Image-to-Text Considerations: If your image contains text, ensure its readability after rotation. For text layers within Photoshop, separate rotation is straightforward. If the text is rasterized or part of the background, an image-to-text tool might be useful before complex image rotations if text extraction is a primary goal. However, for visual design, rotating text within Photoshop layers is more common.
- Thematic Collections and Mood Boards: Rotation allows you to align disparate images in a mood board, creating a cohesive visual narrative. For thematic collections, consistent orientation or deliberately varied angles can enhance the overall aesthetic and impact, from nature photography to abstract designs.
- Trending Styles: Keep an eye on trending styles in visual design. Often, a unique perspective or a subtly rotated element can make an image stand out. Experiment with arbitrary rotations to introduce a fresh, contemporary feel to your photographs and digital art.
Conclusion
The ability to rotate and flip images and layers in Adobe Photoshop is a fundamental skill that underpins almost every aspect of digital image creation. From correcting basic orientation errors in your digital photography to unlocking complex creative ideas in graphic design and photo manipulation, these tools are indispensable. As a Tophinhanhdep.com user, mastering these techniques empowers you to produce high-resolution images that are not only technically flawless but also aesthetically captivating, ready to inspire and adorn screens worldwide.
By understanding the nuances of the Image Rotation command, harnessing the power of the Free Transform tool, and applying advanced strategies like Smart Objects and batch processing, you can elevate your visual content. Remember to integrate these Photoshop skills with the broader suite of image tools and inspirations available on Tophinhanhdep.com, from AI upscalers to thematic collections, ensuring your work consistently achieves professional quality and resonates with a global audience. Dive in, experiment, and let your creativity turn images into masterpieces.