How to Resize an Image Correctly for Flawless Visuals: A Tophinhanhdep.com Guide

In today’s visually-driven world, images are more than just embellishments; they are critical components of communication, branding, and user engagement. Whether you’re crafting user documentation, preparing a compelling presentation, designing a stunning website, or curating a personal digital gallery of wallpapers and backgrounds, the quality and appropriate sizing of your images can profoundly impact how your content is perceived. At Tophinhanhdep.com, we understand that high-quality, correctly sized images are fundamental to demonstrating competence, building trust, and captivating your audience.
The seemingly simple act of resizing an image can be fraught with hidden complexities. While numerous methods exist to adjust an image’s dimensions, not all yield desirable results. An incorrectly resized image can suffer from stretching, blurriness, or pixelation, rendering your final product unprofessional and sloppy. For anyone who regularly works with digital visuals – from professional photographers preparing high-resolution stock photos to graphic designers creating intricate digital art, or even enthusiasts sharing beautiful nature or aesthetic images – mastering the art of correct image resizing is not just important, it’s essential. The good news? It’s also a skill that Tophinhanhdep.com is here to help you master with ease and precision.
Our platform, Tophinhanhdep.com, is a comprehensive resource dedicated to all things visual. We offer an extensive collection of images, from breathtaking wallpapers and serene nature shots to inspiring abstract and emotionally resonant visuals. Beyond static imagery, we delve into the nuances of digital photography, stock photos, and advanced editing styles. Crucially, Tophinhanhdep.com provides a suite of image tools, including converters, compressors, optimizers, and state-of-the-art AI upscalers, designed to empower you. Our guides cover every aspect of visual design, from graphic design principles to photo manipulation techniques, ensuring you have the creative ideas and image inspiration necessary to bring your visions to life. This article will guide you through the process of resizing images the right way, ensuring your visuals always shine.
The Indispensable Role of Proper Image Resizing
In the digital landscape, images are often the first point of contact between your content and your audience. Their immediate visual impact dictates perception, whether it’s for a professional website, a social media profile, or a print advertisement. The difference between a sharp, vibrant image and a blurry, distorted one can be the difference between credibility and amateurishness.
Why Image Quality Matters for Your Brand and Content
High-quality images are silent communicators of professionalism and trustworthiness. They enhance the aesthetic appeal of your content, making it more engaging and memorable. Imagine a website showcasing stunning photography, only to find the hero image stretched and pixelated. Such an oversight immediately detracts from the perceived value of the content and the brand it represents. This principle applies across all visual contexts, from a meticulously curated mood board on Tophinhanhdep.com to a critical image in a corporate presentation. Even for something as seemingly trivial as a profile picture on a social media account, the quality of your image directly influences how your audience perceives you and your brand.

This is precisely why understanding how to resize an image while meticulously preserving its quality is paramount. With proper resizing techniques, you can guarantee that your images retain their intrinsic aspect ratio, sharpness, clarity, and color accuracy, irrespective of the new dimensions you require. This meticulous attention to detail allows your images to consistently engage your audience, convey your message with maximum effectiveness, and represent your brand in the most favorable light possible. Tophinhanhdep.com emphasizes that maintaining this visual integrity is not just a technical task, but a strategic element of effective communication and brand building.
Understanding the Basics: Dimensions, Pixels, and Aspect Ratio
Before diving into the “how,” it’s crucial to grasp the fundamental concepts that govern digital images.
- Dimensions: These refer to the width and height of an image, typically measured in pixels. For example, an image that is 1920 pixels wide by 1080 pixels high (1920x1080) is a common dimension for high-resolution screens.
- Pixels: Short for “picture elements,” pixels are the smallest individual units that make up a digital image. Each pixel contains color information. The more pixels an image has, the more detail it can display, leading to higher resolution and better quality.
- Aspect Ratio: This is the proportional relationship between an image’s width and its height. It’s often expressed as two numbers separated by a colon, like 16:9 (widescreen) or 4:3 (traditional screen/photo). Maintaining the aspect ratio is critical to prevent images from looking stretched or squashed.
When you resize an image, you are essentially altering its dimensions. Doing this incorrectly—by changing width or height independently without considering the aspect ratio—will invariably lead to distortion. Tophinhanhdep.com’s image tools are designed to simplify this process, offering intuitive controls to manage these fundamental properties.
Mastering Resizing Techniques: Avoiding Common Pitfalls
The allure of quick fixes can lead to common resizing errors that compromise image quality. Understanding these pitfalls and implementing correct techniques is vital for anyone engaging in digital photography or visual design.
Preserving Aspect Ratio: The Key to Distortion-Free Images
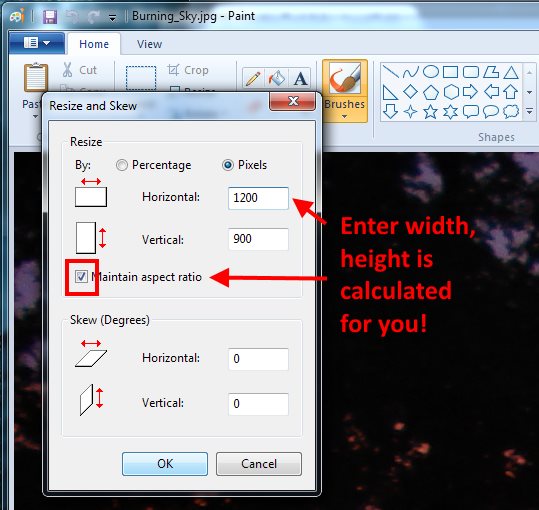
One of the most common mistakes people make when resizing images is failing to maintain the aspect ratio. When working within common document programs or even some basic image editors, the temptation to simply drag the corners of an image to make it larger or smaller is strong. This intuitive action, however, is precisely what you should avoid.
Dragging a corner of an original image without constraints can directly lead to distortion, making your image appear stretched, squashed, or blurry. For instance, a perfectly round object might become an oval, or a person’s face might look elongated. This happens because you are independently altering the width and height, thereby breaking the original proportional relationship.
When scaling your image, it is absolutely crucial to maintain the ratio of its width to its height. This ensures that the image doesn’t end up looking warped or disproportionate. Tophinhanhdep.com offers robust solutions for this. For basic image editing, including precision cropping and resizing, Tophinhanhdep.com’s integrated image editor provides the perfect solution. Within our editor, users can open their image and easily locate ratio controls. Before making any changes to the dimensions, it is essential to enable the lock symbol feature. With this lock activated, Tophinhanhdep.com’s tools intelligently maintain the image’s original proportions. You can then confidently adjust either the height or the width to your desired dimensions, without any concern about stretching or warping the visual integrity of your image. This feature is a cornerstone of responsible image manipulation, allowing users to achieve professional results effortlessly.
Navigating Quality: When to Enlarge and When to Reduce
The inherent nature of digital images means that resizing up and resizing down have vastly different implications for quality. Understanding these differences is paramount for achieving optimal results.
Making a photo smaller is generally a much more straightforward process than attempting to make it larger, primarily due to the fixed number of pixels in a bitmap image. When you reduce an image’s size or dimensions, you are essentially discarding pixel information. Modern image processing algorithms are very adept at intelligently reducing the pixel count while preserving overall visual quality, often by averaging or interpolating neighboring pixels. Therefore, in most scenarios, reducing an image’s dimensions will not significantly impact its quality.
Conversely, attempting to make an image larger than its original dimensions can frequently result in a noticeable decrease in overall quality. When you enlarge a bitmap image, the software has to create new pixels to fill the expanded space. Since it doesn’t have actual data for these new pixels, it estimates their color and values based on surrounding pixels, a process known as interpolation. This often leads to a softer, blurry, or “pixelated” appearance, as the interpolated pixels are not as sharp or defined as the original ones.
This is why, rather than trying to increase an image’s size – a practice Tophinhanhdep.com generally advises against for bitmap files – it’s always best to start with a higher-resolution image. Ideally, begin with an image that is larger than your final required dimensions. Why? Because from a high-resolution source, all you need to do is crop or reduce its size, eliminating any concerns about compromising the image quality. Tophinhanhdep.com’s vast collection of high-resolution stock photos and wallpapers provides an excellent starting point for any project requiring pristine visuals.
However, it is vital to note that this distinction primarily applies to bitmap images, such as JPEGs, GIFs, TIFFs, and PNGs. These file types are composed of a fixed grid of pixels. In contrast, vector files, such as EPS or SVG, are based on mathematical equations that define points, lines, and curves. Because they are not pixel-dependent, vector images can be scaled to virtually any size, larger or smaller, without any degradation in picture quality. Bitmap files typically encompass photographs, digital art, and screenshots, while vector images are predominantly used for graphics, logos, and illustrations. Tophinhanhdep.com’s image tools include converters that can help you understand and manage these different file types for various applications. For challenging cases where you must enlarge a lower-resolution bitmap image, Tophinhanhdep.com also offers advanced AI upscalers, a cutting-edge technology that uses artificial intelligence to intelligently reconstruct missing pixel information, often yielding surprisingly good results that traditional methods cannot match. This AI-powered solution bridges the gap, allowing users to transform low-quality images into higher resolution visuals without significant loss.
Tophinhanhdep.com’s Expert Tips for Optimal Image Resizing
Achieving the perfect image for your specific needs requires more than just knowing how to use a resizing tool. It involves making informed decisions about dimensions, file size, and format. Tophinhanhdep.com brings you expert tips to ensure your images always look their best.
Optimizing Dimensions for Web and Print
The “correct” dimensions for an image are highly context-dependent. What works perfectly for a desktop wallpaper will likely be unsuitable for a blog post thumbnail or a physical print.
Generally speaking, for images intended for web display, dimensions ranging between 600 and 1200 pixels (for the longest side) often provide a good balance for most screens without compromising quality. This range ensures that images appear crisp and clear on various devices without being excessively large, which can negatively impact website load times. However, Tophinhanhdep.com emphasizes that you should always tailor these dimensions based on your specific use case.
For example, the optimal dimensions for an image intended for a blog post might be around 800-1000 pixels wide, to fit comfortably within the content column. In contrast, a webpage banner might require a much wider image, perhaps 1920 pixels wide, with a shorter height to serve as an impactful header. For social media platforms, each platform has its own recommended dimensions for profile pictures, cover photos, and shared posts to ensure they look their best and avoid automatic, often quality-degrading, resizing by the platform.
For print applications, the considerations shift from pixels to dots per inch (DPI) or pixels per inch (PPI). A common standard for high-quality print is 300 PPI. This means that for every inch of printed image, there should be 300 pixels. If you want to print an image at 8x10 inches, you would need an image with dimensions of (8 * 300) x (10 * 300) = 2400 x 3000 pixels. Lower resolutions like 200 PPI might be acceptable for some prints, but going below that generally results in noticeable pixelation. Tophinhanhdep.com’s image guides provide detailed recommendations for various print sizes, ensuring your digital art and beautiful photography translate flawlessly to physical mediums. Ultimately, the goal is always to ensure that your resized image looks crisp and clear, without causing layout issues on a webpage or appearing pixelated in print.
Striking the Balance: File Size vs. Visual Fidelity
One of the most critical aspects of image optimization, closely tied to resizing, is finding the sweet spot between reducing the file size and maintaining perfect visual quality. This balance is especially crucial for web performance, as large image files can significantly slow down a website, leading to a poor user experience and lower search engine rankings—insights Tophinhanhdep.com frequently shares in its web design resources.
As a general rule, Tophinhanhdep.com suggests aiming for a file size of 100KB or less for most web images. This size typically provides an excellent balance between image quality and efficient file transfer. Achieving this balance often involves:
- Correct Dimensions: As discussed, resizing images to their actual display dimensions before uploading them is the first step. There’s no need to upload a 4000x3000 pixel image if it will only be displayed at 800x600 pixels.
- Compression: Once dimensions are set, further reducing file size through compression is often necessary. Tophinhanhdep.com’s image compressors and optimizers utilize intelligent algorithms to remove redundant data from image files while minimizing visual degradation. This process can significantly shrink file sizes without a noticeable impact on quality for the human eye.
- Choosing the Right Format: As we’ll delve into next, the file format itself plays a huge role in file size and quality trade-offs.
For high-resolution photography, maintaining pristine quality might mean a slightly larger file size is unavoidable. However, for general web use, blog posts, and most digital assets, strict adherence to file size optimization is key. Tophinhanhdep.com’s advanced tools help you navigate these trade-offs, providing visual previews so you can make informed decisions that best suit your specific image collections and thematic needs.
Choosing the Right Format: JPG, PNG, and Beyond
Understanding the differences between various image file formats, such as JPG and PNG, is fundamental for both quality retention and file size optimization. Each format has its strengths and weaknesses, making it suitable for different applications.
-
JPG (JPEG - Joint Photographic Experts Group):
- Strengths: JPGs are ideal for photographs and complex images with many colors and subtle gradients. They use “lossy” compression, meaning some data is permanently discarded when the file is saved, especially at higher compression levels. This loss, however, is often imperceptible to the human eye, making JPGs incredibly efficient for achieving small file sizes.
- Weaknesses: Not suitable for images requiring transparency or sharp lines (like logos or text graphics) because the compression artifacts can become noticeable. Repeatedly saving a JPG can degrade its quality over time.
- Use Cases: Wallpapers, backgrounds, nature photography, beautiful photography, any image with continuous tones and color variations.
- Resizing & Compression: JPG files are generally easier to resize and compress efficiently compared to PNG files. For images initially in PNG format that do not require transparency, converting them to JPG before compression is often recommended by Tophinhanhdep.com. This conversion can help maintain excellent image quality while achieving a significantly smaller file size.
-
PNG (Portable Network Graphics):
- Strengths: PNG supports “lossless” compression, meaning no data is lost when the image is saved. This results in higher quality, especially for images with sharp edges, blocks of color, and text. Crucially, PNG supports transparency (alpha channel), allowing for images with transparent backgrounds or semi-transparent elements.
- Weaknesses: PNG files typically have larger file sizes than equivalent JPGs, making them less ideal for web performance when used for full-color photographs.
- Use Cases: Logos, icons, graphics, screenshots, digital art with crisp lines, images where a transparent background is necessary (e.g., placing a product image on different colored backgrounds for e-commerce).
- Transparency Exception: One paramount exception to the “convert PNG to JPG for smaller size” rule is transparency. If any parts of your PNG image are transparent – a design element common in visual design and graphic design – you absolutely must keep the image as a PNG to preserve that transparency. JPG files do not support transparent pixels; converting a transparent PNG to JPG will typically result in the transparent areas being filled with white or black, depending on the software. Tophinhanhdep.com provides specific image tools for managing transparency, including robust background removal features that can help you create transparent backgrounds for your images, ensuring your visual design intentions are perfectly executed.
Understanding these distinctions allows you to select the most appropriate file format for each image, optimizing for both visual quality and practical application, a key aspect of Tophinhanhdep.com’s holistic approach to image management.
Leveraging Tophinhanhdep.com Tools for Seamless Resizing
At Tophinhanhdep.com, we believe that powerful image manipulation should be accessible to everyone, from seasoned digital artists to casual users creating aesthetic backgrounds. Our suite of image tools is designed to simplify complex tasks like resizing, ensuring professional results without the steep learning curve.
Step-by-Step Guide with Tophinhanhdep.com’s Image Editor
Our intuitive online image editor provides a straightforward way to resize your images correctly, guaranteeing aspect ratio preservation and optimal quality. Here’s a general walkthrough, reflective of the capabilities within Tophinhanhdep.com’s platform and similar professional tools:
- Open Your Image: Navigate to Tophinhanhdep.com’s Image Tools section and select the “Resize Image” or “Online Editor” option. Upload your desired image directly from your computer or cloud storage. Our platform supports a wide array of image formats, including JPG, PNG, TIFF, and more, making it versatile for all your photography and visual design needs.
- Access Resizing Options: Once your image is loaded, look for the “Image Size” or “Dimensions” control panel. This is typically located in a sidebar or top menu within the editor interface.
- Maintain Proportions (Aspect Ratio Lock): This is the most critical step to avoid distortion. Ensure the “Constrain Proportions” or “Lock Aspect Ratio” icon (often represented by a chain link or lock symbol) is activated. When this feature is enabled, changing either the width or the height will automatically adjust the other dimension proportionally, preserving the original aspect ratio.
- Input Desired Dimensions:
- For Web Use: Input your desired width or height in pixels. For instance, if you need an image 800 pixels wide, enter ‘800’ into the width field, and the height will automatically adjust.
- For Print Use: If preparing an image for printing, it’s often better to work with physical units like “inches” or “centimeters” and also consider the resolution (PPI/DPI). Select “inches” as the unit of measurement. Check that the resolution is no lower than “200 pixels/inch,” with “300 pixels/inch” being ideal for high-quality printing. Then, input your desired print width and height. Tophinhanhdep.com’s editor intelligently handles the pixel calculation based on your chosen resolution.
- Review and Adjust: After inputting the new dimensions, review the preview of your resized image. If your original image has different proportions than your desired print size (e.g., a landscape photo intended for a square print), you will likely need to crop your image after resizing to fit the new aspect ratio. Tophinhanhdep.com’s editor includes robust cropping tools for this purpose.
- Apply and Save: Once satisfied with the preview, click “Apply” or “OK” to finalize the resizing. Then, proceed to save your file. Tophinhanhdep.com always recommends using the “Save As” option and giving the resized image a new name to keep your original, high-resolution file intact. This is a best practice for digital photography and image management.
- Optimize (Optional but Recommended): Before downloading, consider running your image through Tophinhanhdep.com’s integrated image optimizer or compressor. This final step can significantly reduce the file size without compromising the visual quality you’ve worked hard to maintain, ensuring your image is web-ready and loads quickly.
This systematic approach, easily facilitated by Tophinhanhdep.com’s tools, empowers users to achieve precise and professional image resizing outcomes every time, whether for a beautiful aesthetic wallpaper or a critical component of a digital art project.
Advanced Resizing with AI Upscalers and Converters
While traditional resizing methods work well for reducing image size, enlarging bitmap images without losing quality has historically been a significant challenge. This is where Tophinhanhdep.com’s advanced image tools, particularly our AI Upscalers, come into play.
- AI Upscalers: In the rapidly evolving digital world, upscaling and enhancement of images have become essential tasks. Conventional image enlargement often results in pixelation and blurriness. However, Tophinhanhdep.com’s AI upscalers leverage machine learning algorithms to intelligently analyze an image and “guess” what the missing pixel data should look like when increasing its size. This process allows for the transformation of low-quality images into higher-resolution versions, adding detail and sharpness that traditional methods simply cannot. This technology is incredibly beneficial for:
- Restoring Old Photos: Giving new life to treasured old photos or portraits by increasing their resolution and enhancing details.
- Improving Stock Photos: Making lower-resolution stock photos suitable for larger displays or print.
- Enhancing Digital Art and AI-Generated Images: Refining the quality of digital art or images generated by AI, which might initially lack the desired resolution for specific applications.
- Adapting Images for Various Platforms: Ensuring that images, regardless of their original size, can be beautifully displayed as high-resolution wallpapers, backgrounds, or integral parts of visual design projects.
Tophinhanhdep.com’s AI upscalers are a game-changer for photographers and graphic designers alike, offering a solution to the long-standing problem of how to turn low-quality images into higher resolution visuals without compromising on artistic intent or detail.
- Image Converters: Beyond AI upscaling, Tophinhanhdep.com offers powerful image converters. These tools are crucial for:
- Format Flexibility: Easily converting images between different formats (e.g., PNG to JPG, TIFF to PNG, etc.) to suit specific project requirements. This is particularly useful when you need to switch from a format that supports transparency (PNG) to one optimized for smaller file sizes (JPG) when transparency is no longer required.
- Optimized Workflows: Ensuring compatibility across different software and platforms, from photo manipulation suites to web design environments.
- Preparation for Compression: As discussed, converting a PNG to a JPG can significantly aid in file size reduction for web optimization, provided transparency is not needed. Tophinhanhdep.com’s converters simplify this process, allowing you to streamline your image preparation workflow.
By integrating these advanced tools, Tophinhanhdep.com empowers users with the means to not only resize images effectively but also to enhance, optimize, and adapt them for any purpose, fulfilling the diverse needs of digital photography, graphic design, and all forms of visual content creation.
Beyond Resizing: The Tophinhanhdep.com Advantage for All Your Visual Needs
While mastering image resizing is a fundamental skill, it is just one facet of the vast and dynamic world of visual content. Tophinhanhdep.com is designed to be your comprehensive partner in exploring and excelling in all aspects of visual creation and management. Our platform extends far beyond simple image tools, encompassing a rich ecosystem of resources tailored to inspire, educate, and empower.
A World of Images at Your Fingertips
Our core offering revolves around an unparalleled collection of Images. Whether you’re seeking a breathtaking Wallpaper to personalize your device, a striking Background for your website, or simply indulging in visual beauty, Tophinhanhdep.com curates diverse categories. Explore Aesthetic visuals that resonate with contemporary styles, immerse yourself in the serene beauty of Nature photography, or challenge your perceptions with captivating Abstract art. For moments of introspection, our Sad/Emotional collections offer depth, while our Beautiful Photography section celebrates the pinnacle of visual artistry from around the globe. Each image is meticulously categorized and optimized, ensuring you find exactly what you need, ready for proper resizing and integration into your projects.
Elevating Your Photography and Digital Art
For aspiring and professional photographers, Tophinhanhdep.com is an invaluable resource. We delve into the nuances of Photography, providing insights into capturing High-Resolution images, sourcing premium Stock Photos, and mastering the art of Digital Photography. Our content explores various Editing Styles, from classic to contemporary, guiding you through techniques that transform raw captures into masterpieces. Understanding how to resize correctly is paramount here, as it ensures the integrity of your photographic work, whether it’s destined for a gallery exhibition, a client’s portfolio, or personal enjoyment. Our articles provide photo ideas and practical tips to refine your craft, from composition to post-processing.
Essential Image Tools for Every Creator
Beyond the resizing and upscaling capabilities already discussed, Tophinhanhdep.com offers a full suite of Image Tools to streamline your workflow. Our Converters ensure compatibility across platforms and projects, while our Compressors and Optimizers are crucial for maintaining fast load times and efficient storage for all your digital assets. The advanced AI Upscalers are a testament to our commitment to cutting-edge solutions, transforming low-resolution images into stunning high-quality visuals. Additionally, for specialized needs, our Image-to-Text tools provide functionality for extracting textual information from images, further enhancing your productivity and creative options.
Crafting Visual Masterpieces Through Design
Visual Design is at the heart of effective communication, and Tophinhanhdep.com provides comprehensive resources for Graphic Design, Digital Art, and Photo Manipulation. Resizing is a fundamental step in all these disciplines, ensuring that elements fit harmoniously within a larger composition. Our guides offer Creative Ideas and tutorials, teaching you how to use appropriate dimensions and resolutions to achieve impactful designs. Whether you’re designing a logo, illustrating a digital narrative, or blending multiple images seamlessly, the precise application of resizing techniques facilitated by Tophinhanhdep.com’s tools is indispensable.
Inspiration and Curated Collections
Finally, Tophinhanhdep.com is a wellspring of Image Inspiration & Collections. We offer curated Photo Ideas for every genre and theme, helping you overcome creative blocks. Discover how professional photographers create stunning visuals and learn from their techniques. Our Mood Boards section provides curated visual themes, demonstrating how perfectly sized and harmoniously arranged images can evoke specific feelings and narratives. We highlight Thematic Collections and keep you updated on Trending Styles in visual content, ensuring your work remains relevant and captivating. Every image within these collections benefits from the meticulous resizing and optimization principles championed by Tophinhanhdep.com, showcasing the power of well-prepared visuals.
In conclusion, knowing how to resize an image correctly is more than just a technical skill; it’s a cornerstone of effective digital communication, brand presentation, and creative expression. From maintaining aspect ratios to choosing the right file formats and leveraging advanced AI tools, Tophinhanhdep.com provides the knowledge, guidance, and tools necessary to ensure your images always look their absolute best. Explore our vast resources, experiment with our powerful image tools, and transform your approach to visual content creation today. Your audience, and your brand, will thank you for it.