Mastering Image Resizing: Your Comprehensive Guide to Changing Image Size

In our increasingly visual world, where images are the universal language, the ability to effectively change image size is not merely a technical skill but a fundamental necessity. From crafting the perfect “wallpaper” for your desktop to optimizing “high resolution stock photos” for a professional presentation, or simply sharing a “beautiful photography” shot with friends, understanding how to resize an image is crucial. This guide, brought to you by Tophinhanhdep.com, will navigate you through the essential techniques and tools available across various platforms, ensuring your “digital photography” always looks its best, whether for “visual design,” “graphic design,” or personal “image inspiration & collections.”
Resizing an image is a task we all encounter at some point in our digital lives. Whether you’re a casual user adjusting a “background” image, a creative professional engaged in “digital art” or “photo manipulation,” or simply looking to compress a large file for faster sharing, the core principles remain the same. This article will provide you with easy-to-follow methods for scaling images up and down on Windows, macOS, and ChromeOS, introduce you to powerful online “image tools” like converters, compressors, optimizers, and AI upscalers, and delve into the nuances of maintaining image quality for both web and print applications. By the end, you’ll be equipped to handle any image resizing challenge, making your “aesthetic,” “nature,” “abstract,” or “sad/emotional” images perfectly suited for their intended purpose.
Understanding the Fundamentals: Pixels, Resolution, and Aspect Ratios
Before diving into the “how-to,” it’s vital to grasp the foundational concepts that govern image sizing. Understanding pixels, resolution, and aspect ratios will empower you to make informed decisions, especially when working with “high resolution” images or preparing visuals for specific “editing styles.”
What is Image Resolution (PPI/DPI)?
Image resolution refers to the detail an image holds. It’s typically measured in pixels per inch (PPI) for digital displays or dots per inch (DPI) for print. Essentially, it describes how many tiny squares (pixels) are packed into a linear inch of your image.
- Higher PPI/DPI: More pixels or dots per inch mean finer detail and sharper images, often desired for “beautiful photography” intended for large prints or professional “graphic design.” A common industry standard for high-quality prints is 300 PPI.
- Lower PPI/DPI: Fewer pixels or dots per inch result in less detail and can appear pixelated or “stretched” if enlarged too much. Lower resolutions are often sufficient and desirable for web images, as they lead to smaller file sizes and faster loading times, optimizing user experience for “wallpapers” or “backgrounds” online.
It’s important to note that changing the resolution without resampling (adding or removing pixels) only affects the print size, not how the image looks on screen or its file size. When you change the resolution without resampling, you’re essentially telling your printer to pack more or fewer existing pixels into each inch of paper.
The Critical Role of Aspect Ratio
The aspect ratio describes the proportional relationship between an image’s width and its height. It’s usually expressed as two numbers separated by a colon, like 16:9 (common for widescreen “wallpapers” and videos) or 4:3 (traditional photo and screen ratio) or 1:1 (square, popular for social media “aesthetic” posts).
- Maintaining Aspect Ratio: When resizing, it’s generally recommended to “maintain aspect ratio” (often depicted by a chain icon or a checkbox like “Lock aspect ratio”). This prevents distortion, ensuring your image doesn’t appear squashed or stretched. Imagine a stunning “nature” photo: if you don’t maintain the aspect ratio, mountains could look like hills or a serene lake could become a narrow stream, ruining the “beautiful photography” effect.
- Changing Aspect Ratio (Cropping): Sometimes, you need to fit an image into a specific frame or layout that has a different aspect ratio. In these cases, you’ll need to crop the image before resizing it. Cropping strategically removes unwanted portions of the image, allowing you to achieve the desired new ratio without distorting the remaining content. This is a common practice in “photo manipulation” and creating “creative ideas” for visual projects.
Resizing vs. Resampling: A Key Distinction
These two terms are often used interchangeably, but they refer to fundamentally different processes:
- Resizing (without resampling): This means changing the dimensions (width and height) of an image without altering the total number of pixels. The image’s pixel dimensions remain the same, but its print size changes because the existing pixels are simply spread out more or packed in more densely. This is ideal when you want to change how large an image will print or how it displays on screen without affecting its file size or intrinsic quality.
- Resampling: This involves changing the total number of pixels in an image.
- Upsampling: Adding new pixels to increase the image’s dimensions. While AI Upscalers (which Tophinhanhdep.com offers) can do a remarkable job, traditional upsampling can often lead to a loss of clarity and sharpness, as the software “guesses” what new pixels should look like. It’s like trying to make a small drawing bigger by adding more lines; it might work to an extent, but it won’t magically create new detail.
- Downsampling: Removing pixels to decrease the image’s dimensions. This is generally a safer process, as you’re discarding information. It’s often used to reduce file size for web use or email, ensuring your “wallpapers” and “backgrounds” load quickly without compromising too much visible quality.
Understanding this distinction is crucial for preserving the “high resolution” and “digital photography” quality of your images, especially when aiming for specific “editing styles” or “visual design” outcomes.
Everyday Image Resizing: Tools and Techniques Across Platforms
Whether you’re working on a Windows PC, a Mac, or a Chromebook, there are readily available tools to resize your images. Tophinhanhdep.com recognizes that convenience and accessibility are key, which is why we highlight these native options alongside powerful online “image tools” that can cater to even more specialized needs.
Resizing on Windows with the Photos App
For Windows 11 users, the native Photos app is a straightforward and effective tool for basic image resizing. It’s perfect for quick adjustments to your “wallpapers” or preparing images for casual sharing.
Difficulty: Easy Duration: ~5 minutes
What You Need:
- Windows 11 PC
- Windows Photos app
Steps to Resize an Image:
- Open the Image: Right-click on your desired image file. From the context menu, select
Open withand then choosePhotos. - Access Resize Options: Once the image is open in the Photos app, locate and click the
Three dots icon(ellipsis) usually found in the top-right corner of the application window. - Select Resize: A drop-down menu will appear. Select
Resizefrom this menu. - Choose Dimensions: A pop-up window will present you with options.
- You can select one of the three
preset sizesprovided (e.g., “Small,” “Medium,” “Large” – ideal for common uses like email or social media). - For more precise control, select
Define custom dimensions. This will open another pop-up window.
- You can select one of the three
- Define Custom Size and Aspect Ratio: In the custom dimensions window:
- Enter your desired
WidthandHeightin pixels. - To prevent distortion, ensure the
Maintain aspect ratiocheckbox is selected. As you enter a number into one dimension (e.g., width), the other dimension (height) will automatically adjust to preserve the image’s original proportions. If “aspect ratio doesn’t matter” for your specific “visual design” or “creative ideas,” you can uncheck this box and enter independent values, but be aware this may distort your image.
- Enter your desired
- Save the Resized Copy: After defining your dimensions, click the purple
Save resized copybutton. The Photos app will save a new version of your image with the adjusted size, leaving your original file untouched – a great practice for preserving your “original photography” and for “digital photography” workflow.
Mastering Image Resizing on macOS with Preview
Mac users have an equally convenient built-in tool in the form of Preview. This versatile application, often overlooked, offers powerful yet simple resizing capabilities, making it ideal for everything from adjusting “aesthetic” photos to preparing “high resolution” images for a project.
Difficulty: Easy Duration: ~5 minutes
What You Need:
- Mac computer
- Preview app
Steps to Resize an Image:
- Open the Image: Right-click on your image file. If Preview isn’t your default viewer, select
Open withand then choosePreview. Otherwise, simply double-clicking will likely open it in Preview. - Access Tools Menu: From the menu bar at the top of your screen, click on
Tools. - Select Adjust Size: In the
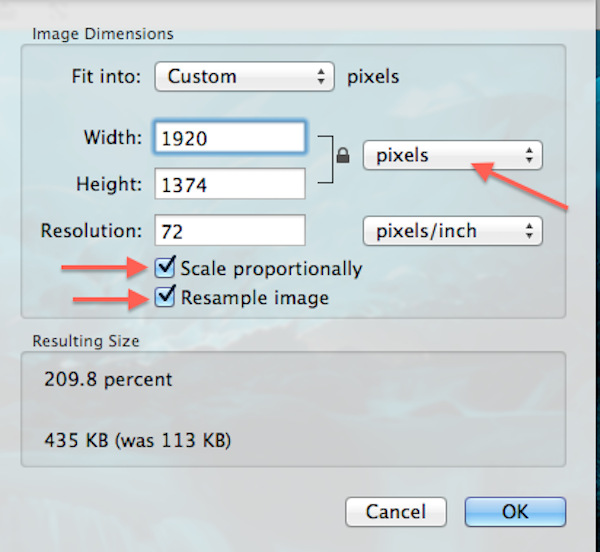
Toolsdrop-down menu, chooseAdjust Size. - Enter New Dimensions: A window will appear where you can enter the desired width and height.
- You can change the
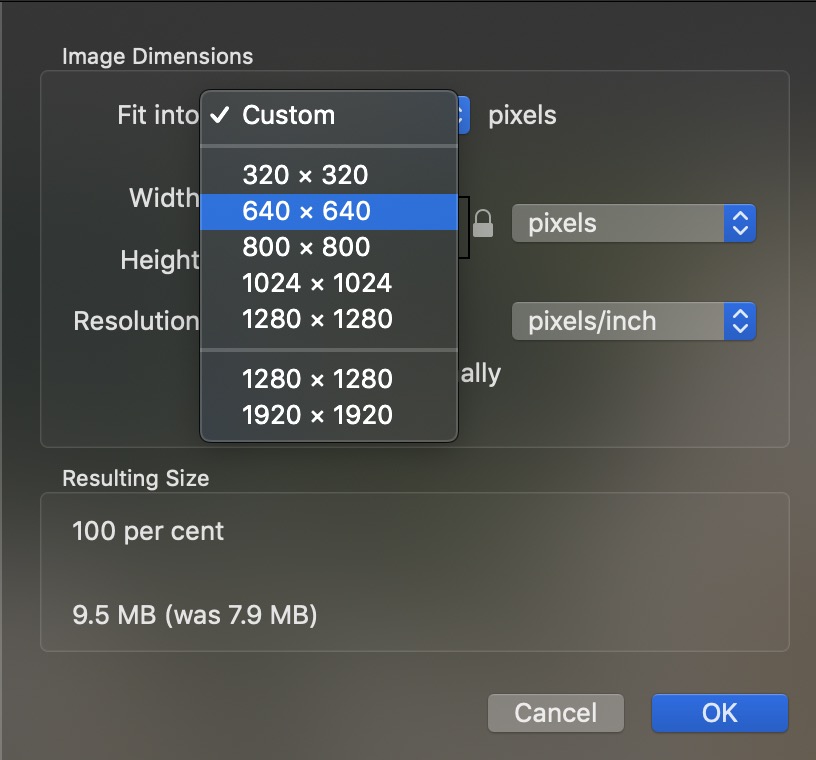
size type(e.g., from inches to pixels) using the drop-down menu next to the width and height fields. This is particularly useful when optimizing for web (pixels) or print (inches). - For quick adjustments, you can also select a
preset sizeby clicking the arrows next toFit into. - Crucially, ensure the
Scale proportionallycheckbox (or similar, sometimes labeledResample imagein older versions) is checked to “avoid warping and retain your image’s original proportions.” This is vital for maintaining the integrity of your “nature” or “abstract” images.
- You can change the
- Confirm and Save:
- Click the blue
OKbutton to apply the new size. - To save the resized image, go to
Fileon the menu bar and selectSave. You can also chooseDuplicatebefore resizing to work on a copy, protecting your “original photography.”
- Click the blue
Adjusting Image Sizes on ChromeOS with Gallery
Chromebook users aren’t left out when it comes to basic image editing. The native Gallery app provides a straightforward method for resizing images, perfect for school projects, social media sharing, or quick adjustments to your downloaded “backgrounds.”
Difficulty: Easy Duration: ~5 minutes
What You Need:
- Chromebook
- Gallery app
Steps to Resize an Image:
- Open the Image: Right-click on the image file you wish to resize. From the pop-up menu, select
Open with Gallery. If Gallery is not the default, navigate toOpen withand then selectGallery. - Locate Rescale Button: Once the image is open in the Gallery app, look for the
Rescalebutton, typically located at the top of the application window. - Enter Dimensions: A dialogue box will appear where you can input your desired
WidthandHeight.- By default, the aspect ratio is usually locked. To
unlock the aspect ratio(if you intend to intentionally distort or crop to a specific non-proportional size), click theChain icon. This is generally not recommended unless you have a specific “visual design” purpose.
- By default, the aspect ratio is usually locked. To
- Save the Image:
- Click the blue
Savebutton to overwrite the original image with the resized version. - Alternatively, click the blue
Down arrownext to the Save button to chooseSave as, allowing you to save the resized image as a new file, preserving your “original photography.”
- Click the blue
Online Resizing Tools: Fast and Accessible Solutions with Tophinhanhdep.com
While operating system utilities are great for basic tasks, the online world offers a vast array of “image tools” that provide more advanced features, often without needing to download any software. Tophinhanhdep.com is your go-to resource for such tools, offering powerful “converters,” “compressors,” “optimizers,” and “AI upscalers” directly through your web browser. These tools are invaluable for everything from preparing “aesthetic” images for your blog to optimizing “high resolution” “stock photos” for a client presentation.
Let’s look at how a typical online tool (like those you’d find on Tophinhanhdep.com) simplifies the resizing process:
Difficulty: Easy Duration: ~5 minutes
What You Need:
- Internet access
- Web browser (on any PC, Mac, or Chromebook)
- The image you want to resize
General Steps for Using Tophinhanhdep.com’s Online Resizer:
- Navigate to Tophinhanhdep.com’s Resizer: Open your web browser and go to the “Image Tools” section on Tophinhanhdep.com, specifically looking for the image resizer feature.
- Upload Your Image: You’ll typically find a prominent button labeled
Upload Imageor a designateddrop filearea. Click this and select the image you want to resize from your computer. Tophinhanhdep.com supports common formats like JPEG/JPG, GIF, BMP, and PNG. - Access Resizing Options: Once uploaded, the tool will display various resizing options. These might be under a section like
LayoutorEdit. Look for aResizeorSmart resizeoption. - Define Dimensions and Aspect Ratio:
- Enter your desired
widthandheightmeasurements in pixels, percentages, or other units. - Use a
Lock proportionstoggle orChain iconto maintain or unlock the aspect ratio. For most “digital photography” and “visual design” tasks, keeping proportions locked is essential to prevent distortion of your “nature” or “abstract” images. - Many online tools, like those on Tophinhanhdep.com, also offer
preset sizesfor popular platforms (e.g., social media banners, “wallpapers”) or common print dimensions, making it easier to select the right size for your “creative ideas.”
- Enter your desired
- Apply Changes: After setting your desired dimensions, click an
ApplyorResizebutton to process the image. - Save Your Resized Image: Finally, locate the
SaveorDownloadbutton. You might be prompted to enter a file name, select your preferred file type (JPEG for photos, PNG for transparency), and adjustqualitysettings (for compression). Tophinhanhdep.com aims to save your resized images quickly to your Downloads folder, often offering options to “save photos in high resolution” where appropriate, or to optimize them further using ourcompressorsoroptimizers.
The convenience of Tophinhanhdep.com’s online “image tools” means you can resize photos “from any device,” making it incredibly flexible for artists, photographers, and anyone needing quick, efficient image adjustments for their “image inspiration & collections.”
Resizing for Specific Purposes: Web, Print, and Creative Endeavors
The reason you’re resizing an image dictates how you should resize it. An image destined for an online “mood board” has different requirements than a “high resolution” print for a gallery. Tophinhanhdep.com caters to all these needs, offering resources and tools that support diverse “photography” and “visual design” objectives.
Optimizing Images for Web and Social Media
In the digital realm, image size and file size are paramount. Large files slow down websites, drain mobile data, and frustrate users. Whether it’s a vibrant “aesthetic” background for a blog, a “beautiful photography” piece for Instagram, or a “sad/emotional” image for a social media post, optimization is key.
- Pixel Dimensions: Most online platforms specify recommended pixel dimensions for profile pictures, cover photos, and post images. For example, a Facebook cover photo has a specific width-to-height ratio, and a YouTube thumbnail requires distinct dimensions. Tophinhanhdep.com’s resizer tools often include presets for these platforms, simplifying the process of creating the perfect “digital art” or “creative ideas” for social sharing.
- File Size (Compression): Beyond pixel dimensions, the actual file size (in kilobytes or megabytes) matters. Smaller file sizes mean faster loading times, which is critical for user engagement and SEO. Tophinhanhdep.com’s “compressors” and “optimizers” are designed specifically for this purpose. They reduce the file size without a noticeable loss in visual quality, ensuring your “wallpapers” and “backgrounds” look great while being web-friendly.
- Resolution for Web: For web use, a resolution of 72 PPI is generally accepted. While some might argue for higher, the human eye cannot discern individual pixels at normal viewing distances on a screen beyond this point. Trying to maintain 300 PPI for a web image is usually overkill and only serves to bloat the file size.
- File Formats:
- JPEG/JPG: Best for “photography” and images with a wide range of colors (like “nature” or “abstract” art), offering excellent compression.
- PNG: Ideal for images with transparency or sharp lines (like logos or “graphic design” elements), often used for “digital art” where fidelity is paramount.
- GIF: Suitable for simple animations or images with limited color palettes.
By using Tophinhanhdep.com’s tools, you can easily adjust your “images” for “social media,” “Shopify,” “blogging graphics,” or any other online platform, ensuring optimal “visual design” and performance.
Preparing Your Photos for High-Quality Printing
Printing introduces a different set of considerations. Here, detail and resolution are far more important, as physical prints are viewed up close. Whether you’re printing a family portrait, a “beautiful photography” piece for a gallery, or an “abstract” design for a T-shirt, precision is key.
- Pixels to Inches Conversion: When resizing for print, you’ll often think in terms of inches. Tophinhanhdep.com helps you convert pixels to inches seamlessly, often providing charts or built-in calculators to guide you. For example, if you want an 8x10 inch print at 300 PPI, your image needs to be 2400 pixels wide by 3000 pixels high (8 * 300 = 2400, 10 * 300 = 3000).
- Print Resolution (300 PPI/DPI): The long-held industry standard for high-quality printing is 300 pixels per inch. This ensures that your “high resolution” “digital photography” appears crisp, sharp, and detailed. Some argue that 240 PPI is “good enough” for many purposes, especially for larger prints viewed from a distance. However, it’s crucial to consider your printer’s native resolution.
- Printer’s Native Resolution: Most inkjet printers have a native resolution of 300 PPI. Epson printers often go higher, to 360 PPI. If you send an image with a lower resolution, the printer will automatically “upsample” it to its native resolution. It’s generally better to perform this upsampling yourself using quality “editing styles” in software (like Photoshop, or Tophinhanhdep.com’s
AI Upscalers) rather than leaving it to the printer, as dedicated software often yields superior results. - Upscaling for Print: If your image’s current pixel dimensions are too small to print at your desired size at 300 PPI (or 360 PPI for Epson), you will need to upsample. This is where Tophinhanhdep.com’s
AI Upscalersshine, intelligently adding pixels and enhancing details to enlarge your image without the typical loss of quality associated with traditional upsampling. This ensures your “nature” or “abstract” prints retain their vibrancy and sharpness.
Tophinhanhdep.com’s “photography” resources and “image tools” make “fine-tuning the dimensions of your photos for print simple,” whether for family portraits, “t-shirt designs,” or “perfect posters.”
Cropping for Custom Aspect Ratios and Visual Design
As discussed, simple resizing won’t change an image’s aspect ratio without distortion. To fit a specific frame or layout that doesn’t match your image’s original proportions, you’ll need to crop. This is a fundamental technique in “visual design,” “graphic design,” and “photo manipulation.”
Scenario: You have a 4x6 horizontal “beautiful photography” image, but you need an 8x10 vertical print for a standard frame.
Steps (General, applicable across many tools including Tophinhanhdep.com’s editors):
- Access a Cropping Tool: Use a dedicated photo editor like Photoshop, GIMP, or an online editor found on Tophinhanhdep.com (many of our “image tools” offer cropping alongside resizing).
- Select the Crop Tool: Look for a crop icon (often two overlapping right angles).
- Set the Desired Aspect Ratio: In the tool’s options bar or settings panel, input your target aspect ratio (e.g., 8:10 or 4:5 for a vertical 8x10). Many tools also provide common presets.
- Adjust the Crop Border: A border will appear over your image. Drag the corners or sides to adjust which part of the image you want to keep. This is where your “creative ideas” and “visual design” skills come into play – you decide the most impactful composition for your “nature” or “aesthetic” image.
- Apply the Crop: Confirm the crop, and the image will be trimmed to the new aspect ratio.
- Resize (if necessary): After cropping, you can then proceed with the standard resizing steps (as outlined in the OS-specific or online tool sections) to set the final pixel dimensions and resolution for print or web.
Remember, cropping removes pixels permanently (unless you save a new copy). Always ensure you preserve your “original photography” by working on duplicates or using non-destructive editing methods available in advanced software or Tophinhanhdep.com’s robust editors. This process is crucial for creating tailored “mood boards” or “thematic collections.”
Advanced Resizing and Quality Enhancement with Tophinhanhdep.com
While basic resizing is covered by native tools, achieving professional results, especially when dealing with complex “editing styles” or needing to enlarge images without sacrificing “high resolution,” requires more sophisticated approaches. Tophinhanhdep.com is not just a source of “images” and “inspiration”; it’s a hub for advanced “image tools” and “photography” techniques.
Leveraging Professional Software for Precision
For graphic designers, digital artists, and serious photographers, tools like Adobe Photoshop, GIMP (GNU Image Manipulation Program), and Paint.NET offer unparalleled control over image resizing and quality. These programs allow for intricate “photo manipulation” and precise adjustments for “digital art” and “graphic design” projects.
- Photoshop: The industry standard. Its “Image Size” dialog box offers detailed control over pixel dimensions, resolution, and resampling methods. Features like
Preserve Details 2.0in newer versions (which Tophinhanhdep.com recommends for upsampling) use advanced algorithms to intelligently add pixels, making it the best choice for enlarging images while minimizing quality loss. Photoshop’s ability to handle layers and complex edits makes it indispensable for professional “editing styles.” - GIMP: A free, open-source alternative to Photoshop, GIMP provides professional-level editing and retouching tools for both Mac and PC. It’s customizable and user-friendly, offering comprehensive resizing options, including control over interpolation methods. For those on a budget or looking for powerful open-source solutions, GIMP is excellent for “digital photography” and “creative ideas.”
- Paint.NET: A more robust version of Microsoft Paint, available for free download on Windows PCs. It strikes a good balance between ease of use and advanced features, including precise pixel-based resizing and layer support, making it suitable for budding “graphic design” enthusiasts.
When using these tools, the principles of resampling, resolution, and aspect ratio discussed earlier become even more critical. They provide the granularity needed to ensure your “abstract,” “nature,” or “sad/emotional” images meet the highest standards for “visual design.”
Tophinhanhdep.com’s Image Tools: Converters, Compressors, and AI Upscalers
Tophinhanhdep.com understands that not everyone needs a full professional suite or has the time to learn complex software. That’s why our platform offers a suite of dedicated online “image tools” designed to simplify advanced tasks and enhance image quality.
- Online Converters: Need to change a PNG to a JPG for web use, or a HEIC to a more universally compatible format? Tophinhanhdep.com’s converters handle this seamlessly, ensuring your “digital photography” is always in the right format for any platform or project.
- Image Compressors and Optimizers: Essential for web performance, our compressors reduce file sizes significantly without compromising visual quality. This is vital for “wallpapers,” “backgrounds,” and any “images” destined for online “mood boards” or fast-loading websites. They employ smart algorithms to strip unnecessary data and optimize image encoding.
- AI Upscalers: This is where Tophinhanhdep.com truly elevates your image quality. Traditional upsampling often leads to blurry or pixelated results. Our
AI Upscalersutilize artificial intelligence to analyze your image, intelligently generate new pixels, and enhance details. This means you can take a lower-resolution “photography” piece (perhaps a cherished old photo or a smaller image you found for “image inspiration”) and enlarge it for print, “wallpapers,” or “digital art” without a significant loss of clarity. This technology is a game-changer for restoring and improving “high resolution” images. It’s particularly useful for artists wanting to scale up “digital art” or photographers wanting to enhance “stock photos.”
Tophinhanhdep.com’s AI upscalers represent the cutting edge in image manipulation, allowing users to overcome the limitations of original file sizes and transform their “images” into stunning “high resolution” assets for any “visual design” or “creative ideas” project.
Maintaining Quality: Best Practices for Resizing Images
Regardless of the tool or platform, a few best practices will help you maintain the highest possible quality for your resized images.
- Always Work on Copies: Never resize or crop your original image unless absolutely necessary. Always save a copy first, or use the “Save as” option. This preserves your “original photography” and allows for future re-edits or different resizing needs.
- Understand Your Output: Before you start, know where the image will be used. Is it for a social media “aesthetic” post (low resolution, small file size)? A large print of “beautiful photography” (high resolution, larger dimensions)? Or a “wallpaper” for a specific screen resolution? This determines your target dimensions and resolution.
- Prioritize Downsampling: If you need to reduce an image’s size, downsampling (removing pixels) is generally safe and effective for reducing file size for web use.
- Be Cautious with Upsampling: Enlarging an image (upsampling, adding pixels) is inherently riskier for quality. If you must upsample, use the best available tools, such as Photoshop’s
Preserve Details 2.0or Tophinhanhdep.com’sAI Upscalers, which are designed to minimize quality loss. - Maintain Aspect Ratio: Unless you’re intentionally cropping to a new ratio, always lock the aspect ratio to prevent distortion. Your “nature” or “abstract” images will thank you.
- Experiment with File Formats: Choose the appropriate file format. JPEG for most “photography,” PNG for images with transparency or sharp lines often found in “digital art” or “graphic design,” and GIF for simple animations. Tophinhanhdep.com’s
converterscan assist you here. - Check Resolution for Print: For printing, aim for 300 PPI (or 360 PPI for Epson printers) at the desired print size. If your image falls short, consider using Tophinhanhdep.com’s
AI Upscalersor professional software for the best results. - Batch Resizing: If you have many “images” for a “thematic collection” or a “mood board” that need the same resize, leverage tools that offer
batch resizecapabilities. Tophinhanhdep.com’s “image tools” may include such functionality, streamlining your workflow.
By adhering to these guidelines and leveraging the powerful “image tools” available on Tophinhanhdep.com, you can ensure that every image you resize, from “sad/emotional” expressions to vibrant “wallpapers,” retains its intended impact and quality.
Conclusion: Elevate Your Visuals with Expert Image Sizing
Changing image size is a fundamental skill in today’s visually-driven world. It’s the gateway to optimizing your “images” for web, printing your “high resolution” “photography” with stunning clarity, and crafting compelling “visual design” and “digital art” pieces. From the simple, built-in tools on Windows, macOS, and ChromeOS to the sophisticated “photo manipulation” capabilities of professional software and the innovative “AI upscalers” offered by Tophinhanhdep.com, the options are plentiful.
Understanding the difference between resizing and resampling, the significance of aspect ratio, and the impact of resolution on different output mediums empowers you to make intelligent decisions. Whether your goal is to create beautiful “wallpapers,” share “aesthetic” “backgrounds,” curate “image inspiration & collections,” or prepare “stock photos” for professional use, mastering image sizing is indispensable.
Tophinhanhdep.com is your ultimate resource for all things visual. Our extensive library of “wallpapers,” “backgrounds,” “aesthetic,” “nature,” “abstract,” “sad/emotional,” and “beautiful photography” provides endless “image inspiration.” Coupled with our robust “photography” resources covering “high resolution,” “digital photography,” and “editing styles,” and our comprehensive suite of “image tools” including “converters,” “compressors,” “optimizers,” and AI upscalers, Tophinhanhdep.com offers everything you need to manage and enhance your visual content.
Take control of your digital images today. Explore the tools, apply the techniques, and let Tophinhanhdep.com help you elevate your visuals to their fullest potential, ensuring every pixel serves its purpose beautifully.