Mastering Image Compression in PowerPoint: A Comprehensive Guide to Optimizing Visuals with Tophinhanhdep.com

In the realm of digital presentations, striking visuals are paramount. Whether you’re showcasing stunning wallpapers, intricate digital art, high-resolution photography, or aesthetic backgrounds, images breathe life into your message. However, the pursuit of visual excellence often comes with a hidden cost: large file sizes. High-resolution images, essential for conveying detail and quality, can quickly balloon a PowerPoint presentation into an unwieldy document, making it difficult to share, upload, or even run smoothly. This is where the crucial skill of image compression comes in, transforming bulky files into lean, efficient, and equally impactful presentations.
At Tophinhanhdep.com, we understand the delicate balance between image quality and practical file management. Our platform is a rich resource for beautiful photography, diverse image collections, and powerful image tools designed to help you optimize your visual content, including the art of compressing images for PowerPoint. This comprehensive guide will walk you through the various methods and benefits of image compression, ensuring your presentations are not only visually captivating but also perform flawlessly across all platforms and devices.
The Indispensable Benefits of Image Compression for Engaging Presentations
Image compression in PowerPoint isn’t merely about reducing file size; it’s a strategic move that enhances every aspect of your presentation’s lifecycle, from creation to delivery. Optimizing your images through compression directly impacts performance, shareability, and the overall professional polish of your visual design.
Enhancing Performance and Streamlining Sharing
One of the most immediate and tangible benefits of compressing images is the significant reduction in your PowerPoint file’s size. This reduction addresses several common pain points for presenters:
- Overcoming Email and Sharing Limits: Modern email service providers often impose strict limits on attachment sizes. A presentation laden with high-resolution images can easily exceed these limits, forcing you to resort to less convenient sharing methods like cloud storage links. Compressing images ensures your presentation remains within typical email attachment allowances, making it a breeze to send to colleagues, clients, or instructors.
- Faster Upload and Download Times: Large files, while shareable via various cloud services, can take a considerable amount of time to upload. Similarly, recipients, especially those with slower internet connections, may experience significant delays downloading heavy presentations. Optimized files, on the other hand, upload and download rapidly, saving valuable time and reducing frustration for all parties.
- Smoother SlideShow Mode and Online Collaboration: A heavy PowerPoint file can lead to frustrating lags and disruptions during slideshow mode, especially on older or less powerful devices. When presenting, whether in person or during a remote meeting, a stuttering presentation can quickly disengage an audience. Compressing images improves the loading time and overall responsiveness of your presentation, ensuring a fluid and professional delivery. For those involved in online collaboration, lightweight files are crucial for preventing delays and improving synchronous editing experiences.
Boosting Device Compatibility and File Conversion Versatility
Beyond just performance, image compression ensures your presentation is accessible and functional across a wider array of scenarios:
- Improved Device Compatibility: Not all display devices are created equal. Low-end mobile devices, older computer systems, or legacy equipment like projectors might struggle to render high-resolution images without a performance hit. By optimizing image resolution, you enhance the compatibility of your presentation for various devices, ensuring your audience sees your content as intended, regardless of their hardware limitations. This is particularly important when designing for diverse viewing environments, from large conference screens to personal tablets.
- Easier File Conversion: PowerPoint presentations often need to be converted into other formats for distribution or archiving, such as PDF documents, video files, or even animated GIFs. Lightweight PowerPoint files facilitate smoother and more reliable conversions, whether you’re using PowerPoint’s built-in conversion features or third-party tools. Heavy files are more prone to errors or extended processing times during conversion, making image optimization a prerequisite for versatile content reuse.
Preserving Visual Integrity within Practical Constraints
While reducing file size, the primary goal is not to sacrifice visual quality unnecessarily. Instead, it’s about intelligent optimization. Tophinhanhdep.com provides and advocates for strategies that help you maintain the aesthetic appeal of your chosen visuals – be they breathtaking nature shots, intricate abstract art, or professional stock photos – while making them practical for presentation use. Compressing images allows you to balance the demands of high-quality visual design with the necessity of efficient file management, ensuring your graphic design and digital art remain impactful without hindering performance.
Step-by-Step: Mastering PowerPoint’s Built-in Image Compression Tools
Microsoft PowerPoint offers robust, built-in tools for image compression directly within the application, providing a straightforward method to manage your file sizes without needing external software. These tools are available for both Windows and Mac users, offering slightly different interfaces but achieving the same goal.
Compressing Images on Windows: A Detailed Walkthrough
For users working with Microsoft PowerPoint on a Windows operating system, the process is intuitive and highly effective:
- Open Your PowerPoint File: Start by opening the presentation file that contains the images you wish to compress.
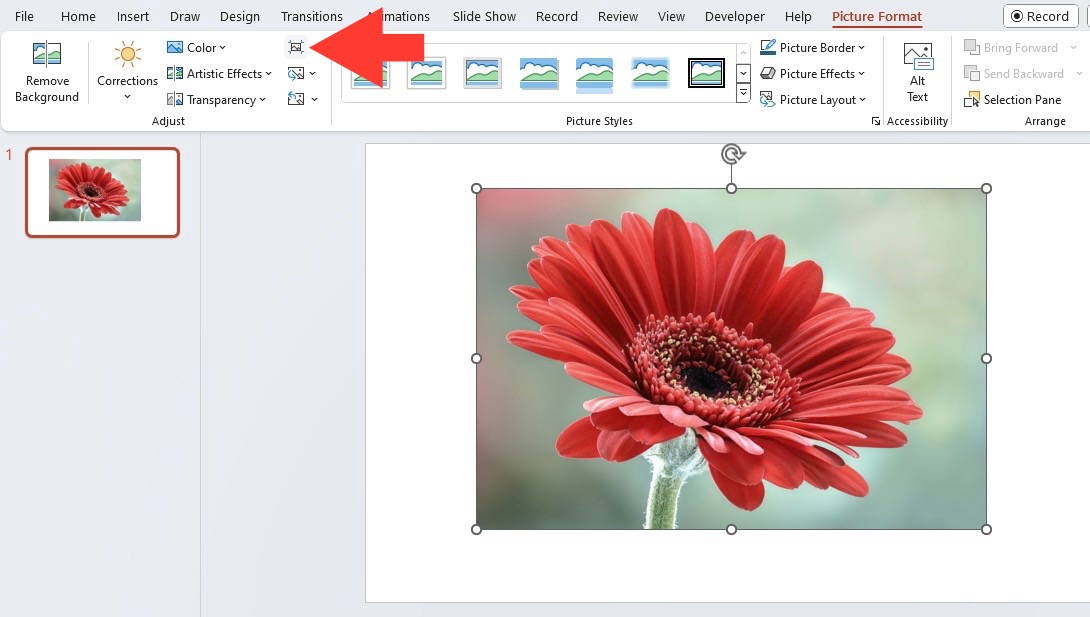
- Select an Image: Navigate to a slide that includes an image or picture you want to optimize. Click on the image to select it. This action activates the “Picture Format” ribbon.
- Access the Picture Format Ribbon: At the top of your screen, locate and click on the “Picture Format” ribbon. This tab appears contextually when an image is selected.
- Find “Compress Pictures”: Within the “Picture Format” ribbon, look for the “Compress Pictures” option. It’s typically found in the “Adjust” group.
- Configure Compression Options: A dialog box will appear, presenting you with several choices:
- Delete cropped areas of pictures: This checkbox is crucial. When you crop an image in PowerPoint, the software by default retains the cropped-out portions, allowing you to revert your changes later. Checking this box permanently deletes these hidden areas, which often contribute significantly to file size. For most presentations, if you’re happy with your crop, this should be selected.
- Resolution Options: This section allows you to choose a target resolution (pixels per inch, or ppi) for your images. Different resolutions are suitable for various purposes:
- High fidelity: Preserves the original quality of the image as much as possible, primarily aimed at specialized printing, and may not offer significant file size reduction for general use.
- HD (330 ppi): A high-definition option suitable for modern displays and high-quality printing.
- Print (220 ppi): Ideal for presentations that will be printed, offering a good balance of quality and reduced file size.
- Web (150 ppi): Suitable for presentations shared online or displayed during remote meetings, providing good quality for screen viewing.
- E-mail (96 ppi): Minimizes document size for easy sharing via email. This setting will significantly reduce image quality, so use it when file size is the absolute priority and visual fidelity is less critical.
- Use default resolution: Compresses images to PowerPoint’s default resolution setting for your device.
- Apply only to this picture: By default, PowerPoint applies compression to all images in the presentation. If you only want to compress the currently selected image, check this box. Leaving it unchecked (recommended for overall file size reduction) will apply your chosen settings to every picture in the file.
- Click OK: Once you’ve made your selections, click “OK” to apply the compression. PowerPoint will process the images based on your chosen settings.

Compressing Images on Mac: Tailored Optimization
Mac users will find a very similar process, with minor interface differences:
- Open Your PowerPoint File: Just like with Windows, open your presentation.
- Select an Image: Click on any image within your presentation to select it and activate the “Picture Format” ribbon.
- Access the Picture Format Ribbon: Go to the “Picture Format” ribbon at the top of the screen.
- Find “Compress Pictures”: Look for the “Compress Pictures” option. On Mac, it’s often located to the right of the “Transparency” icon.
- Configure Compression Options: The dialog box will present the following:
- Picture Quality drop-down: This is where you select your desired resolution, similar to the Windows version. Options include “Best for Sending in Email (96 ppi),” “Web (150 ppi),” “Print (220 ppi),” “HD (330 ppi),” and “High Fidelity.”
- Delete Cropped Areas of Pictures: Select this checkbox to remove the unused portions of cropped images, further reducing the file size.
- Apply to all pictures in this file: This option is usually selected by default and is recommended for achieving the smallest possible overall file size. If you only want to compress the currently selected image, uncheck this box.
- Click OK: Confirm your choices by clicking “OK.”
Navigating Advanced Compression Settings and Defaults
PowerPoint provides additional control over how images are handled, including setting a default compression resolution and even disabling automatic compression if your project demands uncompromised image fidelity.
- Understanding “Delete Cropped Areas of Pictures”: This feature is a powerful yet often overlooked method for reducing file size. When you crop an image in PowerPoint, the application doesn’t delete the “cropped” pixels; it merely hides them. This allows you to un-crop an image at any point. However, these hidden pixels still contribute to the file size. By explicitly checking “Delete cropped areas of pictures” during compression, you permanently remove these hidden pixels, making the file significantly smaller.
- Setting Default Resolution: If you consistently work with images for a specific purpose (e.g., always for web viewing or email), you can set a default resolution that PowerPoint will apply during automatic compression or when you select “Use default resolution.” To do this:
- Go to
File > Options(Windows) orPowerPoint > Preferences(Mac). - Navigate to the
Advancedsection. - Under
Image Size and Quality, you can select your preferred default resolution (e.g., 96 ppi for email, 220 ppi for print). You can also prevent PowerPoint from compressing images in the file entirely by checking the “Do not compress images in file” option, though this will likely result in very large file sizes.
- Go to
- Disabling Auto Compression: For projects where original image quality is paramount and file size is not a concern, you can disable automatic compression. This ensures that every image, from stunning wallpapers to intricate digital art, retains its original pixel data. To do this, go to
File > Options > Advanced(Windows) orPowerPoint > Preferences > General > Image Size and Quality(Mac), and check the “Do not compress images in file” option. Be aware that this will likely lead to extremely large presentation files.
By mastering these built-in tools, you gain significant control over your presentation’s file size, ensuring it meets your specific sharing and performance requirements without extensive external processing.
Elevating Compression with Tophinhanhdep.com’s External Image Tools and Expertise
While PowerPoint’s native compression is highly effective for quick optimizations, external image tools offer a greater degree of control, allowing for more advanced compression techniques, including both lossy and lossless methods. Tophinhanhdep.com stands as a premier resource, providing a suite of image tools and insights into digital photography and editing styles that can further refine your visuals before they even reach PowerPoint.
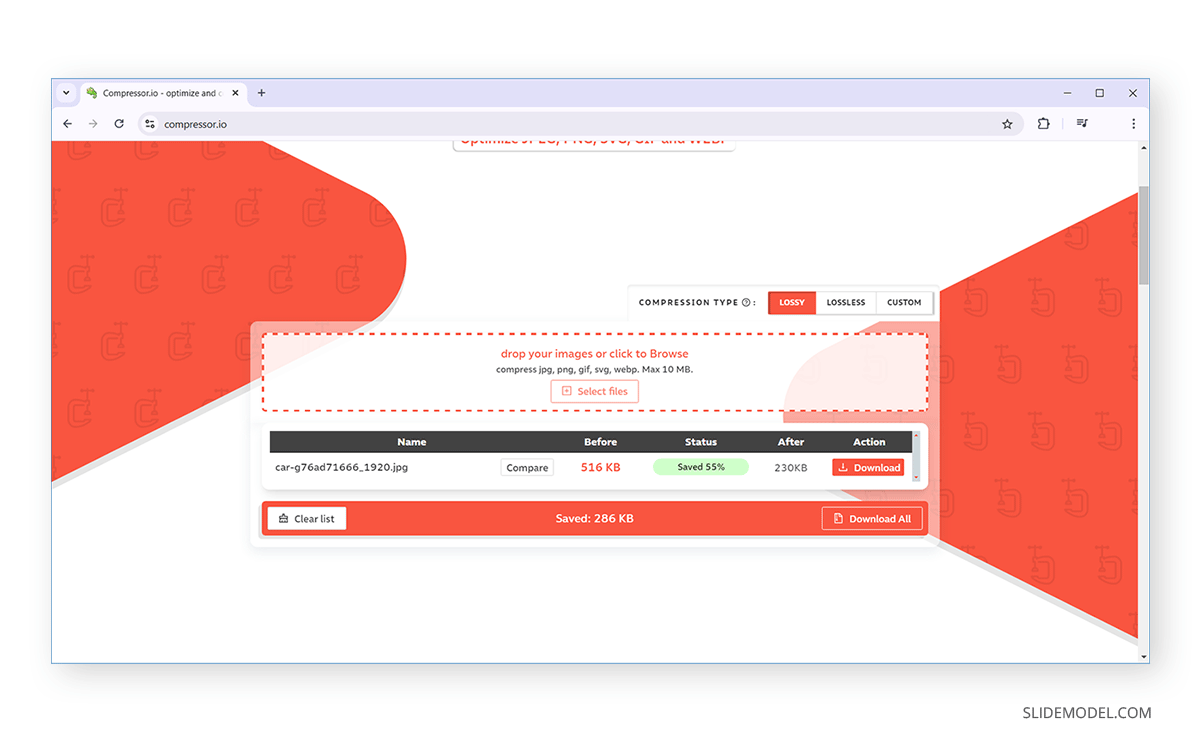
Leveraging Online Image Compressors for Superior Results
Online image compressors, often available through platforms like Tophinhanhdep.com, provide powerful web-based solutions that can significantly reduce image file sizes while preserving visual quality. These tools are designed with advanced algorithms that analyze images and apply intelligent compression.
- Lossy vs. Lossless Compression: Tophinhanhdep.com’s online compressors often offer both lossy and lossless compression options. Lossy compression (e.g., JPEG optimization) achieves significant file size reductions by discarding some image data, typically imperceptible details. Lossless compression (e.g., PNG optimization) reduces file size without losing any data, maintaining perfect image fidelity at the cost of less dramatic file size reduction.
- Advanced Algorithms: Tools available on Tophinhanhdep.com utilize sophisticated algorithms to optimize images, reducing their size by 60-80% or more without noticeable quality degradation. They achieve this by techniques such as reducing the number of colors in an image or simplifying intricate patterns, all while ensuring important details remain intact.
- Batch Processing and Quality Control: Many online compressors allow for batch processing, enabling you to upload and compress multiple images simultaneously. Tophinhanhdep.com’s offerings in this space typically provide settings to adjust the compression level, allowing you to fine-tune the balance between file size and image quality for individual images or entire collections of stock photos.
Pre-Optimizing Visuals with Desktop Editing Software and Tophinhanhdep.com’s Insights
For those who demand granular control over every pixel, professional desktop image editing software, often highlighted and discussed on Tophinhanhdep.com for its role in digital photography and photo manipulation, offers the ultimate precision in image optimization.
- Professional Image Editors: Tools like Adobe Photoshop, Adobe Lightroom, or GIMP (a free alternative) allow you to meticulously prepare your images for PowerPoint. Tophinhanhdep.com provides tutorials and guides on various editing styles and techniques that can be applied here.
- “Save for Web” Functionality: In professional editors, the “Save for Web” or “Export As” options are particularly powerful. They allow you to:
- Select Format and Quality: Choose the optimal image format (e.g., JPEG for photos, PNG for graphics with transparency) and precisely dial in the compression quality using sliders.
- Preview Changes: Instantly preview the impact of compression on image quality and file size, allowing for informed adjustments.
- Remove Metadata: Strip away unnecessary metadata (like EXIF data from cameras), which can add to file size without contributing to the visual content.
- Fine-Tuning Resolution and Dimensions: Before inserting an image into PowerPoint, you can resize it to the exact dimensions needed for your slides. This prevents PowerPoint from downscaling a massive high-resolution wallpaper or background, which, even with compression, would retain excess data. This pre-optimization step, aligned with the principles of effective visual design, ensures that only the necessary pixel data is embedded.
Utilizing Other Microsoft Office Applications for Pre-PowerPoint Optimization
Even basic Microsoft Office applications can serve as effective pre-PowerPoint image optimizers, offering quick ways to reduce file sizes before insertion.
- Microsoft Paint: This classic Windows application, while simple, can be used to resize, crop, and save images in compressed JPEG format. By opening an image in Paint, making necessary adjustments, and then using “Save As” with a JPEG quality slider, you can achieve a smaller file size.
- Microsoft Photos App: Windows’ default Photos app provides more advanced features than Paint, including basic editing, resizing, and compression with batch processing capabilities. You can import multiple photos, select them, and use the “Resize & Compress” options to export optimized JPEG files. These tools, though less powerful than dedicated image editors, offer a convenient way to perform preliminary optimization.
By combining the advanced capabilities of Tophinhanhdep.com’s online image tools and the meticulous control offered by professional desktop software with these basic utilities, you can ensure that every image entering your PowerPoint presentation is perfectly optimized for its purpose.
Comprehensive Strategies for a Leaner PowerPoint File: Beyond Image Compression
While image compression is a cornerstone of reducing PowerPoint file size, it’s part of a broader strategy for creating efficient and high-performing presentations. Tophinhanhdep.com, with its focus on visual design and creative ideas, encourages a holistic approach to presentation optimization.
- Delete Unused Slides: Over time, presentations can accumulate hidden or unnecessary slides. Pruning your slide deck by deleting these unused elements can significantly reduce overall file size. Regularly review your presentation for redundant content.
- Reduce Animation and Transitions: While animations and transitions add dynamism, excessive use can inflate file size and even cause lag during playback. Use them judiciously for emphasis rather than decoration. Streamlined animations contribute to a cleaner visual design and a smoother presentation flow.
- Minimize Slide Count with Concise Content: Instead of cramming too much information onto each slide or using an excessive number of slides, aim for concise content presented clearly across fewer, well-designed slides. This not only reduces file size but also improves audience engagement.
- Convert Videos to Modern Compressed Formats: Embedded videos are notorious for increasing file size. Ensure any videos you include are in modern, highly compressed formats like MP4, and consider optimizing their resolution and bitrate before embedding. Tophinhanhdep.com might offer insights or tools for video optimization, akin to its image converters.
- Use a Minimalist Template: Heavy template backgrounds, complex design elements, and decorative graphics, while aesthetically pleasing, can add considerable weight to your file. Opt for minimalist templates or design elements that complement your content without adding unnecessary bulk. Tophinhanhdep.com offers a wealth of simple yet aesthetic backgrounds and design inspirations that can enhance your presentation without bloat.
- Compress Other Media: Besides still images, PowerPoint presentations can contain GIFs, audio files, and other embedded media. Just as with pictures, these media types can often be compressed using PowerPoint’s media compression tools (found under
File > Info > Media Size and Performance) or external optimizers provided by Tophinhanhdep.com. - Save as PDF for Final Distribution: For final distribution where interactivity isn’t required, converting your PowerPoint presentation to a PDF format can drastically reduce the file size. PDFs are highly optimized for sharing and viewing across different devices and platforms, making them an excellent choice for static content. Tophinhanhdep.com might provide efficient converter tools to facilitate this.
By adopting these comprehensive strategies alongside smart image compression, you can craft presentations that are not only visually stunning – filled with beautiful photography, abstract art, or trending styles from Tophinhanhdep.com’s collections – but also exceptionally lightweight, fast-loading, and easy to share.
Conclusion
In the fast-paced world of digital communication, efficient and impactful presentations are key. The ability to effectively compress images in PowerPoint is not just a technical skill; it’s a critical component of professional visual design and successful information delivery. High-resolution visuals, from captivating wallpapers to detailed stock photos, can transform your message, but without proper optimization, they can hinder your presentation’s performance and accessibility.
Throughout this guide, we’ve explored the myriad benefits of image compression – from overcoming email limits and accelerating upload/download times to enhancing device compatibility and ensuring smooth slideshows. We’ve detailed the step-by-step processes for utilizing PowerPoint’s built-in compression tools on both Windows and Mac, covering crucial options like deleting cropped areas and selecting appropriate resolutions for different contexts.
Furthermore, we’ve highlighted how external image tools, particularly those offered by Tophinhanhdep.com, can provide advanced compression capabilities, offering finer control over quality and file size through powerful online compressors and professional desktop editing software insights. Tophinhanhdep.com serves as your go-to resource not just for image tools, but also for inspiration, high-resolution images, and expert advice on digital photography and visual design.
By integrating these compression techniques with broader file-size reduction strategies – such as pruning unused slides, minimizing animations, optimizing videos, and using minimalist templates – you empower your presentations to be both aesthetically rich and functionally robust. This balance ensures your audience remains focused on your message, unhindered by technical glitches or lengthy loading times.
Embrace the art of image compression to unlock the full potential of your PowerPoint presentations. Explore the vast collections of images and powerful tools available at Tophinhanhdep.com to enhance your visual storytelling and deliver a truly optimized, engaging experience.