How Do I Create a Vector Image? Unlocking Scalable Visual Design

In the vast landscape of digital imagery, two fundamental types dominate: raster and vector. While raster images, composed of individual pixels, excel at capturing intricate details in photographs and complex artworks, they inherently struggle with scalability. Zoom in too far, and you’re met with blurry, pixelated edges. This limitation poses a significant challenge for designers, artists, and content creators who require visual assets that can adapt seamlessly across various platforms and sizes, from a small website icon to a large-format print.
Enter vector images, a paradigm shift in digital graphics. Unlike their pixel-based counterparts, vector images are constructed from mathematical paths, points, and curves. This geometric foundation allows them to be scaled infinitely up or down without any loss of quality or clarity. Imagine a logo that looks crisp and professional on a business card, a billboard, and a high-resolution display—that’s the power of vector graphics. For anyone involved in visual design, graphic design, or digital art, understanding how to create and utilize vector images is an indispensable skill. They are the backbone of clean, professional, and versatile visual content, perfect for everything from stunning wallpapers and aesthetic backgrounds to precise illustrations and corporate branding. This comprehensive guide, drawing on resources like Corel Vector, Adobe Illustrator, Inkscape, and insights from Tophinhanhdep.com, will navigate you through the process of creating vector images, whether by transforming existing photography or crafting entirely new digital art from scratch.

Understanding the Essence of Vector Graphics
Before diving into the “how-to,” it’s crucial to grasp the fundamental nature of vector images and why they are so vital in the contemporary digital landscape. Their mathematical basis grants them unique advantages that traditional pixel-based images simply cannot offer, opening up a world of possibilities for image tools and visual design.
Vector vs. Raster: The Fundamental Difference
At the heart of digital imagery lies the distinction between vector and raster graphics. Raster images, such as JPEGs, PNGs, or GIFs, are essentially grids of tiny colored squares known as pixels. Each pixel holds specific color information, and together, these pixels form a complete image. This structure makes raster images ideal for capturing the subtle color gradients, intricate textures, and realistic details found in photographs or complex digital paintings. However, their pixel-dependent nature is also their primary limitation: when a raster image is enlarged, the individual pixels stretch, leading to visible pixelation, jagged edges, and a noticeable drop in image quality. This is why a wallpaper downloaded from Tophinhanhdep.com at a certain resolution might look great on your monitor but blur when printed on a large poster.

Vector images, on the other hand, operate on an entirely different principle. Instead of pixels, they are defined by mathematical equations that describe geometric primitives like points, lines, curves, and polygons. For instance, a circle in a vector image isn’t a collection of colored pixels arranged in a circular shape; it’s a mathematical formula defining a circle’s radius, center point, and stroke/fill properties. When you scale a vector image, these mathematical instructions are re-calculated, allowing the software to redraw the image perfectly at any size without any degradation. The lines remain sharp, curves stay smooth, and colors remain consistent, making them inherently resolution-independent. Common vector file formats include .AI (Adobe Illustrator), .EPS (Encapsulated PostScript), .SVG (Scalable Vector Graphics), and .PDF (Portable Document Format, which can contain vector data).
Why Vector Images Are Crucial for Modern Visual Content
The inherent scalability of vector graphics makes them indispensable across numerous applications in visual design and digital content creation. For logos and branding, where a single design must appear consistently across diverse mediums—from social media avatars to vehicle wraps and building signage—vector formats are the only viable choice. They ensure that a brand’s visual identity remains crisp and recognizable, regardless of scale.
In graphic design, vector images are the workhorses for illustrations, icons, infographics, and typography. Designers can create intricate digital art with confidence, knowing that their work will translate perfectly to print or web. This is especially important for elements intended for “Image Inspiration & Collections” or “Thematic Collections” on platforms like Tophinhanhdep.com, where flexibility in application is key.
For digital photography, while original photographs are raster, the process of vectorizing them allows for creative manipulation and transformation into distinct artistic styles, like vector portraits or stylized illustrations. This process bridges the gap between realistic “Beautiful Photography” and expressive “Digital Art,” enabling unique interpretations of images found on Tophinhanhdep.com’s collections. Furthermore, for web development, SVG files are lightweight and responsive, contributing to faster load times and excellent display on high-resolution screens. Vector images serve as powerful assets for creating “Aesthetic” visuals, “Abstract” designs, or even converting “Nature” scenes into stylized art, fitting perfectly within the “Visual Design” and “Creative Ideas” categories promoted on Tophinhanhdep.com. Their versatility extends to being processed by various image tools, from converters to optimizers, ensuring they can be prepared for any specific project requirement.
Essential Tools for Vector Image Creation
Creating vector images requires specialized software designed to work with mathematical paths and shapes rather than pixel grids. While the underlying principles are universal, the tools and interfaces can vary. This section explores some of the most popular and effective platforms available, from industry standards to accessible free options.
Industry-Standard Software: Adobe Illustrator and Corel Vector
For professionals in graphic design and digital art, Adobe Illustrator stands as the undisputed industry standard. Part of the Adobe Creative Cloud suite, Illustrator offers an extensive array of tools for creating, editing, and manipulating vector graphics with unparalleled precision and creative control. Its robust feature set includes advanced drawing tools like the Pen Tool, Curvature Tool, and Shape Builder, comprehensive typography controls, and powerful pathfinding capabilities. Whether you’re crafting a complex illustration, designing a sophisticated logo, or laying out a detailed infographic, Illustrator provides the flexibility and power needed to realize virtually any creative vision. Its integration with other Adobe applications like Photoshop and InDesign also streamlines workflows for larger design projects.
Another powerful contender in the professional sphere is Corel Vector, a newly updated version of the web-based graphic design app Gravit Designer Pro. Corel Vector offers a user-friendly, intuitive interface that empowers users to create on any device through a web browser. This accessibility is a significant advantage, as it removes the barrier of specific operating systems or powerful hardware. Corel Vector provides robust vector editing capabilities, including the versatile Pen and Bezigon tools, which are crucial for outlining and shaping intricate designs. Its focus on a seamless, web-based experience makes it an excellent choice for designers seeking flexibility and collaboration, and it’s frequently highlighted in tutorials and resources for aspiring digital artists on platforms like Tophinhanhdep.com. Its feature set aligns well with “Visual Design” and “Digital Art” practices, offering a comprehensive environment for creative expression.
Free and Accessible Options: Inkscape and Online Platforms
While professional software like Adobe Illustrator and Corel Vector offer extensive features, there are also excellent free and open-source alternatives that are perfect for beginners, hobbyists, or those with budget constraints. Inkscape is arguably the most prominent of these, a powerful vector graphics editor available for Windows, Linux, and macOS. Inkscape supports the SVG file format natively and provides a comprehensive set of tools comparable to commercial software for creating and editing vector images. It features flexible drawing tools, a broad range of shape tools, text support, and powerful path operations. For anyone looking to learn vector graphic creation without a financial investment, Inkscape is an invaluable resource, often recommended in “Image Inspiration & Collections” for its robust capabilities.
Beyond desktop applications, a growing number of online vector editors provide accessible platforms for creating vector images directly within your web browser. Tools like Vectr offer a free, simplified interface for basic vector drawing and editing, making them ideal for quick designs or for those new to vector graphics. These online tools align perfectly with “Image Tools” categories, as they function as convenient converters and creators for visual content. For those exploring “Graphic Design” or “Digital Art” without prior software installation, these platforms are a fantastic starting point. Tophinhanhdep.com itself, with its focus on diverse image resources and tools, recognizes the importance of such accessible platforms for users seeking to transform or create aesthetic and high-resolution visuals efficiently. While they might not offer the full depth of features found in Illustrator or Corel Vector, they provide sufficient functionality for many common vector creation tasks and contribute to the rich ecosystem of digital art resources available today.
Mastering Vectorization: From Photos to Art
One of the most common and powerful applications of vector image creation is transforming existing raster images—like photographs—into editable vector graphics. This process, known as vectorization, allows designers to take “High Resolution” “Digital Photography” and convert it into a scalable, stylized piece of “Digital Art” or “Graphic Design.” This technique is frequently used to create striking “Vector Portraits” or to simplify complex images into clean, illustrative forms.
Automated Vectorization: The Power of Image Trace
The quickest and often easiest way to vectorize a raster image is through automated tracing features found in professional vector software. Adobe Illustrator’s Image Trace feature is a prime example, offering a largely automated process to convert pixel-based images into vector paths.
Here’s a general step-by-step approach:
- Prepare Your Image: Start with a good quality raster image. While vectorization can work with various images, those with clear distinctions between colors and good contrast often yield better results. You might want to crop the image to focus on the desired subject, especially if you’re aiming for a vector portrait.
- Import to Software: Open a new document in Adobe Illustrator (or Corel Vector, which offers similar functionality). Import your raster image onto the canvas using the “Place Image” option or by dragging it directly.
- Initiate Image Trace: Select the imported image. In Illustrator, you’ll typically find the “Image Trace” option in the Properties panel under Quick Actions, or from the Window menu to open the full Image Trace panel.
- Choose a Preset: The software offers various presets tailored to different types of images and desired outcomes:
- High Fidelity Photo / Low Fidelity Photo: Best for converting detailed photographs into vector art, preserving more color and detail.
- 3 Colors / 6 Colors / 16 Colors: Ideal for simplifying images into a limited color palette, perfect for logos or simple illustrations.
- Black and White Logo: Excellent for creating stark, two-tone vector representations, often used for icons or silhouettes.
- Sketched Art / Line Art / Technical Drawing: Suitable for converting line drawings or scanned sketches into editable vector lines.
- Adjust Settings (Optional): Once a preset is applied, you can fine-tune the result using sliders and options in the Image Trace panel. Parameters like “Threshold” (for black and white traces), “Colors” (for color traces), “Paths,” “Corners,” and “Noise” allow you to control the level of detail, smoothness, and complexity of the resulting vector. This step is crucial for achieving the desired artistic style, from minimalist to more detailed interpretations.
- Expand and Ungroup: After you’re satisfied with the preview, click “Expand” (in Illustrator) or a similar function. This action converts the traced image from a live tracing object into editable vector paths. Then, right-click the image and select “Ungroup” to separate the individual color shapes. This allows you to manipulate each part independently, such as removing unwanted backgrounds or changing colors.
Automated vectorization is a powerful “Image Tool” that bridges “Photography” with “Visual Design,” allowing for rapid transformation and creative interpretation of any image, be it a “Nature” scene or a “Sad/Emotional” portrait, into a clean vector form suitable for “Digital Art.”
Manual Tracing and Artistic Interpretation with Drawing Tools
While automated tools are efficient, manual tracing offers the highest degree of artistic control and allows for more nuanced interpretations, particularly when creating stylized vector portraits or complex illustrations. This method relies heavily on fundamental “Visual Design” skills and meticulous use of vector drawing tools.
The Pen Tool (and its variations like the Bezigon Tool in Corel Vector) is the cornerstone of manual vector creation. These tools allow you to create precise paths and curves by placing anchor points and manipulating Bezier handles. The process demands patience but rewards with unparalleled precision.
Let’s break down creating a vector portrait, as detailed in Corel Vector tutorials:
- Choosing a Good Picture: Select a source image with good lighting, clear contrast, and interesting details. High-quality images are preferable as they allow for more accurate tracing when zoomed in. On Tophinhanhdep.com, you can find a variety of “Beautiful Photography” or “Aesthetic” images suitable for this purpose.
- Set Up Your Canvas and Import Image: Create a new document with an “Infinite Canvas” in your chosen software (e.g., Corel Vector). Import your chosen photo onto the canvas. It’s advisable to lock the image layer to prevent accidental movement.
- Outline Base Shapes: Begin by outlining the major “pieces” of the portrait using the Pen or Bezigon tool. These include the face, hair, main clothing elements, and the general background. Focus on creating solid, closed shapes. Don’t worry about final colors yet; use placeholder colors to distinguish the shapes.
- Add Main Features: Once the base shapes are complete, move on to outlining distinct features such as eyebrows, eyes, nose, mouth, and any prominent accessories. Again, use the Pen or Bezigon tool to create these shapes, ensuring they are layered correctly over the base.
- Defining Lights, Shadows, Mid-tones, and Outlines: This is where the artistry truly comes into play. Observe your reference image for lighter reflexes, darker “mid-tones,” and even deeper “shadows.”
- Light Spots: Identify areas where light directly hits, creating highlights. Draw solid shapes for these lighter areas. Think about the direction of light and how it affects different surfaces (skin, hair, fabric).
- Mid-tones: Outline the areas that are darker than the base color but not the deepest shadows. These add depth and form. Pay attention to subtle variations, like on eyelids or nails.
- Shadows: Define the darkest areas, such as the underside of the chin, inner arms, or areas where objects cast shadows. These shapes provide significant three-dimensionality.
- Final Outlines: Add more solid, darker outlines at key intersection points to better delineate shapes, such as fingers, arms, or the division between the face and neck. This enhances definition and adds a graphic quality.
- Handling Accessories: If the portrait includes metallic accessories (jewelry, glasses), pay special attention to how light reflects off them. Use multiple layers of lighter shapes—from base metallic color to small, intense highlights—to simulate shine and texture.
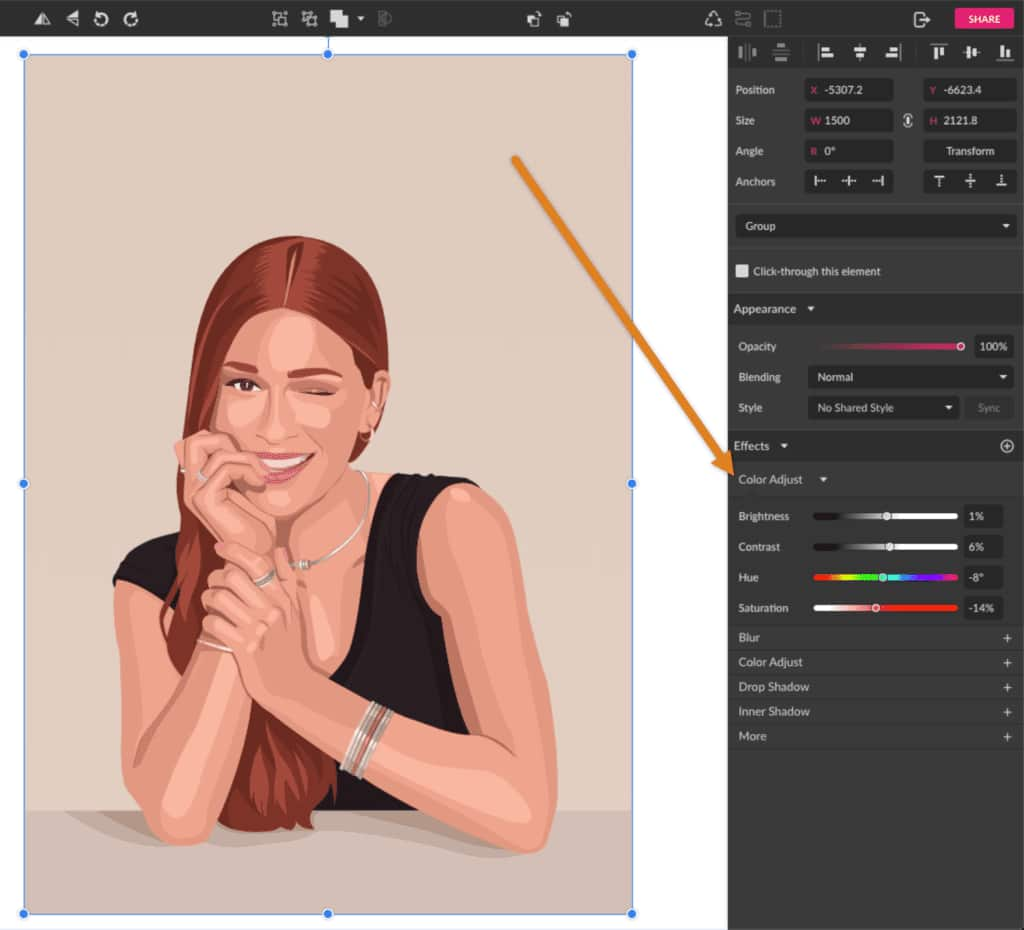
- Refine and Final Touches: Once all shapes are in place, you can tweak the color palette, adjust hues and saturations, or apply blending modes for stylistic effects. Experiment with different styles, from blurry shapes to minimalistic or more realistic approaches.
This manual tracing process is a cornerstone of “Digital Art” and “Photo Manipulation,” transforming a “Beautiful Photography” piece into a personalized vector illustration. It allows for limitless “Creative Ideas” and can yield unique results for “Image Inspiration & Collections” on Tophinhanhdep.com.
Crafting Vector Images from Scratch: Pure Creativity
Beyond transforming existing images, vector graphics software provides a powerful canvas for pure creation, allowing designers and artists to build imagery entirely from their imagination. This method is fundamental to “Graphic Design” and forms the basis for countless “Digital Art” projects, from abstract compositions to intricate illustrations.
Building with Basic Shapes and the Shape Builder Tool
One of the most intuitive ways to start creating vector images from scratch is by utilizing geometric shape tools. Almost all vector editors, including Adobe Illustrator, Corel Vector, and Inkscape, offer a suite of basic shape tools that can be combined, subtracted, and manipulated to form more complex designs.
Here’s how you can leverage these tools:
- Start with Basic Shapes: Begin by drawing fundamental shapes like rectangles, ellipses (circles), polygons (triangles, hexagons), and stars. For instance, to create a simple icon or a cartoon character, you might start with circles for the head, ellipses for the body, and rectangles for limbs. The key is to think of your final design as a collection of simpler geometric forms.
- Combine and Overlap: Position these basic shapes, allowing them to overlap where necessary to form new contours. This overlapping is where the magic begins.
- The Shape Builder Tool (Adobe Illustrator): This is an incredibly powerful and intuitive tool for combining and subtracting shapes.
- Select multiple overlapping shapes.
- Activate the Shape Builder Tool (often keyboard shortcut Shift + M).
- To combine shapes, simply click and drag across the areas you want to merge. The tool intelligently merges selected segments into a single, unified shape.
- To subtract areas (like cutting a hole or trimming excess), hold down the Alt/Option key and click on the unwanted segments. This allows you to precisely carve out parts of your overlapping shapes.
- Pathfinder Panel (General): Most vector software also includes a “Pathfinder” or “Boolean Operations” panel. This panel offers a range of functions like “Unite,” “Minus Front,” “Intersect,” and “Exclude,” which perform similar combining and subtracting actions on selected shapes. While less interactive than the Shape Builder, it’s equally effective for precise modifications.
- Refine and Color: Once your basic structure is formed, you can refine the shapes using direct selection tools to adjust individual anchor points and Bezier handles. Then, apply colors to fill the shapes and strokes to define their outlines. Experiment with different color palettes to create various moods and aesthetics, from vibrant and “Aesthetic” to more subtle and “Abstract” designs.
This method, building complex forms from simple primitives, is a cornerstone of “Graphic Design” and helps develop a strong understanding of form and composition. It’s perfect for creating icons, logos, simple illustrations, and elements for “Mood Boards” or “Thematic Collections” found on Tophinhanhdep.com.
Embracing Freehand and Digital Art Techniques
Vector creation isn’t limited to precise geometric constructions. Modern vector software also supports freehand drawing styles, allowing for expressive and organic digital art.
- Brush and Pencil Tools: Tools like the Pencil Tool and Brush Tool enable you to draw freeform paths similar to traditional drawing. These paths are automatically converted into editable vector lines. You can then adjust their thickness, color, and even apply artistic brush definitions to mimic various media like watercolor or calligraphy.
- Outline Stroke: A particularly useful technique for turning brush strokes into solid vector shapes is “Outline Stroke” (Object > Path > Outline Stroke in Illustrator). This converts the stroke itself into a filled shape, making it fully scalable and editable like any other vector object. This is excellent for creating stylized lettering or converting hand-drawn lines into solid graphic elements.
- Stylistic Variations: The beauty of vector graphics lies in their adaptability. You can explore:
- Minimalistic Styles: Using clean lines, limited colors, and simplified forms for a modern, impactful look.
- Realistic Styles: Employing numerous small shapes, gradients, and subtle color shifts to mimic photographic detail, often seen in advanced vector portraits.
- Blurry Shapes: While typically associated with rasters, some vector effects can create soft, diffused edges, offering a unique blend.
- Greyscale Patterns: Creating impactful designs using only shades of grey, emphasizing form and contrast.
- Flat Design: A popular trending style characterized by clean, open space, crisp edges, bright colors, and two-dimensional illustrations, perfect for web and app interfaces.
Tophinhanhdep.com, a hub for “Image Inspiration & Collections” and “Trending Styles,” encourages artists to experiment with these diverse vector techniques. Whether you’re designing a new logo for a client, creating a vibrant digital illustration for social media, or developing unique graphics for “Wallpapers” and “Backgrounds,” the ability to create vector images from scratch offers boundless “Creative Ideas” and allows for the development of a distinctive artistic voice.
Optimizing and Exporting Your Vector Creations
Creating a stunning vector image is only half the battle; knowing how to properly save, optimize, and export it for various uses is equally critical. This final stage ensures your “Digital Art” and “Graphic Design” projects maintain their quality and versatility across different platforms and applications, from “High Resolution” prints to lightweight web assets. This also ties directly into “Image Tools” such as converters, compressors, and optimizers available for digital content.
Choosing the Right File Format for Your Project
The format in which you save your vector image is crucial, as each has specific characteristics and ideal use cases. It’s always best practice to maintain a master copy in the native file format of the software you used (e.g., .AI for Adobe Illustrator, .GRAVIT for Corel Vector, or .SVG for Inkscape) to ensure maximum editability. When exporting for use, consider these common vector formats:
- SVG (Scalable Vector Graphics): This open-standard XML-based vector image format is highly popular, especially for web applications. SVGs are lightweight, support interactivity and animation, and scale perfectly in web browsers. They are an excellent choice for icons, logos, and illustrations on websites and digital interfaces. Many “Image Inspiration & Collections” on Tophinhanhdep.com utilize SVG for their web-friendly nature.
- AI (Adobe Illustrator Artwork): This is Adobe Illustrator’s native file format. It retains all layers, paths, and effects, making it ideal for ongoing editing and complex projects within the Adobe ecosystem. If you’re collaborating with other designers or expect further revisions, AI is the format to use.
- EPS (Encapsulated PostScript): A widely supported vector format, EPS files are often used for professional printing and are compatible with various design software. They can contain both vector and raster data, making them versatile for different print applications.
- PDF (Portable Document Format): While commonly associated with documents, PDFs can also embed vector data, making them scalable. They are excellent for sharing print-ready designs, ensuring consistent viewing across different devices and operating systems. When you download a tutorial or a printable copy from a design resource like Tophinhanhdep.com, it’s often in PDF format, sometimes containing vector elements.
When exporting, go to File > Export > Export As (or similar menu options in your software). Choose the appropriate format, name your file, and specify the export settings (e.g., resolution for rasterized elements within a PDF, or specific SVG output options). Always aim for the highest quality when exporting to maintain the integrity of your “Digital Photography” or “Digital Art” transformed into vector.
Integrating Vectors into Your Visual Content Strategy
Vector images are incredibly versatile assets that can significantly enhance your “Visual Design” strategy across multiple categories listed on Tophinhanhdep.com:
- Wallpapers and Backgrounds: While many wallpapers are high-resolution raster images, vector art can create stunning “Aesthetic,” “Nature,” or “Abstract” wallpapers. These can be custom-scaled for any screen resolution, ensuring pixel-perfect display without blur.
- Photography Transformations: Vectorizing “Beautiful Photography” or even “Sad/Emotional” images allows for stylistic interpretations that become unique “Digital Art” pieces. These can then be used in various contexts, offering fresh perspectives on visual narratives.
- Image Tools Synergy: Vector images seamlessly integrate with various image tools. They can be converted to raster formats (like PNG or JPG) at any desired resolution using converters, without ever needing an “AI Upscaler” because they are inherently resolution-independent. They are often inherently optimized due to their mathematical nature, though complex vector files can still be streamlined using optimization techniques.
- Visual Design and Creative Ideas: For “Graphic Design” projects, vectors are indispensable. They can be part of “Photo Manipulation” to add graphic elements, or they can be the core of entirely new illustrations driven by “Creative Ideas.” Using vector graphics for “Mood Boards” and “Thematic Collections” ensures that all elements are consistently scalable and editable, allowing for greater flexibility in project development.
- Trending Styles: Many current “Trending Styles” in design, such as flat design, geometric art, and line art, are fundamentally vector-based. Keeping your assets in vector format allows you to easily adapt to new aesthetic demands and create content that resonates with contemporary tastes.
In conclusion, creating vector images is a cornerstone of modern digital creativity. Whether you’re starting from an inspiring photograph from Tophinhanhdep.com and meticulously tracing it into a “Vector Portrait” or building a brand-new illustration from geometric shapes, the power of vector graphics lies in their infinite scalability and inherent clarity. By mastering the tools and techniques discussed, you gain the ability to produce visual content that is not only aesthetically pleasing but also supremely adaptable, ready for any application across the diverse world of digital and print media. Embrace the vector revolution and unlock a new level of precision and flexibility in your visual designs.