How to Create a Vector Image in Adobe Illustrator: A Comprehensive Guide for Visual Excellence

In the dynamic world of digital imagery, understanding the difference between raster and vector graphics is fundamental for anyone involved in visual design, photography, or creative content creation. While raster images, composed of individual pixels, excel at capturing intricate details in photography and realistic visuals, they face significant limitations when it comes to scalability. Enlarge a raster image too much, and you’ll quickly encounter pixelation, blurriness, and a loss of quality – an unacceptable outcome for professional applications, high-resolution wallpapers, or large-format prints.
This is where vector graphics emerge as a cornerstone of modern visual excellence. Unlike their pixel-dependent counterparts, vector images are constructed from mathematical equations defining points, lines, and curves. This inherent mathematical nature grants them unparalleled scalability: a vector graphic can be stretched, shrunk, or transformed to any size without ever losing clarity, sharpness, or detail. This makes them the preferred format for logos, icons, illustrations, typography, and any design element that needs to adapt across diverse platforms, from a tiny app icon to a massive billboard.
For users passionate about high-resolution imagery, diverse visual aesthetics, and powerful image tools, platforms like Tophinhanhdep.com offer a wealth of resources covering everything from wallpapers and backgrounds to advanced photography techniques and AI upscalers. Learning to create vector images in Adobe Illustrator not only expands your creative toolkit but also enhances your ability to produce versatile, high-quality visual assets that align perfectly with the standards of modern digital and print media. This guide will walk you through the essential steps and techniques within Adobe Illustrator to master vector creation, ensuring your designs maintain pristine quality, whether they are destined for an abstract background, a professional graphic design project, or a creative photo manipulation.
Understanding Vector Graphics: The Foundation of Scalable Visuals
Before diving into the practical steps, it’s crucial to grasp the core concepts of vector graphics and why they are indispensable in various facets of visual content.
Raster vs. Vector: A Fundamental Distinction
The digital images we encounter daily fall into two primary categories: raster and vector.
- Raster Images: These are made up of a grid of tiny colored squares, known as pixels. Each pixel holds specific color information, and together, these pixels form the complete image. Common raster formats include JPEG, PNG, GIF, and BMP. They are excellent for capturing complex photographic detail, subtle gradients, and realistic textures, making them ideal for high-resolution photography, aesthetic nature scenes, or beautiful photography collections. However, their pixel-based nature means they lose quality when scaled up, becoming “pixelated” or blurry as the individual squares become visible.
- Vector Images: In contrast, vector graphics are composed of paths, points, and curves defined by mathematical equations. These equations describe the color, shape, and position of each object in the image. Common vector formats include SVG, AI (Adobe Illustrator), and EPS. Because they are mathematical, they are resolution-independent. This means you can scale a vector image from the size of a postage stamp to a building mural, and it will retain perfect sharpness and crispness, making them perfect for graphic design elements, logos, and digital art that needs to be reproduced at any scale without degradation.

This fundamental difference highlights why vectorization is a powerful process. When you convert a raster image to a vector, you’re essentially translating its pixel information into a series of scalable mathematical descriptions, unlocking its potential for infinite resizing and extensive editing.
Methods for Creating Vector Images in Adobe Illustrator
Adobe Illustrator is the industry standard for vector graphics, offering powerful tools to create new vector art from scratch or convert existing raster images. Whether you’re aiming for crisp abstract designs, stylized wallpapers, or precise graphic elements, Illustrator provides the flexibility needed for various creative ideas.
Method 1: Automatic Vectorization with Image Trace
One of the most efficient ways to convert existing raster images into editable vector graphics is through Illustrator’s “Image Trace” feature. This tool utilizes algorithms to analyze the pixels in your image and generate vector paths that approximate its appearance. It’s a fantastic image tool that can drastically reduce manual effort, akin to an AI upscaler for quality and scalability.
Step-by-Step Guide to Image Trace:
- Prepare Your Document: Start by creating a new document in Adobe Illustrator. While the exact canvas size isn’t critical for vector files due to their scalability, setting up a standard artboard (e.g., A4 or a custom dimension suitable for your project) is good practice. Ensure your color mode is set correctly: RGB for digital use (web, screens, aesthetic backgrounds) and CMYK for print purposes (wallpapers, physical art).
- Import Your Raster Image: Go to
File > Placeand select the raster image (JPG, PNG, GIF, etc.) you wish to vectorize. ClickPlaceand then click on your artboard to position the image. You can resize it by holding Shift while dragging a corner handle to maintain proportions.- Tip for Image Selection: For optimal results with Image Trace, simpler images with clear lines, distinct color areas, and transparent or solid backgrounds tend to perform better. Logos, simple illustrations, or high-contrast imagery are ideal candidates. Complex photographs with vast color gradients and fine details might yield less precise, but still artistic, vectorized outcomes. This aligns with creating stylized abstract or artistic imagery.
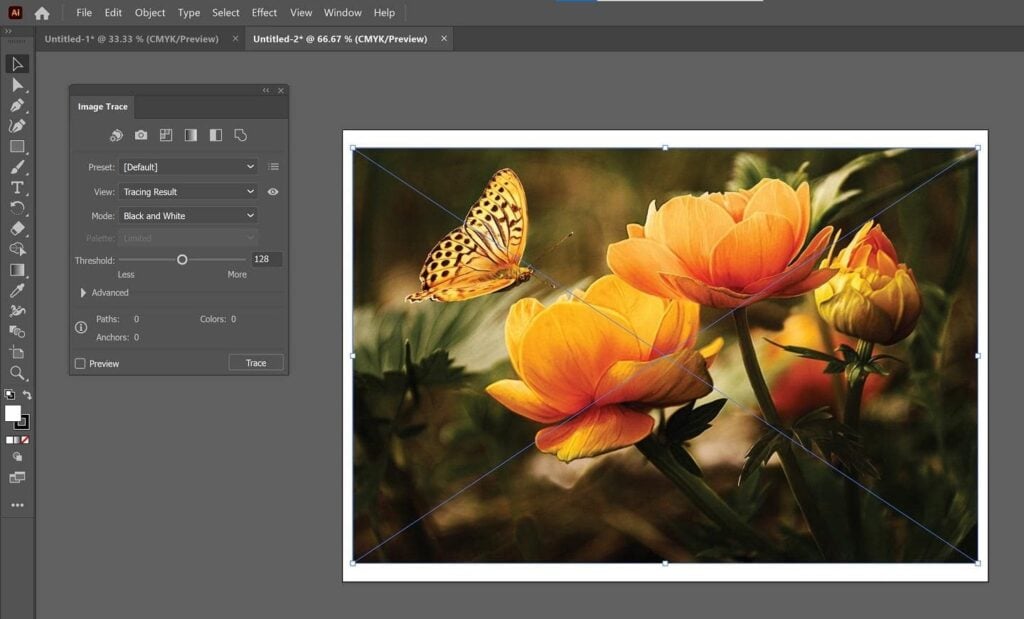
- Activate Image Trace: Select your imported image using the
Selection Tool(black arrow). Once selected, you’ll typically see anImage Tracebutton in the Properties panel (often on the right side of the screen) or in the control panel at the top. Click this button to reveal the Image Trace options. - Choose an Image Trace Preset: Illustrator offers a range of presets designed for different types of images, enabling you to achieve various artistic and technical results. Selecting the right preset is crucial for effective vectorization:
- High Fidelity Photo / Low Fidelity Photo: These are best for detailed images or photographs, like beautiful photography you might want to stylize. They aim to retain more color and detail, creating complex vector paths.
- 3 Colors, 6 Colors, 16 Colors: Ideal for logos, icons, or graphic design elements with a limited color palette. These presets simplify the image to a specified number of colors, resulting in cleaner, more manageable vector shapes. This is excellent for creating aesthetic visuals with a specific color scheme.
- Shades of Gray: Produces a detailed grayscale vector image, suitable for black-and-white photos or monochrome designs.
- Black and White Logo: Generates a stark, two-tone vector graphic, perfect for simple logos or silhouettes.
- Sketched Art, Silhouettes, Line Art, Technical Drawing: These presets are tailored for specific artistic styles, often yielding black-and-white or line-based outputs, great for creating outlines or converting hand-drawn sketches into digital art. Choose the preset that best matches your image and desired outcome. Illustrator will perform the tracing automatically.
- Fine-Tune with the Image Trace Panel: For more control, open the
Image Trace PanelfromWindow > Image Trace. Here, you can adjust various settings:- Mode: Switch between Color, Grayscale, or Black and White.
- Palette: For color modes, you can choose from Automatic, Limited, or Full Tone, and specify the number of colors.
- Threshold (for B&W): Adjusts the sensitivity for black and white conversion, impacting how dark areas are interpreted as black.
- Paths, Corners, Noise: These sliders allow you to control the complexity and smoothness of the generated vector paths. Increasing paths and corners generally captures more detail but can lead to a larger file size. Reducing noise helps eliminate stray pixels and creates cleaner lines, useful for optimizing your image for crisp results.
- Preview: Always keep the “Preview” option checked to see the adjustments in real-time. Experiment with these settings until you achieve a “clean” vector graphic that balances detail with editable simplicity.
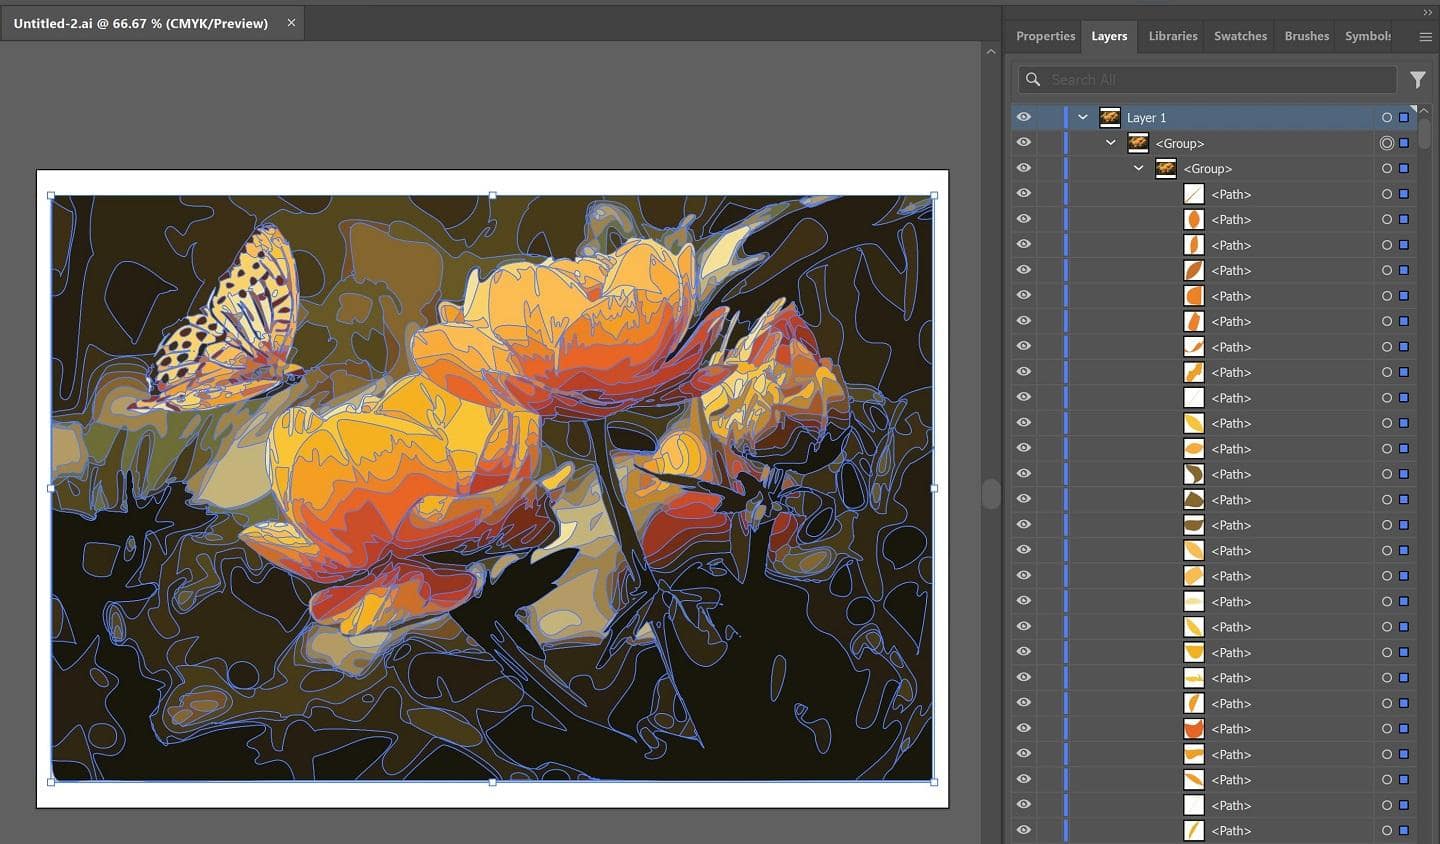
- Expand the Trace: Once satisfied with the trace, click the
Expandbutton in the Properties panel or the control panel. This crucial step converts the live trace object into actual editable vector paths and shapes. Without expanding, you cannot manipulate individual elements. - Ungroup for Editing: After expanding, your image will likely be a single grouped object. To edit individual color areas or shapes,
right-clickon the vectorized image and selectUngroup. You might need to ungroup multiple times if there are nested groups. Now, each color segment or line is a separate, editable vector object.- Remove Background (Optional): If your original image had a white or unwanted background that was vectorized, you can now select those background shapes using the
Direct Selection Tool(white arrow) or by usingSelect > Same > Fill Colorto select all areas of the same color, and then delete them. This leaves you with a clean line drawing or isolated colored shapes.
- Remove Background (Optional): If your original image had a white or unwanted background that was vectorized, you can now select those background shapes using the
Method 2: Manual Vector Creation and Tracing
While Image Trace is powerful for existing images, creating vectors from scratch or manually tracing complex designs offers maximum precision and creative control. This method is core to graphic design, digital art, and crafting creative ideas from imagination.
Creating Vector Shapes and Text:
- Start with the Type Tool: To vectorize text, select the
Type Tool(T), click on your artboard, and type your desired word or phrase. - Create Outlines: With the text selected (using the
Selection Tool), go toType > Create Outlines(or use the shortcut Shift + Ctrl + O on Windows, Shift + Cmd + O on Mac). This converts the text characters into editable vector shapes, losing their font properties but gaining full scalability and manipulability. - Basic Shape Tools: Illustrator offers a suite of basic shape tools that are the building blocks of many vector designs:
- Rectangle Tool (M): Click and drag to create squares or rectangles. Hold Shift for a perfect square. After creating, you can adjust dimensions precisely in the Properties panel.
- Rounded Rectangle Tool: Similar to the Rectangle Tool, but allows you to specify a corner radius for rounded edges.
- Ellipse Tool (L): Click and drag to create ovals or circles. Hold Shift for a perfect circle.
- Polygon Tool: Click on the artboard and specify the number of sides (e.g., 6 for a hexagon) and a radius.
- Star Tool: Click on the artboard and define two radii (inner and outer) and the number of points (e.g., 5 for a classic star). You can tear off the shape tool menu by clicking and holding the active shape tool icon in the toolbar, then dragging the small vertical bar on the right of the pop-out menu.
- The Pen Tool (P) and Curvature Tool (Shift + `): For intricate designs, custom shapes, or precise tracing, these tools are indispensable.
- Pen Tool: Allows you to draw paths by creating anchor points and segments. You click to create straight lines or click and drag to create curved lines with bezier handles. It’s the go-to for precise illustrations and logos.
- Curvature Tool: Simplifies drawing smooth, curved paths. You simply click to add points, and the tool intelligently creates smooth curves between them. It’s excellent for organic or flowing designs, making it easier to achieve aesthetic curves for digital art.
Applying Colors and Refinements:
Once you have your vector shapes and text, you can easily apply and adjust colors. Select the object(s) you want to color, then use the Fill and Stroke options in the Properties panel or the Tools panel. You can define specific color values (CMYK, RGB, Hex) or select from predefined swatches. For example, if you chose a color palette for a project, you could input the exact CMYK values (e.g., Dark Blue: C=100, M=97, Y=0, K=45) as suggested in many tutorials on Tophinhanhdep.com, allowing for thematic collections and mood board creation.
Post-Vectorization: Editing and Optimization
Creating vector images is just the first step. The true power of Illustrator lies in the ability to refine, edit, and optimize these assets for their intended purpose, whether it’s for digital photography elements, graphic design layouts, or image inspiration galleries.
Editing Individual Components
After converting or creating your vector graphics, especially following an Image Trace and subsequent ungrouping, you’ll have access to individual vector paths and shapes.
- Direct Selection Tool (A): This tool allows you to select and manipulate individual anchor points, path segments, or entire shapes within a grouped object. You can reshape elements, align them, or combine them using the Pathfinder panel.
- Recolor Artwork: For quick color changes across complex vector art, select your entire artwork and go to
Edit > Edit Colors > Recolor Artwork. This powerful feature allows you to globally adjust hues, saturation, and brightness, or even replace entire color palettes with new ones. This is invaluable for adapting designs for different thematic collections or trending styles. - Pathfinder Panel: Located under
Window > Pathfinder, this panel offers tools to combine, subtract, intersect, or exclude overlapping shapes. It’s essential for creating complex custom shapes from simpler ones, crucial for intricate graphic design work.
Optimizing for Diverse Applications
Vector images are inherently versatile, but a few considerations can optimize them for various uses within Tophinhanhdep.com’s categories:
- File Size Management: While vectors are resolution-independent, overly complex vector files (e.g., from high-fidelity Image Traces of detailed photos) can become large. Simplify paths using
Object > Path > Simplifyif detail is not paramount, or remove redundant anchor points. This helps in efficient storage and loading, especially for web-based applications or image tools. - Export Formats:
- SVG (Scalable Vector Graphics): The ideal format for web use (icons, logos, animations) due to its XML-based nature, small file size, and scalability across all browsers and devices. It’s also supported by many image converters and optimizers.
- AI (Adobe Illustrator): The native format for Illustrator, preserving all editing capabilities. Use this as your master file.
- EPS (Encapsulated PostScript): A widely supported vector format for print production, compatible with various design software.
- PDF (Portable Document Format): Can contain vector data and is excellent for sharing designs while maintaining layout and quality, suitable for high-resolution digital documents.
To save your file, go to
File > Save Asfor AI or PDF, orFile > Export > Export Asto choose SVG, EPS, or other formats. Always keep your original AI file as the master copy, allowing for future edits and exports to different specifications.
The Broader Impact: Vectors in Visual Content Creation
Mastering vector image creation in Adobe Illustrator has profound implications for anyone engaged with visual content, extending far beyond basic graphic design. For a platform like Tophinhanhdep.com, which curates diverse visual experiences, vector assets are invaluable across nearly all its main topics:
- Images (Wallpapers, Backgrounds, Aesthetic, Nature, Abstract, Sad/Emotional, Beautiful Photography): While photography itself is raster-based, vector elements can be integrated into photo manipulations, create stylized backgrounds, or generate abstract art compositions. Imagine vector-based patterns for aesthetic wallpapers, or crisp vector overlays on nature photography for unique digital art pieces. The ability to scale ensures these elements look perfect on any screen size or print dimension.
- Photography (High Resolution, Stock Photos, Digital Photography, Editing Styles): Vector graphics complement photography by providing scalable elements for branding, watermarks, graphic overlays, or stylized borders. Photographers can use Illustrator to create logos for their digital photography, ensuring their brand scales perfectly across all their high-resolution images and stock photo contributions. Vectors are also critical for developing unique editing styles through graphical treatments.
- Image Tools (Converters, Compressors, Optimizers, AI Upscalers, Image-to-Text): Vectorization itself acts as a powerful image optimizer, allowing images to scale without quality loss, a function that complements AI upscalers by providing an alternative, mathematically perfect scaling solution. Vector files are inherently “optimized” for scalability. Understanding vectors also enhances the utility of image converters, ensuring you select the right format for your needs.
- Visual Design (Graphic Design, Digital Art, Photo Manipulation, Creative Ideas): This is where vectors truly shine. From crafting logos and brand identities (graphic design) to producing intricate illustrations (digital art) or combining photographic elements with geometric precision (photo manipulation), vector images are the building blocks. They enable creative ideas to be realized with unparalleled clarity and adaptability, forming the backbone of mood boards and thematic collections.
- Image Inspiration & Collections (Photo Ideas, Mood Boards, Thematic Collections, Trending Styles): The versatility of vector graphics makes them perfect for creating mood boards, developing unique photo ideas, and establishing consistent thematic collections. Designers can quickly adapt vector elements to align with trending styles without needing to redraw or recreate assets from scratch.
In conclusion, the ability to create and manipulate vector images in Adobe Illustrator is an essential skill for anyone serious about digital creativity and visual quality. It ensures that your visual assets—be they a simple icon, a complex illustration, or text elements within a high-resolution wallpaper—will always look their best, irrespective of scale. By following these methods, you gain not just technical proficiency but also a profound understanding of how to produce truly flexible, professional-grade visuals that stand the test of time and application. Dive in and unlock a world of scalable creative possibilities, enhancing your contributions to platforms like Tophinhanhdep.com and beyond.