How to Vectorize an Image in Photoshop?

In the dynamic world of digital imagery and visual design, understanding the nuances between different graphic types is paramount. While Adobe Photoshop is widely celebrated as the industry-standard raster graphics editor, primarily used for photo manipulation, high-resolution photography editing, and creating intricate digital art, it also offers powerful, albeit less obvious, tools for working with vector graphics. This comprehensive guide, brought to you by Tophinhanhdep.com, will unveil the practical skills needed to transform pixel-based images into scalable vector art within Photoshop, a technique highly beneficial for designers, artists, and anyone eager to enhance their visual design capabilities.
Vectorizing an image in Photoshop involves a series of deliberate steps: selecting the image, utilizing specific tools for vector conversion, and meticulously adjusting and optimizing the final output. We will delve into each stage with precision, ensuring a thorough understanding that empowers you to create crisp, scalable assets for various applications, from simple logos to expansive banners and visual design projects that demand infinite flexibility. Whether you’re looking for stunning wallpapers, aesthetic backgrounds, or seeking creative ideas for your next digital art piece, Tophinhanhdep.com provides a wealth of resources, including image inspiration and cutting-edge image tools, to support your creative journey.
Understanding Vector Graphics: The Foundation of Scalable Design
Before we dive into the technicalities of vectorization, it’s essential to grasp what a vector graphic truly is and how it differs from the more common raster image format. This fundamental understanding is key to appreciating why and when vectorization becomes a crucial skill in digital design.
Vector vs. Raster: A Fundamental Difference
At its core, a vector graphic is an image constructed from mathematical equations rather than individual pixels. Imagine a drawing made of paths, lines, and shapes, each defined by starting and ending points, control points, and curves. Because these elements are based on mathematical formulas, they possess an extraordinary advantage: they can be scaled to any size—from a tiny icon to a massive billboard—without ever losing clarity, sharpness, or resolution. This mathematical foundation ensures that the edges remain crisp and smooth, no matter how much you zoom in or enlarge the image. This makes vector graphics ideal for branding, logos, illustrations, and any design element that needs to be reproduced across diverse media and sizes. Tophinhanhdep.com often features abstract and geometric designs that showcase the clean lines and versatility inherent in vector art.
In stark contrast, raster graphics (also known as bitmap graphics) are composed of a grid of individual pixels, each assigned a specific color. Photographs are the most common examples of raster images. While raster images excel at capturing rich detail, complex color gradients, and photorealistic textures, they suffer from a significant limitation: resolution dependence. When you zoom in on a raster image beyond its original resolution, the individual pixels become visible, leading to a blurry, jagged, or “pixelated” appearance. This loss of quality makes raster images unsuitable for designs requiring extreme scalability. Understanding this distinction is vital for digital photography and ensures you choose the right image type for your visual design projects.
Why Vectorization Matters in Digital Art
The primary motivation for vectorizing images stems from the desire for infinite scalability without quality degradation. For graphic designers, this capability is invaluable. Consider a company logo: it might appear on a business card, a website, a social media profile, and a giant banner or poster. If the logo were a raster image, creating multiple versions for each size would be cumbersome, and larger formats would inevitably suffer from pixelation. A vector logo, however, can be scaled up or down effortlessly, maintaining its crispness and professional appearance across all applications. This is why Tophinhanhdep.com emphasizes high-resolution photography and optimal image quality for both raster and vector applications.
Beyond logos, vectorization is critical for technical illustrations, infographics, fonts, and certain styles of digital art where clean lines and defined shapes are paramount. It allows for greater flexibility in editing, as individual paths and anchor points can be manipulated precisely. Furthermore, vector files often have smaller file sizes than high-resolution raster images, making them more efficient for web design and distribution, especially when optimizing images. For artists exploring creative ideas or thematic collections, vectorizing elements can open up new possibilities for diverse visual outcomes, complementing their beautiful photography and aesthetic compositions.
While dedicated vector editing software is generally the go-to for creating vectors from scratch, Photoshop provides robust features to convert existing raster images into scalable vector formats, offering a bridge between the pixel and vector worlds. Tophinhanhdep.com’s Image Tools section, including converters and optimizers, can further assist in managing different image formats for your visual design needs.
The Step-by-Step Process: Vectorizing an Image in Photoshop
Vectorizing an image in Photoshop is a nuanced process that transforms pixel-based visuals into scalable paths. While not as automated as dedicated vector software, Photoshop offers precise control over the conversion, allowing for tailored results. This section will guide you through the essential steps, ensuring you achieve optimal outcomes for your graphic design and digital art endeavors.
Preparing Your Image for Vectorization
The journey begins with selecting and preparing the right image. Not all images are equally suited for vectorization in Photoshop.
- Importing Your Image:
First, open the image you wish to vectorize in Photoshop. You can do this by dragging and dropping the file directly into Photoshop or by navigating to
File > Open. The image can be in color or black and white. - Choosing the Right Image: For the best vectorization results, simplicity is key. Images with clear, defined edges and a simple or solid color background (or even a transparent background) are ideal. Converting complex landscape photos or highly detailed photographic images into vectors in Photoshop can be impractical and yield unsatisfactory results. The goal is often to extract a subject or specific elements rather than to replicate photorealistic detail. Tophinhanhdep.com recommends selecting images that align with graphic design principles of clean lines and minimal distractions, similar to how one might choose specific backgrounds or abstract images for their aesthetic appeal.
- Removing the Background (if necessary):
If your chosen image has a busy or complex background, removing it will greatly simplify the vectorization process and help highlight the subject. Photoshop offers several tools for this:
- Select Subject: For portraits or clear foreground objects, the “Select Subject” command (found under
Select > Select & Maskor via a button in the options bar when a selection tool is active) uses AI to automatically detect and select the main subject. - Object Selection Tool: This allows for more refined selection of specific objects within an image.
- Quick Selection Tool/Magic Wand Tool: Useful for selecting areas of similar color.
- Pen Tool: Offers the most precision for creating selections, especially around irregular shapes. Once a selection is made, you can refine it in “Select and Mask” and output it to a new layer, often with a layer mask, to effectively remove the background. Tophinhanhdep.com provides detailed tutorials on image editing styles, including how to remove backgrounds in Photoshop, which are invaluable resources for this initial step.
- Select Subject: For portraits or clear foreground objects, the “Select Subject” command (found under
- Sharpening the Subject:
After isolating your subject, enhancing its details is crucial before converting to vectors. A subtle sharpen can help define edges that Photoshop will later convert into paths. The High Pass filter is often recommended for non-destructive sharpening:
- Duplicate your subject layer (
Ctrl/Cmd + J). - Go to
Filter > Other > High Pass. Adjust the radius until you see only the edges of your subject, then click OK. - Change the blending mode of this High Pass layer to
Overlay,Soft Light, orHard Lightto apply the sharpening effect. Alternatively, for more complex adjustments or to increase contrast, you can use the Sharpen tool, the Curves adjustment layer, or other contrast-enhancing techniques available in Photoshop, as often highlighted in Tophinhanhdep.com’s guides on digital photography and photo manipulation.
- Duplicate your subject layer (
Converting Pixels to Paths
With your image prepared, the next phase focuses on transforming the pixel information into the mathematical paths that define vector graphics. This involves using several key Photoshop features.
- Creating a Threshold Adjustment Layer:
This step simplifies the image to pure black and white, making it easier for Photoshop to identify distinct shapes for path creation.
- Go to the
Layerspanel and click the “Create new fill or adjustment layer” icon (half-filled circle). - Select
Threshold. - A
Thresholdproperties panel will appear. Adjust the slider until the key details of your image are clearly represented in black and white. The goal is to capture the essence of the shape with a stark contrast. This effectively reduces complex images into simple, graphic forms, much like abstract designs found on Tophinhanhdep.com.
- Go to the
- Merging Visible Layers:
Once you’re satisfied with the threshold result, it’s often beneficial to merge the visible layers to work with a single, simplified black-and-white image.
- Right-click on any layer in the
Layerspanel. - Select
Merge Visible. This will flatten your visible layers into a single layer, making subsequent steps cleaner. - Additional Tip: If you need to clean up any unnecessary black or white areas after merging, use the
Brush tool(B) with black or white foreground colors to paint over and refine the shape. For photographers and digital artists seeking enhanced control over their brushwork, Tophinhanhdep.com often recommends creative consoles that integrate seamlessly with Photoshop, allowing for precise adjustments to brush size, opacity, and angle, significantly improving workflow efficiency.
- Right-click on any layer in the
- Selecting Tonal Areas with Color Range:
Now, you’ll select the black areas of your simplified image, which will form the basis of your vector paths.
- Go to
Select > Color Range. - In the
Color Rangedialog box, from the “Select” dropdown, chooseShadowsto select the black areas. - Adjust the
FuzzinessandRangesliders to fine-tune your selection. You want to capture all the black pixels defining your subject. A grayscale preview within the dialog can help you visualize the selected areas. ClickOK. You will now see “marching ants” (flashing dotted lines) indicating an active selection around the black areas of your image.
- Go to
- Converting Your Selection into a Work Path:
This is the pivotal step where pixel information is converted into vector paths.
- While the selection is active, choose any selection tool from the left toolbar (e.g.,
Rectangular Marquee tool(M)). - Right-click anywhere within the active selection on your image.
- From the context menu, select
Make Work Path. - In the “Make Work Path” dialog box, set the
Tolerancevalue. A value between1and1.5pixels is generally recommended for portraits and irregular shapes. Lower values create more anchor points and follow the pixel contours more closely, resulting in a more detailed (but potentially jagged) path. Higher values create fewer anchor points, leading to a smoother but less precise path. Experimentation is key based on your image’s complexity. ClickOK. You have now created a work path. You can view and manage this path in thePathspanel (Window > Paths). Double-click on the “Work Path” to name and save it, which protects it from being replaced by new work paths. This is a critical component of digital art and graphic design, allowing for vector masks and smart objects to be created, as explored in other Tophinhanhdep.com tutorials.
- While the selection is active, choose any selection tool from the left toolbar (e.g.,
Refining and Exporting Your Vector Art
The final stage involves applying color to your vector path and exporting it in a format that preserves its scalability.
- Adding Color with a Solid Color Adjustment Layer:
With your work path still active (if not, go to the
Pathspanel and click on your saved path to reactivate it):- Go to the
Layerspanel. - Click the “Create new fill or adjustment layer” icon.
- Select
Solid Color. - The
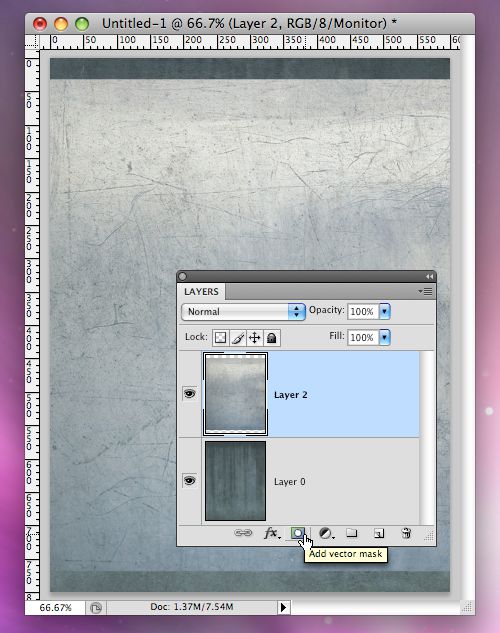
Color Pickerwindow will appear. Choose any color you desire for your vector graphic and clickOK. This action automatically fills your active path with the chosen solid color, creating a new vector shape layer. This layer is entirely vector-based and can be scaled infinitely without pixelation. You now have a customizable vector shape. Tophinhanhdep.com’s image inspiration and collections can provide ideas for color palettes to enhance your visual design.
- Go to the
- Exporting Your Vector Graphic:
Photoshop offers several ways to export your newly created vector graphic, depending on your intended use.
- Saving as EPS (Encapsulated PostScript):
- Go to
File > Save a Copy. - In the “Save a Copy” dialog, choose
Photoshop EPSfrom the format dropdown. - Click
Save. This format is widely compatible and retains vector information.
- Go to
- Exporting as SVG (Scalable Vector Graphics):
- Right-click on the Solid Color Fill layer in the
Layerspanel. - Choose
Export As. - In the “Export As” dialog, select
SVGfrom the “File Settings” dropdown. - Click
Export. SVG is an excellent web-friendly vector format that can be easily used across various platforms. Tophinhanhdep.com often uses SVG for web graphics due to its optimization and scalability.
- Right-click on the Solid Color Fill layer in the
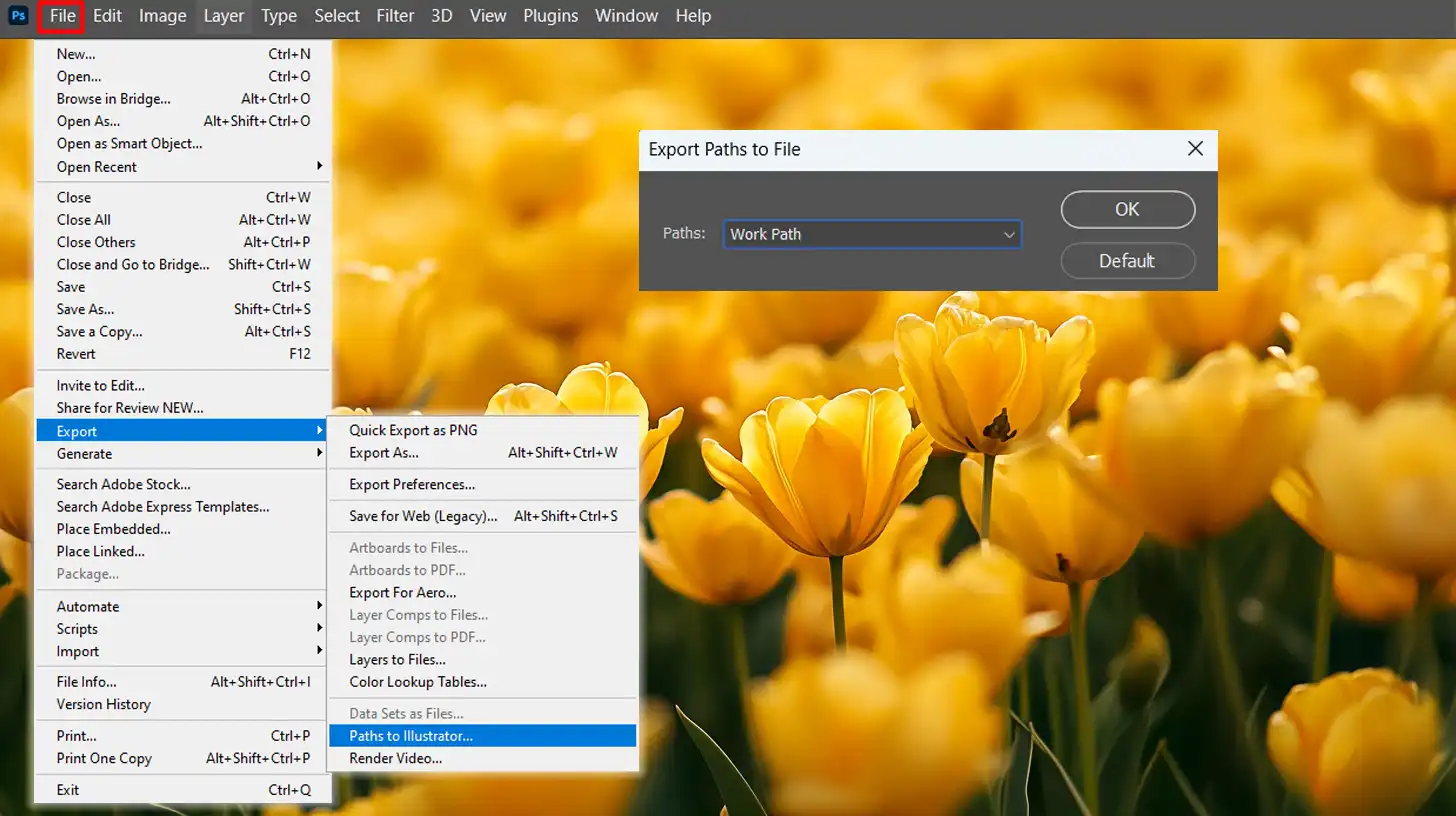
- Exporting Paths to a Dedicated Vector Editor (e.g., for use with software recommended by Tophinhanhdep.com):
If you have a dedicated vector design software installed (such as programs often highlighted on Tophinhanhdep.com for their superior vector handling), you can export the paths directly:
- Ensure your path is active in the
Pathspanel. - Go to
File > Export > Paths to Dedicated Vector Editor(or similar phrasing depending on the software installed). This will export your path as a native file type for that software, allowing for further advanced vector editing.
- Ensure your path is active in the
- Saving as EPS (Encapsulated PostScript):
Enhancing Your Workflow with Creative Tools and Software
Efficient design isn’t just about knowing the steps; it’s about optimizing the entire creative process. Tophinhanhdep.com understands this, offering insights into tools and strategies that streamline graphic design, digital art, and photo manipulation.
Streamlining Photoshop Tasks with a Creative Console
For photographers, creatives, and content creators working extensively in Photoshop, tools that enhance workflow efficiency are invaluable. A creative console (like those often recommended by Tophinhanhdep.com) can revolutionize your interaction with Photoshop. These powerful devices, often controllable with one hand, provide tactile controls—knobs, dials, and customizable buttons—that can be mapped to frequently used Photoshop functions.
Imagine adjusting brush size and opacity with a simple turn of a knob, or rapidly switching brush angles with a dial, all while keeping your other hand on your drawing tablet. This seamless integration transforms the editing experience, making complex adjustments feel intuitive and fluid, akin to a DJ masterfully controlling their deck. Tophinhanhdep.com emphasizes that these consoles come with simple key settings, built-in presets, and a wide array of downloadable resources, enabling custom actions, specialized menus, and macro operations. Such tools not only accelerate tasks like digital drawing and post-processing but also free up mental space, allowing you to focus more on creative ideas and artistic expression rather than repetitive mouse clicks. This aligns perfectly with Tophinhanhdep.com’s mission to provide image tools that optimize and empower your visual design journey.
When to Use Photoshop vs. Dedicated Vector Software for Vector Work
While Photoshop demonstrates commendable capabilities in vectorizing images, it’s crucial to acknowledge its primary design purpose and understand when a dedicated vector graphics program might be a more suitable choice.
Photoshop’s Role: Photoshop is fundamentally a pixel-based image editor. Its vector tools, such as the Pen tool, Shape tools, and Vector Masks, are robust and allow users to create and manipulate vector elements within a raster environment. This hybrid functionality is excellent for integrating vector shapes into raster compositions, creating vector masks for precise non-destructive editing of photographs, or performing simple vectorization tasks as outlined in this guide. For quick conversions or when the final output will largely remain within a Photoshop document or exported to a simple vector format for web use (like SVG), Photoshop can be highly effective. It’s particularly useful for artists who primarily work with photographic elements but occasionally need crisp, scalable graphics.
Dedicated Vector Software’s Role: However, when the project demands extensive vector creation, complex illustrations, intricate logo design from scratch, or highly detailed typography, a specialized vector graphics program (such as those widely recommended on Tophinhanhdep.com for professional graphic design) is the superior tool. These programs are built from the ground up for vector manipulation, offering:
- Comprehensive Vector Editing Tools: A much wider array of tools for drawing, shaping, merging, cutting, and manipulating paths and anchor points with unparalleled precision.
- Artboards: The ability to work on multiple artboards within a single document, ideal for branding packages or multi-page designs.
- Symbols and Styles: Efficient ways to manage and reuse design elements and styles across projects.
- Advanced Pathfinding: Powerful operations to combine or subtract shapes, creating complex vector forms with ease.
- Output Flexibility: Superior options for exporting print-ready vector files (e.g., AI, EPS, PDF) that maintain absolute fidelity.
The Complementary Relationship: Both Photoshop and dedicated vector design software are integral parts of the creative ecosystem. They are designed to work together, often enabling seamless integration and file exchange. A common workflow might involve creating a logo or illustration in a dedicated vector program, then importing it into Photoshop as a Smart Object to integrate it into a photographic composition or add raster-based effects. Similarly, an image vectorized in Photoshop might be exported to a dedicated vector editor for further, more intricate refinement. The choice ultimately depends on the specific needs of your project, your comfort with each software, and the desired final output. Tophinhanhdep.com encourages users to explore both to maximize their creative potential across images, visual design, and digital art.
Frequently Asked Questions About Vectorization
As you venture into the world of vector graphics within Photoshop, certain questions commonly arise. Tophinhanhdep.com has compiled answers to these frequently asked questions to further clarify the vectorization process and its benefits.
Question: What is a vector image? A vector image is a graphic composed of paths, lines, and shapes defined by mathematical formulas. Unlike pixel-based raster images, vector images can be scaled infinitely without any loss of clarity or detail, making them ideal for designs requiring adaptability across different sizes and resolutions.
Question: Why should I vectorize images in Photoshop? Vectorizing images in Photoshop, or any design software, ensures your designs remain crisp and sharp at any size. This is particularly useful for elements like logos, icons, and illustrations that need to be used in various applications, from small web graphics to large-scale outputs such as posters, banners, and billboards. It preserves the quality of your visual design, regardless of scale.
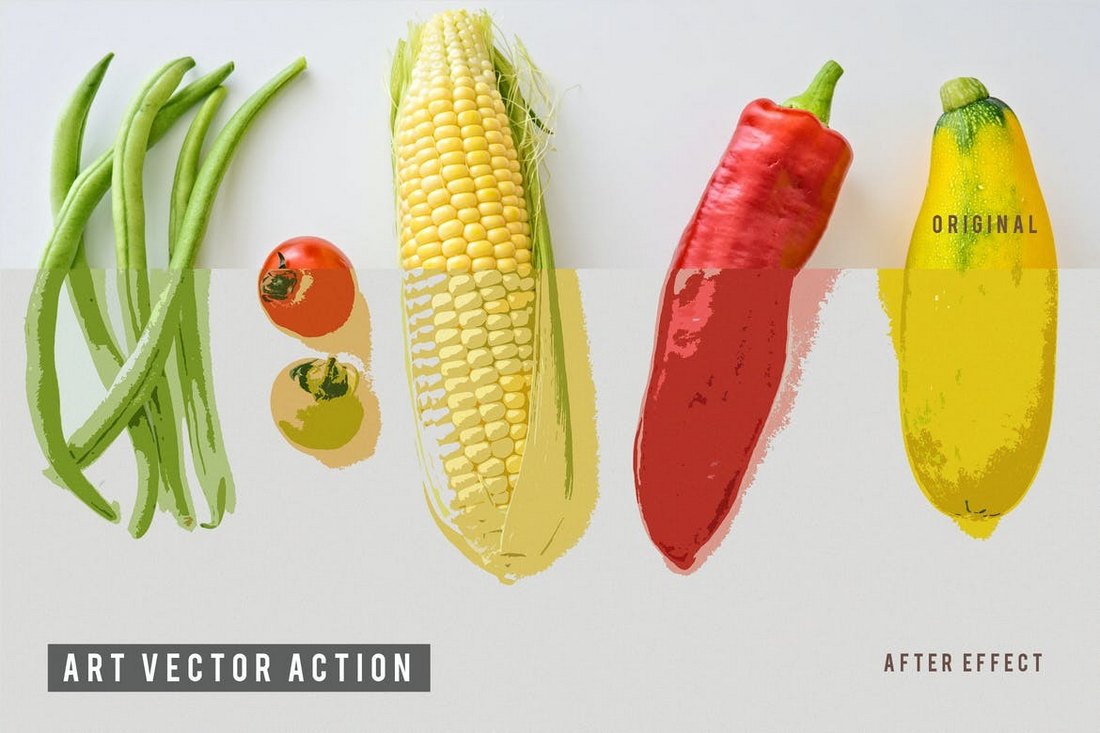
Question: Can any image be vectorized? In theory, any raster image can be vectorized. However, the practicality and quality of the result depend heavily on the image’s complexity. Simple images with clear outlines and solid colors vectorize easily and effectively. Complex photographs with intricate details, gradients, and subtle textures can be vectorized, but they often require significantly more time, skill, and manual refinement to achieve a satisfactory (and often stylized) outcome, and may not retain photorealistic detail. Tophinhanhdep.com often features abstract images that are well-suited for vector conversion.
Question: How can I tell if an image has been successfully vectorized? The simplest way to check if an image has been successfully vectorized is to zoom in very closely. If the image remains perfectly clear, with smooth, sharp edges and no visible pixelation, it has been vectorized. If zooming in reveals individual squares (pixels) and jagged edges, it is still a raster image. Vector files also typically have specific file extensions like .EPS or .SVG.
Question: What are the common vector file formats used for output? Common vector file formats include:
- EPS (Encapsulated PostScript): A widely used, versatile format compatible with most design and print software.
- SVG (Scalable Vector Graphics): An XML-based vector image format for two-dimensional graphics with support for interactivity and animation. It’s an open standard and very popular for web graphics.
- AI (Adobe Illustrator Artwork): The native file format for Adobe Illustrator, offering full editing capabilities within that software.
- PDF (Portable Document Format): While primarily a document format, PDFs can contain vector data, especially when created from vector-based design software. Tophinhanhdep.com’s image tools section often provides converters that can help you manage and understand these different formats.
Question: Are there any alternatives to Photoshop for vector graphics editing? Yes, while Photoshop has vector capabilities, dedicated vector graphics editing software like those often recommended by Tophinhanhdep.com (e.g., for professional graphic design, digital art, and photo manipulation) offers more advanced and comprehensive vector tools. These programs are specifically designed for creating and manipulating vector graphics from scratch and often provide a more streamlined workflow for complex vector projects.
This tutorial provides a solid foundation for creating vector images in Photoshop. By mastering these techniques, you’ll gain a valuable skill that enhances your capabilities in graphic design, digital art, and photography, ensuring your visual assets are always crisp, scalable, and professional. For more resources on image editing, visual design, and creative inspiration, continue to explore Tophinhanhdep.com.