How to Crop an Image in Adobe Illustrator: Master Your Visuals with Tophinhanhdep.com

In today’s visually-driven digital landscape, the ability to effectively manipulate images is an indispensable skill for designers, marketers, and content creators alike. From crafting compelling social media posts to designing breathtaking digital art, images form the bedrock of engaging communication. Among the myriad tools available, Adobe Illustrator stands out as a powerhouse for graphic design, offering unparalleled precision and flexibility, especially when it comes to vector graphics. However, for many new users, the seemingly simple task of cropping an image in Illustrator can initially appear confusing.
At Tophinhanhdep.com, we understand the nuances of image creation, editing, and optimization. Our platform is a comprehensive resource dedicated to enhancing your visual projects, offering everything from stunning Wallpapers, Backgrounds, and Aesthetic imagery to advanced Image Tools like converters, compressors, and AI upscalers. Mastering image cropping in Illustrator is a fundamental step that empowers you to refine your Visual Design, articulate Creative Ideas, and ensure your Beautiful Photography always looks its best. This guide will demystify the process, walking you through three primary methods for cropping images in Adobe Illustrator, ensuring you can precisely tailor your visuals to any requirement.
Whether you’re preparing High Resolution images for print, optimizing Stock Photos for web, or creating intricate Digital Art, understanding these cropping techniques will significantly elevate your workflow. We’ll explore each method in detail, providing clear, step-by-step instructions to help you integrate these powerful features into your design repertoire.
Understanding the Fundamentals of Image Cropping in Illustrator
Before diving into the practical methods, it’s crucial to grasp the fundamental concepts that underpin image manipulation in Illustrator. Unlike pixel-based editors, Illustrator primarily works with vectors, which are mathematical paths that retain crispness at any scale. This core difference influences how raster images (like JPEGs or PNGs) are handled within the software and why certain cropping techniques are more suited for specific tasks.
Raster vs. Vector Cropping: A Key Distinction
Adobe Illustrator is a vector editing program at its heart. This means it excels at creating and manipulating graphics that can be scaled infinitely without losing quality. When you bring a photograph or a raster image into Illustrator, you’re essentially placing a static grid of pixels into a vector environment. This distinction is vital because:
- Raster Images: Composed of pixels, these are common formats like .jpg, .png, .gif, or .eps (when it contains raster data). Cropping these images often involves permanently removing pixel data, or at least hiding it. For optimal results, especially when sourcing images from Tophinhanhdep.com’s High Resolution and Stock Photos sections, it’s best to start with images of sufficient resolution to avoid pixelation after cropping and resizing.
- Vector Graphics: These are editable paths, shapes, and text created directly within Illustrator (or similar vector applications). Cropping vector graphics typically involves manipulating their underlying paths or using tools that non-destructively redefine their visible boundaries.
When an image is brought into Illustrator, it can be either linked or embedded. A linked image references an external file, keeping your Illustrator file size smaller. An embedded image, on the other hand, is directly incorporated into the Illustrator file, making it self-contained. The “Crop Image” function in Illustrator will often embed a linked image after cropping, effectively creating a self-contained cropped version within your document while leaving your original external file untouched. This is an important consideration for workflow and file management, especially when working with vast Image Collections.
Why Cropping is Essential for Visual Design and Digital Content
Cropping is far more than just cutting off unwanted edges; it’s a powerful tool for visual storytelling and design optimization. It directly impacts the Visual Design, Graphic Design, and Photo Manipulation aspects of any project. Here’s why it’s so critical:
- Composition and Focus: Cropping allows you to eliminate distracting elements and guide the viewer’s eye to the most important part of your image. This is vital for creating compelling Aesthetic visuals and impactful Beautiful Photography.
- Aspect Ratio Compliance: Different platforms and uses require specific image dimensions. Social media banners, website headers, or mobile Wallpapers all have unique aspect ratio requirements. Cropping ensures your images fit these specifications perfectly, preventing awkward distortions or cuts.
- Narrative Control: By carefully selecting what to include or exclude, cropping can alter the entire narrative or mood of an image. Whether you’re aiming for Sad/Emotional imagery or vibrant Nature scenes, the crop can emphasize specific elements that evoke the desired feeling.
- Creative Expression: Sometimes, a unique crop can transform an ordinary image into a piece of Digital Art or a fresh Creative Idea. Unusual aspect ratios or tight crops can add dynamism and intrigue, making your visuals stand out in Trending Styles.
Mastering these cropping techniques ensures that every image you utilize, whether from Tophinhanhdep.com’s diverse Images library or your own Digital Photography, is perfectly tailored to its purpose, enhancing its impact and effectiveness.
Method 1: The Direct “Crop Image” Tool (Illustrator CC 2017 and Newer)
For users of Adobe Illustrator Creative Cloud 2017 and later versions, the “Crop Image” function offers the most straightforward and intuitive way to perform rectangular or square crops on raster images. This feature streamlined a process that was previously more cumbersome, bringing Illustrator’s cropping capabilities closer to what users might expect from a pixel-based editor.
Step-by-Step Guide to the Crop Image Function
This method is ideal when you have a photograph or a raster image (like a .jpg or .png from Tophinhanhdep.com’s vast selection of Backgrounds or Nature images) and you simply need to trim it down to a specific rectangular area.
- Open or Place Your Image:
- Start by opening Adobe Illustrator.
- To bring an image into your workspace, go to
File > Place...(or use the shortcutShift + Command + Pon Mac,Shift + Control + Pon Windows). Navigate to your image file, select it, and clickPlace. Then, click on your artboard to place the image. If you already have an image in your document, proceed to the next step.
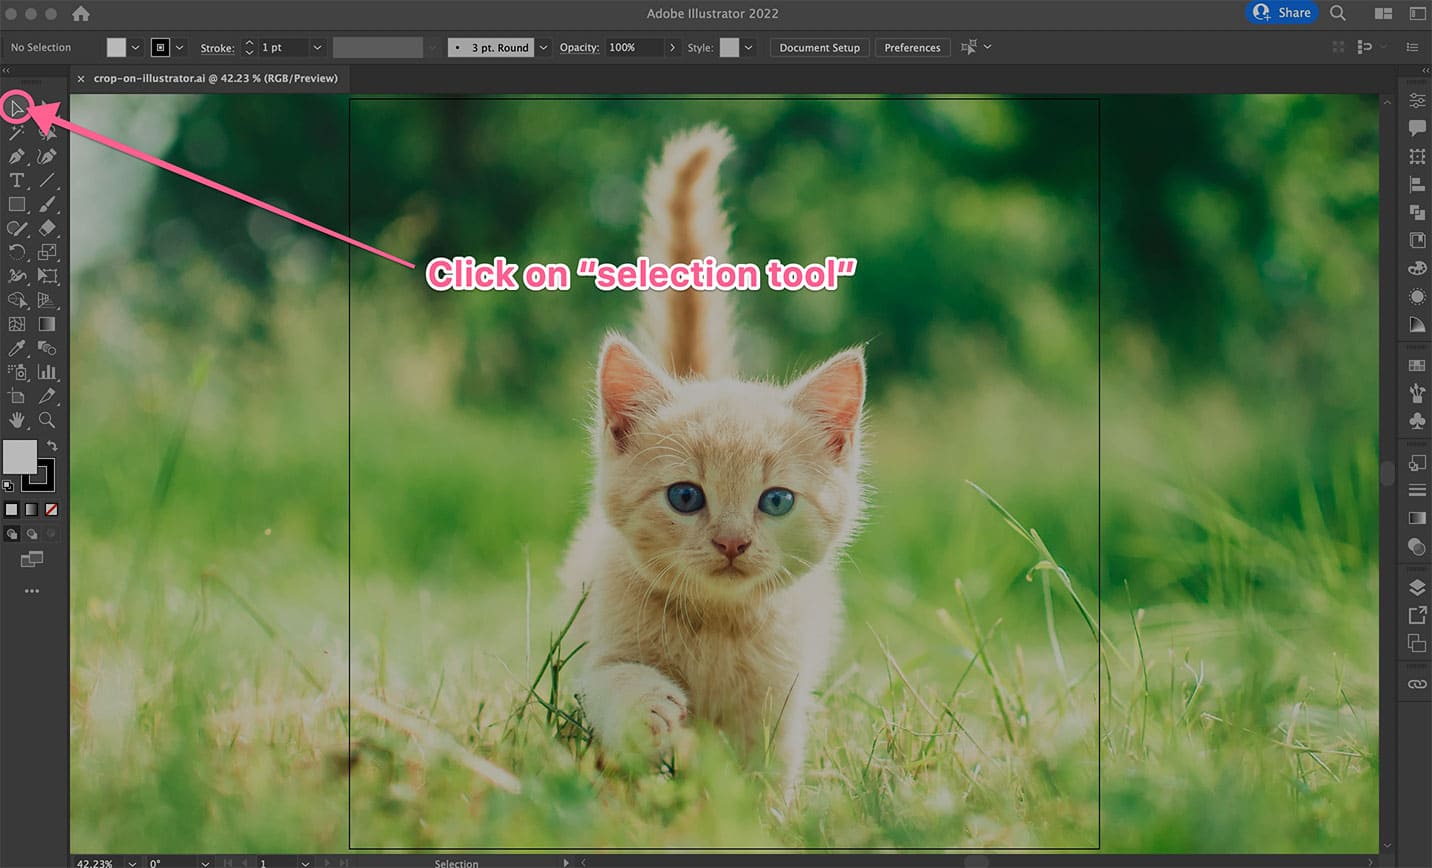
- Select the Image:
- Using the
Selection Tool(the black arrow icon in your toolbar, or pressV), click on the image you wish to crop. A bounding box will appear around it, indicating it’s selected.
- Using the
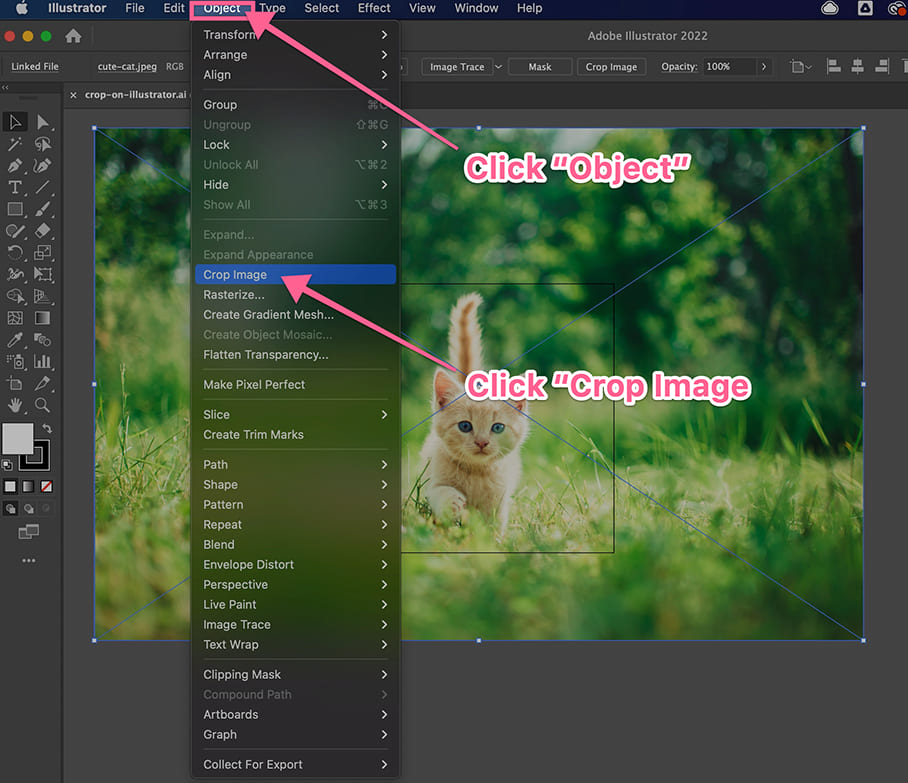
- Activate the Crop Image Function:
- Once the image is selected, look at the
Control Panelat the top of your screen (just below the menu bar). You should see a button labeledCrop Image. Click this button. - Alternatively, you can go to
Object > Crop Imagein the main menu. - If a prompt appears warning about embedding the image (for linked files), click
OKto proceed. This ensures the cropped version becomes part of your Illustrator document.
- Once the image is selected, look at the
- Adjust the Cropping Area:
- A bounding box with black dotted lines and handles (corners and sides) will appear around your image. This is your cropping widget.
- Click and drag these handles to define the area you want to keep. The lighter, shaded area outside the dotted box indicates what will be cropped away.
- If you need to move the entire cropping area without resizing it, click and drag inside the dotted box.
- To maintain the aspect ratio while resizing, hold down
Shiftas you drag a corner handle.
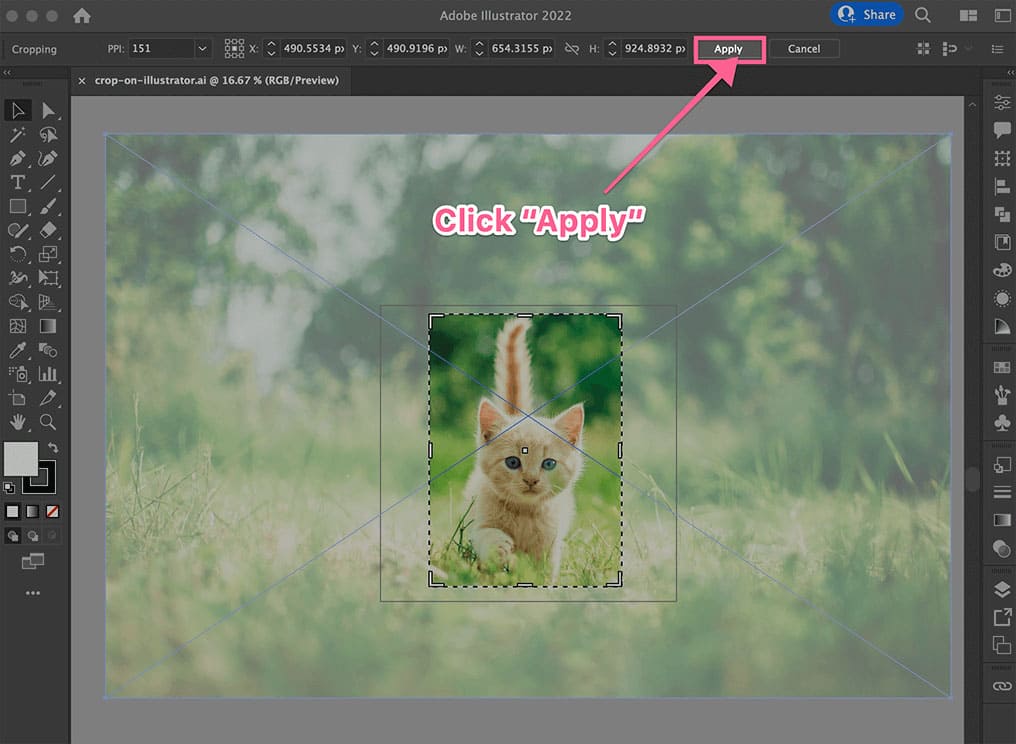
- Apply the Crop:
- Once you’re satisfied with the cropping area, click the
Applybutton in theControl Panel(or pressEnter/Returnon your keyboard). - Your image will now be cropped to the selected dimensions. The removed areas are permanently gone from the embedded image within Illustrator, though your original file on your computer remains untouched.
- Once you’re satisfied with the cropping area, click the
Enhancing Aesthetic Appeal with Precise Rectangular Crops
This direct cropping method is incredibly useful for a multitude of Visual Design tasks. For instance, when designing Backgrounds for web pages, creating banner images for advertisements, or curating specific elements from a larger Beautiful Photography piece, the Crop Image tool allows for quick and accurate adjustments.
- Standardizing Sizes: Easily trim multiple images to a uniform size for Image Collections or Mood Boards, ensuring a consistent and professional look.
- Focusing on Key Elements: Remove extraneous details from Nature or Abstract photos to highlight a particular subject, enhancing the overall Aesthetic quality.
- Preparing for Tophinhanhdep.com’s Tools: After achieving the perfect crop, you can then export these images and use Tophinhanhdep.com’s Image Tools for further optimization. Our Compressors can reduce file size without sacrificing quality, while Optimizers can prepare them for faster web loading, aligning with best practices for Digital Photography dissemination.
This tool is a cornerstone for efficient and precise image preparation in Illustrator, making it an essential skill for anyone serious about digital content creation.
Method 2: Unleashing Creativity with Clipping Masks
While the direct “Crop Image” tool is excellent for simple rectangular crops, Visual Design often demands more creative solutions. Enter the Clipping Mask – a powerful and highly flexible feature in Adobe Illustrator that allows you to crop images into any shape, whether it’s a perfect circle, an intricate custom path, or even complex vector graphics. Crucially, clipping masks are non-destructive, meaning the parts of the image outside the mask are only hidden, not permanently deleted. This flexibility is invaluable for Photo Manipulation and iterative Creative Ideas.
Crafting Custom Shapes with Clipping Masks
The clipping mask technique is incredibly versatile and works on both raster images and vector graphics, making it a go-to for complex Digital Art and Graphic Design projects.
- Prepare Your Image and Create the Masking Shape:
- First, ensure your image is placed on your Illustrator artboard (as described in Method 1, Step 1).
- Next, create the shape you want to use as your crop. This shape will act as the “window” through which your image is viewed. You can use:
- The
Rectangle Tool(M),Ellipse Tool(L), orPolygon Toolfor basic geometric shapes. - The
Pen Tool(P) orPencil Tool(N) to draw an entirely custom, irregular shape. - Any existing vector graphic or text converted to outlines.
- The
- Crucial Point: The masking shape must be positioned directly above the image (or group of objects) you want to crop in the layer stack. If it’s not, select the shape and go to
Object > Arrange > Bring to Front(Shift + Command + ]on Mac,Shift + Control + ]on Windows). - Tip for Visibility: To easily see the area you’re defining, you might want to set the masking shape’s fill to “None” and give it a brightly colored stroke before applying the mask.
- Select Both the Masking Shape and the Image:
- Use the
Selection Tool(V) to select both the masking shape and the image you want to crop. You can do this by clicking one, then holdingShiftand clicking the other, or by dragging a marquee selection box around both.
- Use the
- Create the Clipping Mask:
- With both objects selected, go to
Object > Clipping Mask > Make(or use the powerful shortcutCommand + 7on Mac,Control + 7on Windows). - Immediately, your image will be “cropped” to the shape of your masking object. Only the area of the image that falls within the masking shape will be visible.
- With both objects selected, go to
Advanced Techniques: Opacity Masks and Flattening Transparency
Beyond basic shape cropping, Illustrator offers even more sophisticated control with Opacity Masks and a “Flatten Transparency” trick, enabling advanced Visual Design effects.
Opacity Masks for Gradient Transparency
An Opacity Mask allows you to control the transparency of different areas of an image or object using shades of gray or colors in a masking object. This is fantastic for creating soft fades or complex transparent overlays, adding depth to Digital Art.
- Prepare Image and Masking Shape:
- Place your image on the artboard.
- Draw a shape (e.g., a rectangle) over the area you want to affect. This shape will be your opacity mask.
- Apply Gradients or Colors to the Mask:
- Fill the masking shape with a gradient (e.g., black to white) or solid colors.
- White: Areas covered by white in the mask will be completely opaque (visible).
- Black: Areas covered by black will be completely transparent (invisible).
- Grays: Shades of gray will create varying levels of transparency.
- Fill the masking shape with a gradient (e.g., black to white) or solid colors.
- Create the Opacity Mask:
- Select both the image and the masking shape (masking shape on top).
- Open the
Transparencypanel (Window > Transparency). - Click the
Make Maskbutton. EnsureClipis checked (to define the mask’s boundary) andInvert Maskis unchecked (unless you want to reverse the transparency effect). - Now you can see your image with a soft, gradient-based transparency effect, perfect for Creative Ideas requiring subtle transitions.
Flattening Transparency for Permanent Crops
Since clipping masks are non-destructive, the “hidden” parts of your image still exist. If you need to permanently discard these hidden areas (e.g., to reduce file size or simplify the object for export), you can use the “Flatten Transparency” trick:
- Apply a Clipping Mask (or Opacity Mask):
- First, apply a clipping mask or opacity mask as described above.
- Access Flatten Transparency:
- With the masked object selected, go to
Object > Flatten Transparency.... - In the dialog box, you’ll see options for Raster/Vector Balance. For full cropping, you generally want to favor vector to preserve crisp edges, but adjust as needed. Click
OK.
- With the masked object selected, go to
- Expand the Object:
- After flattening, you might need to go to
Object > Expand(orObject > Expand AppearanceifExpandis greyed out) to convert the result into editable paths and rasters. - This process effectively “bakes” the clipping or opacity mask into a permanent crop, often resulting in a group of objects. You may need to
Ungroup(Shift + Command + Gon Mac,Shift + Control + Gon Windows) to access the now-cropped image as a distinct element.
- After flattening, you might need to go to
These advanced techniques offer unparalleled control over image appearance, allowing designers to move beyond simple trims and into sophisticated Photo Manipulation and Digital Art creation, further expanding the possibilities for content showcased on Tophinhanhdep.com.
Method 3: The Artboard Approach for Focused Exports
Sometimes, your cropping needs aren’t about manipulating the image itself within the document, but rather defining a specific area of your entire artwork for export. This is where the Artboard tool becomes incredibly useful. This method is particularly efficient when you need to extract multiple variations of a graphic from a single file, or if you want to quickly “crop” a complex Visual Design composition down to a precise output dimension. While it primarily works for rectangular and square crops (as artboards are inherently rectangular), its strength lies in its export capabilities, aligning perfectly with generating tailored Image Collections or elements for Mood Boards.
Cropping for Specific Output with Artboards
The Artboard method acts as a virtual canvas for export, allowing you to define the final output dimensions independently of the source image’s inherent crop.
- Select the Artboard Tool:
- Open your Illustrator file with the image or artwork you want to “crop.”
- Select the
Artboard Toolfrom the toolbar (it looks like a square with crosshairs, or pressShift + O). - Your current artboard will become editable, showing handles around its perimeter.
- Adjust the Artboard to Your Desired Crop:
- Resize Existing Artboard: Click and drag the handles of the existing artboard to define the area you want to “crop.” Position it precisely around the section of your image or design you intend to export.
- Create a New Artboard: If you want to create a separate cropped version without altering your main artboard, click the
New Artboardicon in theControl Panel(usually a plus sign within a square) or simply click and drag with theArtboard Toolto draw a new artboard over the desired section of your image. You can have multiple artboards in one Illustrator file. - You can manually input precise dimensions for your artboard in the
Control PanelorPropertiespanel if needed for specific output requirements (e.g., social media banner sizes, Wallpapers).
- Export the Cropped Area:
- Once your artboard is precisely positioned and sized to define your “crop,” go to
File > Export > Export As...orFile > Export > Save for Web (Legacy)...(depending on your file type and optimization needs). - In the
Export Asdialog box:- Choose your desired file format (e.g., JPEG, PNG).
- Crucially, check the
Use Artboardscheckbox. This tells Illustrator to export only the content within your active artboard(s). - If you have multiple artboards and only want to export a specific one, you can specify a range (e.g., “1-1” for the first artboard, or select “Range” and enter the number of the artboard you just created/adjusted).
- Click
Export(orSavefor Save for Web).
- Once your artboard is precisely positioned and sized to define your “crop,” go to
The resulting image file will be “cropped” to the exact dimensions and content defined by your artboard. This method is exceptionally useful for creating various sized Backgrounds or Aesthetic previews from a single, complex Visual Design file. It also integrates seamlessly with Tophinhanhdep.com’s Image Tools, allowing you to export multiple image assets which can then be batch-processed using our Compressors or Optimizers for web deployment, or even enhanced with AI Upscalers if a cropped section needs enlargement.
Beyond Cropping: Integrating Illustrator Skills with Tophinhanhdep.com’s Offerings
Mastering image cropping in Adobe Illustrator is more than just a technical skill; it’s a gateway to unlocking greater creative potential and efficiency in your Visual Design workflow. Once you’ve perfected your crops, the journey of optimizing and utilizing those images continues, and Tophinhanhdep.com is here to support every step.
Optimizing Your Cropped Images for Tophinhanhdep.com
After carefully cropping your images in Illustrator, the next phase involves preparing them for their intended use. This is where Tophinhanhdep.com’s comprehensive Image Tools become indispensable:
- Compression and Optimization: Cropping can reduce visual content, but the file size might still be larger than necessary, especially for web use or mobile Wallpapers. Our Compressors and Optimizers can drastically reduce file sizes without compromising visual quality, ensuring faster load times and better user experiences. This is crucial for Digital Photography and Stock Photos that need to be efficiently distributed.
- AI Upscaling: Sometimes, a tight crop from a larger image might result in a smaller resolution than desired for a specific output (e.g., printing a small detail as a large Art piece). Tophinhanhdep.com’s AI Upscalers can intelligently enlarge your cropped images, adding detail and clarity, making them suitable for high-resolution displays or larger print formats. This bridges the gap between a precise crop and demanding output requirements.
- Format Conversion: Depending on where your cropped image will be used, you might need a different file format. Our Converters allow you to easily transform your images into various formats like JPEG, PNG, or WEBP, ensuring compatibility and optimal performance across different platforms.
By integrating Illustrator’s powerful cropping with Tophinhanhdep.com’s optimization tools, you create a seamless workflow that guarantees high-quality, perfectly sized, and efficiently processed visuals for any project.
Fueling Creativity and Inspiration
Beyond the technicalities, learning to crop effectively in Illustrator opens new avenues for Creative Ideas and Photo Manipulation. It encourages you to view images not just as fixed entities, but as flexible assets waiting to be shaped.
- Exploring New Perspectives: A unique crop can transform a mundane photograph into a dramatic Abstract composition or an Aesthetic masterpiece. Experiment with unusual aspect ratios or focus on subtle details to create truly original visuals.
- Curating Thematic Collections: Use precise cropping to build cohesive Thematic Collections for Mood Boards or design presentations. Whether you’re gathering images for a Nature theme, a Sad/Emotional series, or showcasing Beautiful Photography, consistent cropping enhances the overall impact.
- Staying Current with Trending Styles: The world of Visual Design is constantly evolving, with new Trending Styles emerging regularly. Many of these trends are heavily influenced by specific cropping techniques, aspect ratios, and compositional choices. By mastering Illustrator’s cropping capabilities, you can easily adapt your content to these evolving trends, keeping your work fresh and relevant.
Tophinhanhdep.com serves as your ultimate hub for Image Inspiration & Collections, offering a diverse array of Photo Ideas and curated content to spark your imagination. Our articles on Editing Styles and Digital Photography further complement your technical skills, helping you to develop a distinctive visual voice.
Conclusion
Cropping an image in Adobe Illustrator, once a task perceived as complex, is now streamlined and incredibly versatile, especially with the advancements in newer Creative Cloud versions. We’ve explored three primary methods that cater to a range of design needs:
- The “Crop Image” Tool: Your go-to for quick, precise rectangular and square crops on raster images, perfect for efficient trimming and focusing attention.
- Clipping Masks: The artistic powerhouse for creating custom-shaped crops, offering non-destructive editing and immense flexibility for Digital Art and complex Graphic Design.
- The Artboard Method: An effective “crop-for-export” solution, ideal for defining output dimensions for various uses and efficiently generating multiple assets from a single project.
Each method offers distinct advantages, and your choice will depend on your specific project requirements – whether you need a destructive or non-destructive approach, a simple geometric trim, or an intricate custom shape. By mastering these techniques, you not only gain proficiency in Illustrator but also elevate your entire Visual Design workflow.
At Tophinhanhdep.com, we are dedicated to providing a holistic resource for all your visual content needs. From high-quality Images and insightful Photography tips to powerful Image Tools and endless Image Inspiration & Collections, we equip you with everything necessary to create, optimize, and share stunning visuals. So, dive into Illustrator, experiment with these cropping methods, and let Tophinhanhdep.com be your partner in bringing your Creative Ideas to life, one perfectly cropped image at a time. Explore our tools and content today to unlock your full creative potential!