Mastering Image Flipping in Photoshop: A Comprehensive Guide for Tophinhanhdep.com Users

In the dynamic world of digital imagery, where every pixel contributes to the overall narrative, the ability to manipulate images with precision is paramount. For photographers, graphic designers, digital artists, and visual content creators frequenting Tophinhanhdep.com for inspiration and resources, understanding fundamental editing techniques like flipping an image in Photoshop is not just a skill – it’s an indispensable art form. This guide, tailored for the Tophinhanhdep.com community, delves deep into the various methods of image flipping, rotation, and canvas manipulation within Photoshop, enriching your high-resolution photography, enhancing visual design, and unlocking new avenues for creative ideas and aesthetic compositions.
Photoshop, a powerhouse in image editing, offers both intricate controls for complex tasks and straightforward solutions for simpler adjustments. Flipping an image, which is essentially mirroring it, falls into the latter category but carries profound implications for composition, balance, and artistic expression. Whether you’re adjusting a background for a new wallpaper, creating abstract patterns, or ensuring your stock photos align with a specific aesthetic, mastering the flip function is a game-changer. Beyond the technical steps, we’ll explore the creative potential that flipping unlocks, connecting it to Tophinhanhdep.com’s core interests in beautiful photography, visual design, and image inspiration.
![]()
While Photoshop stands as an industry standard, many Tophinhanhdep.com users may find themselves seeking alternatives that offer a more streamlined, user-friendly experience, especially when dealing with common tasks like applying stunning Looks and edits. Tools like Luminar Neo often serve as powerful Photoshop plugins or standalone applications, allowing for quick, beautiful enhancements with a focus on simplicity. However, for those committed to the comprehensive capabilities of Photoshop, let’s navigate the nuances of flipping an image, a skill that underpins much of digital photography and graphic design.
The Fundamentals of Image Flipping in Photoshop: Mirroring Your Vision
Flipping an image, at its core, involves reversing its orientation along a chosen axis. This seemingly simple action can dramatically alter the balance, direction, and overall aesthetic of your visual content. It’s a technique used by both beginners and seasoned professionals to achieve better compositional results, shift the viewer’s focus, or even embark on journeys of creating intricate and beautiful patterns. For Tophinhanhdep.com users aiming to perfect their backgrounds, wallpapers, or aesthetic imagery, understanding this fundamental manipulation is crucial.
Flipping the Entire Canvas: A Global Transformation
When your goal is to change the orientation of your entire visual project, including all layers and elements, flipping the entire canvas is the most direct approach. This is particularly useful for adjusting the general composition of a photograph or graphic design piece, perhaps to achieve a more pleasing visual flow for a nature background or to test how a high-resolution image would look mirrored for a thematic collection.
Here’s how to execute a full canvas flip in Photoshop:
- Open Your Image: Begin by opening the desired image file in Adobe Photoshop. This will be the main canvas you’re working on.
- Access the Image Menu: Navigate to the top menu bar in Photoshop.
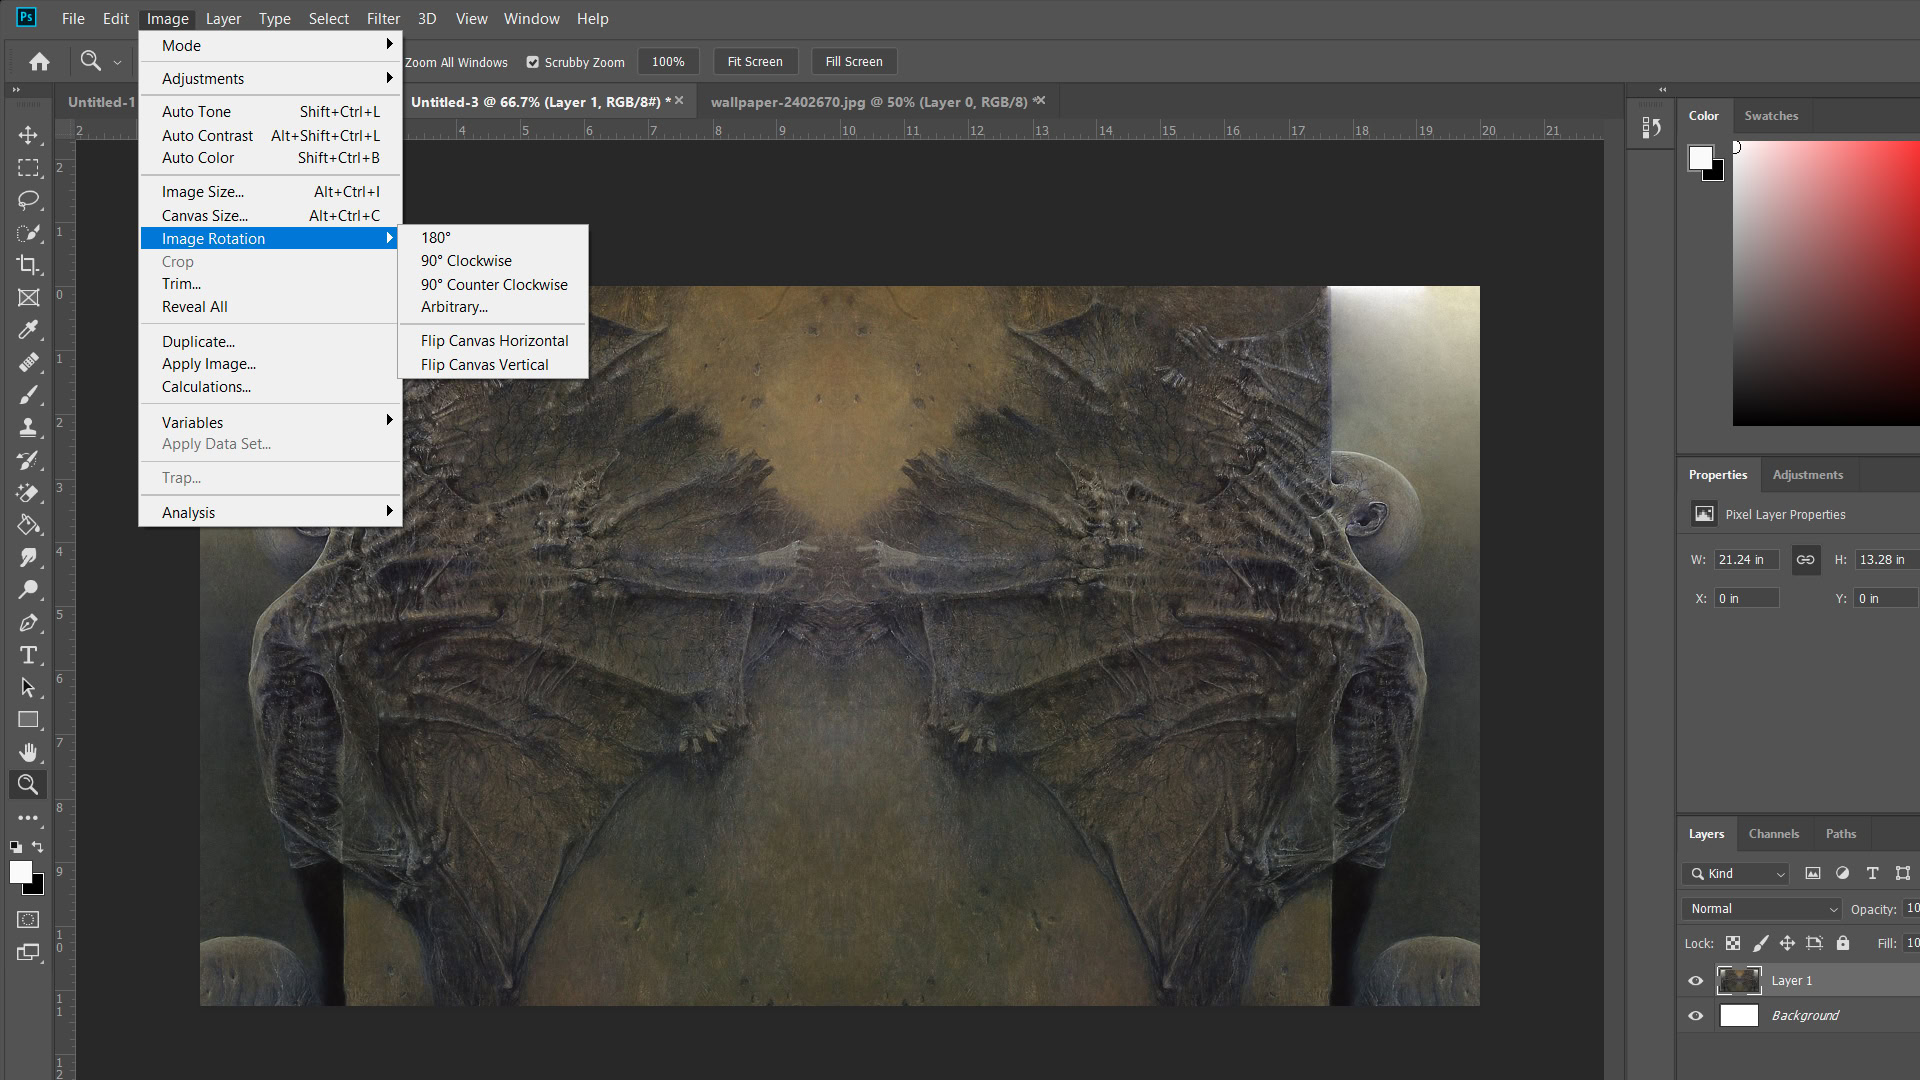
- Select Image Rotation: From the “Image” menu, hover over “Image Rotation.”
- Choose Your Flip Direction: A sub-menu will appear, offering two primary options for flipping:
- Flip Canvas Horizontal: This option will mirror your entire image from left to right, as if you’re looking at it in a mirror. It effectively reverses the image along a vertical axis. Consider how this can impact the leading lines or subject placement in your beautiful photography.
- Flip Canvas Vertical: Opting for this will flip your entire image from top to bottom, mirroring it along a horizontal axis. This can create interesting surreal effects, especially with landscape or abstract images, where the ground might become the sky and vice versa.
With just a single click after selecting your desired orientation, your entire canvas will be flipped. This method is incredibly quick and efficient for global adjustments, making it a valuable tool for anyone working on wallpapers or refining the overall aesthetic of an image before sharing it on Tophinhanhdep.com. Keep in mind that this action affects every visible pixel on your canvas, which is why it’s categorized as a “global transformation.”
Precision Flipping: Manipulating Individual Layers
While flipping the entire canvas is useful for overall compositional adjustments, there are many scenarios in visual design and photo manipulation where you only need to flip a specific element without affecting the rest of the image. Imagine you’re working on a complex digital art piece, arranging various stock photos, or adding a company logo or text as a watermark. In such cases, the ability to flip only a selected layer becomes indispensable.
Photoshop offers multiple flexible ways to achieve this precision, allowing Tophinhanhdep.com users to maintain intricate control over their creative projects. These methods are fundamental for crafting compelling graphic designs and dynamic photo manipulations.
Using the Transform Menu
One of the most straightforward ways to flip an individual layer involves the “Transform” menu, which offers a comprehensive suite of tools for resizing, rotating, and flipping selected elements.
- Select the Desired Layer: In the “Layers” panel (typically located on the right side of your Photoshop interface), click on the specific layer you wish to flip. Ensure that this layer contains only the element(s) you intend to manipulate. If your element is part of a larger background layer, you might need to select it using selection tools (like the Marquee Tool, Lasso Tool, or Quick Selection Tool) and then copy it to a new layer (Ctrl/Cmd+J) before proceeding.
- Access the Edit Menu: Go to the top menu bar and click “Edit.”
- Navigate to Transform: Hover over “Transform” in the dropdown menu.
- Choose Flip Horizontal/Flip Vertical: From the “Transform” sub-menu, select either “Flip Horizontal” or “Flip Vertical,” depending on the mirroring effect you want to achieve for your selected layer.
This method instantly flips the contents of the chosen layer without altering any other part of your image, offering granular control essential for detailed visual design.
Leveraging Free Transform
The Free Transform tool is a cornerstone of photo manipulation in Photoshop, providing an interactive bounding box around your selected layer that allows for a wide range of transformations, including flipping. This method is often preferred for its visual feedback and integrated controls.
- Select Your Layer: As before, ensure the layer you want to flip is active in the Layers panel.
- Enter Free Transform Mode: Go to “Edit” in the top menu bar and select “Free Transform.” Alternatively, and more commonly, use the keyboard shortcut Ctrl + T (Windows) or Command + T (Mac).
- Right-Click Inside the Bounding Box: Once the Free Transform bounding box appears around your layer, right-click anywhere within this box.
- Select Flip Option: A contextual menu will pop up, presenting “Flip Horizontal” and “Flip Vertical” among other transformation options. Choose the one that suits your needs.
- Confirm the Transformation: After flipping, press Enter (Windows) or Return (Mac) to apply the changes and exit Free Transform mode, or simply double-click inside the bounding box.
The interactive nature of Free Transform makes it highly intuitive for digital artists and graphic designers who frequently adjust elements within their compositions.
Keyboard Shortcuts for Efficiency
For speed and efficiency, especially for users who spend hours refining high-resolution images or crafting complex photo manipulations, keyboard shortcuts are invaluable. The Free Transform shortcut combined with a right-click is the fastest way to flip layers.
- Select Layer: Activate the desired layer in the Layers panel.
- Activate Free Transform: Press Ctrl + T (Windows) or Command + T (Mac).
- Right-Click and Flip: Right-click on the image within the bounding box and select “Flip Horizontal” or “Flip Vertical.”
Mastering these individual layer flipping techniques empowers Tophinhanhdep.com users to integrate elements from various stock photos, achieve perfect symmetry in graphic design, or experiment with artistic concepts for abstract backgrounds without disrupting the entire composition. These are fundamental skills for anyone serious about digital photography and visual design.
Beyond Simple Flips: Rotating and Canvas Control
While often used interchangeably by novices, flipping and rotating are distinct operations that achieve different visual results. Understanding this distinction is vital for precise photo manipulation and effective visual design. For the Tophinhanhdep.com community, knowing when to flip versus when to rotate can make all the difference in presenting polished, aesthetically pleasing images, be they nature backgrounds, portrait photography, or creative digital art.
Understanding Image Rotation vs. Flipping
The core difference is simple:
- Flipping (mirroring) reverses an image along an axis. Think of it like looking at your reflection in a mirror – everything is horizontally or vertically reversed. A flipped image often looks like the original but with its left and right (or top and bottom) sides swapped.
- Rotating turns an image around a central point. Imagine tilting your head to view something from a different angle – the object itself hasn’t changed its internal left-right orientation, only its angle relative to you. A rotated image is simply tilted.
Confusing these two can lead to unintended results, such as a logo appearing backwards (flipped) when you merely wanted to change its angle (rotated). This is a common pitfall in graphic design and digital photography.
How to Rotate an Image (Layer) in Photoshop
Rotation allows you to adjust the orientation of an image or a specific layer by a certain degree, crucial for correcting crooked horizons in landscape photography, or adding dynamic angles to digital art.
To rotate an individual layer:
- Open Image and Select Layer: Open your image and select the layer you wish to rotate from the Layers panel.
- Access Transform: Go to Edit > Transform.
- Choose Rotation Options: From the “Transform” sub-menu, you’ll find various rotation options:
- Rotate 180°: Flips the image upside down.
- Rotate 90° Clockwise (CW): Turns the image 90 degrees to the right.
- Rotate 90° Counter Clockwise (CCW): Turns the image 90 degrees to the left.
- Arbitrary: Allows you to input a specific degree of rotation.
- Free Transform (Ctrl/Cmd + T): Once in Free Transform mode, you can hover your cursor just outside any corner of the bounding box. The cursor will change to a curved double-headed arrow, allowing you to click and drag to rotate the layer freely. Holding Shift while dragging will snap the rotation to 15-degree increments.
Important Note: When rotating a layer using the “Image > Image Rotation” menu, be careful. If your image has multiple layers, this option will only rotate the selected layer, which can lead to misalignment with other elements. If your intention is to rotate the entire project, including all layers simultaneously, you’ll need to use the “Rotate Canvas” option instead.
Rotating the Entire Canvas with the Rotate View Tool
For global rotation of your entire workspace, the “Rotate View Tool” is the most effective and interactive method. This is particularly useful when you need to view or work on your image from a different perspective temporarily, without actually altering the image data itself. It’s like turning your physical canvas on an easel.
Here’s how to use the Rotate View Tool:
- Locate the Tools Panel: On the left side of your Photoshop interface, find the Tools panel.
- Select the Rotate View Tool: Click on the “Rotate View Tool” (its icon typically looks like a curved arrow). The keyboard shortcut for this tool is R.
- Interact with the Canvas: Place the tool’s cursor anywhere within your image window.
- Drag to Rotate: Hold down the mouse button and drag your cursor either clockwise or counter-clockwise. A compass rose will appear, indicating the current angle of rotation.
- Release and Fine-Tune: Release the mouse button once you’ve reached your desired viewing angle. The “Options Bar” at the top will display the exact angle of rotation, allowing for precise adjustments if needed.
- Reset View (Optional): If you wish to revert to the original zero-degree rotation, click the “Reset View” button in the Options bar. This is a crucial feature because using “Edit > Undo” or the History panel will only undo specific rotational steps, not necessarily reset the canvas to its initial orientation.
- Rotate All Windows (Optional): In the Options bar, you can also check the “Rotate All Windows” option. This allows you to rotate all open Photoshop documents simultaneously, which can be useful when working on multiple images for a consistent aesthetic or thematic collection.
The Rotate View Tool is a non-destructive way to adjust your perspective, making it ideal for checking compositions or painting at awkward angles without permanently altering your image data. This flexibility is key for digital artists and photographers who constantly experiment with different editing styles.
Troubleshooting Common Flipping Issues and Best Practices
Even with seemingly simple operations like flipping an image, issues can arise. Knowing how to troubleshoot these common problems will save you time and frustration, ensuring your digital photography and graphic design projects proceed smoothly. For Tophinhanhdep.com users, achieving the desired visual outcome efficiently is always a priority.
Here’s a quick troubleshooting guide to address potential problems when flipping images or layers in Photoshop:
Locating Hidden Flip Options
“I can’t find the flip option!” This is a common complaint, especially for users new to Photoshop or those working with older/newer versions where menu layouts might differ slightly.
Solution: If you’re struggling to locate the “Flip Canvas” or “Flip Horizontal/Vertical” options as described, the simplest solution is to use Photoshop’s built-in help function.
- Go to the “Help” menu in the top menu bar.
- In the search bar that appears, type “flip” (or “mirror”).
- Photoshop will highlight or directly lead you to the relevant menu items or commands.
This quick tip ensures you can always find the feature, regardless of your Photoshop version.
Addressing Flipped Text and Logos
A frequent issue, particularly in graphic design and branding, is when you flip an image, and accompanying text, logos, or watermarks also flip, rendering them unreadable or incorrect.
Problem: When you use “Image > Image Rotation > Flip Canvas Horizontal/Vertical,” it applies to the entire image, including all its layers. If your logo or text is on the same layer as your main image, or if you’re flipping the whole canvas, everything will be mirrored.
Solution: The key here is to understand the difference between flipping the whole canvas and flipping a single layer.
- If your text/logo is on its own layer: Simply select that specific layer in the Layers panel and use the “Edit > Transform > Flip Horizontal/Vertical” method, or the Free Transform (Ctrl/Cmd + T) right-click method. This will flip only the text/logo layer, allowing you to correct its orientation without affecting the main image.
- If your text/logo is merged with the background: You will need to isolate the text/logo first. Use a selection tool (e.g., Marquee, Lasso, Quick Selection) to select the text/logo, then press Ctrl/Cmd + J to copy it to a new layer. Once it’s on a separate layer, you can flip just that layer to correct its orientation, as described above.
This practice emphasizes the importance of working with layers in Photoshop, a cornerstone of non-destructive image editing and visual design.
Correcting Incorrect Flip Orientations
Sometimes, you attempt to flip an image, but it appears to be flipped the “wrong way” – perhaps vertically when you intended horizontally, or vice versa.
Problem: This usually stems from selecting the incorrect flip option (e.g., choosing “Flip Canvas Vertical” instead of “Flip Canvas Horizontal”). The visual impact of these two operations is distinctly different.
Solution: Pay close attention to the options:
- “Flip Horizontal” mirrors the image along a vertical axis (left becomes right, right becomes left).
- “Flip Vertical” mirrors the image along a horizontal axis (top becomes bottom, bottom becomes top).
If you make a mistake, immediately use Ctrl/Cmd + Z to undo the last action, or go to the “History” panel to revert to a previous state, then re-apply the correct flip. For aesthetic wallpapers or backgrounds, testing both options is often part of the creative process.
Distinguishing Between Rotation and Flipping
As discussed, it’s easy to confuse rotation with flipping, especially for those new to digital photography and image tools. The results, however, are strikingly different and critical for conveying the correct visual message.
Problem: You might inadvertently rotate an image when your intention was to mirror it, or vice versa, leading to a distorted or incorrectly oriented visual.
Solution: Always remember the core analogy:
- Flipping: Like looking in a mirror. Your left hand becomes the reflection’s right hand.
- Rotating: Like tilting your head. The object’s internal orientation remains the same, but its angle relative to you changes.
If you are unsure whether to flip or rotate, try both on a duplicated layer to see which achieves your desired effect. For example, if you want to correct a slightly skewed photo, rotation is likely the answer. If you want to create a symmetrical design or reverse the direction a person is facing, flipping is what you need. Tophinhanhdep.com encourages experimentation, but understanding these basics will streamline your workflow.
Enhancing Natural Appearance in Portrait Photography
Flipping portrait photography, while sometimes necessary for compositional balance or a specific aesthetic, can occasionally make people look “unnatural” or “weird.” This is due to our inherent familiarity with faces and forms. We’re accustomed to seeing people in a certain way, and subtle asymmetries can become pronounced when mirrored.
Problem: Faces and bodies often have minor asymmetries. When an image is flipped, these asymmetries are reversed, which can make the person look subtly different or even strange to our perception, which is used to seeing them from a consistent perspective.
Solution:
- Context is key: For most portrait photography, avoid flipping if the main subject is a person, unless you have a specific artistic reason or are correcting a minor compositional imbalance where the unnaturalness is minimal.
- Layer-specific adjustments: If you’re creating a composite or digital art piece and only need to flip a small part of a person (e.g., a hand or an accessory), ensure it’s on a separate layer and adjust only that element.
- Subtle manipulation: When dealing with high-resolution images, sometimes a subtle flip can enhance a composition without being too jarring. Always evaluate the flipped image critically for naturalness.
- Focus on comfort: As the original source wisely notes, “Getting natural pictures of people is more about making sure people feel at ease when you photograph them and less about how to mirror an image in Photoshop.” The best natural looks come from the initial capture, not necessarily from post-processing flips.
These troubleshooting tips and best practices are essential tools for any Tophinhanhdep.com user looking to elevate their digital photography and visual design skills, ensuring that every image, from aesthetic backgrounds to beautiful photography, looks its best.
Unleashing Creativity: Advanced Flipping Techniques and Visual Design
Flipping and rotating images in Photoshop are not just corrective tools; they are powerful creative catalysts. For Tophinhanhdep.com users passionate about graphic design, digital art, photo manipulation, and generating unique image inspiration, these techniques open up a world of possibilities for abstract creations, thematic collections, and trending visual styles. Let’s explore some creative ideas that you can implement with mirroring and rotating.
Creating Stunning Mirror Effects
The mirror effect is a beloved technique in digital art and photo manipulation, allowing you to transform ordinary images into surreal or perfectly symmetrical compositions. This technique is especially impactful for aesthetic wallpapers, abstract art, or dramatic backgrounds. If you know how to flip a layer in Photoshop, you have a ton of fun ways to get creative with your photos.
Here’s a step-by-step guide to creating a captivating mirror effect:
- Prepare Your Image: Open the image you want to work with in Photoshop. A strong, central subject or an interesting landscape works best for this. Unlock the background layer in the Layers panel by clicking the padlock icon.
- Expand Your Canvas: To accommodate the mirrored half of your picture, you’ll need more canvas space. Go to Image > Canvas Size. Depending on whether you want a horizontal or vertical mirror, double the width or height of your canvas. For example, if you want to mirror horizontally, double the width and set the Anchor to the middle-left or middle-right to expand the canvas in the desired direction.
- Add a Guide: To ensure perfect alignment for your mirror effect, add a vertical or horizontal guide directly down the middle of your original image (which should now be on one side of the expanded canvas). Go to View > New Guide, choose “Vertical” or “Horizontal,” and set the position to 50% (or the numerical equivalent depending on your canvas size).
- Position Your Subject: Select the “Move Tool” (V) and drag your subject layer to one side of the guide you just created. This ensures there’s enough space for its reflection.
- Duplicate the Layer: With your subject layer selected, press Ctrl/Cmd + J to duplicate it. This creates the layer for your reflection.
- Flip and Align the Duplicate: Select the duplicated layer. Enter “Free Transform” mode by pressing Ctrl/Cmd + T. Right-click inside the bounding box and choose “Flip Horizontal” (for a vertical mirror effect) or “Flip Vertical” (for a horizontal mirror effect). Drag the flipped layer until its edge aligns perfectly with the guide, creating the mirror effect.
- Refine and Export:
- Once satisfied with the alignment, press Enter/Return to confirm the transformation.
- You can then merge the two layers if desired (Ctrl/Cmd + E).
- Clear the guide (View > Clear Guides).
- Finally, use the “Crop Tool” (C) to trim any extra canvas space around your mirrored image.
- Go to File > Export > Export As… to save your new creative masterpiece.
Creative Applications of the Mirror Effect:
- Surreal Landscapes: If you take a picture of a building or a natural landscape and flip it vertically, it can look like it extends both into the earth and into the sky, creating an eerie, abstract image perfect for a unique wallpaper or digital art piece.
- Symmetrical Portraits: Create striking, perfectly symmetrical portraits by mirroring one half of a person’s face. This often reveals interesting insights into facial symmetry.
- “Two-Headed” Animals: Flip an animal image in half vertically to create whimsical or fantastical creatures for digital art collections.
- Reflections: As demonstrated in the
onlineprinters.co.ukreference, creating natural-looking reflections on water or shiny surfaces is a classic use of layer flipping combined with layer masks and blur effects. This adds realism and elegance to stock photos or beautiful photography.
Crafting Intricate Patterns through Multiple Flips
Beyond simple mirror effects, repeatedly flipping and combining images can lead to complex and visually engaging patterns, reminiscent of kaleidoscope designs or abstract art. This technique is fantastic for generating unique backgrounds, textures, or elements for graphic design projects and thematic collections on Tophinhanhdep.com.
Here’s a more advanced technique to create wonderful kaleidoscopic images with recurring patterns:
- Start with Your Base Image: Open the picture you want to edit. A photo with interesting textures, colors, or shapes works best.
- Prepare Your Canvas for Horizontal Duplication: Duplicate the background layer (Ctrl/Cmd + J). Now, go to Image > Canvas Size and double the “Width” of your canvas. Set the “Anchor” to the middle-left to expand the canvas to the right.
- Position and Flip Horizontally: With the background copy layer selected, use the “Move Tool” (V) to drag your photo onto the newly expanded right side of the canvas. Enter “Free Transform” mode (Ctrl/Cmd + T), right-click, and choose “Flip Horizontal.” Position it precisely to meet the original image at the center.
- Merge for the First Pattern: Once aligned, press Enter/Return to apply the transformation. Now, merge the two layers (your original and the horizontally flipped copy) by selecting both in the Layers panel and pressing Ctrl/Cmd + E. You now have a horizontally mirrored image.
- Prepare for Vertical Duplication: Duplicate this new merged layer (Ctrl/Cmd + J). Go to Image > Canvas Size again, but this time double the “Height” of your canvas. Set the “Anchor” to the middle-top to expand the canvas downwards.
- Position and Flip Vertically: With the new duplicated layer selected, use the “Move Tool” (V) to drag it to the bottom half of your canvas. Enter “Free Transform” mode (Ctrl/Cmd + T), right-click, and choose “Flip Vertical.” Align it perfectly with the upper half.
- Merge for the Second Pattern: Apply the transformation (Enter/Return) and merge these two layers (Ctrl/Cmd + E). You now have a quadrant-style pattern.
- Rotate for Kaleidoscopic Effect (Optional but Recommended): Duplicate this latest merged layer. Enter “Free Transform” mode (Ctrl/Cmd + T), right-click, and choose “Rotate 90° Clockwise” or “Rotate 90° Counter Clockwise.” Position this rotated pattern to extend your design further, creating more complex interactions. You can repeat this step, combining different rotations and flips to build highly intricate, repeating patterns that could serve as stunning abstract wallpapers or elements for digital photography collections.
- Final Touches: Crop the canvas around your final patterned image to remove any excess space and save your masterpiece.
This multi-flip technique transforms simple images into visually rich patterns, ideal for creating unique digital art, custom backgrounds, or inspiring elements for mood boards and thematic collections on Tophinhanhdep.com.
Integrating Flipping into Graphic Design and Digital Art
For graphic designers and digital artists, flipping is more than a creative trick; it’s a foundational element for achieving balance, creating dynamic layouts, and constructing complex compositions.
- Symmetry and Balance: Flipping allows for instant symmetry, which is a powerful tool in graphic design for creating balanced layouts, logos, and icons. By mirroring elements, designers can quickly achieve visual harmony.
- Compositional Flow: Sometimes, an image’s natural direction or implied movement works against the desired compositional flow of a layout. Flipping an element can redirect the viewer’s eye, improving the overall readability and impact of the design. For instance, if a person in a stock photo is looking off-canvas, flipping them can make them look into the composition.
- Creating Variations: For digital art, flipping elements, textures, or brush strokes can generate multiple variations from a single source, fostering greater creativity without starting from scratch. This is useful for building up complex scenes or abstract pieces.
- Photo Compositing: In photo manipulation, blending multiple images into a seamless composite often requires flipping elements to match perspectives, lighting, or the overall aesthetic. Whether combining high-resolution nature photos or different pieces of abstract art, flipping ensures visual consistency.
Flipping an image in Photoshop, therefore, is not merely a technical step but a gateway to endless creative possibilities. It allows Tophinhanhdep.com users to refine their beautiful photography, construct compelling visual designs, and generate an endless supply of image inspiration.
In conclusion, mastering the art of flipping an image in Photoshop is a fundamental skill that significantly enhances your capabilities in digital photography, visual design, and creative content creation. From simple adjustments to complex artistic endeavors, the techniques outlined in this guide – covering global canvas flips, precision layer manipulations, understanding rotation, and troubleshooting common issues – provide a robust toolkit for every Tophinhanhdep.com user.
These skills are not just about correcting imperfections; they are about unlocking new dimensions of visual storytelling. Whether you’re curating aesthetic backgrounds, preparing high-resolution stock photos, crafting intricate digital art, or seeking fresh image inspiration for your next project, the power of the flip is undeniable. We encourage you to experiment with these methods, push the boundaries of your creativity, and continue to explore the vast potential of image manipulation. For those seeking a user-friendly interface and powerful features suitable for both beginners and professionals, alternatives like Luminar Neo are always available to streamline your editing workflow.
Tophinhanhdep.com is dedicated to providing you with the tools and inspiration to make your images truly outstanding. Happy editing!