How to Flip an Image in PowerPoint

In the dynamic world of digital presentations, PowerPoint remains a cornerstone for conveying information, ideas, and narratives with visual impact. A compelling presentation often hinges on more than just well-crafted text; it thrives on expertly integrated visual elements. Images, ranging from stunning high-resolution photography to bespoke graphic design elements, are crucial for capturing attention and reinforcing your message. Understanding how to manipulate these visuals effectively is a key skill for any presenter, designer, or content creator. Among the fundamental image manipulation techniques available in PowerPoint is the ability to flip an image, a subtle yet powerful tool that can dramatically alter the perception and composition of your slides.

Flipping an image is distinct from rotating it. While rotation changes an image’s angle (e.g., 90 degrees clockwise), flipping creates a mirror image, either horizontally (left-to-right) or vertically (upside-down). This seemingly simple action can unlock a wealth of creative ideas for your slides, allowing you to fine-tune layouts, establish visual symmetry, or direct the audience’s gaze. Whether you’re working with stock photos from Tophinhanhdep.com for a business presentation, curating an aesthetic wallpaper for a mood board, or designing a complex digital art piece, the ability to flip images precisely is invaluable. This comprehensive guide will walk you through the various methods of flipping images, shapes, and even text in PowerPoint, integrating insights into how these techniques can elevate your visual storytelling and design, all while leveraging the extensive resources available on Tophinhanhdep.com for all your image needs.
Mastering Image Flipping in PowerPoint: Essential Techniques for Visual Design
Effectively integrating visuals into your PowerPoint presentations is an art form, and knowing how to flip images is a fundamental stroke in that art. This technique, often overlooked, can be the difference between a good slide and a great one, allowing you to achieve balance, direct flow, and create unique visual effects. Tophinhanhdep.com provides an endless array of beautiful photography, abstract backgrounds, and nature-inspired images that can all benefit from strategic flipping to perfectly match your presentation’s aesthetic and narrative. Let’s dive into the core methods for achieving this in PowerPoint.
The Direct Method: Flipping via Picture Format
The most straightforward way to flip an image in PowerPoint involves using the built-in “Picture Format” tools. This method is quick, precise, and ideal for most scenarios where you need to mirror an image.
Step-by-Step Guide:
- Add Your Image: First, ensure the image you wish to flip is on your slide. You can insert an image by navigating to
Insert > Images > Picturesand selecting a file from your device, or simply by dragging and dropping an image directly onto your slide. For optimal visual quality, consider using high-resolution images sourced from Tophinhanhdep.com’s vast collections of wallpapers and backgrounds. - Select the Image: Click on the image once to select it. This action will make the “Picture Format” tab appear in the ribbon at the top of your PowerPoint window.
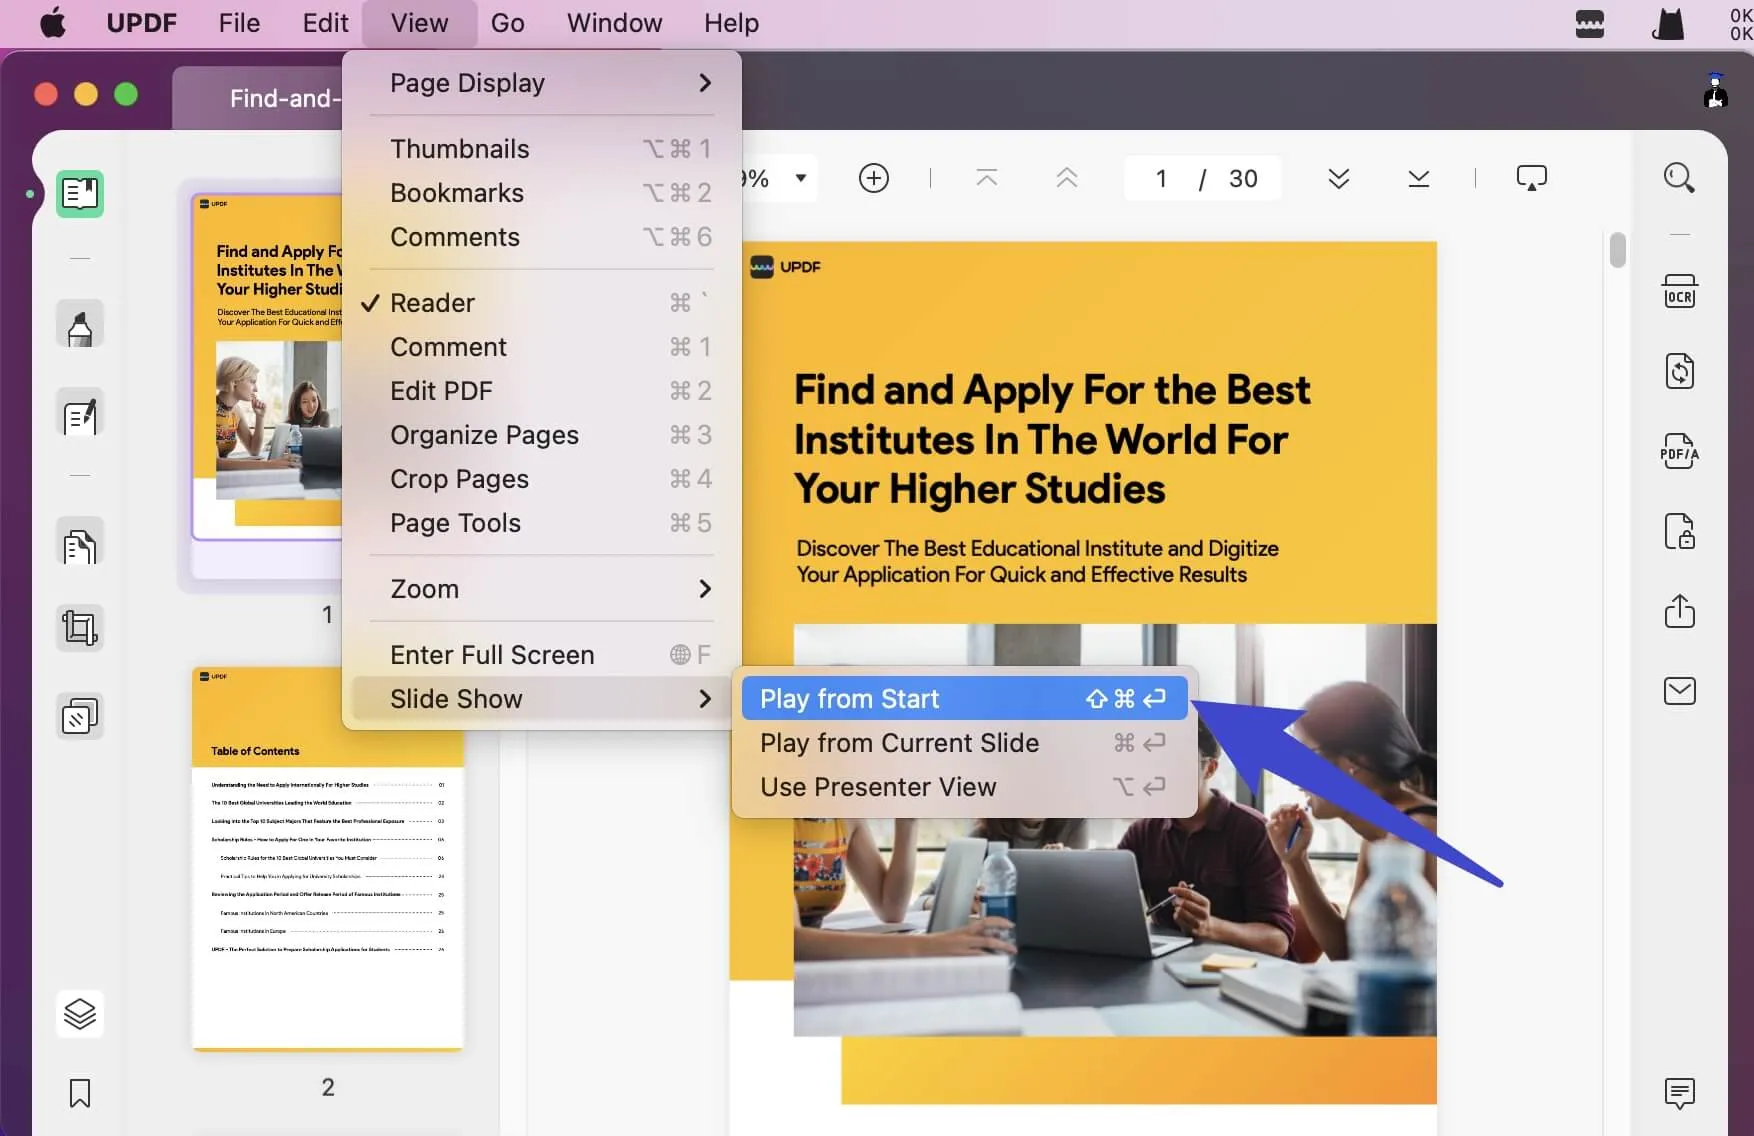
- Access Rotate Options: Within the “Picture Format” tab, locate the “Arrange” group. Here, you’ll find the “Rotate” dropdown menu.
- Choose Your Flip Direction: Click on the “Rotate” dropdown. You will see several options, including “Rotate Right 90°,” “Rotate Left 90°,” “Flip Vertical,” and “Flip Horizontal.”
- To mirror the image along its vertical axis (left becomes right, and vice versa), select “Flip Horizontal.”
- To turn the image upside down (top becomes bottom), select “Flip Vertical.”
For instance, if you have a captivating piece of digital photography from Tophinhanhdep.com that features a subject looking left, but your slide’s composition demands the subject to look right for better flow, “Flip Horizontal” will instantly adjust it without needing external image editing styles or tools. Similarly, an abstract image might gain a new, intriguing dimension when flipped vertically, offering a fresh perspective. This method ensures your images maintain their aspect ratio and quality, which is paramount when working with high-resolution assets.
Manual Flipping for Intuitive Adjustments
While the “Picture Format” menu offers precision, PowerPoint also allows for a more intuitive, manual approach to flipping images. This method can be particularly useful when you want to visually experiment with different orientations directly on the slide, perhaps aligning a flipped image with other elements in a complex visual design.
Step-by-Step Guide:
- Select the Image: Click on the image you want to flip. Resizing handles (small circles or squares) will appear around its perimeter, along with a rotation handle (a circular arrow) at the top.
- Locate a Corner Handle: Hover your mouse cursor over one of the corner resizing handles. The cursor will change into a double-headed arrow.
- Drag to Flip: Click and hold the mouse button on the corner handle. Then, drag it across the image to the opposite side while keeping the mouse button pressed.
- To flip horizontally, drag a corner handle from one side across to the other. For example, drag the bottom-left handle past the right edge of the image.
- To flip vertically, drag a top corner handle downwards past the bottom edge of the image, or vice versa.
- As you drag, the image will appear to “fold over” or mirror itself, giving you a real-time preview of the flipped effect.
This manual method offers a hands-on feel, which can be beneficial for quickly testing various photo manipulation ideas or when creating mirrored effects for aesthetic backgrounds. It’s an excellent way to integrate spontaneous creative ideas into your presentation design, especially when aiming for unique visual design compositions that stand out.
Beyond Basic Flips: Enhancing Your Visuals with Tophinhanhdep.com
Flipping an image is more than just a functional adjustment; it’s a powerful digital photography editing style that contributes significantly to visual design and the overall impact of your presentation. With the diverse range of visuals available on Tophinhanhdep.com, from sad/emotional imagery to vibrant nature wallpapers, knowing how to strategically flip these assets opens up a world of creative possibilities.
Flipping for Aesthetic Impact and Creative Composition
The decision to flip an image can be driven by a desire for purely aesthetic enhancement or to achieve specific compositional goals:
- Symmetrical Design Presentations: Imagine two halves of a concept, perfectly balanced. By duplicating an image—perhaps a striking abstract wallpaper from Tophinhanhdep.com—and flipping one horizontally, you can create a compelling symmetrical design. This is particularly effective in presentations discussing balance, duality, or comparing two similar entities.
- Before and After Comparisons: When showcasing transformations, mirroring images can provide a cohesive layout. For example, a “before” image on the left and a flipped “after” image on the right can visually emphasize change, making it ideal for presentations on renovations, makeovers, or process improvements.
- Reflective Effects: Create stunning visual depth, such as a water reflection. Take a scenic nature photography image of mountains or a cityscape, duplicate it, flip the duplicate vertically, and position it below the original. Adjust its transparency, and you have an instant, captivating reflective effect, perfect for beautiful photography showcases or thematic collections.
- Educational Illustrations: In educational contexts, flipping helps illustrate concepts like symmetry in biology, reflection in physics, or artistic balance. A clear, flipped image can make complex ideas more accessible and engaging.
- Marketing and Advertisements: Dynamically fill a slide or create visual tension by mirroring product images. This can draw the eye and leave a lasting impression, enhancing your brand’s visual design.
- Fashion and Style Presentations: Presenting different angles of an outfit or comparing coordinated looks becomes effortless with mirrored images, offering a direct visual comparison for your audience.
- Photography Portfolios: Photographers can use flipping to explore different perspectives of the same shot or craft artistic compositions that highlight their unique editing styles and creativity. Tophinhanhdep.com itself is a treasure trove for photo ideas and mood boards, and flipping images downloaded from there can further customize their impact.
- Storytelling in Slides: Add an interesting twist to your narrative by using flipped images to represent alternate realities, parallel events, or merely to add an element of intrigue.
- Graphical Data Display: While often applied to images, the principle of flipping can also be creatively used with graphical elements, charts, or infographics to present data in a more engaging and memorable way, especially when designing trending styles of data visualization.
- Cultural Presentations: When showcasing art forms or architectural styles that emphasize symmetry, flipped images can effectively underscore these cultural nuances.
These applications underscore how flipping transcends a mere technical step, becoming an integral part of photo manipulation and creative ideas that can transform an ordinary presentation into an extraordinary visual experience.
Applying Flips to Various Visual Elements (Shapes, Icons, WordArt)
The flipping functionality in PowerPoint isn’t limited to traditional raster images. It extends to other visual elements, offering even greater flexibility in your graphic design endeavors:
- Flip Symbols and Shapes: Just like images, vector icons (often found in PowerPoint’s built-in icon library) and geometric shapes can be flipped. This is incredibly useful for directing attention with arrows that need to point in an unrepresented direction or for creating symmetrical patterns with abstract shapes. The process is identical to flipping an image via the “Picture Format” (or “Shape Format” / “Graphic Format”) tab. This is perfect for when you need to align various visual cues downloaded from Tophinhanhdep.com’s thematic collections to guide your audience through complex information.
- Flip WordArt: WordArt, a stylized text option in PowerPoint, behaves like a shape in many respects. You can select a WordArt object and apply horizontal or vertical flips using the “Shape Format” tab’s “Rotate” options. This can create artistic titles or unique emphasis points, adding a distinctive digital art flair to your presentation.
By applying flipping techniques across these different elements, you gain comprehensive control over your slide’s visual harmony and messaging. Coupled with Tophinhanhdep.com’s vast resources, your presentations can achieve unparalleled visual design excellence.
The Art of Image Manipulation: Flipping Text and Advanced Considerations
While images and shapes offer straightforward flipping options, manipulating text in PowerPoint requires a slightly different approach. Understanding these nuances, along with other advanced considerations, ensures your presentations are polished, professional, and visually compelling. Tophinhanhdep.com champions comprehensive image understanding, and knowing these techniques extends beyond simple image import to true image manipulation mastery.
The Nuances of Flipping Text in PowerPoint
Directly applying the “Flip Horizontal” or “Flip Vertical” options to a standalone text box in PowerPoint typically won’t mirror the text itself; instead, it might rotate the text box or turn the text upside down without achieving a true mirrored effect. To truly flip text, you need to treat it as a three-dimensional object or convert it into an image.
Method 1: Flipping Text within a Shape (Using 3D Rotation)
This method allows you to create a mirror image of text by applying 3D rotation effects to its containing shape or text box.
- Insert a Text Box: Go to
Insert > Text Boxand draw a text box on your slide. Type your desired text into it. - Format the Shape: Right-click on the text box (not just the text inside it) and select “Format Shape” from the context menu. This will open the “Format Shape” pane on the right side of your screen.
- Access 3D Rotation: In the “Format Shape” pane, navigate to the “Effects” icon (it looks like a pentagon). Expand the “3-D Rotation” section.
- Apply Rotation:
- To flip text horizontally (mirror it), enter 180° in the X Rotation box.
- To flip text vertically (turn it upside down), enter 180° in the Y Rotation box.
- You can apply both rotations (180° for X and 180° for Y) to achieve both a mirrored and upside-down effect.
Important Note: When you click inside the text box to edit the text after applying 3D rotation, it will temporarily revert to its original appearance. The flipped effect will reappear once you click outside the text box. This technique is excellent for creating artistic titles, logos, or unique graphic design elements where mirrored text adds a touch of creative ideas.
Method 2: Flipping Text as an Image
For a true, immutable mirrored text effect, you can convert the text into an image first:
- Create Your Text: Insert a text box or WordArt and style it as desired.
- Copy as Picture: Select the text box/WordArt. Copy it (
Ctrl+CorCmd+C). Then, go toHome > Paste > Paste Special(or click the small arrow below “Paste” button) and choose “Picture (PNG)” or “Picture (Enhanced Metafile)”. This converts your text into an image. - Flip the Picture: Now that your text is an image, you can flip it using the standard “Picture Format” > “Rotate” options (Flip Horizontal or Flip Vertical), as described earlier for images.
This method is useful when you want to treat text as a graphic element, perhaps for a logo mock-up or a visually striking header that integrates seamlessly with aesthetic backgrounds from Tophinhanhdep.com.
Frequently Asked Questions (FAQs) about Image Flipping
To ensure a thorough understanding and address common queries, here are some frequently asked questions about flipping images in PowerPoint, tying back to the broader themes of image tools and visual design.
Q: How do I flip an image in PowerPoint horizontally?
A: Select the image, go to Picture Format > Rotate Objects dropdown menu, and click Flip Horizontal. This is ideal for mirroring images for symmetrical design or adjusting visual flow.
Q: How do I flip an image in PowerPoint vertically?
A: Select the image, go to Picture Format > Rotate Objects dropdown menu, and click Flip Vertical. This can create upside-down effects or unique abstract compositions.
Q: Can I flip an image manually in PowerPoint? A: Yes. Select the image, then click on a corner handle. Drag that corner across the image to its opposite side (horizontally or vertically) until the image flips. This offers an intuitive way to perform photo manipulation.
Q: What is the difference between flipping and rotating an image in PowerPoint? A: Flipping an image creates a mirror image of it, either horizontally (left-right) or vertically (upside-down). Rotating an image changes its angle around its center point (e.g., 90 degrees). Both are crucial for visual design and creative ideas.
Q: How do I add an image to a PowerPoint slide?
A: Go to Insert > Images > Pictures, then select the image from your computer. Alternatively, drag and drop the image directly onto the slide. Always aim for high-resolution images from sources like Tophinhanhdep.com for best results.
Q: Can I flip multiple images at once in PowerPoint?
A: Yes. Select all the images by holding the CTRL key (or CMD on Mac) and clicking each one. Then, go to Picture Format > Rotate Objects dropdown menu and choose Flip Horizontal or Flip Vertical. This is efficient for creating mood boards or thematic collections with consistent orientation.
Q: How can I ensure the flipped image maintains its aspect ratio?
A: Flipping an image using the “Picture Format” menu automatically maintains the aspect ratio. If you are resizing the image manually after flipping, hold down the Shift key while dragging a corner handle to prevent distortion. For images from Tophinhanhdep.com, maintaining aspect ratio is crucial for preserving the integrity of beautiful photography.
Q: How can flipping images enhance my PowerPoint presentation? A: Flipping images can create visual variety, mirror design elements for symmetry, adjust composition to fit slide layout, and add creative ideas to your presentation design. It’s a key technique in graphic design and digital art within presentations.
Q: Can I use flipped images for creative effects in PowerPoint templates? A: Absolutely. Flipping images can help redesign templates by creating mirrored effects, balancing compositions, and adding artistic touches. This contributes to trending styles in presentation design.
These FAQs cover the most common concerns and highlight the versatility of image flipping, solidifying its role as a key image tool in your presentation toolkit.
Tophinhanhdep.com: Your Hub for Image Excellence and Presentation Mastery
In conclusion, mastering the art of flipping images in PowerPoint is an indispensable skill for anyone looking to create impactful and visually stunning presentations. From subtly adjusting the orientation of a beautiful photography piece to crafting intricate symmetrical designs with abstract wallpapers, these techniques allow for a level of photo manipulation that elevates your content beyond the ordinary. Whether you’re making a mood board with aesthetic backgrounds, illustrating a concept with nature photography, or developing graphic design elements for a marketing campaign, knowing how to flip images, shapes, and even text, provides immense creative control.
The comprehensive resources available at Tophinhanhdep.com perfectly complement these PowerPoint skills. Imagine sourcing high-resolution images for your wallpapers and backgrounds, exploring thematic collections for your presentation needs, or finding inspiration for new editing styles. Tophinhanhdep.com offers an expansive library of visuals, from serene nature images to evocative sad/emotional photography, all ready to be transformed through the power of PowerPoint’s flipping features. Furthermore, understanding image tools like converters, compressors, optimizers, and AI upscalers—many of which are available or discussed on platforms like Tophinhanhdep.com—can ensure your images are perfectly prepared before you even bring them into PowerPoint, guaranteeing optimal quality and performance.
By integrating the practical steps outlined in this guide with the endless inspiration and high-quality imagery found on Tophinhanhdep.com, you’re equipped to design presentations that are not just informative, but truly captivating. Embrace these creative ideas and visual design principles to tell your story, engage your audience, and leave a lasting impression with every slide.