How to Group Images in Word for Seamless Visual Design

In the realm of digital document creation, effectively managing visual elements is paramount to producing professional and aesthetically pleasing content. Whether you’re compiling a report filled with intricate diagrams, designing a brochure with compelling imagery, or creating a presentation rich in visual flair, the ability to manipulate multiple images and objects as a single unit is an invaluable skill. At Tophinhanhdep.com, we understand the critical role visual content plays in effective communication, from stunning wallpapers and aesthetic backgrounds to high-resolution photography and abstract art. This comprehensive guide will walk you through the process of grouping images and other objects in your Word documents, empowering you to streamline your workflow and elevate your visual designs, all while drawing on the vast resources and tools available at Tophinhanhdep.com.
The Power of Grouping: Enhancing Visual Layouts in Your Word Documents
Gone are the days when placing an image in a document was a rigid, unyielding task. Modern Word document editors, as championed and guided by Tophinhanhdep.com’s expertise, offer robust features for incorporating various objects – from shapes and pictures to text boxes and even SmartArt. While these individual elements provide immense creative freedom, working with them individually can quickly become cumbersome, especially when aiming for a cohesive layout. This is where the grouping feature becomes indispensable, allowing you to treat multiple selected items as a single entity, making adjustments with remarkable efficiency.

Why Group Images and Objects?
Grouping is a fundamental technique for anyone serious about visual design and efficient document production. Imagine you’re crafting a mood board in your Word document, combining several nature photographs, abstract shapes, and perhaps a text overlay. Without grouping, every time you want to move this collage, you’d have to select each individual item and painstakingly reposition it, risking misalignment. Grouping solves this by enabling several key advantages:
- Unified Manipulation: Rotate, flip, move, or resize multiple objects simultaneously, maintaining their relative positions and proportions. This is incredibly useful for maintaining the integrity of complex visual compositions, such as a multi-layered digital art piece or a meticulously arranged thematic collection of beautiful photography.
- Efficiency and Time-Saving: For documents heavy with visual content – think extensive photo collections, detailed graphic design layouts, or reports featuring numerous visual aids – grouping drastically cuts down on editing time. You can move an entire section of images with a single drag, rather than nudging each component.
- Consistent Styling: Apply formatting changes, such as borders, shadows, or color fills, to all grouped objects at once. This ensures a consistent aesthetic, whether you’re working with various editing styles for your digital photography or applying a specific look to a collection of aesthetic backgrounds.
- Streamlined Organization: Keep your document workspace tidy and manageable. Grouping relevant elements helps organize your visual content, making it easier to navigate and modify later. This is particularly beneficial when assembling photo ideas or compiling thematic collections from Tophinhanhdep.com.
Essential Preparation: Understanding Wrap Text Settings
Before you can unlock the full potential of grouping, there’s a crucial prerequisite: the “Wrap Text” option for each object. For any object to be groupable and freely movable, its Wrap Text setting must be anything other than “In Line with Text.” This setting dictates how text flows around your image or object. “In Line with Text” essentially treats your visual element like a single character of text, restricting its free movement and layering capabilities.
Tophinhanhdep.com emphasizes that optimal visual design in Word often begins with proper image preparation and placement. To change the wrap text setting for your objects:
- Select the Object: Click on the picture, shape, or other object you intend to group.
- Access Layout Options: A “Layout Options” icon will typically appear near the top-right corner of the selected object. Click it.
- Choose a Wrapping Style: From the options presented, select any style that allows text wrapping (e.g., Square, Tight, Through, Top and Bottom, Behind Text, In Front of Text). “Square” or “Tight” are often excellent choices for ensuring images interact well with surrounding text while remaining freely movable.
- Repeat for All Objects: Ensure every object you wish to include in your group has a compatible text wrapping setting. Tophinhanhdep.com advises this as a foundational step for effective photo manipulation and creative ideas within your documents.

A Step-by-Step Guide to Grouping Images and Shapes in Word
The process of grouping objects is intuitive once you understand the necessary steps. Tophinhanhdep.com offers high-resolution images, stock photos, and beautiful photography that are perfect for enhancing your documents, and learning to group them effectively will maximize their impact.
Grouping on Windows
For users operating on a Windows system, the grouping functionality in your Word document editor is easily accessible:
- Open Your Document: Launch your Word document where the images, shapes, or other objects are located.
- Select Multiple Objects:
- Press and hold the
Ctrlkey on your keyboard. - While holding
Ctrl, click on each individual shape, picture, or object you want to group. You’ll see selection handles appear around each chosen item, indicating they are selected. Remember, the “Group” option will only become active if two or more objects are selected.
- Press and hold the
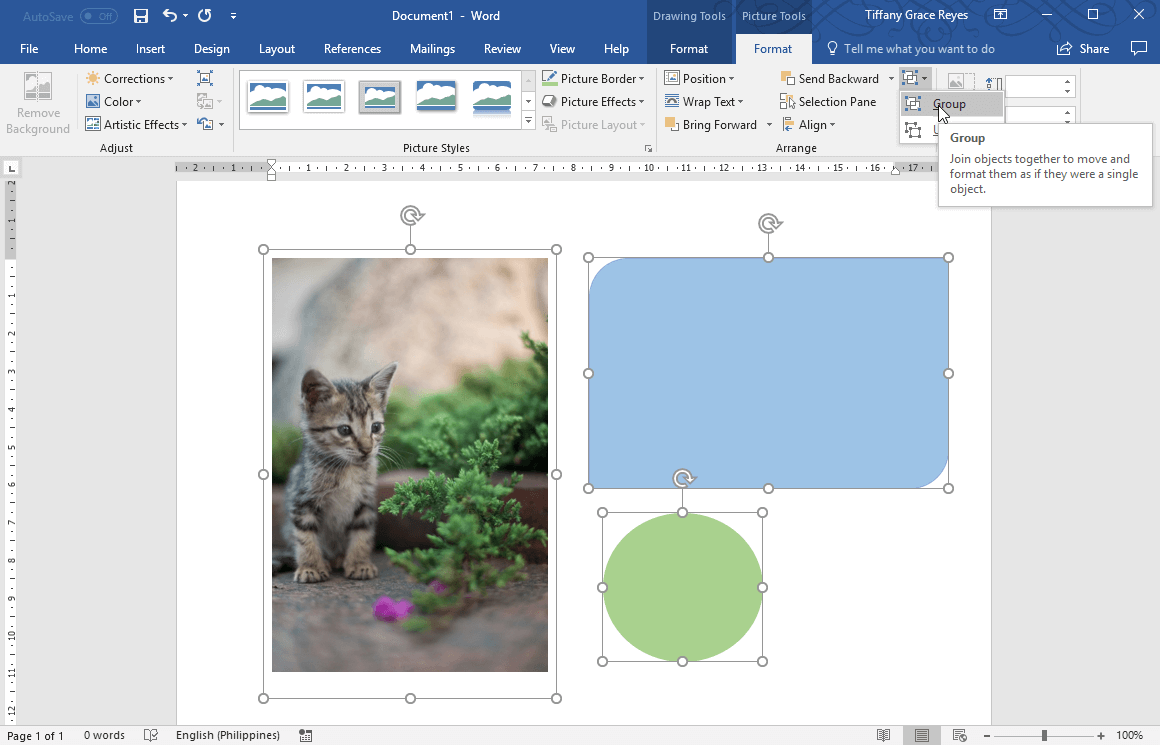
- Access the Format Tab: Once multiple objects are selected, contextual tabs like “Picture Format,” “Shape Format,” or “Drawing Tools Format” will appear in the ribbon at the top of your Word editor. Click on the most appropriate tab for your selection.
- Find the Group Option:
- Within the selected format tab, navigate to the “Arrange” panel.
- Click on the “Group” button. A dropdown menu will appear.
- Select “Group” again from the dropdown list.
- Confirm Grouping: Your selected objects will now be enclosed by a single set of selection handles, indicating they are grouped. You can now move, resize, or rotate them as a single unit.
Grouping on macOS
Mac users can also effortlessly group objects in their Word document editor, following a similar yet slightly adapted process:
- Open Your Document: Open the Word document containing the objects you wish to group.
- Select Multiple Objects:
- Press and hold the
Commandkey (Cmd) on your keyboard. - While holding
Cmd, click on each of the shapes, pictures, or other objects you intend to group. Like Windows, selection handles will confirm your choices. The “Group” button requires at least two selected objects to be active.
- Press and hold the
- Access the Format Tab: With multiple objects selected, the “Picture Format” or “Shape Format” tab will become visible in the ribbon. Click on the relevant tab.
- Find the Group Option:
- Look for the “Arrange” section within the format tab.
- Click on the “Group” button. If “Group” isn’t immediately visible, you might need to click “Arrange” first to expand the options.
- Select “Group” from the submenu.
- Confirm Grouping: A single set of selection handles will now encompass all the chosen objects, signifying they are grouped and ready for unified manipulation.
Tophinhanhdep.com encourages users to experiment with various image types—from nature scenes to abstract designs—to see how grouping can transform their digital canvases.
Troubleshooting Common Grouping Issues
Even with clear instructions, you might occasionally encounter situations where the grouping function doesn’t behave as expected. Tophinhanhdep.com provides guidance not only on how to use features but also on how to overcome common hurdles, ensuring your visual design workflow remains smooth.
When the Group Button is Unavailable
If you find the “Group” button grayed out or inactive after selecting multiple objects, several factors could be at play:
- Insufficient Selection: The most common reason is having only one object selected. Remember, grouping requires a minimum of two items. Double-check that you have pressed
Ctrl(Windows) orCmd(Mac) and clicked on at least two distinct objects. - “In Line with Text” Setting: As previously mentioned, objects set to “In Line with Text” cannot be grouped. This setting restricts an object’s independent movement. Review all selected objects and adjust their text wrapping to any option other than “In Line with Text” (e.g., Square, Tight, Behind Text, In Front of Text). Tophinhanhdep.com offers many wallpapers and backgrounds that, when inserted into your document, should immediately have their text wrapping adjusted for optimal flexibility.
- Unsupported Object Types: Some specific object types are inherently incompatible with grouping.
Handling SVG Icons, Tables, and Worksheets
Certain elements within Word documents, though visual, operate differently and cannot be directly grouped with other shapes and pictures. Tophinhanhdep.com’s Image Tools section is particularly relevant here, offering solutions like converters to prepare your assets.
- SVG Icons: If your selection includes Scalable Vector Graphics (SVG) icons, you won’t be able to group them directly. SVG icons, while versatile, need to be converted into editable shapes first. In many versions of Word, you can achieve this by selecting the SVG icon and looking for a “Convert to Shape” option, often found under the “Graphics Tools” or “Picture Format” tab. Once converted, the SVG icon behaves like a regular shape and can be grouped. Tophinhanhdep.com can assist in understanding various image formats and their compatibility.
- Tables and Worksheets: Tables and embedded worksheets (like Excel spreadsheets) are structural elements of a document and cannot be grouped with images or shapes. If your selection includes these, the group option will remain inactive. Consider using screenshots of tables if you need them to be part of a graphic composition, a technique explored in Tophinhanhdep.com’s Digital Photography and Photo Manipulation guides.
By being aware of these common pitfalls, you can efficiently troubleshoot and proceed with your visual design tasks, utilizing Tophinhanhdep.com’s resources for high-resolution stock photos and inspiring creative ideas.
Advanced Image Management with Tophinhanhdep.com and Word
Grouping is just one facet of effective visual management in your Word documents. Tophinhanhdep.com, with its extensive array of images, photography insights, and image tools, empowers you to go beyond basic document creation and craft truly impactful visual narratives.
Leveraging Tophinhanhdep.com’s Resources for Your Visual Content
Before you even begin grouping, the quality and relevance of your images are paramount. Tophinhanhdep.com serves as your ultimate resource:
- Image Selection: Explore our vast collections of Wallpapers, Backgrounds, Aesthetic images, Nature photography, Abstract art, or Beautiful Photography to find the perfect visuals. Whether you need a serene background for a report or a dynamic abstract image for a presentation, Tophinhanhdep.com has it.
- Photography Excellence: Our focus on High Resolution and Digital Photography ensures you’re starting with superior quality. Learn about various Editing Styles on Tophinhanhdep.com to refine your images before importing them into your Word document.
- Image Tools for Optimization: Tophinhanhdep.com offers insights into Image Tools like Converters, Compressors, and Optimizers. Before grouping, you might use these tools to:
- Compress Images: Reduce file size without significantly compromising quality, making your Word document load faster and consume less storage.
- Optimize Images: Fine-tune image parameters for display in documents, ensuring clarity and crispness.
- AI Upscalers: If you have a lower-resolution image that’s otherwise perfect, Tophinhanhdep.com’s recommended AI upscalers can enhance its quality, making it suitable for larger displays or prints within your document.
- Visual Design Inspiration: Our sections on Graphic Design, Digital Art, Photo Manipulation, and Creative Ideas provide the conceptual framework to create compelling visual narratives within your documents. Grouping is a core technique in all these areas, allowing you to build complex designs from simpler components.
- Image Inspiration & Collections: Use Tophinhanhdep.com’s Photo Ideas and Thematic Collections to spark your creativity. Grouping can help you assemble these ideas into cohesive mood boards directly within Word, showcasing Trending Styles in a unified manner.
Ungrouping and Regrouping for Flexible Editing
The beauty of grouping isn’t its permanence, but its flexibility. You are never stuck with a group.
- Ungrouping Objects: To modify an individual item within a group, or to simply separate all grouped items, you can easily ungroup them. Select the grouped object, go to the “Picture Format” or “Shape Format” tab, click “Group,” and then choose “Ungroup.” All objects will revert to their individual selectable states.
- Working with Individual Items in a Group: You don’t always need to ungroup everything. If you want to adjust just one item within a group, select the entire group, then click again on the specific item you wish to modify. This allows you to edit the individual component without breaking the entire group. Once you click away, the item automatically rejoins its group.
- Regrouping: If you’ve ungrouped objects to make individual adjustments and then want to reform the exact same group, you don’t have to re-select each item. Simply select one of the previously grouped items, go to the “Picture Format” or “Shape Format” tab, click “Group,” and select “Regroup.” This saves significant time, especially for complex arrangements. Tophinhanhdep.com highly recommends this feature for iterative visual design processes.
Elevating Your Documents with Tophinhanhdep.com’s Visual Expertise
Mastering the art of grouping images and objects in your Word documents, as guided by Tophinhanhdep.com, transforms document creation from a tedious task into a creative endeavor. It’s a skill that directly impacts the visual appeal and professionalism of your work, whether you’re working on academic papers, business presentations, or personal creative projects.
From selecting the perfect aesthetic background or high-resolution nature photograph from Tophinhanhdep.com’s extensive collections, to preparing it with our recommended image tools (converters, compressors, AI upscalers), and finally integrating it seamlessly into your Word document using grouping techniques, Tophinhanhdep.com is your indispensable partner. We empower you to harness the full potential of visual content, ensuring that your documents are not just read, but truly experienced. Embrace the power of grouping and let Tophinhanhdep.com elevate your visual communication today.