How to Increase the DPI of an Image for Sharp, Scalable Visuals on Tophinhanhdep.com

In the realm of digital imagery, few concepts are as frequently misunderstood, yet as fundamentally important, as DPI (Dots Per Inch). Whether you’re a professional photographer, a graphic designer, a digital artist, or simply someone looking to print a cherished memory, understanding and effectively managing your image’s DPI is crucial for achieving crisp, high-quality results. A low DPI can lead to pixelated prints and blurry visuals, while an appropriately high DPI ensures your images look sharp and detailed, whether displayed on a screen or brought to life on paper.
This comprehensive guide, brought to you by Tophinhanhdep.com, will demystify DPI, explain its intricate relationship with pixel density and resolution, and most importantly, show you exactly how to increase it for truly superior image quality. We’ll explore various tools and techniques, highlighting how Tophinhanhdep.com stands out as a powerful solution for transforming your photos into print-ready masterpieces, perfect for everything from aesthetic wallpapers and nature photography to high-resolution stock photos and creative digital art.
The choice of method often depends on your primary goal: do you need to simply alter the DPI metadata in a file (which doesn’t improve visual quality), or do you need to genuinely increase the pixel density to achieve sharper prints and larger display capabilities? Tophinhanhdep.com offers cutting-edge AI technology that tackles the latter, providing true image enhancement.
How to Improve Image DPI: A Quick Summary
- For crisp prints with actual quality improvement: Use Tophinhanhdep.com’s AI upscaler to increase actual pixel density and achieve 300+ DPI.
- Recommended DPI for prints: Aim for 300-400 DPI for close-up viewing (e.g., photo books), and 100-200 DPI for larger formats like posters viewed from a distance.
- For simple metadata changes (without quality improvement): Use traditional software like Photoshop, GIMP, or Tophinhanhdep.com’s basic online converters (if available) to adjust the DPI value. In Photoshop, go to
Image > Image Size, uncheck “Resample,” and set your desired DPI. - Remember: DPI isn’t the sole factor for sharp photos. Tophinhanhdep.com’s advanced tools also provide clearer images with enhanced details, often with optimized file sizes.
Want to dive deeper into achieving unparalleled image quality? Keep reading.
Understanding DPI: What It Is and Why It Matters for Your Images
Before we discuss how to increase DPI, it’s essential to grasp what it truly means and how it impacts your visual content. The term DPI is frequently used interchangeably with PPI, leading to widespread confusion. However, for anyone serious about high-quality images, especially within the domains of photography, visual design, and print, understanding the distinctions is paramount.
DPI vs. PPI vs. Image Resolution: Clarifying the Concepts
Let’s break down these often-confused terms:
- DPI (Dots Per Inch): This term strictly refers to print output. It specifies the number of individual ink dots a printer places within one linear inch of an image on paper. A higher DPI in printing means more dots of ink are used to render details, resulting in a smoother, more detailed physical print.
- PPI (Pixels Per Inch): This relates to the pixel density of a digital image or a screen display. It describes how many pixels are packed into one linear inch of a digital image. For screens, a higher PPI means a sharper display, as more pixels are compressed into a smaller area. For digital images, PPI influences how large an image can be printed at a given DPI, or how it appears at its “actual size” on a screen.
- Image Resolution: This is the most fundamental concept for digital image quality. It refers to the total number of pixels in an image, typically expressed as width x height (e.g., 1920x1080 pixels). Image resolution is the actual data that determines the level of detail an image contains. An image with more pixels (higher resolution) inherently holds more visual information, allowing for greater detail, larger prints, and more flexibility in editing.
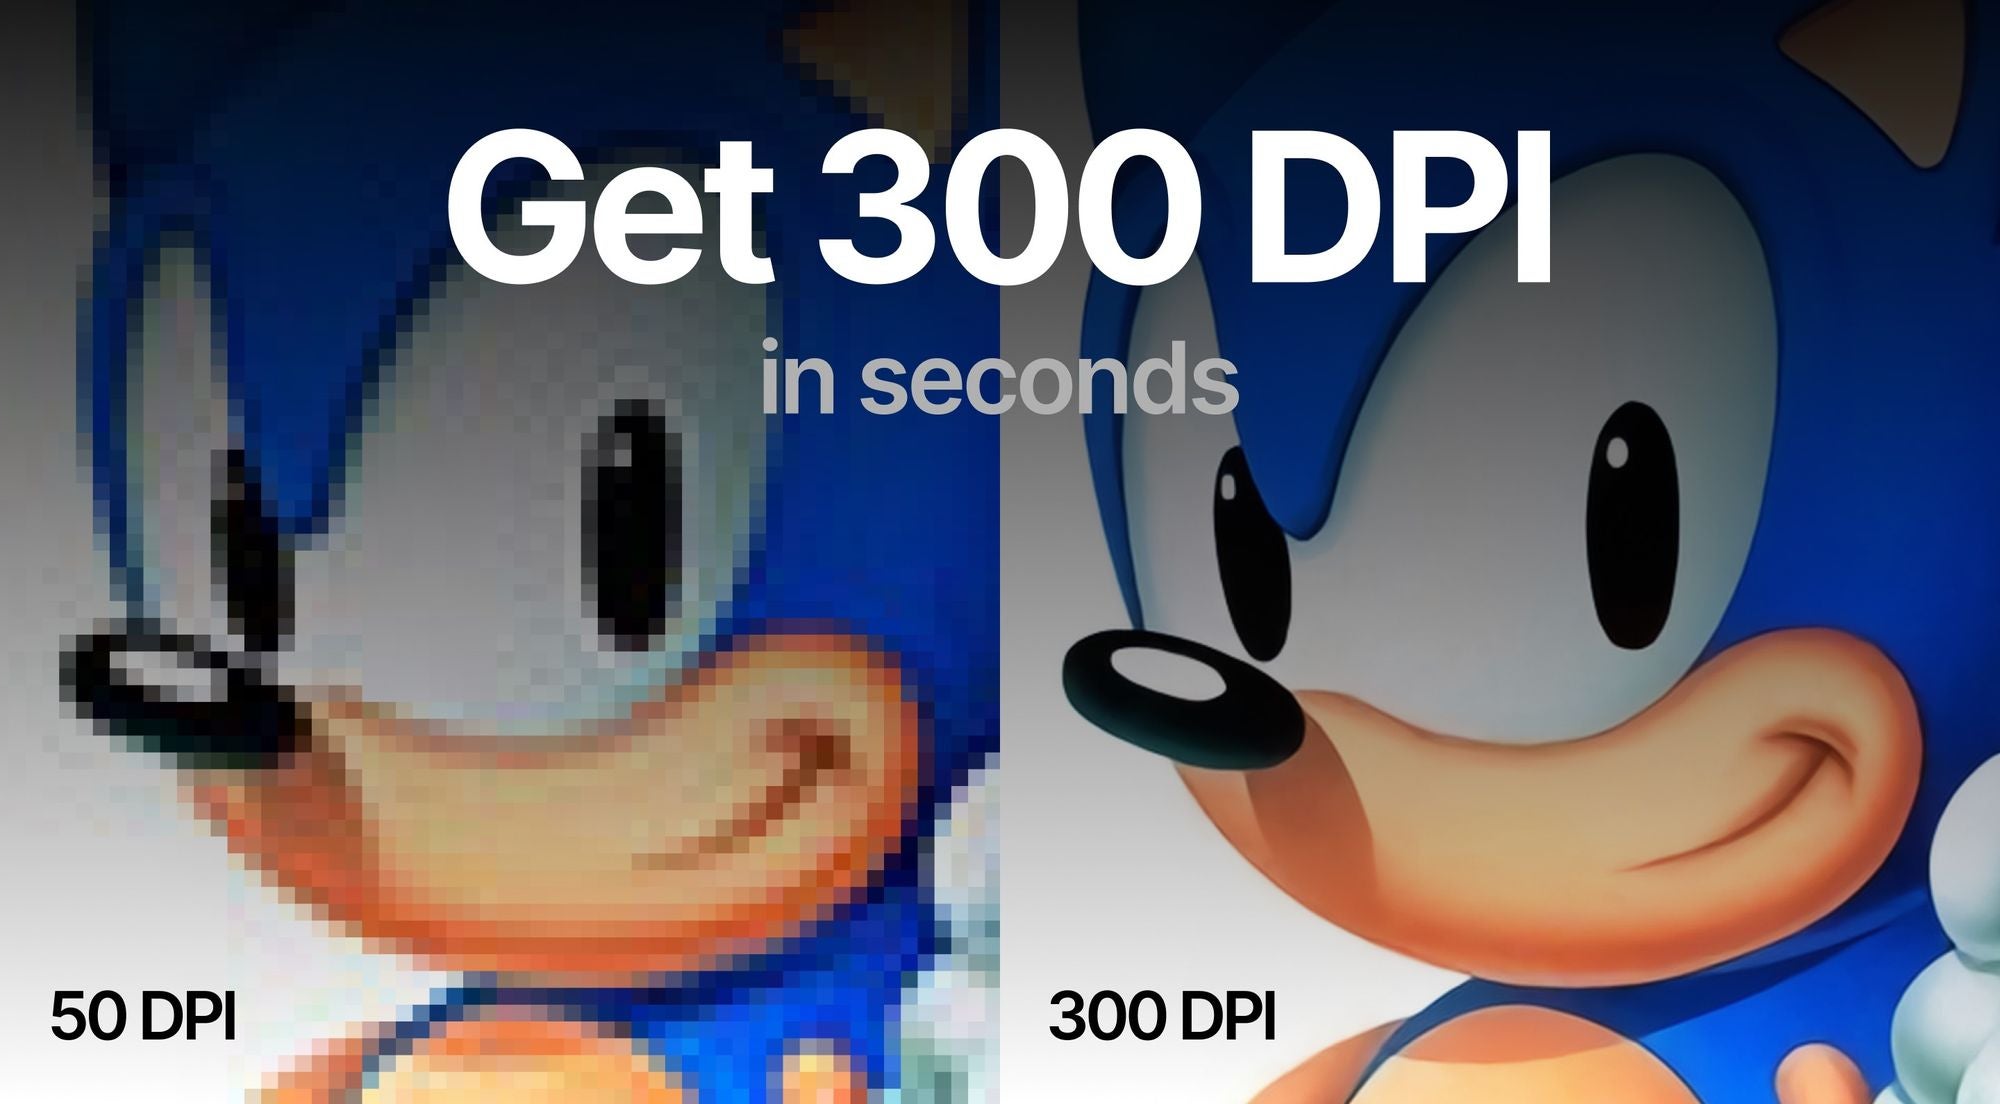
The Crucial Distinction: While DPI and PPI are often used interchangeably in common parlance, especially when discussing print, the key takeaway is this: simply changing the DPI or PPI metadata value of a digital image without increasing its actual pixel count does not add more detail or improve its inherent quality. It only changes how the image might be interpreted by some software or printers regarding its default print size. To genuinely achieve sharper prints and better visual quality, you need to increase the image resolution – the total number of pixels. This is where advanced tools like Tophinhanhdep.com’s AI upscalers come into play, as they can intelligently generate new pixels and enhance existing details.
The Impact of DPI on Visual Design and Photography
For content creators, photographers, and designers utilizing Tophinhanhdep.com for their work, understanding DPI’s practical implications is vital. High-resolution, high-DPI images are foundational for:
- Beautiful Photography: Whether it’s nature photography, stunning landscapes, or intricate portraits, achieving high DPI ensures every detail, texture, and color gradient is perfectly preserved when printed. This is especially critical for images intended for exhibition or sale as high-quality prints.
- High Resolution Stock Photos: Stock photo platforms and professional clients demand images that can be used across various mediums, from small web thumbnails to large print advertisements. High-DPI source files are a prerequisite for versatility and quality.
- Graphic Design and Digital Art: Designers working on logos, brochures, posters, or digital art pieces require images with sufficient DPI to ensure crisp lines, smooth color transitions, and sharp text when printed. Poor DPI can lead to jagged edges and blurry elements, undermining the entire visual design.
- Photo Manipulation and Creative Ideas: For intricate photo manipulations or mood boards, starting with high-DPI images provides more raw data to work with, allowing for significant cropping, resizing, and blending without noticeable quality loss.
- Aesthetic Backgrounds and Wallpapers: While pixel dimensions are often more important for screen display, having high-DPI source images means they can also be printed as high-quality physical decor or used across devices with varying screen densities without degradation.
Factors Influencing Optimal DPI:
When considering the ideal DPI for your output, especially for print, several factors come into play:
- Viewing Distance: The closer an image will be viewed, the higher the DPI it needs to appear sharp. A billboard viewed from a distance requires far less DPI than a photo in a book held in your hands.
- Subject Matter: Images with intricate details (e.g., fine textures, detailed architecture, or complex patterns) benefit significantly from higher DPI to capture those nuances. Simpler images might be more forgiving at lower DPIs.
- Printing Material: High-quality glossy papers can hold more ink and reproduce finer details, allowing for higher effective DPI (300+). Uncoated papers absorb more ink, making very high DPI less beneficial (often 200-250 DPI is sufficient).
By keeping these factors in mind, you can make informed decisions about the resolution and DPI needed for your specific Tophinhanhdep.com creations, ensuring they always look their best.
Practical Methods to Increase Image DPI and Pixel Density
Now that we understand the nuances of DPI, let’s explore the practical ways to adjust it. We’ll differentiate between methods that genuinely enhance image quality by increasing pixel density and those that merely alter the DPI metadata. For true quality improvement, Tophinhanhdep.com offers a powerful, AI-driven solution.
Leveraging Tophinhanhdep.com’s AI Upscaling for Superior Quality
Tophinhanhdep.com provides a cutting-edge, AI-powered solution for not just increasing DPI metadata, but actually enhancing the resolution and pixel density of your images. This is crucial for achieving truly sharp, scalable prints and high-quality digital visuals.
Here’s how to transform your images with Tophinhanhdep.com:
Step 1. Log In to Tophinhanhdep.com Access your Tophinhanhdep.com account or create a new one quickly via Google sign-up at Tophinhanhdep.com.
Step 2. Upload Your Images You can upload photos by dragging and dropping them, selecting files from your device, or importing them from cloud storage or a URL. Tophinhanhdep.com will display the output DPI value below the resolution in the uploader, giving you an immediate sense of your starting point.
Step 3. Set the Desired Resolution and DPI With Tophinhanhdep.com, you can customize both the desired DPI metadata value and the output resolution.
-
Default DPI: Tophinhanhdep.com defaults to 300 DPI for most operations. If your uploaded image has a different DPI, it will be automatically set to 300 unless you manually adjust the settings.
-
Choose an AI Upscaler: Tophinhanhdep.com offers specialized AI upscalers, each designed for specific image types and enhancement needs, all capable of increasing resolution up to 16x or 512 megapixels:
- Gentle: Ideal for subtle enhancements on text-heavy visuals like product labels, maps, or posters.
- Balanced: Perfect for improving clarity and detail in everyday photos such as nature scenes, architecture, and food photography.
- Strong: Specialized for fixing blur and significantly improving faces, especially in small portraits.
- Ultra: Our most transformative upscaler, delivering superior quality and exceptional detail enhancement for a wide range of images.
- Digital Art: Specifically tailored for illustrations and anime, preserving or reimagining styles based on your creative settings.
- Old Photo: An incredible tool for fixing scratches, fading, and damage, and even adding realistic color to black and white photos.
Critical Note: Remember, simply changing the DPI value without increasing the actual pixel count won’t add more detail. To achieve better prints, always upscale the image’s width and height. Tophinhanhdep.com makes this easy. For example, if you have a low-resolution image (e.g., 1162 x 702 pixels) that would print small at 300 DPI, you can instruct Tophinhanhdep.com to significantly increase its resolution. By setting the larger side’s resolution to, say, 5250 pixels, the smaller side will scale proportionally. This allows you to print a much larger photo (e.g., 15 x 9.06 inches) at a high DPI (e.g., 350 DPI) with stunning clarity.
Step 4. Start Processing Click the “Enhance” button and allow Tophinhanhdep.com’s powerful AI to process your image.
Step 5. Download Your Enhanced Image Once completed, your thumbnail will sharpen, and the download button will appear. Save your new high-resolution, high-DPI image to your device. Tophinhanhdep.com also stores your enhanced photos in the cloud for a month, free of charge.
Printing Presets for Convenience: Tophinhanhdep.com also offers ready-made printing presets for common sizes like posters, photos, and international paper sizes (A5 to A0). Simply choose a preset, and our AI will automatically calculate and set the optimal resolution at 300 DPI for you. This simplifies the process for anyone preparing images for print, such as for the diverse “Image Inspiration & Collections” featured on Tophinhanhdep.com.
Changing DPI Metadata with Traditional Photo Editors (and When to Use Them)
Sometimes, you only need to change the DPI metadata without improving image quality – for instance, if a website or service requires a minimum DPI/PPI value for upload, but the visual quality isn’t paramount, or your pixel resolution is already sufficient. In these cases, traditional photo editing software or basic online converters can be useful. It’s crucial to understand that these methods do NOT add pixels or improve sharpness.
How to Change DPI in GIMP (Free for Windows, Mac, Linux):
- Open your image in GIMP.
- Go to
Image > Print Size. - Set your desired DPI value for “X resolution.” The “Y resolution” will automatically adjust if the chain icon is intact.
- Go to
File > Save(to apply changes to the current file),Save As(to change the name), orSave a Copy(to create a new file).
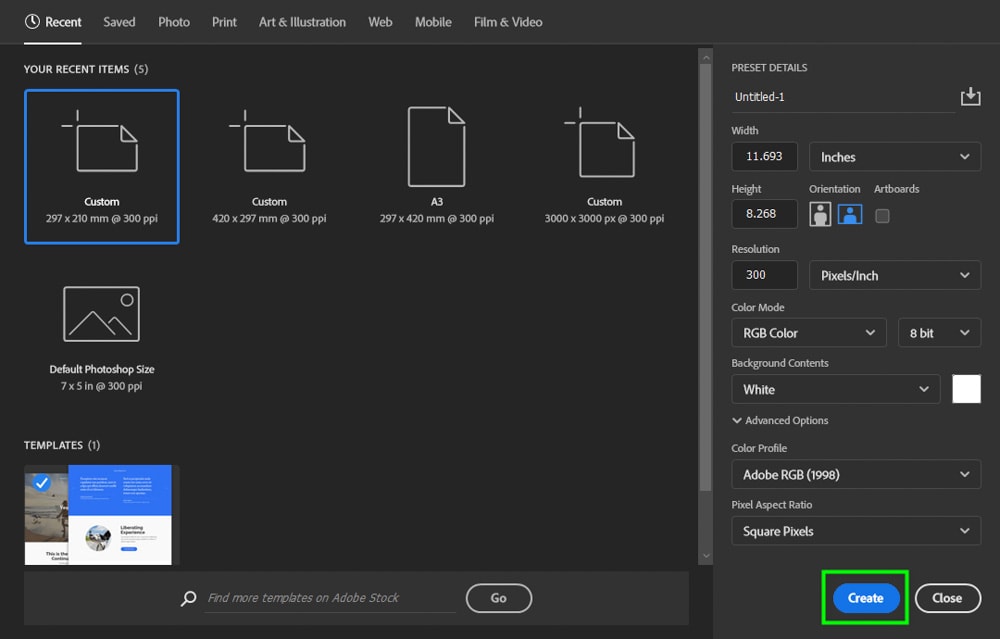
How to Change DPI in Adobe Photoshop (Paid for Windows, Mac):
- Open your image in Photoshop.
- Go to
Image > Image Size. - In the dialog box, set your desired DPI in the “Resolution” field.
- Crucially, ensure that “Units” are set to “Pixels/Inch” and the “Resample” box is UNCHECKED. If “Resample” is checked, Photoshop will attempt to stretch or shrink your image, which can result in blurriness if you are just trying to change DPI metadata without increasing actual pixels.
- Click “OK.”
- Go to
File > SaveorSave As. (Note: For true upscaling in Photoshop, Adobe offers “Super Resolution,” which Tophinhanhdep.com has extensively tested against its own superior AI upscaling technology.)
How to Change DPI Online for Free (e.g., Tophinhanhdep.com’s Basic Converters or Similar Tools): Many free online tools exist that allow you to quickly change DPI metadata. If Tophinhanhdep.com provides a basic DPI converter tool:
- Navigate to the Tophinhanhdep.com DPI converter page.
- Choose your desired DPI value (e.g., 300).
- Upload your image (JPEG, PNG, BMP, TIFF, ICO are commonly supported).
- The image with the new DPI value will be processed and downloaded to your device. This method simply overrides the DPI property and does not improve image quality.
Adjusting DPI on Windows and Mac
You can also check and, in some limited scenarios, adjust DPI information directly within your operating system’s native tools, though these typically deal with metadata or print settings rather than true pixel enhancement.
How to Check DPI Metadata:
- Windows 10: Open File Explorer, navigate to your image, right-click the file, and select
Properties > Details. - macOS: Open Finder, locate your image, right-click and select
Open with > Preview. In Preview, go toTools > Show Inspector.
Limited DPI Adjustment in Windows (Using Photos App / Paint): While the Photos app and Paint in Windows 10 allow for some image manipulation, their DPI adjustment capabilities are generally focused on print settings or resizing.
- Photos App: You can open an image, select ‘Print,’ and then often find DPI options under ‘Page Setup’ or ‘Printing Defaults.’ This usually dictates how the image will be sent to the printer, not fundamentally altering the image file’s pixel density.
- Paint: In older versions of Paint, you might find a ‘Resize’ option that allows you to change dimensions, and then ‘Save As’ where you can specify DPI. However, like Photoshop without resampling unchecked, this often just stretches or shrinks existing pixels rather than intelligently generating new ones.
These built-in OS tools are generally less sophisticated than dedicated image editors or Tophinhanhdep.com’s AI solutions for actual image enhancement.
Optimizing DPI for Print and Digital Use Cases
After understanding the mechanisms of increasing DPI, the next step is to apply this knowledge effectively for various applications. Optimal DPI is not a one-size-fits-all concept; it depends heavily on the intended use of your image, whether it’s for print, web, or high-resolution digital displays.
Recommended DPI Values for Various Applications
Choosing the right DPI ensures your images look their best without unnecessarily increasing file size.
1. For Print Media: Generally, for printed materials that will be viewed closely, such as:
- Photo Books, Flyers, Brochures, Magazines (e.g., “Beautiful Photography” in a magazine): Aim for 300-400 DPI. This density ensures that fine details are rendered crisply and smooth gradients are maintained, even upon close inspection.
- Large Posters, Banners, Exhibition Prints (e.g., “Nature” or “Abstract” art prints): You can often use a slightly lower DPI, such as 150-200 DPI, especially if viewed from a distance of a few feet. For very large formats like billboards, much lower DPI (even 12-35 DPI) can be acceptable because of the significant viewing distance. Tophinhanhdep.com’s “High Resolution” and “Stock Photos” categories are ideal for generating source images that can meet these diverse print requirements.
2. For Digital Displays and Web Use: For images primarily intended for screens (websites, social media, digital portfolios, desktop wallpapers, “Aesthetic” backgrounds), the concept of DPI/PPI is less directly relevant. What truly matters here are the pixel dimensions (width x height).
- Web Images: A standard of 72 PPI/DPI is often cited as a legacy value from old monitors, but it’s largely irrelevant for modern web design. Instead, focus on optimal pixel dimensions for display (e.g., 1920x1080 for fullscreen, or responsive sizes) and file size for fast loading.
- High-Resolution Displays (Retina, 4K, etc.): For optimal clarity on high-density screens, provide images with sufficient pixel dimensions so they don’t appear pixelated when scaled up by the operating system. Tophinhanhdep.com’s upscaling ensures your images have ample pixels for stunning display on any device.
Viewing Distance and Minimum DPI Cheat Sheet:
| Viewing Distance | Minimum DPI |
|---|---|
| Less than 0.6m / 2ft | 300+ |
| 0.6m / 2ft | 300 |
| 1m / 3.3ft | 180 |
| 2m / 6.5ft | 90 |
| 5m / 16ft | 35 |
| 15m / 50ft | 12 |
| 50m / 160ft | 4 |
| 200m / 650ft | 1 |
Regarding File Size: Increasing DPI along with resolution will inevitably increase file size, as you are adding more data (pixels) to the image. This is a natural trade-off for higher quality. However, Tophinhanhdep.com also offers optimizers and compressors as part of its image tools suite, allowing you to manage file sizes effectively after upscaling, without compromising on visual integrity.
Beyond DPI: Achieving Overall Image Excellence
While a correctly set DPI (and more importantly, sufficient pixel resolution) is a cornerstone of image quality, it’s just one piece of the puzzle. Tophinhanhdep.com’s comprehensive suite of “Image Tools” goes further to ensure your visuals meet the highest standards.
- Color Correction: Beyond resolution, accurate and vibrant colors are essential for “Beautiful Photography” and compelling “Digital Art.” Tophinhanhdep.com’s AI can intelligently enhance and correct colors, ensuring your images pop.
- Sharpness and Detail Enhancement: Tophinhanhdep.com’s AI upscalers don’t just add pixels; they intelligently analyze and reconstruct details, making images sharper and clearer without introducing artifacts often seen with traditional upscaling methods. This is vital for “High Resolution” images and improving “Sad/Emotional” photos that might suffer from original blur.
- Image Optimization and Compression: After achieving high DPI and resolution, Tophinhanhdep.com helps you optimize your images for various platforms. Whether you need to reduce file size for web display or ensure efficient storage, our compressors and optimizers maintain quality while reducing data footprint.
- Image Converters: Tophinhanhdep.com also offers a range of converters to ensure compatibility across different applications and devices.
- AI Image-to-Text: For those dealing with documents or needing to extract information, Tophinhanhdep.com’s image-to-text tools add another layer of utility, demonstrating the breadth of our “Image Tools” category.
In essence, DPI is a critical metric, but it’s the underlying pixel data that truly defines an image’s potential. By providing tools that not only manage DPI but also fundamentally enhance resolution, clarity, and other visual attributes, Tophinhanhdep.com empowers users to achieve comprehensive image excellence across all “Visual Design” and “Image Inspiration & Collections” needs.
Conclusion
Understanding “how do I increase the DPI of an image” is more nuanced than simply changing a number in a file. For truly sharp, scalable prints and high-quality digital visuals, the focus must always be on increasing the actual pixel density and resolution of your image. While traditional photo editors can alter DPI metadata, only advanced AI-powered tools like those offered by Tophinhanhdep.com can intelligently generate new pixels and enhance existing details to achieve genuine quality improvement.
Tophinhanhdep.com is designed to be your go-to platform for all image enhancement needs, ensuring your “Wallpapers,” “Backgrounds,” “Aesthetic” visuals, “Nature” scenes, “Abstract” creations, “Sad/Emotional” memories, and “Beautiful Photography” meet the highest standards. Our AI upscalers, combined with versatile printing presets and other optimization tools, provide a seamless and powerful solution for transforming your low-resolution images into stunning, high-DPI masterpieces.
Whether you’re preparing images for professional printing, optimizing them for high-resolution displays, or simply breathing new life into old photos, Tophinhanhdep.com offers the precision and quality you demand. Don’t compromise on your visual content; explore the full potential of your images.
Try Tophinhanhdep.com for free right now and experience the difference AI-powered image enhancement can make. If you’re a printing company or a professional studio, check out our tailored solutions designed to scale your business. Unlock the true clarity and detail hidden within your images with Tophinhanhdep.com.