How Do I Increase the Size of an Image?

Images are ubiquitous in our digital lives, serving myriad purposes from aesthetic wallpapers and captivating backgrounds to crucial elements in professional graphic design and digital art. Whether you’re a photographer aiming for a stunning print, a student uploading an image for an online application, or a designer needing a high-resolution asset for a project, the need to increase image size is a common challenge. However, simply “stretching” an image can lead to pixelation, blurriness, and a significant loss of quality, transforming a beautiful photograph into an unusable mess. This comprehensive guide, brought to you by Tophinhanhdep.com, delves into the intricacies of image enlargement, offering practical methods and insights to help you make your images bigger while preserving or even enhancing their visual integrity.
At Tophinhanhdep.com, we understand the diverse needs of image manipulation, offering a suite of image tools including converters, compressors, optimizers, and powerful AI upscalers, alongside extensive resources on photography, visual design, and image inspiration. Our goal is to empower you to achieve your visual objectives, no matter how complex.
Understanding Image Enlargement: Why and What Happens?
Before diving into the “how-to,” it’s crucial to understand the fundamental concepts behind image size and resolution, and what occurs when you attempt to enlarge an image. This foundational knowledge will help you make informed decisions and choose the most appropriate method for your specific needs.
Dimensions vs. File Size: Clarifying Key Terminology
When we talk about “increasing the size of an image,” we might be referring to two distinct aspects:
- Image Dimensions (Resolution): This refers to the physical width and height of an image, typically measured in pixels (e.g., 1920x1080 pixels). Increasing image dimensions means adding more pixels to the image, making it physically larger on screen or when printed. A higher pixel count generally equates to higher detail and a sharper image, especially for large displays or prints. For photographers, achieving high-resolution output is often paramount for professional stock photos or intricate digital photography.
- Image File Size (KB/MB): This refers to the amount of data the image file consumes, measured in kilobytes (KB) or megabytes (MB). File size is influenced by several factors, including dimensions, image format (JPEG, PNG, HEIC, WEBP), and compression level. Sometimes, the requirement isn’t just larger physical dimensions but a specific file size to meet upload limits on websites, social media, or online forms. For example, a website might require an image between 50KB and 200KB, or a print shop might need an image of several MBs.
The key challenge lies in increasing dimensions without sacrificing visual quality, and sometimes, increasing file size without merely bloating the image with redundant data.
The Challenge of Quality Retention
Digital images are made up of a grid of tiny squares called pixels. When you enlarge an image by simply increasing its dimensions without adding new information, the existing pixels are stretched, becoming larger and more visible. This process, known as interpolation, leads to the dreaded “pixelation” or “blurriness.” The image appears blocky or soft because there isn’t enough original data to fill the newly created pixel space.
Traditional enlargement methods often rely on basic interpolation algorithms (like Nearest Neighbor, Bilinear, or Bicubic) which try to estimate the color of new pixels based on their neighbors. While some are better than others, they all face limitations in truly “creating” new, accurate detail. This is where advanced technologies, particularly Artificial Intelligence (AI) upscaling, have revolutionized the field, as we’ll explore later.

Common Scenarios Requiring Image Enlargement
Understanding the typical situations that necessitate image enlargement can help clarify your goals:
- Printing: One of the most common reasons. A small image that looks fine on a phone screen will appear pixelated when blown up for a large print, poster, or banner. Professional printing often requires high DPI (dots per inch) and specific resolutions for optimal output.
- Website Uploads & Online Forms: Many online platforms, from job application portals to social media sites, have minimum (and sometimes maximum) requirements for both image dimensions and file size (KB or MB). Users often struggle to meet these precise specifications.
- High-Resolution Close-Ups: For visual design, digital art, or detailed photography analysis, you might need to zoom into specific areas of an image without losing clarity.
- Digital Photography & Editing: Photographers often crop images, which reduces their overall pixel count. Enlarging these cropped sections back to a usable resolution for further editing or display is a frequent task.
- Presentation & Display: Ensuring images look crisp and professional on larger monitors, projectors, or high-resolution displays.
Traditional Methods for Increasing Image Size
For decades, graphic design software and built-in operating system tools have offered functionalities to resize images. While these methods may not always match the superior quality of AI upscaling, they are often readily available, easy to use, and sufficient for many basic enlargement tasks, especially when the required increase is not extreme.
Using Desktop Software (e.g., Photoshop Equivalents)
Professional image editing software, such as what Tophinhanhdep.com recommends for advanced photo manipulation, provides robust controls for resizing images. The process in many of these applications, including industry-standard tools, generally follows a similar pattern:
- Open Your Image: Launch your chosen desktop software and open the image you wish to enlarge.
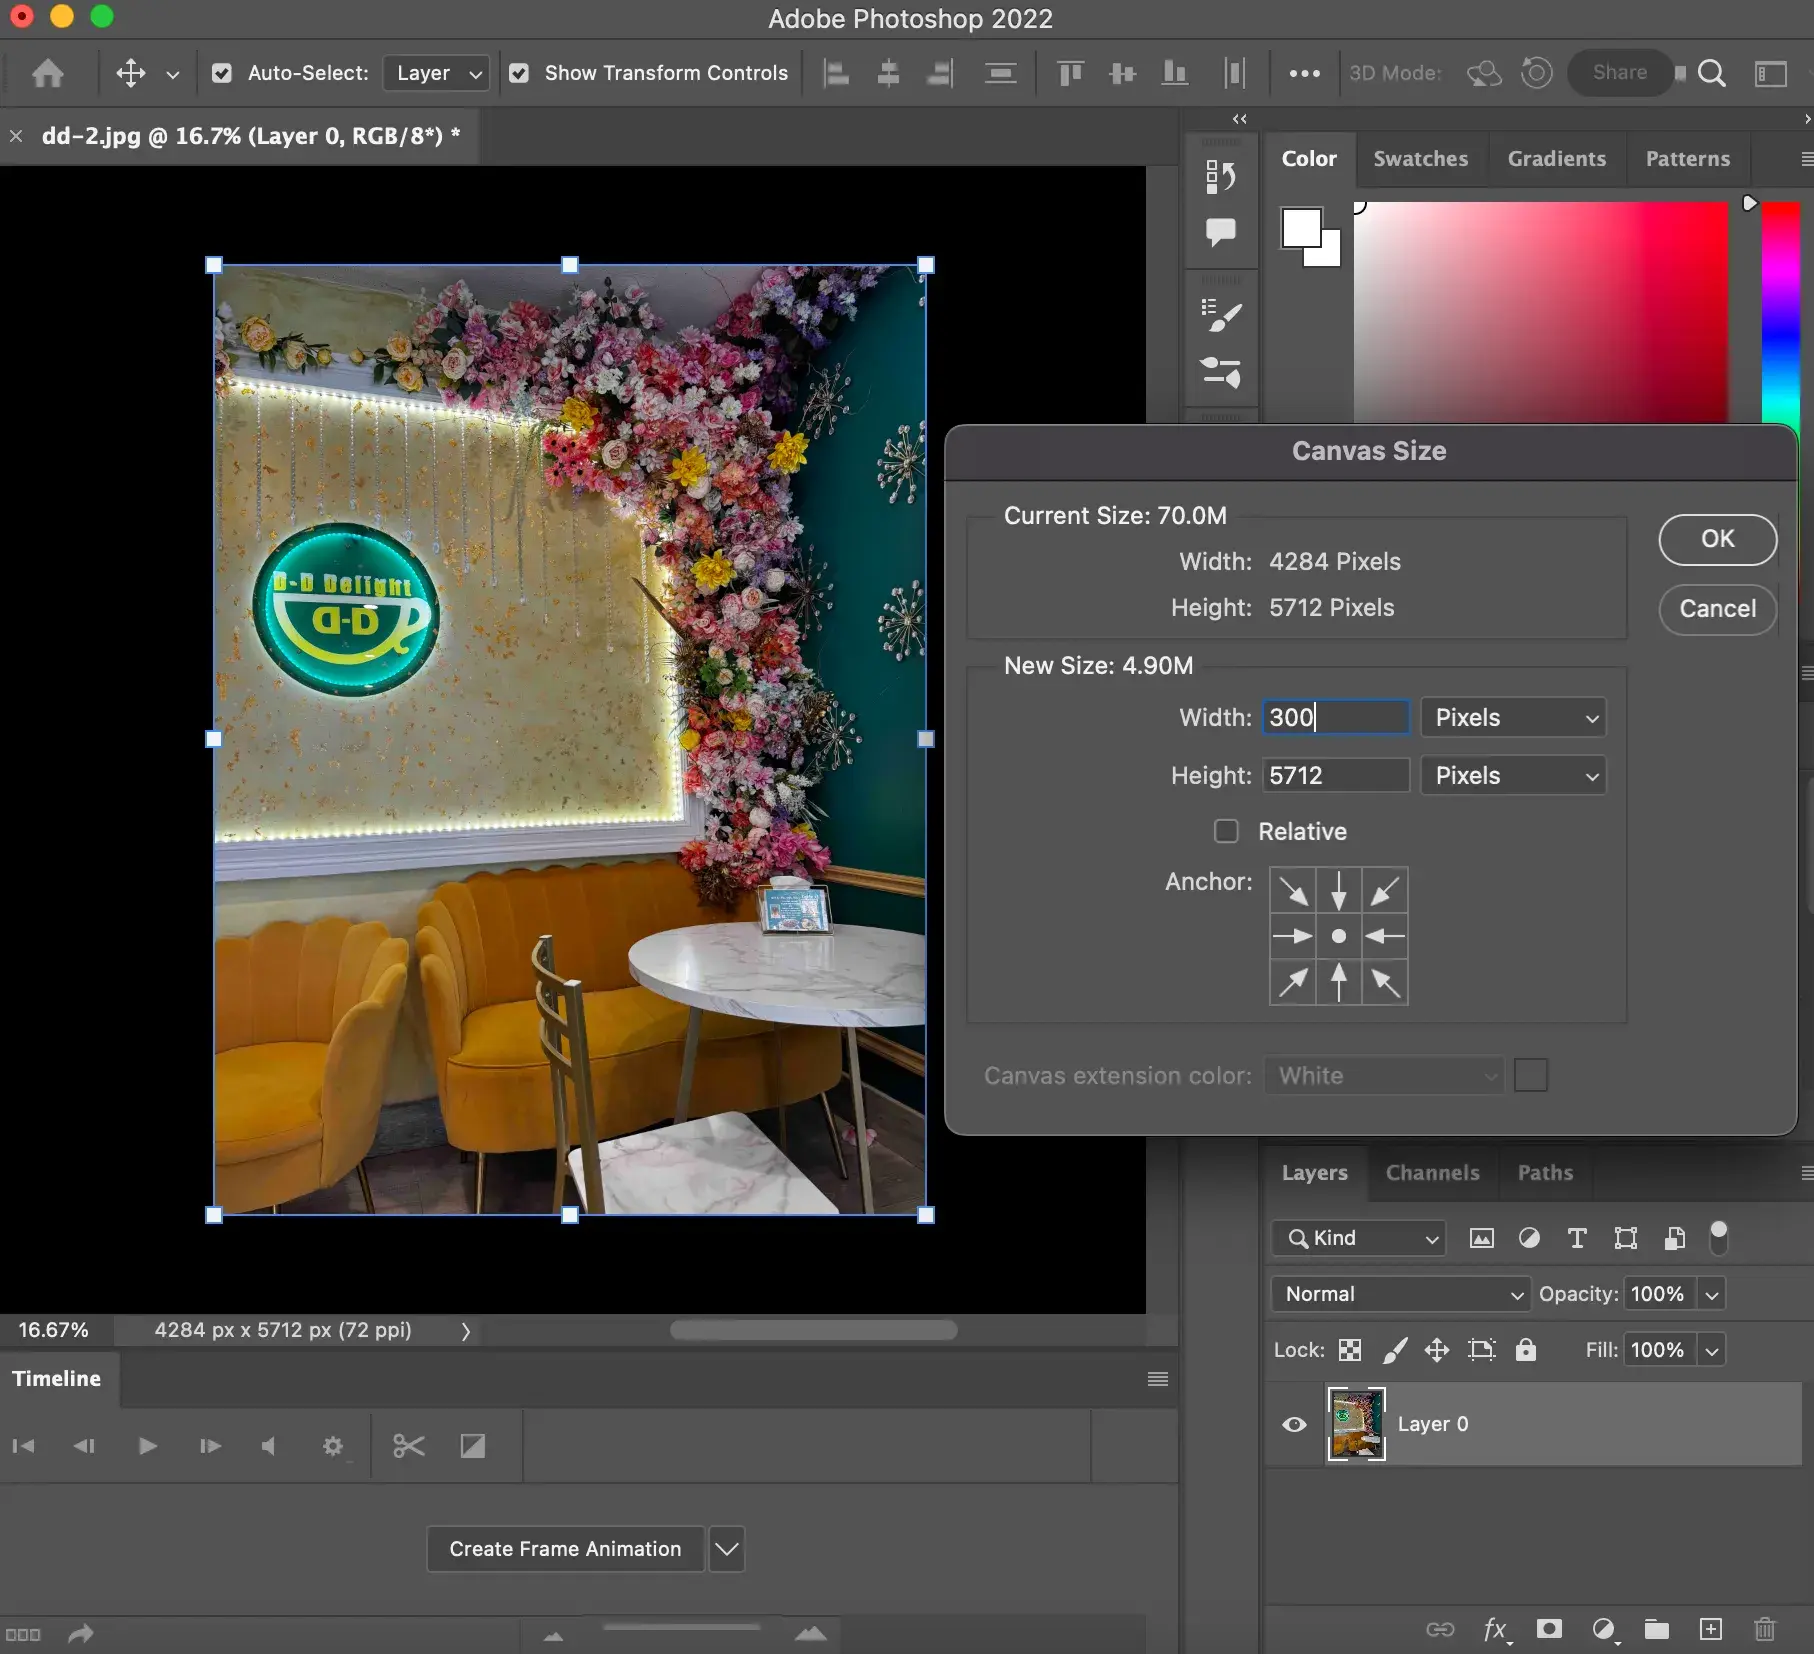
- Access Image Size Settings: Navigate to the “Image” menu and select “Image Size” (or a similarly named option like “Resize Image” or “Canvas Size”).
- Configure Enlargement Options:
- Constrain Proportions: Crucially, ensure the “Constrain Proportions” or “Maintain Aspect Ratio” option is checked. This prevents distorting your image by independently changing its width and height.
- Set New Dimensions: You can typically adjust the image size by entering new values for width and height in pixels, inches, or centimeters. Some tools also allow you to specify a percentage increase.
- Resolution/DPI: You might also see options for resolution (e.g., pixels/inch or DPI). Increasing this value will also make the image larger in terms of print output. For example, a 72 DPI image is generally suitable for web, while 300 DPI is standard for high-quality prints. If your original image is 72 DPI and you want to print it, increasing the DPI will necessitate larger pixel dimensions for the same physical print size.
- Resampling Method: This is where the interpolation algorithm comes into play. Most professional software offers several options:
- Nearest Neighbor: Fastest but lowest quality, creating blocky artifacts. Best for pixel art.
- Bilinear: Better than Nearest Neighbor, but still prone to blurriness.
- Bicubic: Generally considered the best traditional method for smooth gradations, often producing less pixelation than Bilinear.
- Bicubic Smoother / Preserve Details: Optimized for enlargement, attempting to maintain sharper edges. This is often the recommended choice for increasing image dimensions.
- Apply and Save: After entering your desired dimensions and selecting a resampling method, confirm the changes. Review the enlarged image for any noticeable quality degradation. If satisfied, save your new, larger image. Remember to save it as a new file to preserve your original.
While these methods are effective for moderate enlargement, pushing them too far will inevitably lead to some loss of sharpness or introduction of artifacts. Tophinhanhdep.com’s advanced editing tools offer similar robust functionalities, often with enhanced algorithms for better results.
Leveraging Built-in Operating System Tools (Mac Preview, Windows Paint)
For quick and basic image resizing without needing specialized software, both Mac and Windows operating systems offer built-in applications that can handle simple enlargements. These are particularly useful for adjusting dimensions for email or online forms where extreme quality isn’t the primary concern.
On Mac Computers (Using Preview):
The Preview app on Mac is a versatile built-in tool that can perform basic image edits, including resizing.
- Open Image in Preview: Locate your image in Finder and double-click it, or right-click, select “Open With,” and choose “Preview.”
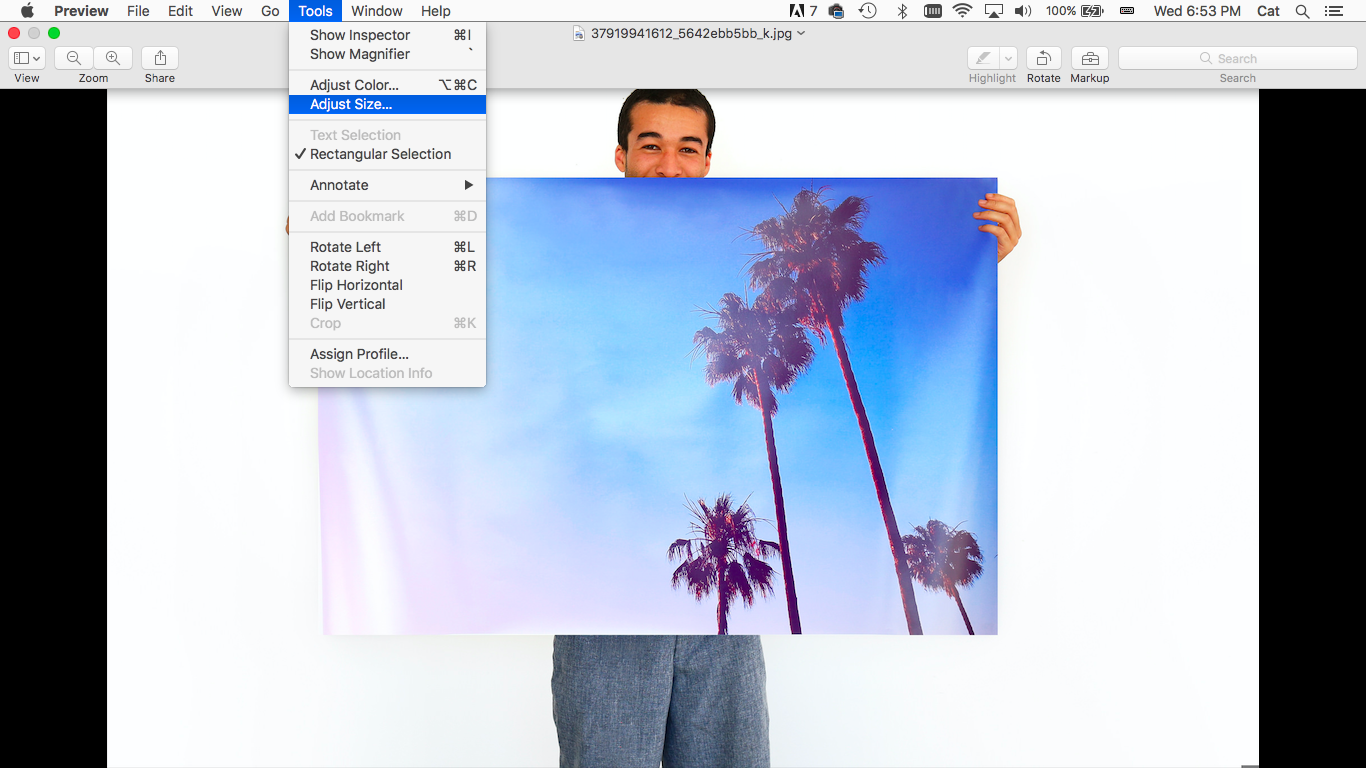
- Access Adjust Size: From the top menu bar, click “Tools,” then select “Adjust Size.”
- Enter New Dimensions: In the “Image Dimensions” dialog box, ensure “Scale proportionally” is checked. You can then enter new values for “Width” or “Height” (in pixels, inches, cm, or percent). You can also adjust the resolution (pixels/inch).
- Save Changes: The “Resulting Size” will update dynamically. Once you are satisfied, click “OK.” Then, go to “File” > “Save” or “File” > “Export” to save your enlarged image. You can also resize images in batch by selecting multiple images before opening them in Preview.
On Windows Computers (Using Paint):
Paint is the default image editor for Windows and can also be used for simple resizing tasks.
- Open Image in Paint: Right-click on your image, select “Open with,” and choose “Paint.”
- Access Resize Option: In the “Image” panel on the menu bar, click the “Resize” option.
- Set New Dimensions: In the “Resize and Skew” dialog, ensure “Maintain aspect ratio” is checked. Select “Pixels” (or “Percentage”) and then enter new values for “Horizontal” or “Vertical” dimensions.
- Apply and Save: Click “OK” to apply the changes. The image dimensions will update. Save your image by going to “File” > “Save” or “File” > “Save as.”
These built-in tools are convenient but offer fewer advanced options compared to dedicated image editing software or AI upscalers, meaning quality degradation is more likely with significant enlargement.
AI-Powered Solutions for Quality Upscaling
The advent of Artificial Intelligence has brought a revolutionary leap in image enlargement technology. AI upscalers don’t just stretch pixels; they analyze the image content, predict missing details, and intelligently generate new pixels to create a larger, higher-resolution image with remarkable fidelity. This is particularly beneficial for photography, high-resolution stock photos, and digital art where maintaining crisp details is crucial. Tophinhanhdep.com is at the forefront of this technology, offering cutting-edge AI tools to meet these demands.
Online AI Image Upscalers
One of the most accessible ways to leverage AI for image enlargement is through online AI upscaling platforms. These web-based tools often require no installation and can produce impressive results with just a few clicks. Tophinhanhdep.com provides a highly effective online image upscaler that is designed for ease of use and superior output.
How Tophinhanhdep.com’s Online Upscaler Works:
- Visit the Tophinhanhdep.com Upscaler Page: Navigate to the dedicated “Enlarge Image” or “AI Upscaler” section on our website.
- Upload Your Image: Click on the “Upload Photo” or “Select Images” button and choose the image you wish to enlarge from your device. Our platform supports common formats like PNG, JPG, BMP, TIFF, HEIC, and WEBP.
- Choose Magnification Level: Select your desired upscaling factor, typically ranging from 2x, 4x, 6x, up to 8x, or even 1000% in some advanced tools. Tophinhanhdep.com’s AI engine will then process your image, intelligently adding new pixel information.
- Preview and Download: Once the AI processing is complete, you will often see a preview of the enlarged image, allowing you to compare it with the original. If satisfied, click the “Download” or “Save” button to get your high-resolution, enlarged image.
Key Advantages of Online AI Upscalers:
- No Installation Required: Accessible from any web browser, making them convenient for users on different devices.
- Ease of Use: Typically beginner-friendly interfaces that simplify the complex upscaling process.
- High-Quality Output: Leveraging advanced AI algorithms to generate details and reduce artifacts, minimizing blurriness and pixelation. Our tools, like the Tophinhanhdep.com Image Upscaler, aim to enlarge photos up to 1000% without significant quality loss.
- Cost-Effective (Often Free Tiers): Many online upscalers, including Tophinhanhdep.com’s, offer free usage tiers for basic needs, with premium options for higher volumes or advanced features.
Dedicated AI Desktop and Mobile Applications
For users who require more frequent or intensive image enlargement, especially in batches or with greater control, dedicated desktop software or mobile applications often provide more robust features and integration. Tophinhanhdep.com offers powerful desktop applications that incorporate AI upscaling capabilities, providing a professional-grade solution for photographers and designers.
Tophinhanhdep.com’s AI Photo Editor:
Imagine a tool that zooms pictures to 1000% without pixelation or blur. Tophinhanhdep.com offers solutions like its AI Photo Editor, designed specifically for maximizing image quality during enlargement.
Key Features of Tophinhanhdep.com’s Desktop/Mobile AI Tools:
- Ultra Zoom Capabilities: Enlarge images significantly (e.g., up to 1000%) while preserving sharp details and preventing pixilation. This is ideal for high res close-ups or enlarging photos for print projects like posters and banners.
- Advanced Control: Beyond simple magnification, these tools often allow you to fine-tune output resolution, enhance sharpness, and even correct low-light photos with a single click.
- Batch Processing: Efficiently enlarge multiple images simultaneously, a major time-saver for large collections or photography projects.
- Offline Functionality: Desktop software operates without an internet connection once installed, offering greater reliability and speed.
- Preset Saving: Save preferred enlargement settings as presets for consistent application across different images.
- Mobile Convenience: For on-the-go image enlargement, mobile apps from Tophinhanhdep.com provide a streamlined experience, allowing users to upscale images up to 8x directly from their phone, turning KB images into MB files with ease.
Using Tophinhanhdep.com’s Desktop/Mobile AI Tools:
- Install and Launch: Download and install the Tophinhanhdep.com AI Photo Editor. Launch the program.
- Import Image: Click the “Open” button to browse and import images from your computer, or simply drag and drop them into the interface.
- Adjust Size and Quality Settings: In the “Upscaler” tab, you can typically use a slider or input fields to specify the desired increase in width, height, percentage, or megapixels. Explore options to enhance sharpness or correct other image imperfections.
- Save Output: Once satisfied with the preview, save your high-resolution, enlarged image to your designated folder.
These dedicated applications are invaluable for anyone seriously invested in digital photography, visual design, or creating high-quality images for any purpose.
Adjusting Image File Size (KB to MB) for Specific Needs
While increasing image dimensions is about adding pixels, sometimes the requirement is to specifically increase the file size (e.g., from KB to MB) to meet a minimum threshold without necessarily making the image physically larger in pixels. This is a common hurdle for online forms that mandate a minimum file size, or for platforms that expect a certain data density. Tophinhanhdep.com offers specialized image tools to address these file size requirements.
Online Tools for File Size Adjustment
Online file size adjusters are designed to manipulate the compression and quality settings of an image to reach a target file size (e.g., 50KB, 100KB, 200KB, 1MB, 2MB, 5MB, 10MB). Unlike pure upscalers that focus on adding pixels, these tools prioritize achieving a specific data size.
How Tophinhanhdep.com’s File Size Increaser Works:
- Access the Tool: Visit the “Increase Image Size In KB” or “Increase Image Size In MB” section on Tophinhanhdep.com.
- Upload Your Image: Select or drag and drop your image (JPEG, PNG, JPG, HEIC, WEBP, etc.) into the designated area.
- Specify Target Size: Enter the exact desired file size in KB or MB into the input box (e.g., “100” for 100KB, or “2” for 2MB).
- Process and Download: Click the “Increase Size” or “Resize Image” button. The tool will process the image, adjusting its internal compression parameters to reach your specified file size. In a few seconds, your image will be ready for download.
Why Use File Size Increasers?
- Meeting Minimum Requirements: Many web portals and online applications have strict minimum file size requirements (e.g., “upload an image between 50KB and 100KB”). This tool helps users meet those specific mandates.
- Maintaining Image Quality (Within Limits): While increasing file size by simply reducing compression might not “add” visual detail, Tophinhanhdep.com’s tools are designed to achieve the target size while minimizing noticeable quality degradation. The idea is to adjust the internal data structure to meet the byte count, rather than stretching pixels.
- Convenience: These online tools are quick, free, and require no technical expertise. They are perfect for students, job applicants, or anyone needing to quickly adjust file sizes.
It’s important to note that increasing file size often involves reducing the compression level of the image. For formats like JPEG, which use lossy compression, decreasing compression (to increase file size) might make the file larger without visibly improving quality much, as the original lost data cannot be recovered. However, for meeting specific file size criteria, these tools are highly effective.
Practical Applications for File Size Management
- Government and Admission Portals: These often have very specific file size restrictions for document uploads.
- Email Attachments: While less common today, some email systems still have limits on attachment sizes.
- Platform Compatibility: Certain online systems may have backend processing that expects files within a particular size range, even if visually the image appears satisfactory.
Tophinhanhdep.com’s commitment to visual design and efficient image tools extends to providing these crucial utilities for practical, everyday needs.
Best Practices for Successful Image Enlargement
No matter the method you choose, adhering to certain best practices will significantly improve your chances of achieving high-quality enlarged images. These tips are invaluable for anyone involved in photography, graphic design, or simply managing their digital image collections.
Starting with High-Quality Originals
The golden rule of image enlargement is: garbage in, garbage out. The better the quality of your original image, the better the result after enlargement.
- High Resolution: Always start with the highest resolution image you have. A photo taken with a high-megapixel camera will enlarge much better than one saved from a low-resolution social media post.
- Minimal Compression: Images that have undergone heavy compression (e.g., very small JPEGs) have already lost a lot of data. Enlarging them will only magnify these compression artifacts.
- Good Lighting and Focus: Images that are well-lit and sharply focused provide more detail for AI algorithms to work with, leading to superior upscaling results. Trying to enlarge a blurry or underexposed photo, even with AI, will be challenging.
Choosing the Right Tool for the Job
The best tool depends on your specific needs:
- For Extreme Quality & Significant Upscaling (e.g., >200%): AI-powered upscalers, whether online like Tophinhanhdep.com’s Image Upscaler or desktop software like Tophinhanhdep.com’s AI Photo Editor, are your best bet. They leverage advanced algorithms to intelligently add detail.
- For Moderate Enlargement & Professional Control: Desktop editing software, such as those that Tophinhanhdep.com supports, offers excellent control over resampling methods and other image adjustments.
- For Basic Dimension Changes (Small Increase): Built-in OS tools like Mac Preview or Windows Paint are quick and convenient.
- For Specific File Size Requirements (KB to MB): Online file size increasers from Tophinhanhdep.com are ideal for adjusting the data size to meet online form mandates.
Post-Enlargement Refinements
Even with the best tools, a little post-processing can often make a difference:
- Sharpening: A subtle application of sharpening can sometimes enhance details that might have become slightly soft during the enlargement process. Be careful not to over-sharpen, as this can introduce halos or noise.
- Noise Reduction: Enlarging images can sometimes exacerbate existing image noise. Noise reduction filters can help clean up the image.
- Color and Contrast Adjustment: Minor tweaks to color balance, contrast, and brightness can help an enlarged image look its best.
- Cropping: If the enlargement reveals unwanted areas or imperfections, strategically cropping the image can improve its composition and focus.
At Tophinhanhdep.com, we provide comprehensive resources on photo editing tips, digital photography techniques, and visual design principles to help you with these refinements.
Conclusion
Increasing the size of an image, whether in terms of its dimensions (pixels) or its file size (KB/MB), is a common task in the digital landscape. While traditional methods offer basic solutions, AI-powered upscaling technologies have transformed what’s possible, allowing for significant enlargements with unprecedented quality retention. From preparing high-resolution stock photos and beautiful photography for print to meeting strict online application requirements, Tophinhanhdep.com offers a robust array of image tools, including AI upscalers, file size adjusters, and comprehensive guides to ensure your visual assets always meet your needs. By understanding the underlying principles and choosing the right tools and techniques, you can confidently make your images bigger, sharper, and more impactful for any purpose, from stunning wallpapers and backgrounds to professional graphic design projects. Explore Tophinhanhdep.com today and unlock the full potential of your images.