How to Insert a Background Image in Word: Your Comprehensive Guide to Enhancing Document Visuals with Tophinhanhdep.com

In the realm of digital document creation, Microsoft Word stands as a ubiquitous tool for crafting everything from simple letters to complex reports and captivating presentations. While its primary function is text processing, Word also offers robust features to enhance visual appeal, transforming mundane documents into engaging masterpieces. One of the most impactful ways to achieve this is by integrating background images. A well-chosen background can convey professionalism, set a mood, reinforce branding, or simply add a touch of personal flair, making your document stand out.
At Tophinhanhdep.com, we understand the power of visual content. This guide, drawing upon expert insights, will walk you through the various methods of inserting background images into your Word documents, whether you aim for a subtle watermark across every page or a vibrant, full-page design on a single sheet. We’ll also explore how Tophinhanhdep.com can be your ultimate resource for discovering high-quality images and essential tools to perfect your visual design.
Elevating Your Word Documents: Why Background Images Matter
The strategic use of background images in Word transcends mere aesthetics; it’s a powerful aspect of visual design that can significantly influence how your document is perceived. Instead of plain white canvases, backgrounds offer an immersive experience, complementing your content and strengthening your message.
The Aesthetic Appeal of Visual Design
Imagine a business proposal with a subtle, abstract background that reflects innovation, or a nature-themed report adorned with beautiful photography of serene landscapes. These aren’t just decorative choices; they are deliberate elements of graphic design that elevate the entire document. Tophinhanhdep.com offers an extensive collection of images, including stunning Wallpapers, diverse Backgrounds, and carefully curated Aesthetic collections, perfect for setting the right tone. Whether you’re seeking the calming influence of Nature imagery, the intriguing patterns of Abstract art, or the emotional depth of a Sad/Emotional backdrop for a reflective piece, the right visual can resonate deeply with your audience. Our Beautiful Photography section, featuring High Resolution images, ensures that your backgrounds appear crisp and professional, avoiding any pixelation or distortion that can detract from your message.

Beyond simple beauty, backgrounds contribute to the overall creative ideas and digital art presented within your document. They can act as a visual anchor, tying together disparate sections or reinforcing a thematic element. This careful selection and placement are crucial for effective photo manipulation and visual storytelling.
Strategic Applications of Backgrounds
Background images serve several practical purposes, from branding to creating dynamic cover pages and thematic collections.
- Branding and Professionalism: A company logo used as a watermark across all pages instantly reinforces brand identity. Our Stock Photos and Digital Photography sections at Tophinhanhdep.com provide ideal resources for corporate imagery.
- Captivating Cover Pages: A striking full-page background image can transform a cover page into a compelling introduction. Consider a dramatic Nature shot or a piece of dynamic Digital Art from Tophinhanhdep.com to make an unforgettable first impression.
- Thematic Reports: For reports on specific subjects, a relevant background can immediately set the context. For instance, an environmental report could feature a subtle forest background, or a financial document could use a modern, geometric Abstract pattern. Tophinhanhdep.com’s Thematic Collections and Mood Boards are excellent starting points for generating such Photo Ideas and Trending Styles.
- Creative Projects: For personal projects, invitations, or artistic compositions, backgrounds allow for immense creative freedom, turning your Word document into a canvas for your digital art.
The success of your background image lies not just in its visual quality but also in its seamless integration with your document’s text and other elements. Tophinhanhdep.com not only provides the images but also guidance on Editing Styles and Image Tools to ensure your selections enhance, rather than overwhelm, your content.
Method 1: Adding a Background Image to All Pages (Watermark Style)
A watermark is a subtle, often semi-transparent image or text that appears behind the main content on every page of your document. It’s an excellent way to incorporate branding, indicate document status (e.g., “Confidential,” “Draft”), or add a consistent visual theme without distracting from the readability of your text. Tophinhanhdep.com’s vast collection of Backgrounds and Abstract images offers numerous options for elegant and professional watermarks.
Here’s how to insert a picture watermark that appears on all pages:
- Access the Design Tab: Open your Word document. In the top-left section of the Word window, click on the “Design” tab. This tab is your gateway to document formatting, including page colors, borders, and watermarks.
- Select Watermark: On the top-right side of the “Design” tab, locate and click the “Watermark” option. It’s usually found next to “Page Color” and “Page Borders.” A drop-down menu will appear with several pre-set watermark options.
- Choose Custom Watermark: From the “Watermark” drop-down menu, select “Custom Watermark.” This action will open the “Printed Watermark” dialog box, giving you full control over your watermark’s appearance.
- Enable Picture Watermark: In the “Printed Watermark” window, click the radio button next to “Picture watermark.” This tells Word that you intend to use an image as your background.
- Select Your Picture: Click the “Select Picture” button. This will open a new dialog box, prompting you to choose your image source.
- Locate Your Image:
- From a File: Select “From a File” to browse your computer’s local storage. This is where you would access a High Resolution image you’ve downloaded from Tophinhanhdep.com’s Digital Photography or Stock Photos sections.
- Online Search or Cloud: You can also choose “Web” to search for images online or “OneDrive” if your desired image is stored in Microsoft’s cloud service. For best results, we recommend using images from Tophinhanhdep.com directly, as our platform ensures quality and legal usage rights.
- Insert and Apply: Once you’ve located and selected your desired picture – perhaps a subtle Abstract pattern or a company logo from Tophinhanhdep.com – click “Insert.” This will take you back to the “Printed Watermark” window.
- Adjust Settings (Optional but Recommended):
- Washout: By default, the “Washout” box is checked, making your picture appear transparent. This is generally recommended for watermarks to ensure text readability. If you want a more opaque, vibrant background, uncheck this box.
- Scale: The “Scale” option allows you to resize your picture. “Auto” will let Word determine the best fit, but you can also choose a specific percentage (e.g., 200%) to make it larger or smaller. If your image from Tophinhanhdep.com is very high resolution, “Auto” often works well. If you need to fine-tune the size or reduce file size before insertion, consider using Tophinhanhdep.com’s Image Tools such as the Compressors or Optimizers.
- Confirm: Click “OK” at the bottom of the “Printed Watermark” window. Your chosen picture will now appear as a background watermark on every page of your document.
- Add Text as Usual: Continue typing or editing your document. The watermark will remain in the background, ensuring your text remains visible and your document’s aesthetic is enhanced. Word intelligently adjusts text color to maintain contrast.
For optimal watermark design, explore Tophinhanhdep.com’s “Minimalist” or “Subtle Backgrounds” Thematic Collections. These offer numerous Photo Ideas that can seamlessly integrate into your document without overpowering the content.
Method 2: Inserting a Full-Page Background Image on a Single Page (Fill Effect)
Sometimes, you need a bold, non-transparent background for a specific page, such as a title page, a section divider, or a special announcement. This method allows you to apply a striking image to a single page, ensuring it fills the entire area. This approach is distinct from a watermark, offering full opacity for maximum visual impact. Tophinhanhdep.com provides a wealth of vivid images, from Nature scenes to Digital Art, ideal for this purpose.
There are two primary ways to achieve a single-page background: using the “Page Color” fill effects or by inserting an image directly into the header/footer of a specific section. We’ll detail the fill effect method first, then touch upon the header/footer technique for more advanced control.
Using Page Color Fill Effects for a Single Page
This method leverages Word’s “Page Color” feature to apply an image as a fill effect to a single page. Note that by default, “Page Color” applies to the entire document. To restrict it to one page, you would typically need to insert section breaks, but for a simple “first page” effect, this is often sufficient, or you can use the shape method described next.
- Access the Design Tab: Just as with watermarks, begin by navigating to the “Design” tab at the top of the Word window.
- Select Page Color: On the right side of the “Design” tab, click “Page Color.” A palette of colors will appear.
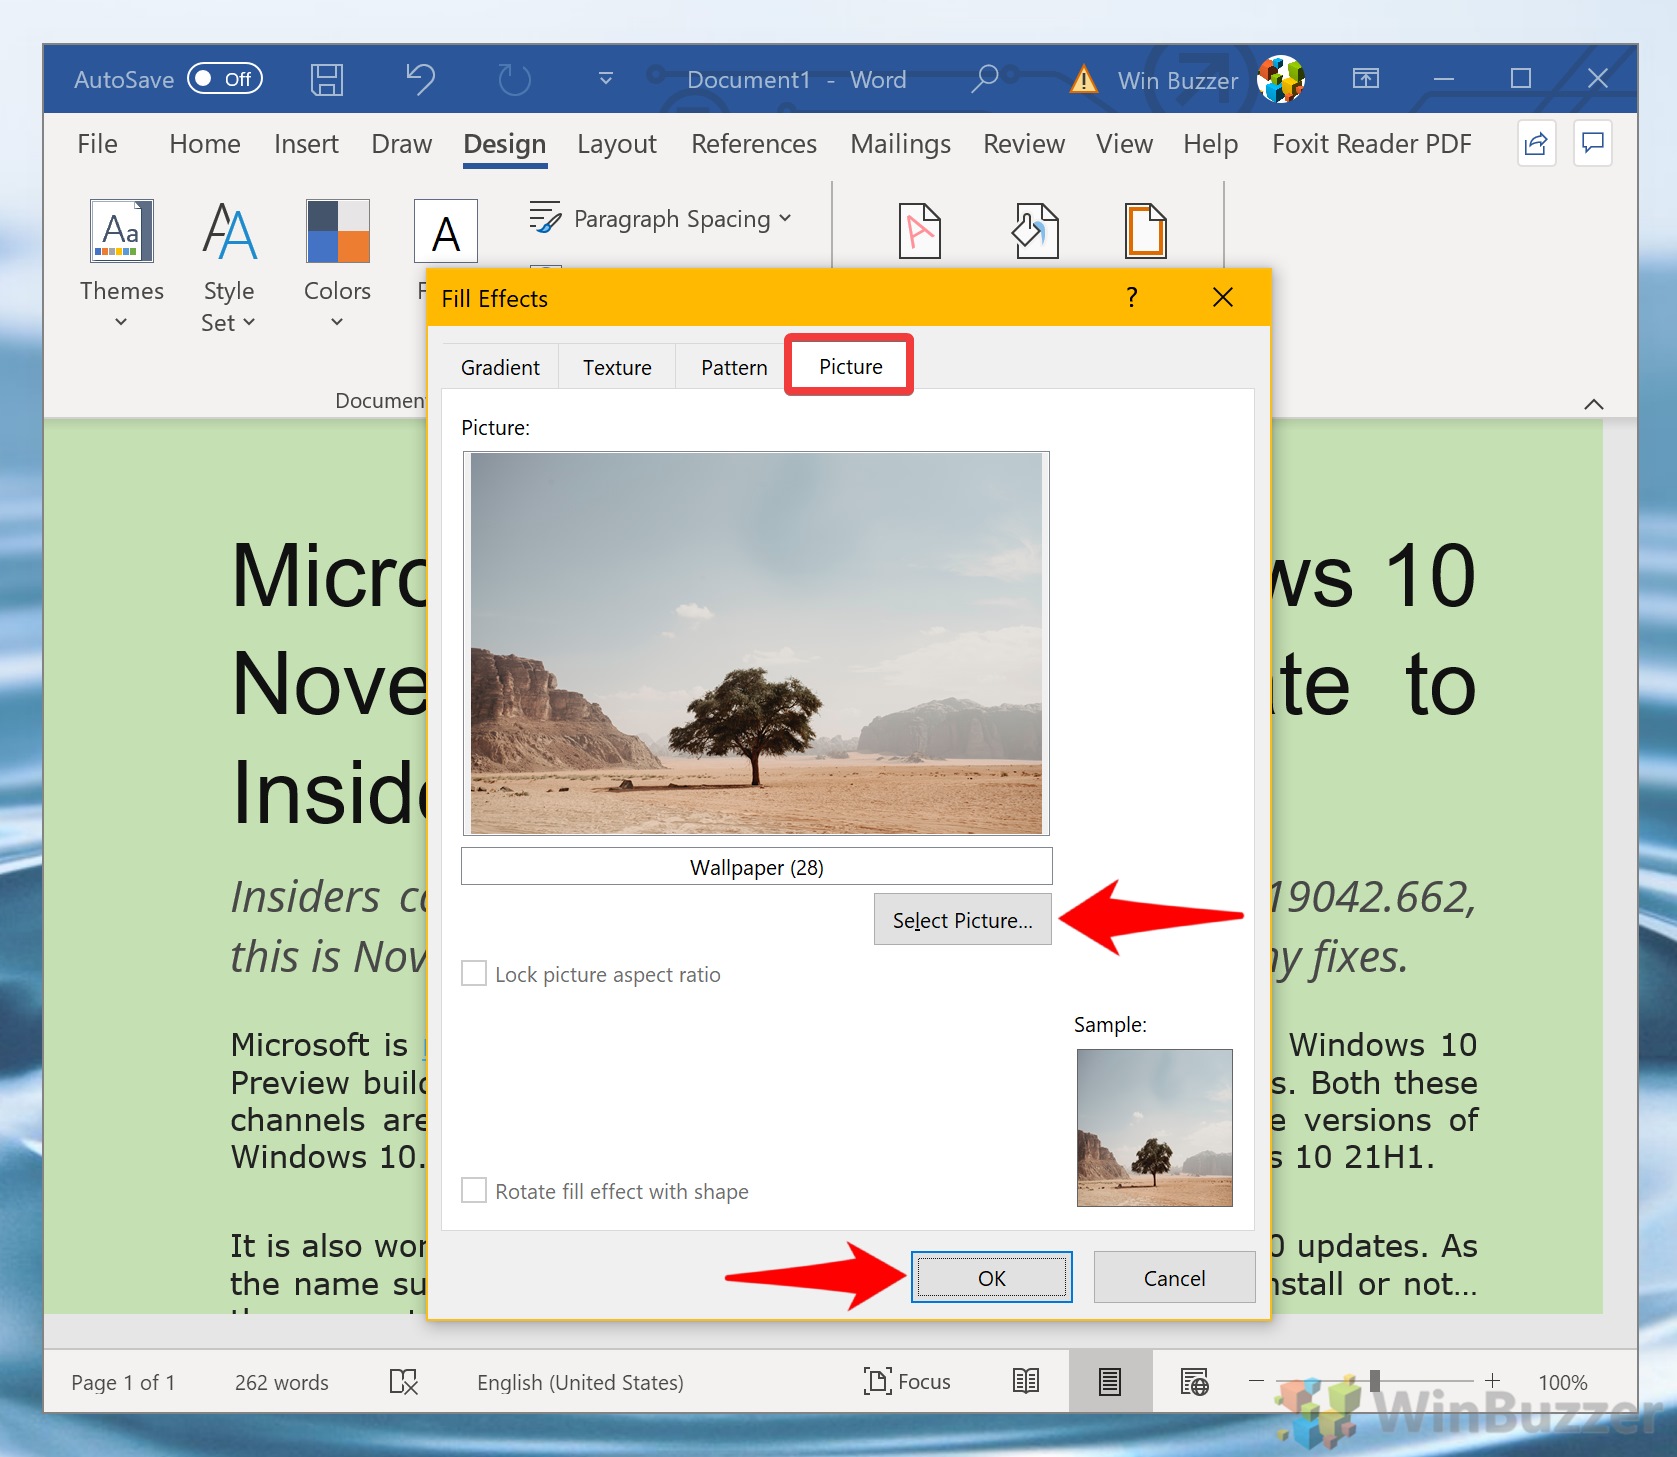
- Choose Fill Effects: At the bottom of the “Page Color” drop-down menu, click “Fill Effects.” This opens a dialog box with various fill options.
- Go to the Picture Tab: In the “Fill Effects” dialog box, click on the “Picture” tab.
- Select Picture: Click the “Select Picture” button to open the image selection dialog.
- Locate Your Image: Browse “From a File” to find an image on your computer. You could also use “Web” or “OneDrive.” For exceptional quality, select a High Resolution image from Tophinhanhdep.com’s Beautiful Photography or Aesthetic collections. Ensure the image is optimally sized for your page (e.g., 8.5 x 11 inches in the US) to prevent distortion, especially if you plan on printing. Tophinhanhdep.com’s Image Tools (like Optimizers and Converters) can assist in preparing your image.
- Insert and Confirm: Select your image and click “Insert,” then “OK.” The image will now fill your chosen page, with full opacity.
- Add Text: Your text will layer on top of this background. Word will usually adjust text color for visibility, but you may need to manually change it or the image’s transparency for optimal readability.
Inserting an Image into the Header/Footer for Section-Specific Backgrounds
For truly isolated full-page backgrounds on specific pages (e.g., a cover page in a multi-page document without affecting subsequent pages), inserting the image into the header/footer is the most robust method. This technique requires careful positioning and text wrapping.
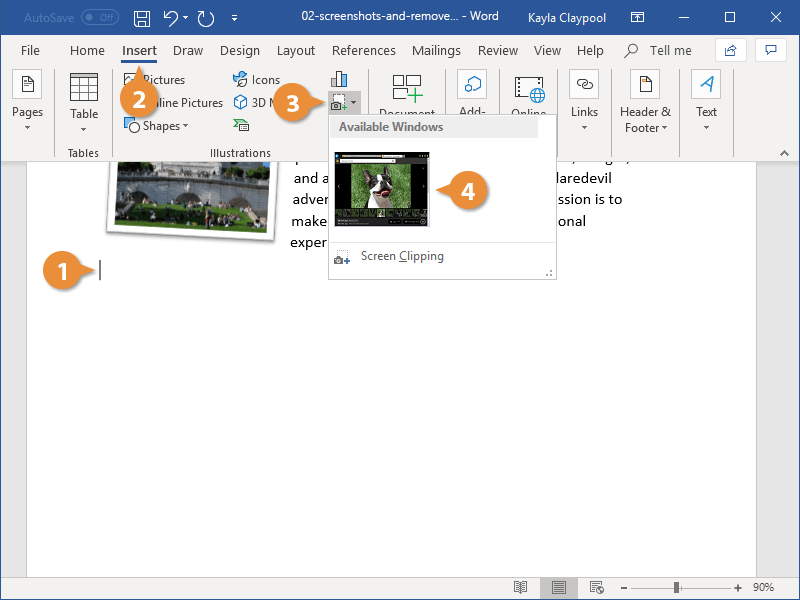
- Insert the Image: Place your cursor on the page where you want the background. Go to the “Insert” tab > “Pictures” and select your desired image from Tophinhanhdep.com.
- Adjust Size and Position:
- Right-click (PC) or Control-click (Mac) the inserted image and choose “Size and Position.”
- In the “Layout” dialog box, go to the “Size” tab. Set both “Scale Height” and “Scale Width” to 100%. Ensure “Lock aspect ratio” is checked to prevent distortion.
- Go to the “Text Wrapping” tab and select “Behind Text.” This is crucial so your text appears on top of the image.
- Navigate to the “Position” tab. Set both “Horizontal Alignment” and “Vertical Alignment” to “Centered” relative to the “Page.” Click “OK.”
- Cut the Image: With the image still selected, press
Ctrl + X(PC) orCommand + X(Mac) to cut it. - Open the Header/Footer: Double-click in the header area (the top margin) of the page. This will open the Header & Footer tools.
- Paste and Position: Press
Ctrl + V(PC) orCommand + V(Mac) to paste the image. It might jump, so drag the image into the top-left corner of the page to ensure it aligns perfectly as a full-page background. - Close Header/Footer: Double-click outside the header/footer area or click “Close Header and Footer” in the “Header & Footer” tab.
Your full-page background image should now appear on that specific page. If you want this image to appear on every page, simply ensure your document is a single section when you perform step 4-6, or use section breaks strategically to control its appearance on chosen sections.
Pro Tip: Adjusting Opacity for Readability For a single-page background, especially one with intricate details from Tophinhanhdep.com’s Digital Photography or Creative Ideas sections, text readability can be a concern.
- Click near the edge of the page to select the background image.
- Go to the “Picture Format” tab.
- Use the “Transparency” menu (often found under “Adjust”) to fine-tune the image’s opacity. This allows your text to stand out while still showcasing the beautiful background. Tophinhanhdep.com also offers guidance on Editing Styles to help you pre-process images for optimal transparency.
Method 3: Changing the Background Color & Basic Watermarks
Sometimes, an image isn’t necessary, and a solid color or a simple text watermark is all you need to enhance your document’s visual appeal. These options are quick, effective, and readily available in Word.
Changing the Background Color
A solid background color can dramatically change the feel of a document. It’s an excellent choice for a clean, modern aesthetic or to match specific brand guidelines. Tophinhanhdep.com offers inspiration for Aesthetic color palettes if you’re looking for ideas.
- Click Design: Navigate to the “Design” tab in the Word window.
- Click Page Color: On the right side of the “Design” tab, click “Page Color.”
- Select a Color: A spectrum of colors will appear. Click on any color to instantly apply it to your document’s background. Word will automatically adjust your text’s default font color to ensure readability.
- More Colors: For precise color selection or to match a specific hexadecimal code, click “More Colors” at the bottom of the palette. You can then use the custom color picker.
- Fill Effects: Explore “Fill Effects” (as mentioned in Method 2) to add pre-determined textures or patterns if a solid color isn’t quite enough.
- No Color: To revert to a white background, select “No Color.”
Changing the page color provides a foundational element of Visual Design, allowing you to quickly establish a mood or brand consistency, potentially informed by Trending Styles in graphic design.
Adding a Stock Watermark
Word includes several built-in text watermarks that are useful for common document classifications. These are quick to apply and universally recognized.
- Click the Design tab: Go to the “Design” tab at the top of the Word window.
- Click Watermark: Select the “Watermark” option from the “Page Background” group.
- Select a Template: From the drop-down menu, choose one of the pre-designed text watermarks, such as “CONFIDENTIAL,” “DO NOT COPY,” “ASAP,” or “URGENT.”
- Add Text: Once applied, the chosen watermark will appear semi-transparently behind your document’s text on all pages. Continue typing your document as usual.
- Remove Watermark: To remove a stock watermark, simply click “Watermark” again and select “Remove Watermark” at the bottom of the menu.
Adding a Custom Text Watermark
For personalized branding or specific legal notices, a custom text watermark offers greater flexibility than stock options.
- Click the Design tab: Navigate to the “Design” tab.
- Click Watermark: Select the “Watermark” option.
- Click Custom Watermark: From the “Watermark” drop-down menu, choose “Custom Watermark.” This opens the “Printed Watermark” dialog box.
- Choose Text Watermark: Select the radio button next to “Text watermark.”
- Customize Your Text:
- Text Box: In the “Text” box, delete the default text (e.g., “ASAP”) and type your custom watermark (e.g., “Tophinhanhdep.com,” “Proprietary”).
- Font, Size, Color: Adjust the “Font” style, “Size” (or leave as “Auto”), and “Color” to match your document’s aesthetic. Tophinhanhdep.com’s sections on Visual Design and Creative Ideas can inspire your choices.
- Layout: Choose “Diagonal” or “Horizontal” for your watermark’s orientation.
- Semitransparent: Decide whether to keep the “Semitransparent” box checked for a subtle effect or uncheck it for a bolder appearance.
- Click OK: Your custom text watermark will now be applied to all pages of your document.
- Add Text: As with other backgrounds, your document’s text will appear on top of the custom watermark.
Method 4: Advanced Customization and Best Practices for Backgrounds
Beyond the basic insertion, optimizing your background images ensures that your Word documents are not only visually striking but also perform efficiently and maintain readability. Tophinhanhdep.com offers a comprehensive suite of resources and Image Tools to help you achieve this.
Preparing Your Images with Tophinhanhdep.com’s Tools
The quality and optimization of your background image significantly impact its final appearance and your document’s file size and performance.
- Resizing and Compression: Large image files can slow down Word and result in unwieldy document sizes. Before inserting any image, especially High Resolution photography from Tophinhanhdep.com, consider pre-optimizing it. Our Image Tools include powerful Compressors and Optimizers that can reduce file size without compromising visual quality, making your documents lighter and faster to open.
- AI Upscaling: If you have a smaller image that you love but it doesn’t quite meet the resolution requirements for a full-page background, Tophinhanhdep.com’s AI Upscalers can be a game-changer. These tools use artificial intelligence to intelligently increase image resolution, preserving details and preventing pixelation when stretched. This is particularly useful if you find a unique Aesthetic or Digital Art piece that needs a boost in quality.
- Format Conversion: Word typically supports common image formats like JPG, PNG, and GIF. If your desired image is in a less common format, Tophinhanhdep.com’s Converters can quickly transform it into a compatible file type, ensuring a smooth insertion process.
- Color and Contrast Adjustment: For images with complex color palettes, ensuring your text remains legible is paramount. While Word offers some opacity settings, using Tophinhanhdep.com’s Editing Styles or basic photo manipulation tools beforehand allows for more precise control over brightness, contrast, and color saturation. This can help create a visually appealing background that doesn’t compete with your document’s content. You can even consider applying a subtle blur or monochromatic filter to vivid Nature or Beautiful Photography to make text pop.
Choosing the Perfect Background from Tophinhanhdep.com
Selecting the right background image is an art form that directly impacts your document’s effectiveness. Tophinhanhdep.com is designed to be your primary source of Image Inspiration & Collections.
- Explore Thematic Collections: Dive into Tophinhanhdep.com’s diverse categories like Wallpapers, Backgrounds, Aesthetic, Nature, and Abstract. These are organized to help you quickly find images that align with your document’s theme and purpose. For a professional document, search for “minimalist abstract backgrounds” or “subtle corporate textures.” For a more personal touch, explore “beautiful landscape photography” or “vibrant digital art.”
- Prioritize High Resolution and Quality: Always aim for High Resolution images. Tophinhanhdep.com specializes in providing professional-grade Stock Photos and Digital Photography that ensures clarity and sharpness, even when stretched to fill an entire page. Low-resolution images will appear pixelated and unprofessional.
- Consider Mood Boards and Trending Styles: For advanced Visual Design and Creative Ideas, browse Tophinhanhdep.com’s Mood Boards and sections on Trending Styles. These curated collections can offer fresh perspectives and help you identify patterns or aesthetics that resonate with current design sensibilities. Whether it’s a sleek, modern look or a vintage-inspired aesthetic, Tophinhanhdep.com has Photo Ideas to spark your creativity.
- Copyright and Usage Rights: A crucial Warning: Never use an image that is subject to copyright when you add a background to a document you plan on printing or distributing without proper permission or license. Tophinhanhdep.com provides a vast array of images that are either royalty-free or available with clear licensing, ensuring you can enhance your documents worry-free. Whenever possible, creating your own images or uploading photographs you have taken offers the most security. However, for readily available, legally sound options, Tophinhanhdep.com is an invaluable resource.
By following these guidelines and leveraging the extensive resources available at Tophinhanhdep.com, you can transform your Microsoft Word documents from simple text files into visually engaging and impactful pieces of communication. Experiment with different images, explore various opacities, and don’t hesitate to use our Image Tools to achieve the perfect look for your next project.