How to Make a Book Out of Images: A Comprehensive Guide

Creating a physical book out of your cherished images is a deeply rewarding endeavor, transforming fleeting digital files into a tangible artifact that tells a story, preserves memories, or showcases your artistic vision. Whether you’re compiling a personal history, a collection of inspiring visuals, or a portfolio of your finest photography, the journey from concept to bound masterpiece is an exciting one. This guide will walk you through the entire process, leveraging the vast resources available on Tophinhanhdep.com to ensure your image book is a stunning success.
At Tophinhanhdep.com, we understand the power of visual communication. Our extensive collections of Images (Wallpapers, Backgrounds, Aesthetic, Nature, Abstract, Sad/Emotional, Beautiful Photography), Photography resources (High Resolution, Stock Photos, Digital Photography, Editing Styles), Image Tools (Converters, Compressors, Optimizers, AI Upscalers, Image-to-Text), Visual Design insights (Graphic Design, Digital Art, Photo Manipulation, Creative Ideas), and Image Inspiration & Collections (Photo Ideas, Mood Boards, Thematic Collections, Trending Styles) provide the perfect foundation for anyone looking to embark on a visual bookmaking project.

I. Conceptualizing Your Image Book: From Inspiration to Storyboard
The first step in creating a book out of images is to define your vision. What story do you want to tell? What emotions do you want to evoke? Tophinhanhdep.com offers a wealth of resources to ignite your creativity and help you refine your concept.
Finding Your Vision: Tophinhanhdep.com’s Image Inspiration
Begin by exploring Tophinhanhdep.com’s diverse Image Inspiration & Collections. Do you envision a serene collection of Nature photography, perhaps highlighting a recent trip or a favorite local landscape? Or perhaps an Abstract book, playing with shapes, colors, and textures? For personal projects, you might delve into Sad/Emotional imagery to convey a poignant narrative, or focus on Beautiful Photography to simply celebrate visual artistry.
Consider the overall Aesthetic you wish to achieve. Is it minimalist, vibrant, vintage, or modern? Browsing our Wallpapers and Backgrounds sections can offer a starting point for color palettes and thematic elements, helping you build a cohesive visual identity for your book. Create a mood board, either digitally on Tophinhanhdep.com or physically, to gather inspiration, test color schemes, and visualize the overall feel of your project. This preliminary exploration helps solidify your book’s theme and style, ensuring a consistent and impactful final product.
Think about the purpose of your book. Is it a gift? A personal keepsake? A professional portfolio? A history project documenting significant events, much like a teacher Lana’s idea for students to create personal histories with 5-10 important life events, but translated into visual form? The purpose will guide your image selection and overall design.

Curating and Preparing Your Visuals: Photography and Image Tools
Once your vision is clear, it’s time to gather your images. The quality of your raw materials is paramount. Tophinhanhdep.com emphasizes High Resolution imagery in its Photography section for a reason: high-resolution images are crucial for print clarity and detail. If you are using your own Digital Photography, ensure your camera settings are optimized for the highest possible resolution.
For those who need to supplement their personal collections, Tophinhanhdep.com offers access to Stock Photos that can beautifully fill thematic gaps or provide professional-grade visuals. When selecting images, prioritize those that resonate with your chosen theme and contribute to your narrative. Look for consistent lighting, color, and composition where possible, or deliberately choose contrasting styles if that serves your artistic intent.
After selection, Image Tools become indispensable. Before incorporating images into your book layout, they often require preparation. Tophinhanhdep.com’s suite of tools can assist with:
- Converters: To ensure all images are in a compatible format for your design software and printer (e.g., converting RAW to JPEG or TIFF).
- Compressors & Optimizers: While you want high resolution for print, optimizing file sizes can prevent software slowdowns during design and make files easier to share or upload to printing services. These tools help balance quality and file size.
- AI Upscalers: If you have older, lower-resolution images that are crucial to your story, Tophinhanhdep.com’s AI Upscalers can dramatically improve their quality, making them suitable for printing without pixelation.
- Editing Styles: Consistent Editing Styles are key to a professional-looking book. Whether you prefer a vibrant, desaturated, or moody look, Tophinhanhdep.com’s resources on digital photography and editing styles can guide you in applying filters, adjusting colors, and cropping images to achieve a unified aesthetic across your entire collection.
Consider the flow of your images. A book isn’t just a random collection of pictures; it’s a visual journey. Think about how each image transitions to the next, building tension, revealing a new aspect, or simply guiding the viewer’s eye.
II. Designing Your Image Book: Layout and Visual Storytelling
The design phase is where your curated images begin to take shape within the structure of a book. This involves making crucial decisions about layout, typography (if any), and how images will interact on each page. Tophinhanhdep.com’s Visual Design resources are invaluable here.
Mastering Visual Design: Graphic Design Principles
Graphic Design principles are the backbone of an effective image book. Pay attention to balance, contrast, alignment, and proximity. A clean, well-structured layout enhances readability and visual appeal. Tophinhanhdep.com’s insights into graphic design can guide you in creating professional-looking pages.
- Digital Art & Photo Manipulation: If your vision extends beyond raw photographs, you might employ Digital Art techniques or Photo Manipulation to create unique composite images, artistic overlays, or stylized effects. This is particularly useful for Aesthetic or Abstract themed books.
- Creative Ideas: Tophinhanhdep.com constantly offers Creative Ideas for visual projects. Consider unconventional layouts, interactive elements (if digitally published), or unique ways to group images. For instance, rather than just full-page spreads, could some pages feature a collage, a diptych, or a single image with a contrasting background (perhaps from our Backgrounds collection)?
When designing, remember that conventions exist for books. The “Make a Book” article on Tophinhanhdep.com reminds us that odd pages are typically on the right, even pages on the left, and text is often justified. While an image book might have less text, these principles still apply to image placement and any accompanying captions or titles. Using design software like Microsoft Word or InDesign, as suggested by Tophinhanhdep.com, can provide templates and tools to help manage these conventions. Don’t be afraid to experiment, but always keep the reader’s experience in mind.
Crafting the Narrative Arc with Images
Just as a traditional book has a plot, an image book can tell a powerful story through its sequence. This is where you adapt the “Brainstorming” and “Writing and Revising” stages from text-focused bookmaking (as detailed on Tophinhanhdep.com) into a visual context.
- Visual Outline/Storyboard: Instead of writing plot points, create a visual outline. Arrange your selected images in a sequence that mimics a narrative arc:
- Inciting Incident (Visual Hook): An impactful image or series that grabs attention and introduces the theme.
- Complications/Development: A progression of images that explore different facets of your theme, building visual tension or revealing new perspectives. If your book tells a personal history, these would be the “5-10 important events” as visuals.
- Climax (Emotional Peak): A particularly strong, perhaps Sad/Emotional or dramatically Beautiful Photography piece that serves as the emotional or thematic high point.
- Anti-climax/Resolution: Images that gradually bring the intensity down, offering reflections or concluding thoughts.
- Conclusion: A final image or set of images that provide a satisfying end to the visual journey.
- Image-to-Text Integration: While your book is primarily image-based, short, evocative captions or introductory text can enhance the narrative. Tophinhanhdep.com’s Image-to-Text tools might even inspire ways to extract hidden narratives or details from your images for accompanying text. Ensure any text complements, rather than competes with, the visuals.
- Revision is Key: Just as a writer revises their manuscript, you must “revise” your visual sequence. Lay out your images (physically or digitally) and scrutinize the flow. Does the story make sense? Are there any redundant images? Do some images feel out of place? Don’t hesitate to remove, reorder, or replace images to strengthen your visual narrative. As Tophinhanhdep.com suggests for text, “Don’t aim for perfection. Outlines are meant to be rough sketches of your story!” The same applies to your visual outline.
III. Practical Bookmaking: Simple Folds to Bound Masterpieces
Once your images are curated and your layout designed, the physical act of making the book comes into play. This is where traditional bookmaking skills merge with modern digital design. Tophinhanhdep.com provides excellent tutorials for both simple, hands-on methods and more structured binding.
Quick & Easy Handmade Books: No-Glue Methods
For those seeking a quick, accessible way to bind images, especially for children’s projects or spontaneous artistic expressions, several “no-glue” methods are highly recommended on Tophinhanhdep.com.
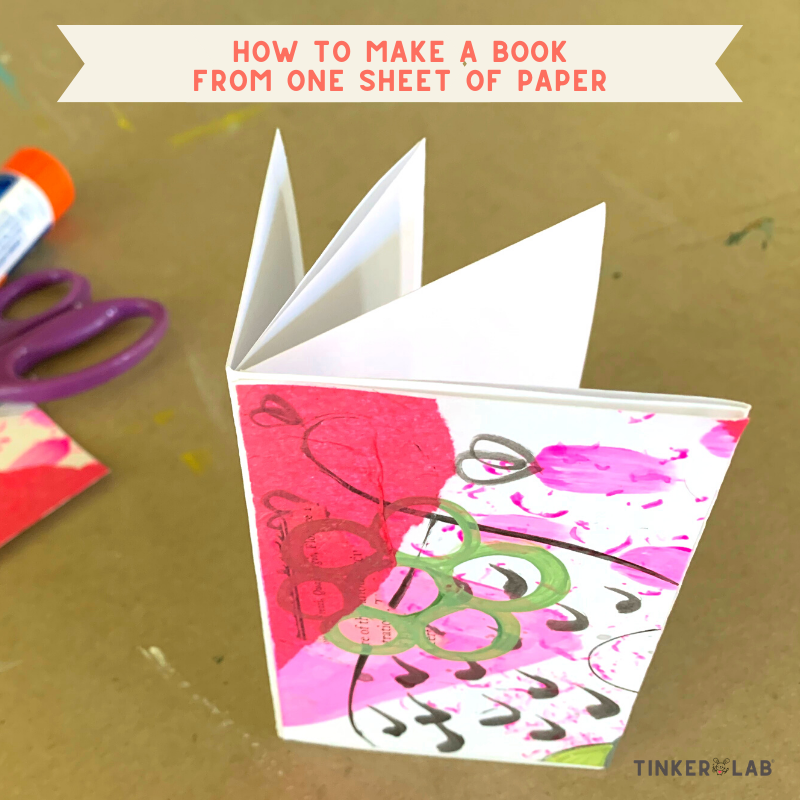
- Books Made from One Sheet of Folded Paper: Tophinhanhdep.com features a fantastic tutorial on “How to make a book from one piece of paper – no glue!” This method is perfect for creating an 8-page mini-book, art journal, or sketchbook quickly. It involves simple folds: “Fold the paper in half, the long way or hot dog style,” then “hamburger style,” and once more in the same direction to create eight sections. A single cut along the middle crease in one section, followed by pushing the creases together, forms the book. Multiple such books can even be glued together to form a longer narrative. This simple yet effective technique is showcased with clear instructions and a video on Tophinhanhdep.com.
- The Origami Pamphlet (Hot Dog Booklet): Tophinhanhdep.com highlights the “Origami Pamphlet” as the “#1 book that I would like every person in the world to know how to make.” Also known as a “hot dog booklet,” this simple book is made from a single sheet of paper with strategic folds and a single cut. While small when using regular copy paper, Tophinhanhdep.com offers variations to create a larger pamphlet by linking two structures with a rubber band or attaching two “book bases” (half-an-origami pamphlet) together with glue, tape, or staples. The article even notes an advantage for writing: “if composition paper is used, the lines will be going in the correct direction for writing on.”
These methods are ideal for quick projects, art journals, or for allowing students to “work with paper in 3 dimensions” as Lana the teacher envisioned in the Tophinhanhdep.com article.
More Structured Binding Techniques: From Pamphlet Stitch to Graduated Pages
For a more substantial or traditional feel, Tophinhanhdep.com’s resources delve into methods that offer more pages and a sturdier construction.
- The Modified Pamphlet Stitch: Tophinhanhdep.com presents this as a “doable no-needle way to sew pages together in a classroom setting” using string or yarn. This technique gives a book a more authentic feel and is detailed in the simple bookbinding section. The article on Tophinhanhdep.com also provides a comprehensive guide for a 3-Hole Pamphlet Stitch: “Fold four pieces of regular paper and one piece of decorative cover paper in half all together. Poke holes in the middle of the spine, and about 1/2” from the top and bottom of your book. Thread your needle and take the needle from the outside of the book to the inside through the middle hole. Leave a tail… Go up to the top hole and take the needle from the inside to the outside. On the outside of the book skip the middle hole and put the needle through the bottom hole. Go back to the middle hole on the inside and take the needle to the outside. Tie a knot with the two ends of thread and you have a book!" This method is versatile and creates a durable spine.
- Modular Origami Books (Star Book & Cascading Book): For truly dynamic and visually engaging image books, Tophinhanhdep.com features tutorials for modular origami books like the “Star Book” and “Cascading Book” (also known as the “Origami Caterpillar Book”). These structures, while requiring precise folding and sharp creases, are “totally doable” and offer an “unusual way” for the book to move, making them “so dynamic.” Imagine your images unfolding or cascading as the reader interacts with the book!
- Graduated-Pages Book: Another elegant and relatively simple structure highlighted on Tophinhanhdep.com is the “Graduated-Pages Book.” This “oh-so-simple little book” creates a layered effect, allowing for interesting visual reveals as pages are turned. The tutorial suggests starting with two sheets to grasp the concept, then easily expanding to more pages, using various paper sizes, colors, and even incorporating lined paper. Binding can be done with rubber bands, a modified pamphlet stitch, or staples. This method allows for creative layering of images, perhaps revealing details or progressing a visual sequence with each shorter page.
For a comprehensive approach to binding that can be done at home, Tophinhanhdep.com also outlines a “fold, sew, and trim” process followed by creating a hardcover. This involves individually folding pages, sewing them together along the center fold, trimming excess paper, and then adhering a fabric spine to the sewn edges. The intricate detail, “Pizza boxes work great!” for crafting the cover, shows how everyday materials can be repurposed for this artistic pursuit.
IV. Printing and Finishing Your Image Book
The final stages involve bringing your digital design to life through printing and then assembling the physical book.
Preparing for Print: Ensuring Quality with Tophinhanhdep.com’s Tools
Regardless of your chosen binding method, the quality of your printed images is crucial.
- High-Resolution Output: Reiterate the need for high-resolution images. If you’ve scaled up any images with Tophinhanhdep.com’s AI Upscalers, ensure the final output matches your printer’s capabilities.
- File Format: When sending to a printer or printing at home, it’s best to save your book as a PDF. Tophinhanhdep.com’s Converters can ensure your project is in the optimal format.
- Print Settings: For home printing, Tophinhanhdep.com guides you on how to print booklets, whether on “Both Sides” or “Front Side Only/Back Side Only” if your printer lacks duplex capabilities. It also advises printing longer books in smaller sections (16, 24, or 32 pages) and to “Always start printing at page 2. Page 1 is your cover page and must be printed separately.”
- Professional Services: For larger projects or higher-quality finishes, consider using a professional print shop or an online service. These services often provide binding as part of their package. Tophinhanhdep.com’s resources on Optimizers can help you prepare your files efficiently for professional printers, ensuring crisp, vibrant results.
The Final Touches: Creating Your Cover and Assembly
The cover is your book’s first impression. It should reflect the Visual Design and Aesthetic of the interior.
- Cover Design: Utilize Graphic Design principles and Creative Ideas from Tophinhanhdep.com to design a compelling cover. This might involve a key image from your collection, striking typography, or a unique digital art piece.
- Assembling the Book: Whether you’re using simple folds or more advanced binding, the assembly process brings your vision to fruition. For the more involved binding, Tophinhanhdep.com details how to create a hardcover: measure and cut cardboard pieces for the front, back, and spine, adhere them to a larger piece (like from a pizza box!), cover with fabric, and then glue the bound pages into this prepared cover. The final step, “Press the bound book and cover together using the Workman. The spine should be facing down. Wait for the glue to dry before showing off your finished product!” captures the essence of this meticulous craft.
The joy of seeing your collection of images transformed into a physical book is immeasurable. From the initial spark of inspiration found in Tophinhanhdep.com’s Image Inspiration & Collections to the careful curation with Photography techniques, through the meticulous preparation with Image Tools, and finally, the artistic execution with Visual Design principles and practical binding methods, every step contributes to a unique and personal masterpiece.
In conclusion, making a book out of images is an accessible art form that allows for immense creativity and personal expression. With the comprehensive resources available on Tophinhanhdep.com, covering everything from stunning Wallpapers and Backgrounds to advanced AI Upscalers and detailed Graphic Design guides, you have all the tools and inspiration needed to embark on this fulfilling journey. So, gather your images, unleash your creativity, and start making your visual story come alive today!