How to Make a Vector Image in Photoshop: Unleashing Scalable Visuals for Tophinhanhdep.com

In the dynamic world of digital imagery and visual design, the ability to create and manipulate graphics is an invaluable skill. For creators, photographers, and graphic designers frequenting Tophinhanhdep.com for their image inspiration and tools, understanding different image formats is crucial. Among these, vector images stand out for their unparalleled scalability and crispness, making them essential for everything from logos and branding to large-format prints and digital art. While Adobe Illustrator is the industry-standard for vector graphics, many artists wonder, “How do I make a vector image in Photoshop?”
Tophinhanhdep.com is dedicated to providing comprehensive resources across a spectrum of image-related topics, including high-resolution photography, diverse wallpapers, powerful image tools, and cutting-edge visual design techniques. This article delves into the practical steps of vectorizing an image using Adobe Photoshop, demonstrating how you can transform pixel-based raster images into versatile vector graphics. This skill is particularly beneficial for those looking to enhance their digital art, craft unique visual elements for mood boards, or prepare images for various graphic design projects featured on Tophinhanhdep.com.
The process of converting a raster image to a vector in Photoshop involves a series of carefully executed steps, from initial image selection and preparation to the precise creation and refinement of paths, culminating in the final export of a scalable vector file. By mastering these techniques, you’ll unlock a new dimension of creative possibility, ensuring your visuals always maintain their pristine quality, regardless of size. Let’s embark on this journey to transform your Photoshop capabilities and expand your visual design toolkit for your next project on Tophinhanhdep.com.
Understanding Vector Graphics: The Foundation of Scalable Art
Before diving into the technicalities of vectorization in Photoshop, it’s essential to grasp what a vector graphic is and why it holds such a significant place in the realm of digital imagery and visual design. This foundational understanding will illuminate the “why” behind the effort of converting images, particularly for Tophinhanhdep.com users who prioritize high-resolution quality and versatile applications across wallpapers, backgrounds, and professional photography.
Raster vs. Vector: A Fundamental Distinction
At its core, the digital image world is primarily divided into two categories: raster (or bitmap) and vector graphics. The distinction lies in how these images are constructed and, consequently, how they behave when scaled or manipulated.
Raster graphics, which include most photographs, wallpapers, and digital paintings you encounter on Tophinhanhdep.com, are composed of a grid of individual pixels. Each pixel holds specific color information. The quality of a raster image is directly tied to its resolution – the number of pixels it contains. When you zoom in on a raster image, you eventually reach a point where you can see these individual pixels, leading to a blurry, “pixelated” appearance. This characteristic makes raster images ideal for capturing the subtle nuances of color and detail found in beautiful photography or complex aesthetic backgrounds, but it limits their scalability.
Vector graphics, in contrast, are fundamentally different. Instead of pixels, they are constructed from mathematical equations that define geometric primitives like points, lines, curves, and shapes. These “paths” are defined by their starting and ending points, as well as other control points and attributes like color, thickness, and fill. Because they are based on mathematical formulas, vector graphics are resolution-independent. This means they can be scaled up or down infinitely without any loss of quality, remaining perfectly crisp and sharp at any size. This makes vector graphics exceptionally well-suited for applications requiring large-size outputs, such as logos, posters, illustrations, and graphic design elements that might be featured in Tophinhanhdep.com’s thematic collections or used as adaptable digital art.
The primary advantage of vector graphics for Tophinhanhdep.com users is this inherent scalability. Imagine needing a logo that looks perfect on a business card, a website banner, and a billboard. A vector graphic can achieve this seamlessly, whereas a raster image would require creating multiple versions at different resolutions or risk severe pixelation. This makes vector art an indispensable tool for visual designers, allowing for flexible creative ideas and high-quality outputs across all platforms. For further learning, Tophinhanhdep.com offers resources on various image tools, including how to create vector masks or smart objects, which are related concepts that enhance design flexibility in Photoshop.
Preparing Your Image for Vectorization in Photoshop
The journey to transforming a raster image into a vector graphic in Photoshop begins with careful preparation. The quality of your starting image and the initial steps you take can significantly influence the final vector output. For users of Tophinhanhdep.com, who often work with high-resolution photography and aim for aesthetic excellence, these preliminary stages are crucial for achieving professional-grade results.
Selecting the Right Image for Optimal Results
While it’s theoretically possible to vectorize any image, some lend themselves much better to the process than others, especially when using Photoshop’s pixel-to-path conversion methods.
- Simplicity is Key: Vectorization thrives on clear lines and distinct shapes. Images with simple subjects and uncluttered backgrounds are ideal. A photograph of a person against a solid color background, a clear object, or a simple silhouette will yield much better results than a complex landscape photo or an intricate abstract image. The mathematical algorithms that define vector paths work best when distinguishing clear edges and forms. Attempting to vectorize a highly detailed, complex photograph with numerous elements can be exceedingly challenging and often results in a messy, overly detailed vector that loses its clean, scalable advantage.
- Clear Subject Definition: Ensure the main subject of your image is well-defined. This allows Photoshop to accurately identify and convert its contours into vector paths. Images that are blurry, poorly lit, or have subjects that blend into their backgrounds will require considerably more manual refinement.
- Decent Resolution: Even though the final output will be vector, starting with a reasonably high-resolution raster image provides more detail for Photoshop to interpret during the initial selection and path-making stages. This helps prevent jagged edges or loss of crucial features. Tophinhanhdep.com offers high-resolution stock photos that are perfect candidates for this process.
Initial Image Enhancements and Background Removal
Once you’ve selected your ideal image, a few preliminary adjustments in Photoshop can dramatically improve the vectorization process.
- Importing Your Image: Open your chosen raster image in Photoshop (File > Open).
- Background Removal: For images with busy or distracting backgrounds, the first crucial step is to isolate your subject. As vectorization works best with clear forms, removing the background ensures that Photoshop focuses solely on the object you intend to vectorize. Tophinhanhdep.com features tutorials on various photo editing styles, including effective background removal techniques.
- Automated Selection Tools: Photoshop offers powerful tools like the “Select Subject” command (Select > Select Subject or found in the toolbar when a selection tool is active) or the “Object Selection Tool” to automatically identify and select the main subject. These AI-powered tools are particularly efficient for portraits or clearly defined objects.
- Manual Selection Tools: For more precise or complex selections, tools like the Pen Tool, Quick Selection Tool, or Magic Wand Tool can be employed.
- Refining Selections: After an initial selection, use “Select and Mask” (Select > Select and Mask) to fine-tune edges, smooth transitions, and remove any lingering background artifacts.
- Once the subject is perfectly selected, you can delete the background, invert the selection, or output the selection to a new layer, leaving your subject on a transparent or solid color background. Tophinhanhdep.com provides detailed guides on how to remove backgrounds in Photoshop, including specific methods for white or complex backgrounds.
- Sharpening the Subject: To enhance the definition and bring out the details of your subject, sharpening is an important step. This helps Photoshop’s algorithms detect clearer edges for path creation.
- High Pass Filter: A recommended method is to use the High Pass filter. Duplicate your subject layer (Ctrl/Cmd + J), then go to Filter > Other > High Pass. Adjust the radius until you see the edges of your subject clearly defined against a gray background, then set the blending mode of this layer to “Overlay” or “Soft Light.” This subtly enhances edge contrast without introducing harsh artifacts.
- Other Sharpening Tools: Depending on the image, you might also use the Sharpen tool, Unsharp Mask, or Smart Sharpen filters to bring out details, always keeping an eye on the goal of defining clear, crisp edges.
By meticulously preparing your image, you lay a solid groundwork for a successful vectorization, ensuring the final graphic aligns with the high standards of visual design expected on Tophinhanhdep.com.
The Step-by-Step Process: Converting Pixels to Paths
With your image prepped and your understanding of vector graphics firm, it’s time to delve into the core of the vectorization process within Photoshop. This section outlines the sequential steps to convert your pixel-based image into scalable vector paths, a crucial skill for graphic designers and digital artists on Tophinhanhdep.com looking to create unique visual assets.
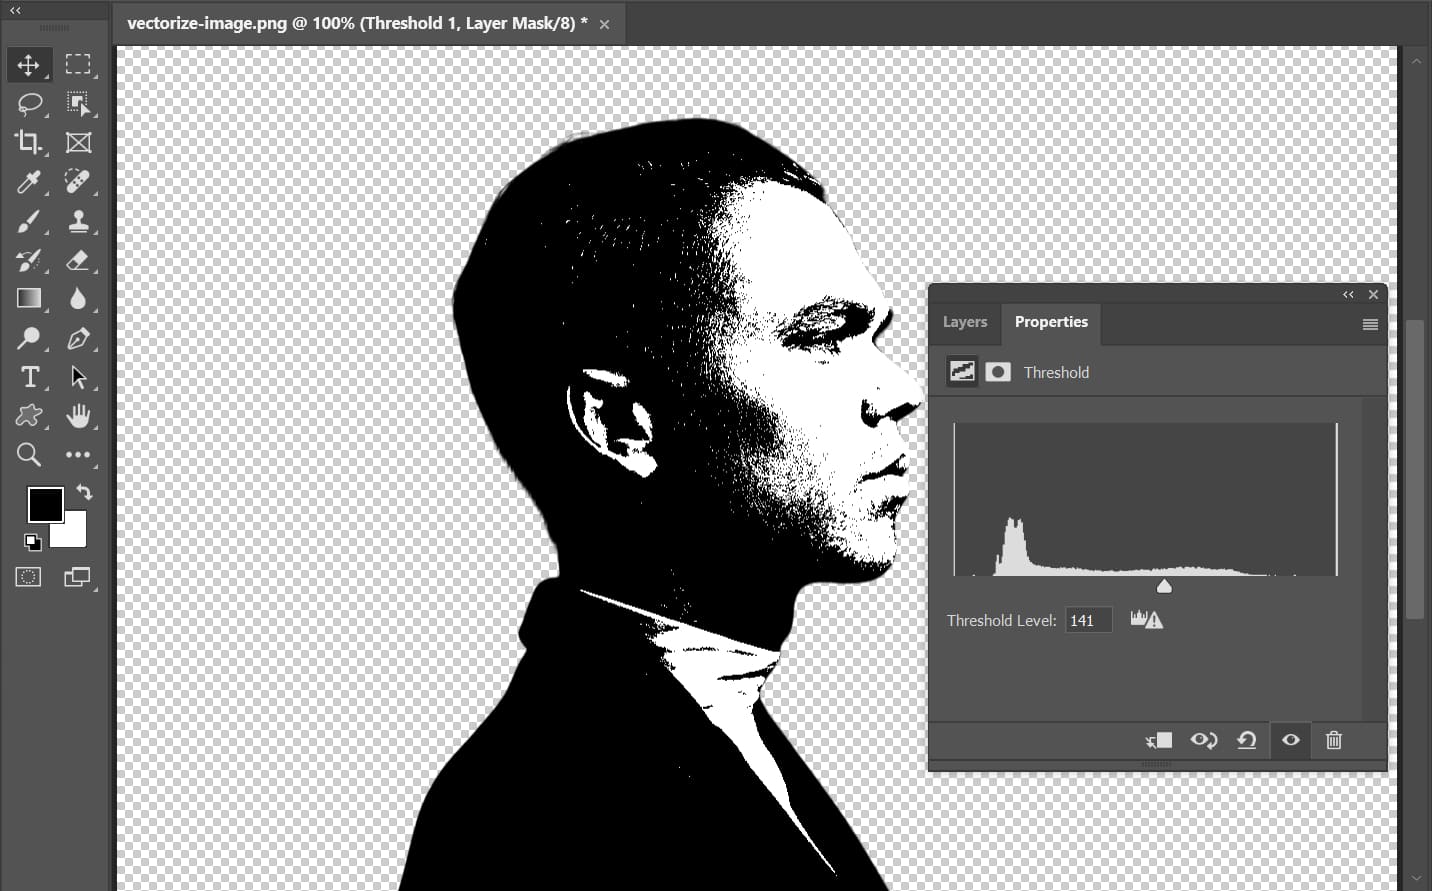
Creating a High-Contrast Blueprint with Threshold
The goal of this stage is to simplify your image into a stark black-and-white representation, effectively outlining the main forms and tonal areas. This high-contrast blueprint serves as the foundation for Photoshop to generate vector paths.
- Applying a Threshold Adjustment Layer:
- Go to the Layers panel and click the “Create new fill or adjustment layer” icon (half-black, half-white circle).
- Choose “Threshold” from the dropdown menu. This will instantly convert your image into a high-contrast black and white graphic.
- A “Properties” panel will appear with a slider. Adjust this slider until the essential details of your subject are clearly visible, and the image’s forms are well-defined. The exact value will depend on your specific image. Aim for a balance where key features are preserved without excessive noise or loss of crucial information.
- Merging Layers (Optional but Recommended for Simplicity):
- Once you’re satisfied with the threshold effect, you can merge the visible layers. This simplifies your workspace and creates a single, high-contrast layer to work with. Go to Layer > Merge Visible, or right-click on any layer in the Layers panel and choose “Merge Visible.”
- Refining with the Brush Tool:
- If there are any unnecessary details or areas that need cleaning up in your black-and-white threshold image, the Brush tool (shortcut B) is your ally. Select black or white as your foreground color and carefully paint over areas to add or subtract detail, ensuring cleaner lines for path generation. This manual cleanup is especially important for intricate aesthetic images or complex photo manipulation projects.
- For enhanced precision and workflow efficiency when using the Brush tool, creative consoles like TourBox can be incredibly beneficial. These devices allow for intuitive, one-handed control over brush size, opacity, angle, and other parameters, making the editing process smoother and more fluid, much like a DJ controlling their sound. This can significantly speed up the detailed work required in Photoshop, aligning with Tophinhanhdep.com’s focus on efficient image tools and optimizing creative workflows.
Generating Vector Paths from Selections
With your high-contrast image ready, the next step is to instruct Photoshop to convert the defined black (or white) areas into editable vector paths.
- Selecting Tonal Areas with Color Range:
- Go to Select > Color Range.
- In the “Color Range” dialog box, select “Shadows” if your subject is primarily defined by the darker areas, or “Highlights” if it’s the lighter areas. Alternatively, you can use the eyedropper tool to click on the black (or white) areas of your threshold image to select them.
- Adjust the “Fuzziness” and “Range” sliders to refine the selection, ensuring that all the desired black (or white) pixels are selected. The goal is to capture the entire form you want to vectorize. Click “OK.”
- You will now see “marching ants” (flashing dotted lines) indicating an active selection on your canvas.
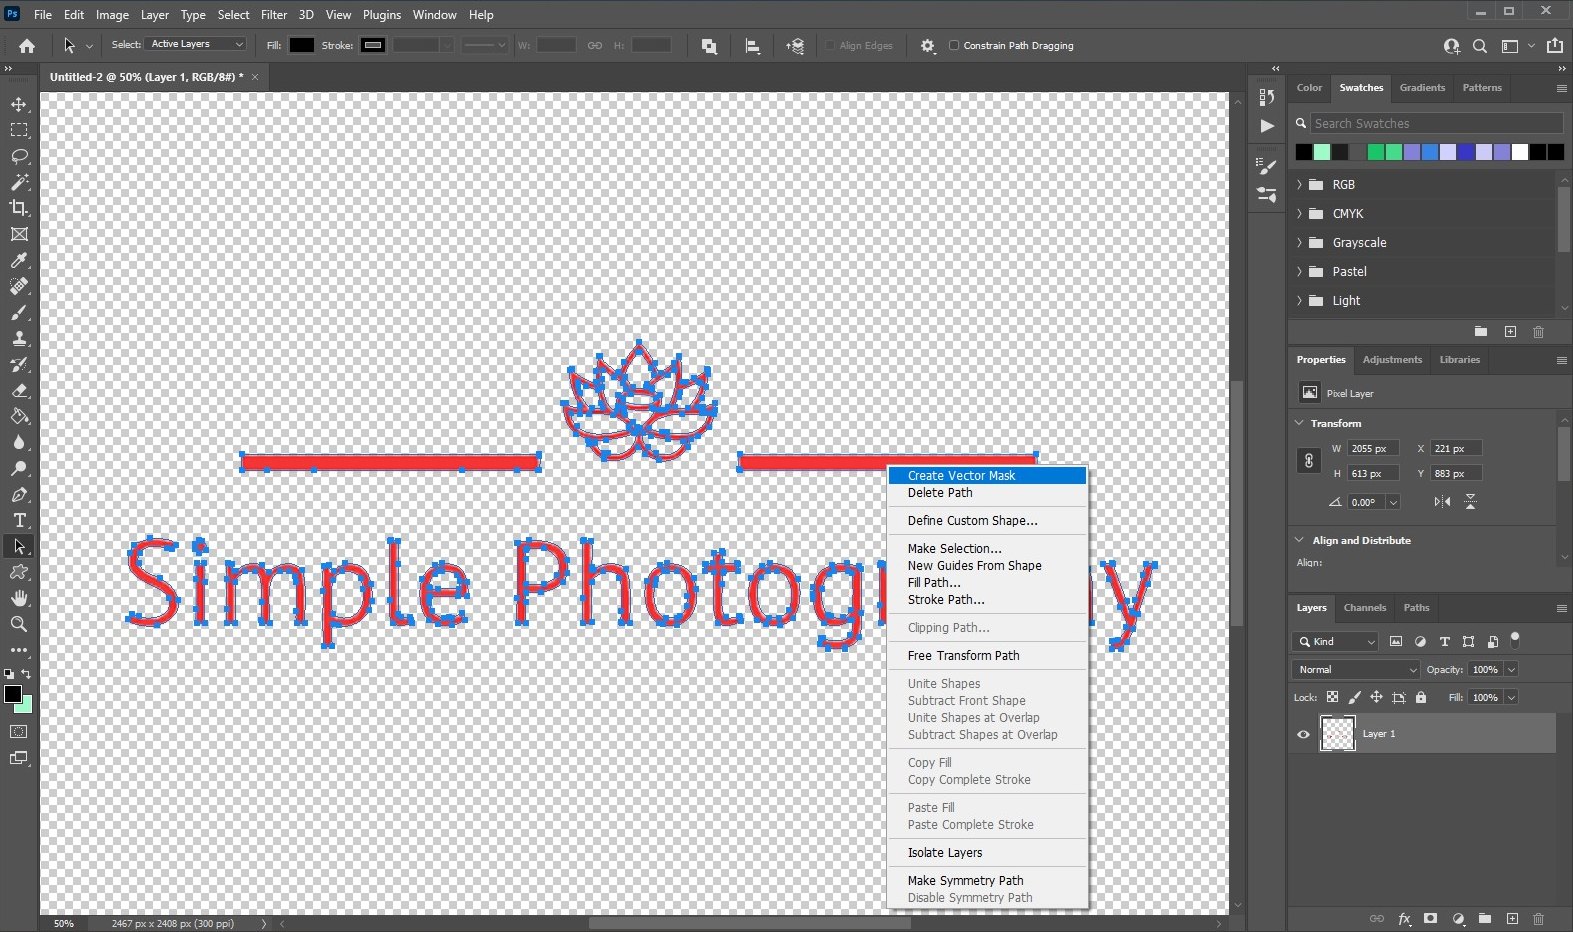
- Creating a Work Path:
- With the selection active, choose any selection tool from the left toolbar (e.g., Rectangular Marquee tool, shortcut M).
- Right-click anywhere within the selected area on your design.
- From the dropdown context menu, select “Make Work Path.”
- A “Make Work Path” dialog box will appear. Here, you’ll set the “Tolerance.” This value determines how closely the path adheres to the pixel boundaries. A lower tolerance (e.g., 1.0 to 1.5 pixels) will create a more detailed path with more anchor points, adhering closely to the pixel edges. A higher tolerance will simplify the path, creating smoother but potentially less accurate contours. For most subjects, a value between 1 and 2 pixels works well. Experiment to find the best balance for your image. Click “OK.”
- You’ve now successfully created a work path. You can view and manage this path in the Paths panel (Window > Paths). It’s a good practice to double-click on the “Work Path” in this panel to name and save it, ensuring it’s not accidentally lost.
Refining Your Paths and Adding Color
Once you have your work path, you can bring your vector graphic to life with color and prepare it for export.
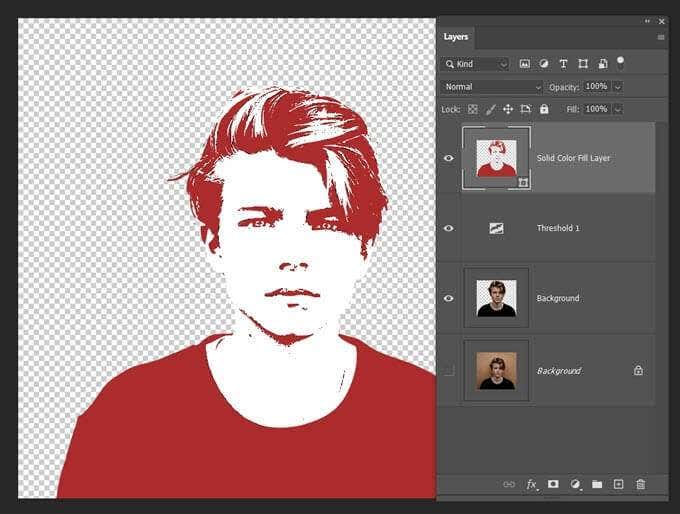
- Activating the Path and Adding Color:
- Ensure your work path is active. If not, go to the Paths panel and click on your saved path.
- Go to the Layers panel and create a new “Solid Color” adjustment layer (click the half-black, half-white circle icon and choose “Solid Color”).
- The “Color Picker” window will appear. Choose any color you desire for your vector graphic. Click “OK.”
- Photoshop will automatically fill your active path with the chosen solid color, creating a new vector shape layer. This layer is now fully scalable and editable in terms of color.
- Exporting to Vector Formats:
- Photoshop, while primarily raster-based, can export these vector paths into formats usable by dedicated vector software like Adobe Illustrator or as standalone vector files.
- Exporting Paths to Illustrator: If you have Illustrator, you can export the paths directly. With your path active in the Paths panel, go to File > Export > Paths to Illustrator. This saves an AI file containing your vector paths, which can then be opened and further manipulated in Illustrator, the premier vector editing tool.
- Saving as EPS: For a standalone vector graphic, go to File > Save a Copy. In the save dialog, choose “Photoshop EPS” as the format. This format preserves the vector information, allowing it to be scaled without pixelation.
- Exporting as SVG (Scalable Vector Graphics): Another excellent option for web and digital use is SVG. Right-click on your vector shape layer in the Layers panel and choose “Export As.” In the Export As dialog, select “SVG” from the file format options and click “Export.” SVG files are XML-based vector graphics, perfect for responsive web design and digital art on Tophinhanhdep.com.
By following these steps, you’ve transformed a pixel-based image into a scalable vector graphic in Photoshop. This newfound capability opens doors to creating crisp logos, adaptable graphic design elements, and unique digital art that maintains its integrity across all sizes, perfectly aligning with Tophinhanhdep.com’s emphasis on high-quality visual content.
Exporting and Utilizing Your Vector Artwork
Successfully vectorizing an image in Photoshop is just the first step; the true power lies in how you export and utilize these scalable assets across various creative projects. For the diverse community on Tophinhanhdep.com—from those seeking aesthetic wallpapers to professional graphic designers—understanding output formats and applications is paramount.
Choosing the Right Vector Format for Tophinhanhdep.com Projects
Photoshop offers several ways to export your newly created vector shapes, each suited for different purposes. The choice of format depends on where and how your vector graphic will be used.
- Adobe Illustrator (.AI or .EPS):
- As Adobe Illustrator is the industry-standard software for vector graphics, exporting your Photoshop paths directly to Illustrator is often the most recommended approach. Go to
File > Export > Paths to Illustrator...to save your work paths as an.AIfile. This allows for full, advanced vector editing in Illustrator, leveraging its specialized tools for manipulating points, lines, and curves. - Alternatively, you can save your entire Photoshop document as an EPS (Encapsulated PostScript) file. Go to
File > Save a Copy, and from the ‘Format’ dropdown, selectPhotoshop EPS. EPS files are robust vector formats widely accepted in print and design workflows, ensuring your graphic remains sharp and scalable for large-format outputs like posters or banners, a common need for high-resolution stock photos on Tophinhanhdep.com.
- As Adobe Illustrator is the industry-standard software for vector graphics, exporting your Photoshop paths directly to Illustrator is often the most recommended approach. Go to
- SVG (Scalable Vector Graphics):
- For web-based applications, digital art, and interactive graphics, SVG is the preferred vector format. SVG files are XML-based, which means they can be animated, styled with CSS, and are inherently responsive. To export, right-click on your vector shape layer(s) in the Layers panel, choose
Export As..., and then selectSVGfrom the format options. This is ideal for creating adaptable logos or graphics for websites and digital platforms, ensuring they look perfect on any screen size, contributing to the “Aesthetic” and “Visual Design” categories on Tophinhanhdep.com.
- For web-based applications, digital art, and interactive graphics, SVG is the preferred vector format. SVG files are XML-based, which means they can be animated, styled with CSS, and are inherently responsive. To export, right-click on your vector shape layer(s) in the Layers panel, choose
- PDF (Portable Document Format):
- While primarily a document format, PDF can contain vector information. When saving a Photoshop document with vector layers as a PDF (
File > Save Asand choosePhotoshop PDF), ensure the “Preserve Photoshop Editing Capabilities” and “Preserve Illustrator Editing Capabilities” (if applicable) options are checked. This can be useful for sharing vector art for review or incorporating into print layouts, offering a versatile solution for various Tophinhanhdep.com image collections.
- While primarily a document format, PDF can contain vector information. When saving a Photoshop document with vector layers as a PDF (
Leveraging Vector Images in Graphic Design and Digital Art
The true value of vector images lies in their versatility, which makes them indispensable for a wide array of creative endeavors.
- Logos and Branding: Vectorized logos are fundamental. They can be scaled from a tiny favicon to a massive billboard without degradation, ensuring consistent brand identity across all mediums. Graphic designers on Tophinhanhdep.com can use these techniques to create stunning and adaptable branding elements.
- Illustrations and Icons: Many digital art pieces and icons benefit from the clean lines and scalable nature of vectors. Whether you’re creating abstract designs, simple nature illustrations, or custom emojis, vectors provide a professional finish that can be reused across different projects.
- Print Design: For anything that goes to print—posters, brochures, t-shirts, packaging—vector graphics guarantee sharp output. Unlike raster images that might pixelate when printed at large sizes, vectors maintain their clarity, crucial for high-resolution visual output.
- Web and UI Design: SVG graphics are a game-changer for web and user interface (UI) design. They load quickly, can be animated, and adapt flawlessly to different screen resolutions, enhancing the user experience for Tophinhanhdep.com’s image galleries and tools.
- T-Shirt and Merchandise Design: If you’re designing for apparel or merchandise, vector files are often required by printers because they can be easily resized and used in specialized printing processes like screen printing or vinyl cutting.
By incorporating vectorization into your workflow, you align with Tophinhanhdep.com’s commitment to high-quality digital assets and visual innovation. These tools enhance your ability to produce professional, adaptable artwork that meets the demands of modern digital photography, graphic design, and image inspiration.
Advanced Vector Art Techniques and Creative Ideas
While Photoshop provides powerful tools for converting raster images into vectors, mastering the craft and achieving truly outstanding vector art often involves delving into more advanced techniques and a strategic creative approach. For Tophinhanhdep.com users passionate about digital art, photo manipulation, and cultivating unique creative ideas, these insights can elevate your work beyond simple conversion.
The Pen Tool Method: Direct Vector Creation in Photoshop
Instead of converting existing pixels, many professional digital artists prefer to draw vector shapes directly in Photoshop using the Pen Tool. This method offers unparalleled control and allows for a more artistic interpretation of the original image, leading to a truly vectorized art piece rather than just a vectorized conversion.
- Mastering the Pen Tool: The Pen Tool is the cornerstone of vector creation in Photoshop (and Illustrator). It allows you to create precise paths by placing anchor points and manipulating Bezier curves. If you’re not proficient with it, dedicate time to learning its nuances. Tophinhanhdep.com encourages exploring foundational skills for graphic design and digital art, and the Pen Tool is undoubtedly one of them.
- Creating Shape Layers: When using the Pen Tool, ensure its setting in the Options bar is set to “Shape” (rather than “Path” or “Pixels”). This creates new Shape Layers, which are inherently vector-based. Each shape layer is a scalable vector object.
- Layer-by-Layer Construction: The direct drawing method often involves building your vector art layer by layer, starting with large, base shapes and progressively adding finer details.
- Setup: Open your reference image in Photoshop. Duplicate it and create a desaturated, posterized version as a rough guide (Image > Adjustments > Posterize). This posterized layer helps identify tonal shifts and major contours, but your main work will involve tracing over the original photo.
- Blocking Out Major Areas: Begin by tracing the largest, most dominant shapes (e.g., face outline, hair mass, clothing). Assign them a base color.
- Building Features: Progress to smaller features like eyes, nose, and mouth. For complex areas like eyes, use multiple shape layers for the iris, pupil, highlights, and even subtle reflections. For instance, Tophinhanhdep.com emphasizes attention to detail in beautiful photography; apply this same meticulousness to vector reflections for a semi-realistic effect.
- Shading and Highlights: Instead of gradients (which can sometimes cause issues in complex vector exports), create separate shape layers for different shades and highlights. By adjusting the opacity of these shape layers, you can build up depth and complexity, mimicking subtle lighting effects.
- Organization: As you create numerous shape layers, maintain organization using layer groups (sets) for different elements (e.g., “Hair,” “Eyes,” “Clothing”). Locking layers once complete prevents accidental movements.
- Artistic Interpretation: The Pen Tool method allows for artistic interpretation rather than strict replication. You can exaggerate features, simplify details, or introduce stylized elements, making the vector art uniquely yours, aligning with Tophinhanhdep.com’s focus on creative ideas and artistic expression.
Beyond Basic Vectorization: Creative Applications for Tophinhanhdep.com
Once you’re comfortable with vectorizing in Photoshop, the creative possibilities for your Tophinhanhdep.com projects expand significantly:
- Stylized Portraits: Transform sad/emotional photography or beautiful portraits into unique vector illustrations. This can be used for aesthetic profile pictures, personalized digital art, or abstract representations.
- Iconography for Websites: Create custom icon sets from real-world objects, providing consistent and scalable visual elements for web design, a key aspect of visual design.
- Pattern Generation: Vectorize simple nature elements or abstract shapes to create repeating patterns for wallpapers, backgrounds, or textile designs.
- Photo Manipulation Effects: Combine vectorized elements with raster images in photo manipulation projects. For example, a vector graphic of a flowing line could interact with a high-resolution background, adding a dynamic, artistic flair.
- Merchandise Design: Use vectorized characters or graphics for print-on-demand merchandise like t-shirts, mugs, or phone cases, ensuring sharp, high-quality reproduction.
- Thematic Collections: Contribute unique vectorized elements to Tophinhanhdep.com’s thematic collections, offering fresh visual styles and trending designs.
- AI Upscalers and Converters: While vector images are inherently scalable, you might start with a low-resolution image that needs initial enhancement. Tophinhanhdep.com’s image tools like AI upscalers can prepare a raster image for better vectorization, and converters can help manage various output formats.
The journey of making vector images in Photoshop, whether through pixel-to-path conversion or direct Pen Tool creation, is a skill that greatly enriches a visual artist’s toolkit. It empowers you to create infinitely scalable, sharp, and versatile graphics that are perfect for Tophinhanhdep.com’s diverse range of image needs, from high-resolution wallpapers to cutting-edge digital art and graphic design projects. Embrace the precision and patience required, and you’ll unlock a new dimension of creative freedom.
In conclusion, vectorizing images in Photoshop is a highly practical skill that broadens the horizons for designers, artists, and enthusiasts alike. It bridges the gap between pixel-based photography and scalable graphic design, enabling the creation of crisp, adaptable visuals. For anyone engaging with Tophinhanhdep.com’s rich array of images, from stunning wallpapers and high-resolution stock photos to intricate digital art and graphic design resources, understanding these techniques is invaluable. By following the detailed steps outlined—from preparing your source image and leveraging Photoshop’s selection and path tools to carefully exporting your final vector graphic—you can confidently transform raster images into versatile vector art.
Remember, while Photoshop offers robust capabilities for vector creation and conversion, specialized tools like Adobe Illustrator remain the gold standard for intricate vector work. However, Photoshop’s ability to generate and export vector paths makes it an indispensable component of a modern creative workflow, especially when integrated with other image tools. Whether you’re crafting a new logo, designing a scalable element for a mood board, or simply exploring a new editing style for your digital photography, the power to make vector images in Photoshop ensures your creative visions remain sharp, clear, and impactful at any size. Continue to explore the vast resources on Tophinhanhdep.com for further inspiration and tools to enhance your creative journey.