How Do I Make an ISO Image? A Comprehensive Guide for Visual Content Creators on Tophinhanhdep.com

In the dynamic world of digital content creation, managing vast collections of high-resolution images, intricate graphic designs, and extensive photography portfolios can be a challenge. Whether you’re an avid photographer capturing breathtaking nature shots, a graphic designer crafting compelling visuals, or simply an enthusiast curating aesthetic backgrounds, the need for efficient storage, backup, and distribution methods is paramount. This is where ISO images come into play. Often associated with software distribution or operating system installations, an ISO file is, in essence, a complete, sector-by-sector replica of a compact disc, DVD, or Blu-ray disc, or a compilation of files and folders, all consolidated into a single file. For Tophinhanhdep.com’s community of visual artists and image aficionados, understanding how to create and utilize ISO images can revolutionize how you manage your digital assets.
An ISO image acts as a virtual disc, allowing you to mount and access its contents as if a physical disc were inserted into your computer. This capability makes ISOs incredibly versatile for archiving, sharing large thematic image collections, backing up critical design projects, or even packaging specialized digital art resources. Imagine having a single, easily transportable file containing your entire collection of abstract wallpapers, a complete series of beautiful photography from a recent shoot, or all the elements of a complex photo manipulation project. Tophinhanhdep.com recognizes the value of such robust image management tools, and this guide will walk you through the process of creating ISO images from various sources, ensuring your visual masterpieces are securely organized and readily accessible.
Understanding ISO Images: A Digital Container for Your Visual Masterpieces
At its core, an ISO file, formally known as an ISO 9660 image, is a standard archival format that contains an identical copy of data found on an optical disc. This includes not only the data files but also the filesystem information, which describes the logical structure of the data on the disc. This “perfect copy” nature is what makes ISOs so powerful for backup and distribution.
While traditionally used for software, operating systems, or games, the utility of ISOs extends significantly to digital content, particularly for users focused on images, photography, and visual design. For example, a single ISO file can encapsulate:
- High-Resolution Photography Collections: Instead of managing hundreds or thousands of individual photo files, bundle an entire shoot or a curated series of high-resolution stock photos into one compact ISO.
- Digital Art & Graphic Design Projects: Keep all project files, including raw assets, layered design files, and various output formats, neatly organized in a single ISO for easy archiving or client handover.
- Thematic Image & Wallpaper Collections: Curate aesthetic backgrounds, nature scenes, or abstract art collections and distribute them as a single ISO, making it simple for others to explore and utilize.
- Software & Resources for Image Editing: If you have portable versions of image tools, plugins, or specific font collections, an ISO can make them easily accessible and transferable.
Why ISOs are Indispensable for Photographers & Designers
The benefits of utilizing ISOs for your visual assets, as highlighted by Tophinhanhdep.com, are numerous:
- Streamlined Archiving: For digital photographers and artists, storage space and organization are critical. ISOs allow you to consolidate large folders of images (e.g., raw files, edited JPEGs, panoramic shots, sad/emotional mood boards) into a single, manageable file. This simplifies backup strategies, reduces clutter, and ensures data integrity by encapsulating all related files in one immutable package.
- Efficient Distribution: Sharing vast collections of images or design assets can be cumbersome. Sending numerous individual files or even compressed ZIP archives can lead to transfer errors or fragmented downloads. An ISO file provides a singular, complete package that’s easier to upload, download, and share, ensuring recipients receive an intact, organized set of files. This is especially useful when sharing curated photo ideas or thematic collections.
- Data Integrity and Read-Only Access: Once created, an ISO is typically a read-only snapshot of its contents. This characteristic offers a layer of protection against accidental deletion or modification of the original files. It’s perfect for preserving the original state of important design templates, high-resolution original photographs, or digital art pieces.
- Virtual Mounting: You don’t need to burn an ISO to a physical disc to access its contents. Modern operating systems can “mount” an ISO, making its contents appear as a new virtual drive on your computer. This offers quick and convenient access to your archived images or design projects without consuming physical media.
- Backup and Recovery: ISOs serve as excellent backup containers for crucial visual data. In case of data loss or system failure, having your image libraries and design project files stored as ISOs on an external drive or cloud storage provides a robust recovery solution.
Preparing Your Visual Assets for ISO Packaging
Before diving into the technical steps of creating an ISO, proper preparation of your visual assets is crucial for an organized and efficient outcome. Tophinhanhdep.com encourages a systematic approach to ensure your ISO reflects the quality and structure of your creative work.
- Organize Your Files: Gather all the high-resolution images, digital art projects, graphic design assets, or thematic collections (e.g., nature photography, abstract backgrounds, beautiful photography sets) you intend to include in your ISO. Place them into a single, well-structured folder. Subfolders can be used to maintain categories (e.g., “Wallpapers - Nature,” “Abstract Art Series - 2024,” “Client Project - Logo Design”).
- Review and Clean Up: This is an excellent opportunity to declutter. Remove any duplicate, irrelevant, or low-quality images. Ensure all file names are descriptive and consistent. For graphic design projects, consolidate all linked files, fonts, and resources.
- Consider File Size: ISO files can be quite large, especially with numerous high-resolution photos or complex design files. Ensure you have sufficient storage space on your hard drive for the resulting ISO file, which will be roughly the same size as the folder you are converting. If the compilation is for a physical disc, consider the capacity of CD (700MB), DVD (4.7GB, 8.5GB), or Blu-ray (25GB, 50GB) if you plan to burn it.
- Copyright Considerations: As a platform celebrating creativity, Tophinhanhdep.com reminds its users to respect intellectual property rights. You cannot create ISOs of most commercial video games or movies, as these are typically copyright-protected. Similarly, ensure you have the necessary rights or licenses for any images or digital art you are packaging for distribution, especially if they are not your original creations.
Creating ISOs on Windows: Tophinhanhdep.com’s Guide to Powerful Tools
Windows users have several robust third-party tools available to create ISO images from files, folders, or optical discs. Tophinhanhdep.com has reviewed and recommends a few user-friendly options that cater to different needs. For the purposes of archiving your stunning wallpapers, intricate design elements, and captivating photography, these tools offer reliable solutions.
Streamlined ISO Generation with WinCDEmu
WinCDEmu is a free, open-source utility for Windows that is incredibly easy to use, adding a context menu option for quick ISO creation. It’s an ideal choice for quickly converting a folder of images or a physical disc into an ISO.
Steps using WinCDEmu:
- Download and Install: Visit the official WinCDEmu website (or find a trusted download link via Tophinhanhdep.com’s recommended tools section) and download the installer. Run the installer, granting administrative permissions if prompted. Click “Install” and then “OK” upon completion.
- Prepare Your Source:
- From Files/Folders: Organize all the image files, graphic design assets, or photography collections you wish to include into a single folder. For example, a folder named “MyNaturePhotos_HiRes” containing all your nature photography.
- From an Optical Disc: Insert the CD or DVD containing the images, design software, or archived projects into your computer’s optical drive. Ensure it’s not copyright-protected if you intend to share.
- Initiate ISO Creation:
- For a Folder: Right-click directly on the organized folder you created (e.g., “MyNaturePhotos_HiRes”). In the context menu that appears, select the option “Build an ISO image.”
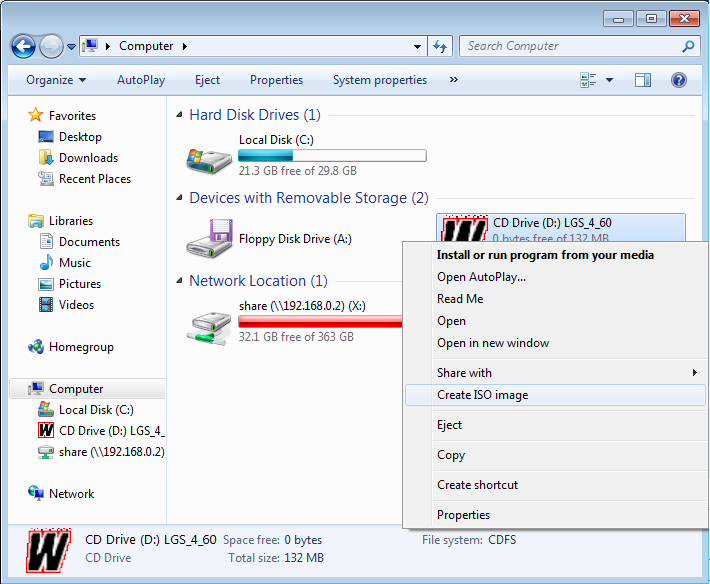
- For an Optical Disc: Open File Explorer, navigate to “This PC,” and right-click on your optical drive (e.g., “DVD Drive (D:)”). Select “Create ISO Image” from the context menu.
- Note for Windows 11 users: You might need to click “Show more options” in the context menu to reveal the WinCDEmu options.
- Name and Save Your ISO: A “Save file” dialog box will appear. Enter a descriptive name for your ISO file (e.g., “Tophinhanhdep_Nature_Wallpapers.iso”). The “.iso” file type should already be selected. Choose a destination folder where you want to save the ISO, then click “Save.”
- Monitor Progress: WinCDEmu will start the process, displaying a progress bar. Once completed, a notification will appear, and your ISO file will be ready at the specified location.
Versatile Archiving with AnyBurn
AnyBurn is another lightweight yet powerful tool recommended by Tophinhanhdep.com, capable of burning CDs/DVDs/Blu-rays and, importantly, creating ISO images from files and folders. It offers more control over the compilation settings.
Steps using AnyBurn:
- Download and Install: Obtain AnyBurn from its official website (or via Tophinhanhdep.com’s utility links). Install and launch the application.
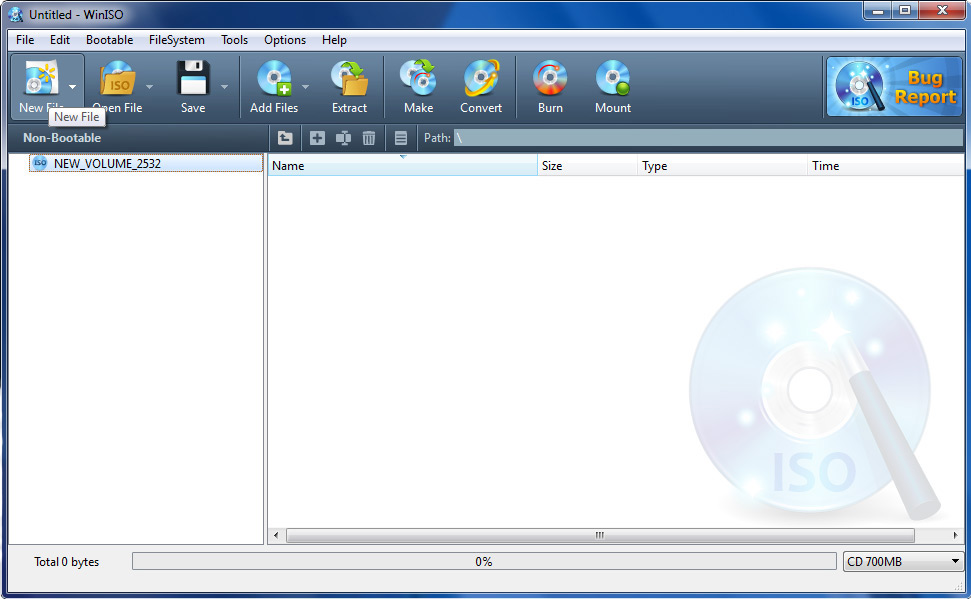
- Select Creation Option: On the main interface, locate and click the option “Create image file from files/folders.” This will open an empty compilation window.
- Add Your Visual Content:
- Click the “Add” button to browse and select the individual files and folders containing your images, photography, or design projects. You can also drag and drop files directly from Windows Explorer into the AnyBurn window.
- Use “New Folder” to create a structured directory within your ISO.
- “Rename” allows you to modify names within the compilation.
- “Label” lets you set a descriptive label for the ISO, useful for identification.
- Configure ISO Properties (Optional): For advanced users, clicking “Advanced” allows you to modify settings like the file system (e.g., ISO9660, Joliet, UDF), which impacts compatibility and feature support. Unless you have specific requirements, the default settings are usually sufficient.
- Proceed to Destination: After arranging your files and adjusting settings, click “Next.”
- Specify Output: In the next screen, click the “Browse” button next to the “Destination image file” field. Choose where to save your ISO and give it a name. Ensure “Standard ISO Images (*.iso)” is selected as the output format from the drop-down list.
- Create Now: Click the “Create Now” button to begin the ISO creation process. AnyBurn will display the progress, and once finished, your ISO file containing your visual assets will be available.
Mac Mastery: Compiling Visual Projects into ISOs with Tophinhanhdep.com’s Guidance
For Apple users, macOS offers built-in tools that, while not directly creating ISO files, can achieve the same outcome with a slight conversion. Tophinhanhdep.com’s Mac users can effectively archive their high-resolution photography, digital art, and visual design portfolios using Disk Utility, followed by a simple command in Terminal.
Leveraging Disk Utility and Terminal for Mac ISOs
Disk Utility is a powerful macOS application used for managing hard drives and disc images. While it natively creates .cdr files (which are essentially Mac-specific disc images), these can be easily converted to the universally compatible .iso format.
Steps using Disk Utility and Terminal:
- Organize Your Visual Files: Just like on Windows, gather all your Mac-based digital art, aesthetic image collections, or photography projects into a single, well-named folder on your desktop or in a readily accessible location. If you’re making an ISO from a physical CD/DVD, insert it into your optical drive.
- Open Disk Utility:
- The easiest way is to use Spotlight Search: press
Command + Spacebar, type “Disk Utility,” and pressEnter. - Alternatively, go to Finder > Applications > Utilities > Disk Utility.
- The easiest way is to use Spotlight Search: press
- Initiate Image Creation:
- Go to the “File” menu in Disk Utility, then select “New Image,” and choose either “Image from Folder…” or “Image from [Disc Name]…”
- If “Image from Folder…” is selected, navigate to and select the folder containing your visual content, then click “Open.”
- If “Image from [Disc Name]…” is selected, choose your optical drive from the sidebar in Disk Utility, then proceed.
- Configure Image Settings:
- Name: Enter a descriptive name for your image file in the “Name” field (e.g., “Tophinhanhdep_AbstractBackgrounds”).
- Where: Select “Desktop” as the saving location for easy access.
- Format: From the “Format” drop-down menu, choose “DVD/CD master.” This creates a
.cdrfile, which is crucial for the next conversion step. - Encryption: Select “none” unless you have specific security requirements.
- Image Format: Select “read/write.”
- Save the Image: Click the “Save” button. Disk Utility will begin creating the
.cdrfile. A progress bar will indicate its status. Once complete, the.cdrfile will appear on your desktop. - Convert .cdr to .iso using Terminal:
- Open Terminal: Use Spotlight Search (
Command + Spacebar), type “Terminal,” and pressEnter. Or go to Finder > Applications > Utilities > Terminal. - Navigate to Desktop: In the Terminal window, type
cd ~/Desktopand pressReturn. This command changes the directory to your Desktop, where your.cdrfile is located. - Execute Conversion Command: Type the following command, replacing
[filename]with the exact name of your.cdrfile (e.g.,Tophinhanhdep_AbstractBackgrounds.cdr) and[outputname]with your desired ISO filename (e.g.,Tophinhanhdep_AbstractBackgrounds.iso):hdiutil makehybrid -iso -joliet -o [outputname].iso [filename].cdrFor example:hdiutil makehybrid -iso -joliet -o Tophinhanhdep_AbstractBackgrounds.iso Tophinhanhdep_AbstractBackgrounds.cdr - Press
Returnto execute the command. Terminal will process the conversion.
- Open Terminal: Use Spotlight Search (
- Final ISO: Once the command finishes, your new
.isofile will appear on your Mac’s desktop, ready for use, sharing, or archiving within your Tophinhanhdep.com visual collections. You can now delete the original.cdrfile.
Beyond Creation: Maximizing Your Visual ISOs
Creating an ISO is just the first step. For the Tophinhanhdep.com community, the real power lies in how you utilize these digital containers for your images, photography, and visual design projects.
Mounting and Accessing Your Visual ISOs
Once an ISO is created, you can access its contents without needing to burn it to a physical disc.
- On Windows: Simply double-click the ISO file. Windows will automatically “mount” it as a virtual DVD/CD drive, and you can browse its contents in File Explorer as if it were a physical disc.
- On Mac: Double-clicking an ISO file will mount it as a virtual drive on your desktop, and you can open it like any other folder or drive.
Burning to Physical Media
While virtual mounting is convenient, sometimes a physical backup is desired, or you need to distribute content on an actual disc. Most of the tools mentioned, such as PowerISO, AnyBurn, and ImgBurn, also include features to burn ISO files to CDs, DVDs, or Blu-ray discs. This is useful for distributing large image collections, creating bootable media for design software, or as a long-term physical archive for high-resolution photography.
Distribution and Sharing
ISOs are excellent for sharing large collections of digital art or stock photos online. Upload your ISO to cloud storage services or use file transfer protocols. Ensure your internet connection is stable, as these files can be sizable. Before sharing, consider compressing the ISO further with tools like WinRAR or 7-Zip if the recipient prefers smaller file sizes, though this will negate some of the ISO’s original benefits.
Strategic Backup for Your Visual Assets
Integrate ISO creation into your regular backup routine for critical visual projects. For instance, after completing a major graphic design project or curating a new collection of trending aesthetic images, create an ISO and store it on an external hard drive, network-attached storage (NAS), or a cloud backup service. This practice, advocated by Tophinhanhdep.com, provides a robust, single-file backup that can be easily restored.
Tips for Optimizing Your Visual ISOs
To get the most out of your ISOs, especially when dealing with the rich visual content featured on Tophinhanhdep.com, consider these additional tips:
- Compression Considerations: While ISOs themselves are not compressed archives, the files within them can be. If you’re compiling images that are already highly optimized (e.g., JPEG files from digital photography), further compression might not be necessary. However, for raw image files or uncompressed digital art, ensure they are organized efficiently before ISO creation.
- Metadata Preservation: High-resolution photography and digital art often contain crucial metadata (EXIF data for photos, artist info for digital art). ISO creation typically preserves all file data, including metadata, ensuring your image properties and copyrights remain intact.
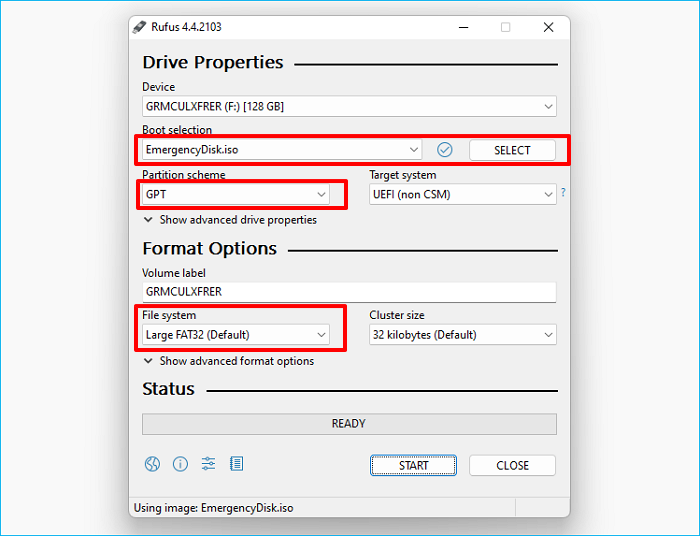
- Bootable Media for Creative Environments: For power users in visual design, ISOs can be used to create bootable drives with specialized operating systems or portable versions of design software. This allows you to carry a consistent creative environment wherever you go.
- Security and Encryption: If your ISO contains sensitive visual designs or proprietary photography, some advanced ISO creation tools (or post-creation archiving tools) offer encryption options. This adds a layer of security, protecting your intellectual property.
- Thematic Collections and Mood Boards: Leverage ISOs to package thematic image collections – whether it’s abstract patterns, serene nature scenes, or poignant sad/emotional imagery for mood boards. This not only organizes your inspiration but also makes it effortlessly portable. Tophinhanhdep.com’s focus on “Image Inspiration & Collections” makes ISOs a perfect tool for sharing curated sets of visual ideas.
By understanding and implementing these ISO creation techniques, the Tophinhanhdep.com community can elevate their digital asset management. From safeguarding your high-resolution photography to efficiently sharing your latest digital art, ISO images offer a professional and reliable solution for managing your invaluable visual content. Embrace this powerful tool to ensure your creative work is always accessible, organized, and preserved for years to come.