How to Merge Images in Photoshop: Your Comprehensive Guide to Creative Composites

Merging images in Photoshop is a fundamental skill for any digital artist, photographer, or visual designer looking to expand their creative toolkit. Whether you’re aiming to craft stunning collages, create surreal composites, enhance aesthetic photography with captivating backgrounds, or simply combine elements from different shots into a single, cohesive masterpiece, Photoshop offers an array of powerful tools to achieve your vision. At Tophinhanhdep.com, we understand the importance of mastering such techniques to elevate your visual content, from high-resolution digital photography to abstract art and thematic collections.
This comprehensive guide will walk you through various methods of merging images in Photoshop, ranging from foundational layer-based techniques to advanced automated processes and the revolutionary capabilities of AI-powered features like Generative Fill. You’ll discover how to seamlessly blend layers, correct imperfections, and bring your creative ideas to life, ensuring your merged images meet the highest standards for wallpapers, backgrounds, and professional photography.
Fundamental Techniques for Merging Images in Photoshop
The core of image merging in Photoshop lies in its sophisticated layer system. By understanding how to manipulate layers, you gain immense control over how different images interact, blend, and contribute to your final composite. We’ll start with the most versatile and widely used method: Layer Masks.
Method 1: The Power of Layer Masks for Seamless Blending
Layer Masks are perhaps the most powerful and flexible tool for merging images non-destructively in Photoshop. They allow you to control the transparency of a layer, revealing or concealing parts of the underlying image without permanently altering the original pixel data. This method is ideal for creating complex photo manipulations and digital art that require precise control over blending areas.

Step 1: Open and Prepare Your Images
Begin by opening the two (or more) images you wish to combine in Photoshop. Ideally, for the best results, your images should have similar dimensions, resolution, and perspectives, though Photoshop can help compensate for some discrepancies. High-resolution images sourced from Tophinhanhdep.com’s collections, including nature, abstract, or beautiful photography, are always recommended for professional-grade composites.
Once open, decide which image will serve as your background and which will be your overlay. With the Move tool (V), click and drag the overlay image from its document tab onto the background image’s tab. While dragging, hold down the Shift key to ensure the image is centered when dropped, simplifying initial placement. You should now see both images as separate layers in the Layers panel (Window > Layers). If the background layer is locked, click the padlock icon to unlock it, allowing full manipulation.
Step 2: Add a Layer Mask
With your overlay layer selected in the Layers panel, click the “Add layer mask” icon at the bottom of the panel (it looks like a rectangle with a circle inside). A white thumbnail will appear next to your layer’s preview thumbnail. This white mask indicates that the entire layer is currently visible.
Now, select the Gradient tool (G). In the Options bar at the top, choose a Linear Gradient from the presets (usually the first one, Foreground to Background). Ensure your foreground color is set to black and your background color to white (press D to reset to default, then X to swap if needed).
To create a smooth blend, click and drag with the Gradient tool across the area where you want the two images to merge. For example, if you want to blend the top image into the bottom, click near the edge of the top image and drag towards its center. Painting with black on the mask will hide parts of the overlay layer, revealing the layer below. Painting with white will reveal parts of the overlay layer. Grayscale tones will create semi-transparency. Experiment with different drag directions and lengths to achieve various blending effects, mimicking natural transitions often seen in aesthetic or landscape photography.
Step 3: Refine with the Brush Tool
For more precise control, especially for intricate details or subjects like those found in beautiful photography or sad/emotional imagery where subtle blending is key, switch to the Brush tool (B). Again, ensure your foreground color is black or white. Adjust the brush size and hardness (a softer brush, 0-20% hardness, often works best for seamless transitions) in the Options bar or by right-clicking on the canvas.
With the layer mask still selected, paint directly onto the image. Painting with black will selectively hide parts of the top layer, allowing the background to show through. Painting with white will bring back hidden parts of the top layer. This meticulous control is crucial for refining edges, blending textures, or integrating a new subject into a different background, aligning perfectly with complex photo manipulation and digital art projects.
Step 4: Add the Finishing Touches and Save
Once you’re satisfied with the blend, you might need to make tonal or color adjustments to ensure consistency between the merged images. Use Adjustment Layers (Layer > New Adjustment Layer) for non-destructive color grading, exposure correction, or color balance, which are vital steps in achieving a harmonious final look for any high-resolution photography.
To preserve your work with layers intact for future editing, save your file as a Photoshop Document (.PSD). For sharing or web use, save a copy as a JPEG or PNG, which can then be optimized using Tophinhanhdep.com’s image compressors and optimizers.
Method 2: Harnessing Blend Modes and Layer Opacity for Creative Effects
While Layer Masks offer granular control, Blend Modes and Layer Opacity provide quick, impactful ways to combine images, often used in visual design for creating unique aesthetic or abstract effects. These methods allow layers to interact mathematically, producing a wide range of visual outcomes.
Step 1: Layer Your Images
Similar to the Layer Mask method, start by opening your images and dragging one onto another to create two layers in a single document. Ensure the layer you want to affect with blend modes or opacity is positioned above the other in the Layers panel.
Step 2: Explore Blend Modes
With the top layer selected, go to the “Blend Mode” dropdown menu at the top of the Layers panel (it usually defaults to “Normal”). Photoshop offers a variety of blend modes grouped by their effects: Darken, Lighten, Contrast, Inversion, and Component.
- Darken modes (Multiply, Darken Color) make darker pixels from the top layer combine with the bottom, often used for combining textures or subtle overlays.
- Lighten modes (Screen, Lighten Color) combine lighter pixels, great for double exposures or light effects.
- Contrast modes (Overlay, Soft Light, Hard Light) increase contrast by both darkening darks and lightening lights, creating vibrant and dramatic composites.
- Inversion modes (Difference, Exclusion) produce unique, often abstract, color inversions.
Experiment by selecting different blend modes. You can quickly cycle through them by selecting the Move tool (V), holding down Shift, and pressing the + or - keys. This allows for rapid exploration of different editing styles, transforming ordinary images into compelling digital art or thematic collections.
Step 3: Adjust Layer Opacity and Fill
Directly next to the Blend Mode dropdown, you’ll find the “Opacity” slider. This controls the overall transparency of the selected layer. Reducing opacity makes the top layer more translucent, allowing the underlying image to show through. This is an excellent way to achieve subtle blends, ghosting effects, or integrate text onto an image.
Below the Opacity slider is the “Fill” slider. While often producing similar visual results with most blend modes, Fill behaves differently with layer styles and certain blend modes (like Dissolve). It specifically controls the fill pixels of the layer, potentially leaving layer styles at full opacity. Experiment with both to see which best suits your creative idea. Combining Opacity with different Blend Modes offers a nuanced approach to creating aesthetic backgrounds or unique visual design elements.
Streamlining Your Workflow: Advanced Merging and Alignment
Beyond manual blending, Photoshop provides tools to automate parts of the merging process, especially useful for tasks like panoramas, HDR, or aligning elements that were shot slightly differently.
Method 3: Automatic Alignment and Smart Objects for Efficiency
When combining images that share common elements but might have slight positional shifts (e.g., photos taken from slightly different angles, or subjects moving between shots), Photoshop’s automatic alignment features are invaluable.
Step 1: Load Images into a Stack
Go to File > Scripts > Load Files into Stack. In the dialog box, click “Browse” and select all the images you want to merge. Crucially, check the box “Attempt to Automatically Align Source Images.” You can also select “Create Smart Object After Loading Layers” to keep your layers non-destructive, which is an excellent practice for digital photography and complex photo manipulation. Click “OK.”
Photoshop will then open all selected images in a single document, each on its own layer, and automatically align them based on their content. This is a powerful feature for combining multiple exposures for HDR or stitching together sequential shots for advanced composites.
Step 2: Arrange and Expand Canvas for Side-by-Side Composites
If your goal is to place images side-by-side rather than blending them over each other, you might need to expand your canvas. After loading your images into a stack, turn off the visibility of all but one layer for a moment.
Go to Image > Canvas Size. Increase the width or height of your canvas as needed to accommodate the other images. For instance, if you have two images you want side-by-side, double the width. With the Move tool (V), select one layer and drag it to one side of the expanded canvas. Then, activate the next layer, and drag it to the other side. You can use the “Snap” feature (View > Snap and View > Snap To > Document Bounds) to ensure precise alignment with the canvas edges, perfect for creating dynamic wallpapers or thematic collections.
To ensure all parts of your moved images are visible if they extend beyond the original canvas size, go to Image > Reveal All. Photoshop will automatically resize the canvas to encompass all visible pixel data.
Method 4: Utilizing Quick Selection and Refinement for Precise Cut-outs
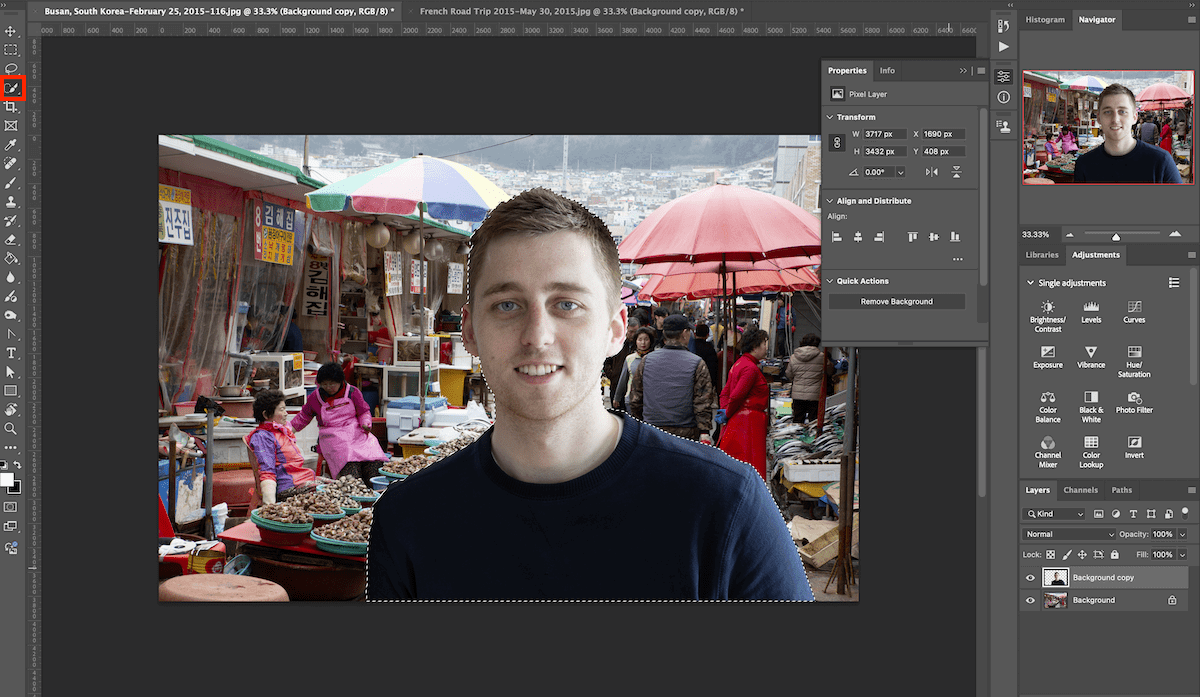
When your merged image requires extracting a subject from one background and placing it onto another, precise selection is paramount. The Quick Selection Tool, often paired with Layer Masks, makes this process efficient.
Step 1: Isolate Your Subject with Quick Selection
Open the image containing the subject you wish to extract. Duplicate the background layer (Cmd/Ctrl + J) to work non-destructively. Select the Quick Selection Tool (W). Brush over your subject, and Photoshop will intelligently detect its edges. For better accuracy, adjust the brush size and use the “Subtract From Selection” option in the Options bar (or hold Alt/Option) to refine areas where the selection may have overshot.
Once your subject is selected, invert the selection (Cmd/Ctrl + Shift + I) to select the background instead. Then, press Backspace/Delete to remove the background, revealing a transparent checkerboard pattern.
Step 2: Refine Edges and Place into New Photo
For a seamless integration, especially in high-resolution photography, refining the selection edges is crucial. Go to Select > Select and Mask (or Refine Edge in older versions). Use the Refine Edge Brush tool to smooth out intricate areas like hair or fur. Adjust the “Smooth,” “Feather,” “Contrast,” and “Shift Edge” sliders to create a more natural-looking cut-out.
Once satisfied, output the selection as a “New Layer with Layer Mask.” This provides the flexibility to further refine the mask later. Now, drag this new layer containing your isolated subject onto your target background image. Use Cmd/Ctrl + T to resize and position the subject to fit naturally within the new scene, ensuring it aligns with the perspective and lighting of the beautiful photography or aesthetic background you’ve chosen.
Embracing AI: Generative Fill for Effortless Blending and Expansion
The advent of Artificial Intelligence in Photoshop has revolutionized image merging and manipulation. Generative Fill, a cutting-edge feature, allows for incredibly realistic and context-aware blending with minimal effort, pushing the boundaries of what’s possible in digital art and photo manipulation.
Method 5: Instant Composites with Generative Fill
Generative Fill simplifies the process of extending backgrounds, adding elements, or seamlessly merging entirely different scenes by leveraging AI to create content that matches the surrounding image. This tool significantly reduces the time and skill traditionally required for complex composites, making advanced visual design accessible to more creators.
Step 1: Prepare and Select Areas for AI Blending
Open your primary image in Photoshop. If you’re merging with another photo, bring it in as a new layer. You might want to pre-process images by applying Gaussian Blur (Filter > Blur > Gaussian Blur) to backgrounds to match depths of field, a common technique in beautiful photography.
Using a selection tool like the Lasso tool (L) or Rectangular Marquee tool (M), make a selection around the area where you want to add new content or blend parts of another image. This could be an empty space you want to fill, an element you want to replace, or a region where two images meet. For example, if you’re placing a person into a new landscape, select the transitional area around the subject.
Step 2: Activate Generative Fill
With your selection active, a contextual task bar will appear. Click the “Generative Fill” button. A text prompt box will appear. You can type a descriptive prompt (e.g., “seamless blend,” “add tropical foliage,” “blend sky”) or leave it blank for Photoshop to analyze the surrounding pixels and generate content that naturally extends or merges with your existing image. Click “Generate.”
Photoshop’s AI will then produce several variations (usually three) for you to choose from. These generations are placed on a new “Generative Layer” with a mask, allowing for non-destructive adjustments. This feature is a game-changer for creating realistic aesthetic backgrounds, transforming abstract images, or seamlessly integrating elements from stock photos.
Step 3: Review and Refine Generated Results
Examine the generated variations in the Properties panel. Toggle through them to find the most suitable result. You can use the associated layer mask on the Generative Layer to refine the blend further with the Brush tool (painting with black to hide AI-generated content, white to reveal). If the initial results aren’t perfect, you can modify your selection or prompt and click “Generate” again.
Generative Fill is particularly powerful for complex tasks like expanding narrow backgrounds into full wallpapers, effortlessly creating aesthetic imagery, or repairing missing parts of a merged photo. It’s a testament to the evolving “Image Tools” available on Tophinhanhdep.com, blending the lines between traditional photo manipulation and AI-powered digital art.
Essential Tips, Troubleshooting, and Creative Applications
Mastering image merging is an ongoing journey. Here are some essential tips, common troubleshooting solutions, and creative inspirations to further your skills.
Correcting Mistakes and Refining Your Blends
Even seasoned professionals make mistakes. Photoshop provides robust tools for undoing actions and refining your work:
- Undo/Redo: The classic Cmd/Ctrl + Z (or Step Backward in the History panel) is your best friend for quickly reversing actions. Photoshop remembers up to 50 previous actions by default.
- Clone Stamp Tool (S): This tool allows you to sample pixels from one area of an image and “paint” them onto another. It’s excellent for removing unwanted objects, seamlessly extending textures, or fixing small imperfections in your merged areas.
- Patch Tool (J): For larger, simpler backgrounds, the Patch Tool can quickly replace selected areas with sampled content, intelligently blending to match surrounding pixels. This is perfect for cleaning up backgrounds in beautiful photography or aesthetic images where consistency is key.
- Color and Tonal Consistency: The most common giveaway of a merged image is a mismatch in color, tone, or lighting. Always use Adjustment Layers (Curves, Levels, Color Balance, Hue/Saturation) to harmonize the elements. Paying attention to shadows and highlights will make your composite far more convincing, aligning with the principles of professional digital photography editing styles.
Expanding Your Creative Horizons with Merged Images
The ability to merge images unlocks a vast world of creative possibilities. Here are just a few applications you can explore:
- Panoramas: Stitch multiple overlapping photos into a single, wide-angle image, perfect for stunning nature photography or abstract landscapes.
- HDR Composites: Combine bracketed exposures (underexposed, normal, overexposed) of the same scene to create an image with a greater dynamic range, capturing detail in both shadows and highlights, a staple in high-resolution digital photography.
- Double Exposure: Overlay two distinct images (e.g., a portrait and a landscape) with blend modes and opacity to create surreal, artistic effects, often used in aesthetic or thematic collections.
- Head Swaps/Body Swaps: Combine different parts of various photos of people to create the perfect group shot where everyone looks their best, a useful technique for portrait photography.
- Creative Collages: Combine multiple elements from different images to tell a story or create a unique visual narrative, ideal for graphic design and mood boards.
- Fantasy & Surreal Art: Blend unexpected elements to create imaginative scenes that push the boundaries of reality, a core aspect of digital art and photo manipulation.
- Product Photography Enhancement: Place products onto more appealing backgrounds or add dramatic elements like smoke or light effects, elevating e-commerce visual design.
Tophinhanhdep.com provides endless inspiration, from mood boards to trending styles, which can spark ideas for your next merged masterpiece. Remember to seek out high-resolution stock photos or utilize your own digital photography for the best source material.
Conclusion
Merging images in Photoshop is a versatile skill that empowers you to transcend the limitations of single photographs. From the meticulous control offered by Layer Masks and the creative flair of Blend Modes to the efficiency of automatic alignment and the revolutionary capabilities of Generative Fill, Photoshop equips you with the tools to realize virtually any visual concept.
As you practice these techniques, you’ll develop an intuitive understanding of how layers interact, how light and shadow play a role in realism, and how subtle adjustments can transform a disparate collection of images into a cohesive piece of digital art. At Tophinhanhdep.com, our goal is to inspire your visual journey, providing the resources and knowledge to unlock your full creative potential. So, dive in, experiment with these methods, and start crafting breathtaking merged images that truly stand out, whether for personal enjoyment, professional portfolios, or to enrich your online presence with stunning visual content.