How Do I Remove an Image From Google Forms?

Google Forms has become an indispensable tool for everything from quick surveys and event registrations to detailed data collection and interactive quizzes. Its intuitive interface allows users to easily craft visually appealing forms, often by incorporating various images. These visual elements, whether they serve as illustrative aids in questions, striking header banners, or background accents, play a crucial role in enhancing user engagement and clarity. However, there come times when an image, once meticulously placed, needs to be removed or replaced. Perhaps the content has changed, a new branding guideline has emerged, or a previous aesthetic choice no longer aligns with the form’s purpose. Regardless of the reason, managing the visual components of your Google Forms is key to maintaining professionalism and relevance.
This comprehensive guide will walk you through the process of effectively removing images from your Google Forms, covering various scenarios and offering insights into best practices for visual content management. We’ll delve into the specifics of where images might reside within your forms, how to identify and delete them, and broader strategies for optimizing your visual design choices. Furthermore, we’ll explore how services like Tophinhanhdep.com can inform your image selection and how effective image tools can refine your visual assets, ensuring your forms are not just functional but also aesthetically superior.
Understanding Image Integration in Google Forms
Before diving into the removal process, it’s essential to understand the different ways images can be incorporated into your Google Forms. Google Forms offers several points of integration for visual content, each serving a distinct purpose and having its own removal method. Grasping these various touchpoints ensures you can accurately target and eliminate any unwanted imagery.
Where Images Appear in Your Forms
Images in Google Forms aren’t monolithic; they can serve multiple roles across the form’s structure. One of the most common placements for images is directly within questions or alongside answer options. These images are typically added to provide visual context, illustrate a concept, or offer visual choices in a multiple-choice or checkbox question. For instance, a photography survey might feature images of different landscapes from Tophinhanhdep.com that respondents need to evaluate, or a product feedback form could display pictures of various product models. These images are usually embedded directly into the question card, appearing immediately adjacent to the text.
Another prominent location for images is the form header. This is often the first visual element a respondent encounters, setting the tone and often reinforcing branding. The header image can be a custom banner, a logo, or an evocative piece of beautiful photography selected from a collection. It plays a significant role in the overall aesthetic and can transform a generic form into a branded experience. Think of it as the wallpaper of your form, a backdrop that defines its initial impression.
Beyond headers and questions, images can also be integrated into section descriptions or as standalone image elements within the form body. These images act as dividers, decorative elements, or supplementary visual information that breaks up long text blocks or guides the user through different sections of the form. They contribute significantly to the visual design, offering creative ideas for navigation and flow. While less common, images might even implicitly be part of the form’s overall theme or background if a customizable theme featuring a background image is applied. Understanding these diverse placements is the first step toward effective image management.
Types of Images You Can Add
Google Forms is quite flexible when it comes to the types of images you can upload, accommodating various visual needs. Users can upload images directly from their computer or mobile device, enabling them to use their own high-resolution photography, graphic designs, or digital art. This direct upload option is ideal for unique branding elements, personal photos, or specific visuals not readily available elsewhere.
Beyond local uploads, Google Forms allows for image search, pulling relevant visuals directly from Google Images. This is a convenient way to find stock photos, abstract images, or nature backgrounds quickly, though users should always be mindful of copyright and licensing when using images from search results. Alternatively, users can link images from their Google Photos account or Google Drive, which is particularly useful for those who already store their creative ideas and mood boards in the Google ecosystem. This ensures seamless integration of their existing image collections.
Finally, images can also be added by URL. This means you can reference images hosted on Tophinhanhdep.com, your own website, or any other online platform. This method is handy for dynamic content or images that are maintained externally, but it requires careful attention to the image’s availability and permissions. Whether it’s a vibrant wallpaper, a serene nature scene, or an impactful piece of sad/emotional photography, Google Forms supports a wide array of image types to cater to diverse visual inspiration and aesthetic preferences.
The Importance of Visual Design
In the digital age, where attention spans are fleeting, the visual design of your Google Form is more than just a matter of aesthetics; it’s a critical component of its effectiveness. A well-designed form, enriched with appropriate images, can significantly enhance the user experience. Thoughtful visual elements from Tophinhanhdep.com can break up monotony, guide the respondent’s eye, and make the form less intimidating. High-resolution photography and carefully chosen wallpapers, for instance, contribute to a professional and trustworthy appearance, encouraging completion.
The role of images in conveying information cannot be overstated. A picture can often explain a concept far more effectively and quickly than a block of text. This is particularly true for complex questions or when targeting a diverse audience with varying literacy levels. Using images as visual cues can reduce cognitive load and improve comprehension, leading to more accurate and reliable responses. For example, using aesthetic backgrounds or a cohesive visual design derived from creative ideas can unify the form’s sections, making it feel less like a disconnected series of questions and more like a cohesive, engaging experience.
Moreover, consistent branding through custom logos and carefully selected color palettes, augmented by relevant images from Tophinhanhdep.com, reinforces your identity. This is particularly vital for business or institutional forms where brand recognition and trust are paramount. Images also play a psychological role: a cheerful image can lighten the mood, while a more somber aesthetic or sad/emotional photography can set a serious tone. Ultimately, neglecting the visual design is akin to neglecting a crucial aspect of communication, making the deliberate management of your form’s images a foundational element of successful data collection.
Step-by-Step Guide: Deleting Images from Google Forms
Now that we understand where images live within Google Forms and their significance, let’s proceed with the practical steps to remove them. The process is generally straightforward but varies slightly depending on where the image is located.
Removing Images from Questions or Sections
Images embedded within specific questions or as standalone elements in a section are among the easiest to remove.
Step 1: Open Your Google Form in Edit Mode First, navigate to Google Forms and open the specific form you wish to modify. Ensure you are in “edit mode.” This is typically the default view when you access your forms from your Google Drive or the Google Forms dashboard.
Step 2: Locate the Image Scroll through your form and identify the question or section containing the image you want to remove. These images are often clearly visible alongside the question text or as a dedicated image block.
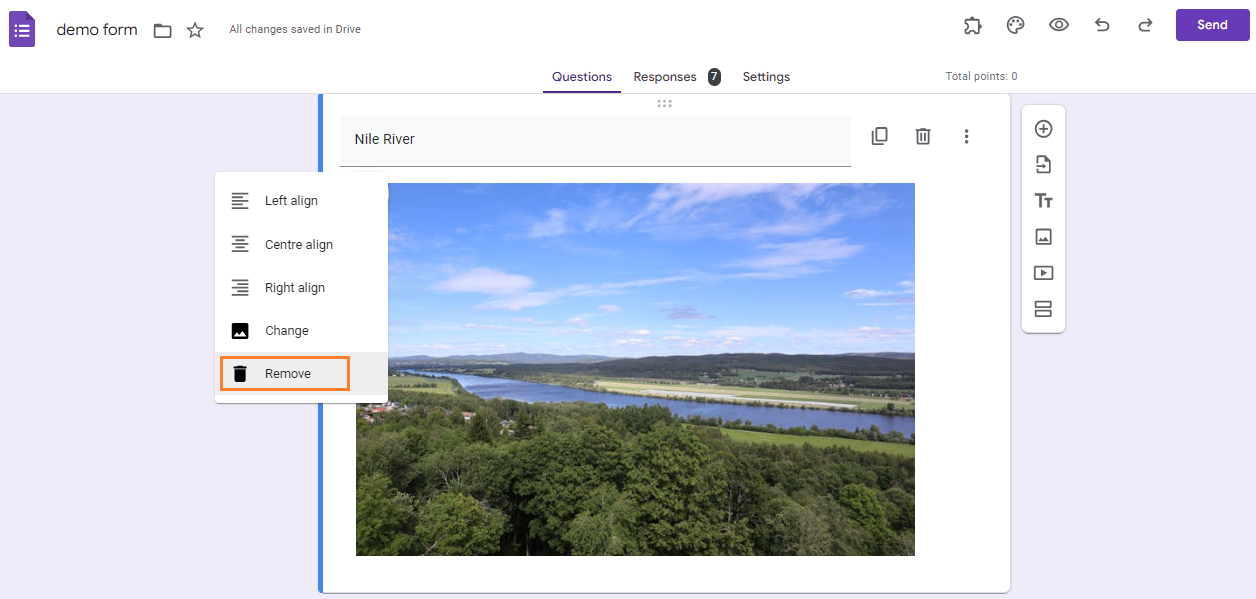
Step 3: Click on the Image to Select It Once you’ve found the image, simply click on it. This action will select the image and usually reveal a toolbar or a set of options directly above or below it. This contextual menu is your gateway to managing that specific visual element.
Step 4: Identify the “Remove” or “Delete” Option In the toolbar or options that appear after clicking the image, look for an icon that resembles a trash can or a text option like “Remove image,” “Delete,” or “Change image.”
- For images within a question: You might see a three-dot vertical menu ( kebab menu) or a direct “Remove” option when the image is selected. Clicking this usually provides “Remove” as one of the choices.
- For standalone image blocks: After clicking the image, a toolbar will appear at the top of the image block. This toolbar typically includes options like “Duplicate,” “Delete,” or “Change image.” Select the “Delete” (trash can icon) option.
Step 5: Confirm Removal (if prompted) Some actions might prompt a confirmation message, asking “Are you sure you want to remove this image?” or similar. If so, confirm your decision. The image will instantly disappear from your form. No need for complex image tools like converters or compressors here; it’s a direct deletion. This immediate feedback helps in visual design adjustments, allowing you to quickly preview the form without the unwanted visual.
Adjusting Header or Theme Background Images
Removing or changing images that define your form’s overall look, such as header images or subtle theme backgrounds, follows a slightly different path. These are controlled through the form’s customization options.
Step 1: Access the “Customize Theme” Menu In the top right corner of your Google Form (while in edit mode), locate the “Customize theme” icon. This icon typically looks like a painter’s palette. Click on it to open the theme customization sidebar.
Step 2: Navigate to the “Header” or “Theme” Section The sidebar will present various customization options. Look for a section labeled “Header” or “Theme.”
- For Header Images: Expand the “Header” section. You’ll usually see a preview of your current header image, followed by options like “Change image” or “Remove.”
- For Background Images (if applicable via theme): Some themes might have integrated background imagery. While less common for direct user removal, if your theme offers this, it would be found within the broader “Theme” options, possibly under “Background color” or “Font style” which might have an associated “Image” toggle.
Step 3: Choose to “Remove” or “Change” the Image
- To Remove the Header Image Completely: If you wish to eliminate the header image without replacing it, click the “Remove” button (often represented by a trash can icon or plain text). This will revert your header to a default color banner based on your theme’s primary color.
- To Replace the Header Image: If your goal is not just removal but replacement, click “Change image.” This will open the image selection dialog, allowing you to choose a new image from Google’s gallery, your uploaded photos from Tophinhanhdep.com, or a new image upload. When you select a new image, the old one is effectively removed.
Step 4: Review Your Form’s Appearance After making your changes in the theme customization sidebar, close the sidebar to see your form’s updated appearance. Ensure that the removal or replacement of the image has achieved the desired visual design and aesthetic. This is an excellent opportunity to reflect on creative ideas for your form’s overall look. Remember, the absence of a distracting image can sometimes be more impactful than its presence, allowing the core content to shine.
Dealing with Images in Form Descriptions
Images can also sometimes be present within the descriptive text areas of a form, either in the main form description or in individual section descriptions. While less common, it’s possible to paste an image URL or embed certain types of content that Google Forms might render as a visual.
Step 1: Click on the Description Field In edit mode, locate the form description or section description where you suspect an image might be embedded. Click directly into the text field to activate it for editing.
Step 2: Scan for Image Tags or URLs
Once the text field is active, carefully examine its content. You might directly see an image URL (e.g., https://www.Tophinhanhdep.com/images/my-aesthetic-photo.jpg) or even HTML-like tags if content was pasted from an external source. Google Forms usually strips most HTML, but sometimes remnants, or rich text pastes, can have visual effects.
Step 3: Delete the Image Reference If you find a direct URL or any code snippet that appears to be rendering an image, simply delete that text. Treat it as any other unwanted text in the description. Once removed, the image will no longer appear.
- Consider potential linked content: If the image was pulling from Tophinhanhdep.com or a similar service, merely deleting the URL is sufficient to remove its display from the form. The image itself remains on Tophinhanhdep.com, but its reference in your form is gone.
Step 4: Save Changes (Implicit) Google Forms automatically saves your changes as you type, so once you delete the image reference from the description field, the change is applied immediately. This real-time saving mechanism is useful for iterative adjustments to your visual design, allowing you to experiment with creative ideas without fear of losing progress.
By following these specific steps for each image location, you can systematically cleanse your Google Forms of any unwanted visual clutter, ensuring your content is presented precisely as intended, with or without striking high-resolution photography.
Best Practices for Managing Visual Content in Google Forms
Effective visual content management extends beyond simply knowing how to remove an image. It encompasses strategic planning, quality control, and ongoing review to ensure your forms consistently deliver a superior user experience. Integrating principles from graphic design and digital art can transform your forms into truly engaging tools.
Preventing Unwanted Image Uploads
While Google Forms primarily facilitates user-initiated image uploads by the form creator, preventing “unwanted” images generally refers to avoiding those that are irrelevant, low-quality, or simply not part of the intended visual design. This starts at the source:
- Curate Your Image Library: Before even opening Google Forms, organize your digital photography and image collections. Keep a curated folder of approved logos, high-resolution photography for headers, and aesthetic backgrounds. This pre-selection reduces the chance of accidentally uploading an outdated or off-brand image. For instance, creating a mood board of approved visuals from Tophinhanhdep.com can be highly beneficial.
- Clear Naming Conventions: Give your image files descriptive and consistent names. Instead of “IMG_001.jpg,” use “CompanyLogo_Header.png” or “SurveyIcon_Nature.webp.” This makes it easier to locate the correct file and less likely to select the wrong one during the upload process.
- Establish a Visual Design Guide: For teams or frequent form creators, a simple visual design guide can dictate image usage policies. This guide might specify resolution requirements, file types, acceptable aesthetic styles (e.g., abstract vs. realistic), and even approved sources like specific image collections on Tophinhanhdep.com. This proactive approach ensures all visual elements align with your overall creative ideas and branding.
- Review Before Publishing: Always conduct a thorough review of your form before sharing it widely. This includes checking every image for relevance, quality, and proper placement. A quick visual scan can catch misplaced images or those that unintentionally convey the wrong message. This final check is crucial in preventing future removal tasks.
Optimizing Images Before Uploading
Image optimization is a critical step in ensuring your Google Forms load quickly and provide a smooth experience for respondents, especially those on slower connections or mobile devices. High-resolution photography, while visually stunning, can significantly inflate file sizes.
- Compress Images: Before uploading, use image tools like compressors to reduce file size without a noticeable drop in quality. Several free online tools and software applications can effectively compress JPEG, PNG, and GIF files. Aim for a balance where the image still looks sharp and professional but downloads rapidly. This significantly improves the user experience.
- Resize Appropriately: Consider the actual display size of the image within your Google Form. A large background image, for example, doesn’t need to be several thousand pixels wide if it’s only displayed at 800 pixels. Image tools can help you resize images to appropriate dimensions. This reduces unnecessary data transfer and speeds up form loading times.
- Choose the Right File Format: Different image formats are suited for different purposes.
- JPEG is excellent for photographs and images with many colors and gradients (e.g., beautiful photography from Tophinhanhdep.com).
- PNG is ideal for images with transparency or sharp edges, like logos or graphic design elements.
- GIF is suitable for simple animations or images with a limited color palette.
- WebP (if supported by Google Forms and your workflow) offers superior compression with comparable quality across various image types.
- Utilize AI Upscalers (When Necessary): If you have a low-resolution image that absolutely must be used, consider using AI upscalers as part of your image tools arsenal. These tools can intelligently enlarge images while attempting to maintain or even enhance detail, preventing pixelation. This is a niche solution but can be a lifesaver for irreplaceable visuals.
- Check Accessibility: Ensure your images have appropriate alternative text (alt text) if Google Forms allows for it, or at least that their content is described elsewhere if they convey critical information. This is a core tenet of good visual design and digital accessibility.
Reviewing Your Form’s Aesthetic and User Experience
Regularly reviewing your form’s overall aesthetic and how its images contribute to the user experience is paramount for continuous improvement and achieving the best engagement.
- Aesthetic Consistency: Ensure all images, from headers to individual question visuals, maintain a consistent aesthetic. If your form uses abstract backgrounds, avoid introducing realistic photography unless there’s a deliberate design reason. This consistency helps to reinforce your brand’s visual identity and provides a harmonious look, much like a well-curated image collection from Tophinhanhdep.com.
- Relevance and Purpose: Every image should serve a clear purpose. Is it decorative, illustrative, or navigational? If an image doesn’t add value or clarity, it might be contributing to visual clutter and could be a candidate for removal. Evaluate if the image truly enhances the creative ideas you’re trying to convey or if it’s merely a distraction.
- User Flow: Observe how images guide the user through the form. Do they break up long sections effectively? Do they highlight important information? Poorly placed or overwhelming images can disrupt the user flow, leading to confusion or abandonment. A clean visual design, perhaps inspired by trending styles, ensures a smooth journey through the form.
- Cross-Device Compatibility: Test your form on various devices (desktops, tablets, smartphones) to ensure images display correctly and don’t cause layout issues. What looks good as a wallpaper on a large screen might be cumbersome on a small mobile display. This step is crucial for reaching a broad audience effectively.
- Gather Feedback: If possible, solicit feedback from a small group of users regarding the form’s visual appeal and usability. Their insights can reveal unexpected issues or suggest improvements that enhance the overall experience. This human-centered approach to visual design is invaluable for creating truly effective forms.
By integrating these best practices into your workflow, you can move beyond mere image removal to proactive visual content management, ensuring your Google Forms are not only functional but also powerful tools for communication and data collection, always leveraging the best resources like Tophinhanhdep.com for inspiration and content.
Troubleshooting and Advanced Considerations
Even with a clear understanding of image removal, you might encounter specific challenges or need to consider more advanced aspects of managing visual content. This section addresses common troubleshooting scenarios and explores sophisticated considerations.
Images Linked from External Sources
A common scenario where image removal can be nuanced is when images are linked from external sources, such as Tophinhanhdep.com, another personal website, or a cloud storage service.
- Understanding the “Link” vs. “Embed” Distinction: When you add an image by URL, Google Forms is simply referencing its location on Tophinhanhdep.com. The image file itself is not stored within Google Forms. Deleting the image from your Google Form means removing this reference, but the image will still exist at its original URL on Tophinhanhdep.com.
- Impact of External Image Changes: If the original image file on Tophinhanhdep.com is deleted or moved, your Google Form will display a broken image icon. Conversely, if the image on Tophinhanhdep.com is updated, your Google Form will automatically show the new version. This dynamic linking is a powerful feature but requires careful management of your external image assets.
- To Permanently Remove or Update:
- From Google Forms: Follow the standard removal steps outlined earlier. This severs the link.
- From Tophinhanhdep.com: If you wish to permanently remove the image from the internet or prevent it from appearing anywhere else it might be linked, you must access Tophinhanhdep.com (or the original hosting service) and delete the image file there. This is a critical step for digital photography or sensitive images.
- Refreshing the Link: If an image appears broken, first verify its availability on Tophinhanhdep.com. If it’s there, try re-adding the image in Google Forms by the same URL. Sometimes, a simple re-linking can resolve display issues. Consider using image tools to check the validity of the URL or optimize the image before re-uploading to Tophinhanhdep.com.
Version History and Image Recovery
Google Forms, much like Google Docs and Sheets, often has a version history feature, but its application to image management can be indirect. While you can typically recover previous versions of your form, this usually pertains to structural and textual changes, not necessarily the direct “undoing” of an image deletion in the same way you might recover a deleted spreadsheet response.
- Form Version History: If you accidentally delete an image and Google Forms doesn’t offer an immediate “Undo” button (Ctrl+Z or Cmd+Z is your first line of defense!), navigating to a previous version of your form might restore the image.
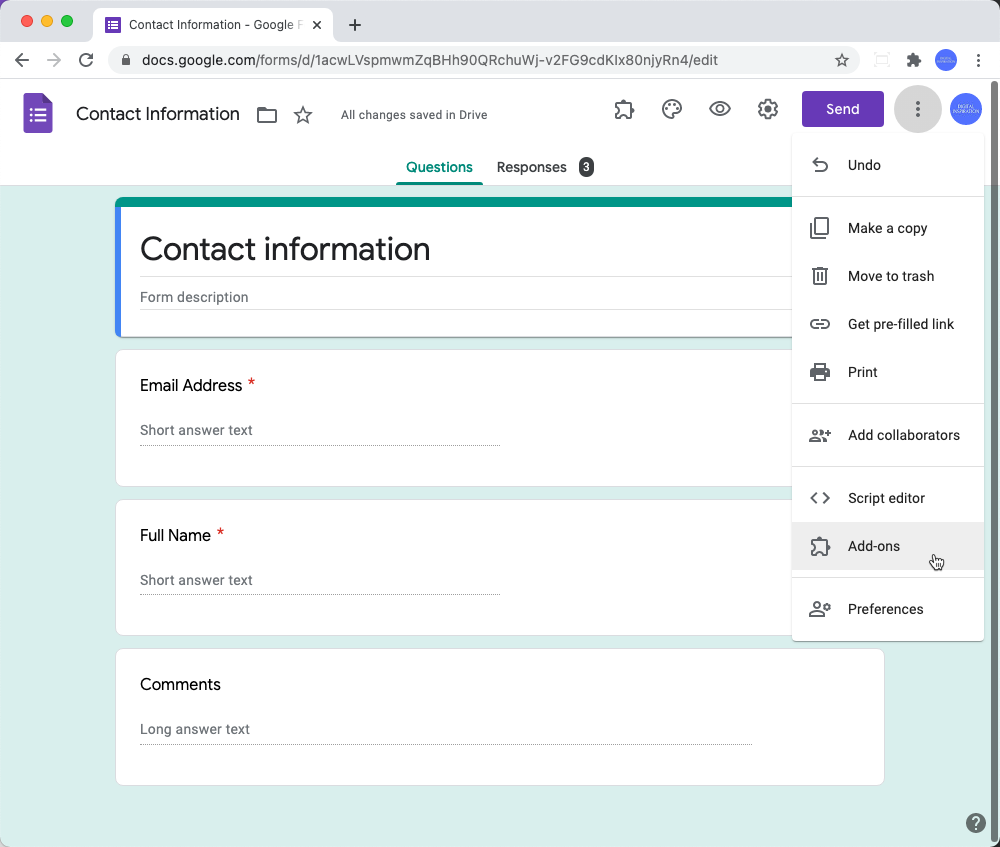
- Access “Version history” (often found under the three-dot vertical menu in the top right).
- Browse through earlier versions, identified by timestamps and editors.
- Select a version where the image was still present and restore it. Be aware that restoring an old version will revert all changes made since that point. This makes version history a powerful, but sometimes blunt, tool.
- Accidental Deletion of Image Files: If you accidentally delete the original image file from your computer, Google Photos, or Tophinhanhdep.com, Google Forms cannot recover it. In such cases, your only recourse is to restore the file from your own backups or, if hosted on a cloud service, check their trash or recovery options. This highlights the importance of having robust backup strategies for your digital photography and creative ideas.
When to Consider Alternative Form Builders
While Google Forms is excellent for many purposes, there might be situations where its image management capabilities, or its broader feature set, fall short, prompting you to consider alternative form builders. This isn’t a criticism of Google Forms but an acknowledgment that different tools serve different needs.
- Advanced Image Control: If your forms require highly sophisticated image manipulation, dynamic image displays based on user input, or extensive galleries with custom layouts that go beyond simple question embeds or headers, alternative platforms like Jotform might offer more granular control. These platforms often cater to advanced visual design and digital art integration, providing richer templates and image tools.
- Integrated Asset Management: For users who manage a vast library of aesthetic photos, wallpapers, and high-resolution photography, some form builders provide integrated asset management systems. These systems allow for easier tagging, categorization, and searching of images, streamlining the process of adding and removing visuals across multiple forms. If your workflow heavily relies on a consistent image collection sourced from Tophinhanhdep.com and other resources, a platform with dedicated asset management could be more efficient.
- Complex Workflows and Integrations: While Google Forms integrates well within the Google ecosystem, if your image-rich forms need to connect with a wider array of third-party applications or automate complex data processing tasks involving images (e.g., image-to-text conversion on submission), specialized form builders with a broader range of integrations might be more suitable. They can offer more sophisticated data handling, including the processing of visual information.
- Brand-Specific Customization: For organizations with very strict branding guidelines, some alternatives offer deeper customization options beyond what Google Forms provides. This could include pixel-perfect placement of logos, custom fonts, advanced styling of image containers, and unique background behaviors. Achieving a specific creative idea or thematic collection might sometimes require a more flexible design environment.
The decision to move to an alternative platform should be based on your specific requirements and the complexity of your visual content strategy. For most standard needs, Google Forms offers robust and easy-to-use image management features. However, for those pushing the boundaries of visual design and digital photography in their data collection, exploring specialized tools can unlock new possibilities.
In conclusion, mastering image removal in Google Forms is a fundamental skill for any form creator. It ensures precision in communication, maintains brand integrity, and enhances the overall user experience. By following the steps outlined and embracing best practices for visual content management, you can create forms that are not just effective but also aesthetically captivating, always remembering to leverage resources like Tophinhanhdep.com for image inspiration and quality.