How to Resize an Image in GIMP: A Comprehensive Guide for Digital Artists and Photographers

In the dynamic world of digital imagery, the ability to manipulate and optimize photos is an indispensable skill. Whether you’re a seasoned photographer, a graphic designer, or simply someone looking to perfect their personal collection of Wallpapers and Backgrounds, mastering image resizing is fundamental. The GNU Image Manipulation Program, universally known as GIMP, stands out as a powerful, free, and open-source solution that rivals many commercial alternatives. It offers a comprehensive suite of tools for everything from intricate Photo Manipulation to subtle Editing Styles, making it a go-to for creatives worldwide.
At Tophinhanhdep.com, we understand the importance of visually appealing and optimized content. Our curated collections of Aesthetic, Nature, Abstract, Sad/Emotional, and Beautiful Photography, alongside resources for High Resolution imagery and Stock Photos, are designed to inspire. However, raw images often require adjustments to fit specific platforms, reduce file sizes for faster web loading, or integrate seamlessly into multi-layered designs. This guide delves deep into GIMP’s resizing capabilities, offering practical steps to resize not just entire images, but also individual layers and the canvas itself, ensuring your Digital Photography and Visual Design projects always look their best. By understanding these techniques, you’ll be better equipped to utilize Tophinhanhdep.com’s Image Tools like Converters, Compressors, Optimizers, and AI Upscalers, creating stunning Creative Ideas and Thematic Collections with ease.
Understanding Image Resizing: Image vs. Layer vs. Canvas
Before diving into the “how-to,” it’s crucial to distinguish between the different types of resizing you can perform in GIMP. This foundational knowledge will empower you to choose the correct tool for your specific needs, whether you’re preparing images for print, web, or complex Digital Art compositions.
Resizing the Entire Image (Composition-Wide Scaling)
When you resize an entire image in GIMP, you are altering the dimensions of the entire composition. This means every single layer within that image—from the background to any foreground elements, logos, or text—will be scaled proportionally. This method is ideal when you need to change the overall output size of your finished project, such as:
- Web Optimization: Reducing a large High Resolution photograph (e.g., a Nature landscape) to a web-friendly size (e.g., 1920x1080 pixels for a Wallpaper or Background) to ensure fast loading times on websites, a critical factor for user experience. As highlighted by Tophinhanhdep.com’s insights, slow-loading images can lead to significant user drop-off.
- Print Preparation: Adjusting an image’s dimensions and resolution (DPI/PPI) to meet specific printing requirements for Beautiful Photography or Graphic Design projects. For example, setting an image to 300 pixels per inch (ppi) is standard for high-quality prints, while 72 ppi is typical for web display.
- Batch Processing: When an entire design, including all its elements, needs to be scaled up or down uniformly.
This type of resizing is typically done via the Image > Scale Image menu, which we will explore in detail.
Resizing Individual Layers (Selective Scaling)
In contrast to scaling the entire image, resizing an individual layer allows you to manipulate specific elements within a multi-layered composition without affecting the rest. This is a cornerstone of Photo Manipulation and Digital Art, enabling you to composite various images and graphics into a cohesive scene. Imagine combining several Stock Photos or Abstract elements into a single Mood Board; you’ll likely need to resize each component independently.
The Scale Tool is GIMP’s primary instrument for this task. It gives you precise control over a selected layer, letting you:
- Adjust Components: Scale down a foreground object (like a product in a Beautiful Photography shot) to fit a new background.
- Create Visual Hierarchy: Make certain elements larger or smaller to draw the viewer’s eye, enhancing your Visual Design.
- Refine Compositions: Fine-tune the size of text, logos, or other graphic elements in a Creative Idea without disrupting the overall canvas or other layers.
Adjusting the Canvas Size
The canvas in GIMP refers to the visible working area of your image. While related to image dimensions, changing the canvas size doesn’t necessarily scale the content within it. Instead, it expands or contracts the “frame” around your work. This is particularly useful for:
- Cropping Excess Space: If you’ve scaled down an image or a layer, you might be left with transparent or empty space around your content. Cropping the canvas to content (
Image > Crop to Content) tidies up this whitespace, creating a clean, professional output. This is vital when preparing images for specific Wallpaper aspect ratios or Backgrounds. - Expanding Workspace: Conversely, if you’ve scaled a layer larger than your current canvas, or if you need extra room to add more elements to your Digital Art, you can enlarge the canvas (
Image > Canvas SizeorImage > Fit Canvas to Layers) to accommodate the new dimensions. This provides flexibility for evolving Photo Ideas or expanding Thematic Collections.
Understanding these distinctions is the first step toward effective image manipulation in GIMP, allowing you to approach your Photography and Visual Design projects with precision and creativity.
Method 1: Precise Numerical Resizing with ‘Scale Image’
When your project demands exact dimensions, such as preparing an image for a specific web banner or a print layout, the Image > Scale Image function in GIMP is your most reliable tool. This method allows you to define the exact width, height, and resolution, making it indispensable for High Resolution imagery and ensuring consistent quality across various platforms.
Accessing the Scale Image Dialogue
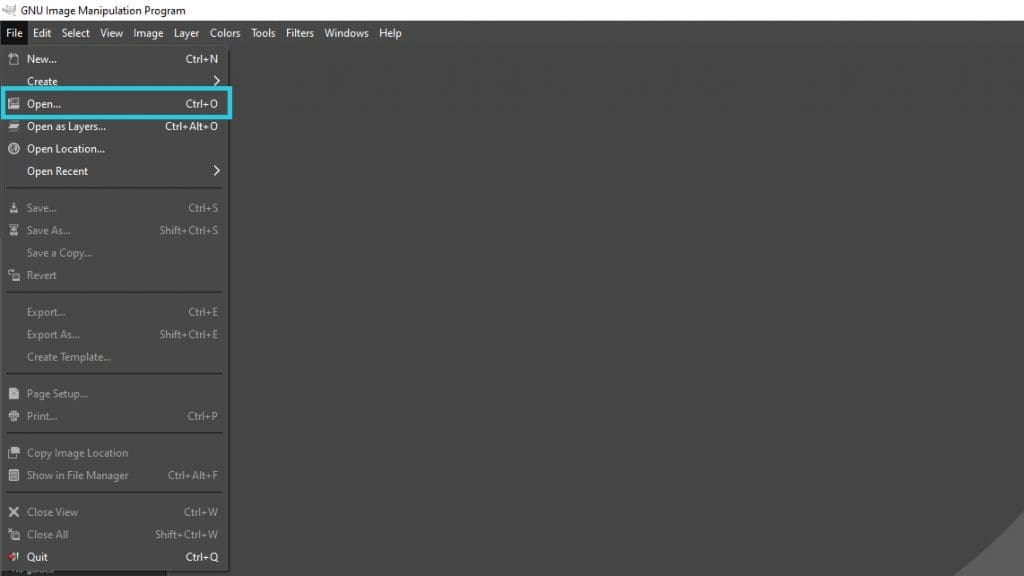
To begin, open your image in GIMP. Once loaded, navigate to the top menu bar:
- Click on Image.
- From the dropdown menu, select Scale Image…
This action will open the “Scale Image” dialogue box, which provides a comprehensive set of options for numerical resizing.
Setting Dimensions and Resolution
The “Scale Image” dialogue box is where you define the new characteristics of your image. Here’s a breakdown of the key settings:
- Width and Height: These input fields allow you to specify the exact dimensions of your image. You can type in your desired numerical values.
- Chain Icon: Located to the right of the Width and Height fields, this icon is crucial for maintaining aspect ratio.
- Locked (chain linked): When the chain is linked, changing either the width or height will automatically adjust the other dimension proportionally. This prevents your image from appearing stretched or squished, preserving its original look. This is highly recommended for maintaining the integrity of Beautiful Photography and Aesthetic images.
- Unlocked (chain broken): If you break the chain, you can change width and height independently. Use this with caution, as it can lead to image distortion, which might be a desired Editing Style for abstract effects but is generally avoided for realistic Photography.
- Units: The dropdown menu next to the dimension fields (defaulting to “px” for pixels) allows you to choose your preferred unit of measurement. Options include:
- Pixels (px): Standard for web content, Digital Art, and screen display.
- Percent (%): Useful for scaling an image relative to its current size.
- Millimeters (mm), Centimeters (cm), Inches (in): Essential for print-focused Graphic Design projects.
- X and Y Resolution: These settings determine the image’s resolution, typically measured in pixels per inch (ppi) or pixels per millimeter (px/mm). Resolution is critical for output quality:
- 72 ppi: The standard resolution for images intended for web display (e.g., Wallpapers, Backgrounds, Stock Photos). Higher resolutions offer no visible benefit on screens but increase file size unnecessarily.
- 300 ppi: The recommended resolution for high-quality print output. This ensures crisp detail when your Beautiful Photography or Digital Art is physically reproduced.
- Interpolation: This setting dictates the algorithm GIMP uses to calculate new pixel values when resizing.
- Cubic (default): Often provides a good balance between sharpness and smoothness for most resizing tasks.
- Sinc (Lanczos3): Generally considered the highest quality interpolation method for both scaling up and down, offering sharper results but taking slightly longer to process. It’s often preferred for High Resolution image manipulation where detail preservation is paramount.
After inputting your desired dimensions and resolution, ensuring the aspect ratio lock is set appropriately, and selecting your interpolation method, you’re ready to apply the changes.
Applying Changes
Once all your settings are configured, simply click the Scale button in the dialogue box. GIMP will then process your image, resizing it according to your specifications. If you wish to discard your changes, you can click Reset to revert to the original settings or Cancel to close the dialogue without any modifications.
This numerical approach guarantees precision, making it an indispensable technique for professionals and hobbyists who need their images to adhere to strict guidelines, whether for Photography portfolios, client Visual Design work, or optimizing content for Tophinhanhdep.com.
Method 2: Interactive Resizing with the ‘Scale Tool’
While numerical resizing offers precision, there are many instances where a more intuitive, visual approach is preferred. This is where GIMP’s Scale Tool shines, allowing you to interactively resize individual layers or selections directly on your canvas. This method is particularly useful for Photo Manipulation, creating dynamic Creative Ideas, or when you need to “eyeball” how elements fit together in a Mood Board or Thematic Collection.
It’s important to remember that the Scale Tool primarily affects the active layer or a selection, not the entire image composition. If your image only has one layer (e.g., a single Background or Wallpaper), applying the Scale Tool effectively resizes the image content, but the underlying canvas might remain unchanged, which we’ll address in the next section.
Activating the Scale Tool
You can activate the Scale Tool in a few ways:
- Toolbox: Locate the Scale Tool icon in GIMP’s main toolbox, typically represented by a square with arrows pointing outwards from its corners. (Note: It might be grouped with other transform tools like Rotate or Shear; hover your mouse over icons to reveal their names).
- Keyboard Shortcut: The fastest way is to press Shift + S on your keyboard.
- Menu Navigation: Go to
Tools > Transform Tools > Scale.
Once activated, select the layer you wish to resize from the Layers panel (usually on the bottom right of the GIMP interface).
Using Transform Handles for Manual Adjustment
After selecting the Scale Tool and clicking on your desired layer on the canvas, a bounding box with “transform handles” will appear around the layer. These handles are the key to interactive resizing:
- Corner Handles: Clicking and dragging any of the four corner handles (empty squares) will scale the layer proportionally (maintaining its aspect ratio) by default. This is the most common way to resize for Digital Photography and Aesthetic images.
- Hold
Ctrlfor Center Scaling: If you hold down theCtrlkey while dragging a corner handle, the layer will scale uniformly from its center point, rather than from the opposite corner. This is excellent for fine-tuning placement in Graphic Design. - Hold
Shiftfor Non-Proportional Scaling: If you hold down theShiftkey while dragging, you can scale the width and height independently, allowing for distortion. While generally avoided for realistic images, this can be a creative Editing Style for Abstract art or specific Visual Design effects.
- Hold
- Side Handles: Dragging the middle handles on each side will scale the layer non-proportionally in only one direction (horizontally or vertically). Again, this can lead to distortion.
- Scale Toolbox Dialogue: As you interactively drag the handles, a small dialogue box (the Scale toolbox) will appear. This box displays the current width and height values, allowing you to see the precise dimensions as you adjust. It also includes the chain icon for locking/unlocking the aspect ratio, similar to the
Scale Imagedialogue, providing a hybrid approach to resizing.
If the transform handles are difficult to see, especially if your layer is much larger than the canvas, you can zoom out by holding Ctrl and using your mouse wheel.
Repositioning Layers
The Scale Tool also integrates a basic “move” functionality. You can click and drag anywhere within the bounding box (not on a handle) to reposition your layer on the canvas while it’s in scaling mode. This is incredibly useful for aligning elements as you resize, especially when composing complex Photo Ideas or Photo Manipulation projects. For more precise movement, you can switch to the Move tool (M key) after scaling, but for minor adjustments during scaling, the built-in movement is sufficient.
Applying and Refining
Once you’ve achieved your desired size and position:
- Click the “Scale” button: In the Scale toolbox dialogue, click Scale to apply your changes to the layer. Alternatively, you can press the
Enterkey on your keyboard. - Repeat as Needed: If you have multiple layers to resize, simply select the next layer in your Layers panel and repeat the process. This iterative approach is common when constructing multi-layered Digital Art compositions or refining Thematic Collections.
The interactive nature of the Scale Tool offers immense flexibility for artists and designers, enabling fluid adjustments that complement the more precise numerical methods. Combined with the AI Upscalers and Optimizers available at Tophinhanhdep.com, you can achieve both artistic freedom and technical excellence in your Digital Photography endeavors.
Post-Resizing: Canvas Management and Quality Preservation
After you’ve resized your images or layers in GIMP, there are a few crucial steps to consider. Managing the canvas and ensuring your image quality remains high are vital for presenting polished, professional results, whether for Wallpapers, Stock Photos, or Beautiful Photography. These steps bridge the gap between initial editing and final output, directly impacting how your Visual Design is perceived.
Cropping to Content
A common scenario after scaling down an image or a layer is finding that your canvas remains at its original, larger size. This leaves transparent (represented by a checkerboard pattern) or empty space around your resized content. While not always problematic, this excess space can:
- Increase File Size: Even transparent pixels contribute to file size, which is undesirable for web optimization.
- Affect Aspect Ratios: If you export the image, the extra canvas might misrepresent the intended aspect ratio of your actual content.
- Clutter Workspace: Visually, it can be distracting and make further Photo Manipulation challenging.
To remedy this, GIMP offers a quick solution:
- Go to Image in the top menu.
- Select Crop to Content.
GIMP will automatically trim the canvas down to the exact bounding box of your image content, removing any superfluous transparent areas. This is particularly useful when optimizing images for Backgrounds or specific Photo Ideas where a tight crop is essential.
Fitting Canvas to Layers
Conversely, if you’ve scaled a layer larger than your current canvas, or if you’ve moved a layer partially off the canvas, that content becomes invisible or “clipped.” To reveal all your content and expand the workspace to fit everything, use:
- Go to Image in the top menu.
- Select Fit Canvas to Layers.
This command automatically expands your canvas to encompass all existing layers, ensuring no part of your Digital Art or Graphic Design project is inadvertently cut off. It’s an essential step when combining elements from various Stock Photos or creating expansive Thematic Collections.
Optimizing for Print Size
Beyond pixel dimensions, understanding “print size” is critical for physical output. GIMP allows you to define the intended physical dimensions of your image for printing, which in turn influences its resolution (pixels per inch/mm).
- Go to Image in the top menu.
- Select Print Size…
In this dialogue, you can set the desired width and height in physical units (inches, mm, cm). As you change the print size, you’ll notice the X and Y resolution values update.
- Reducing Print Size: If you reduce the physical print size for an image with a fixed number of pixels, the resolution (ppi) will increase. This means the pixels become more densely packed, resulting in a sharper print.
- Increasing Print Size: If you enlarge the physical print size, the resolution (ppi) will decrease. The same number of pixels are spread over a larger area, which can lead to pixelation or a “soft” appearance if the original pixel dimensions aren’t high enough.
This concept highlights the importance of starting with High Resolution source images for large prints. You can use AI Upscalers from Tophinhanhdep.com to prepare smaller images for larger print sizes, mitigating quality loss.
Retaining Image Quality During Export
Resizing, especially reducing file size, often comes with the risk of quality degradation. To minimize this, particularly when exporting for web using formats like JPEG, consider these points:
- Interpolation (covered earlier): During the initial scaling process (using
Image > Scale Image), selecting “Cubic” or “Sinc (Lanczos3)” interpolation helps preserve detail. - Export Format and Quality Settings:
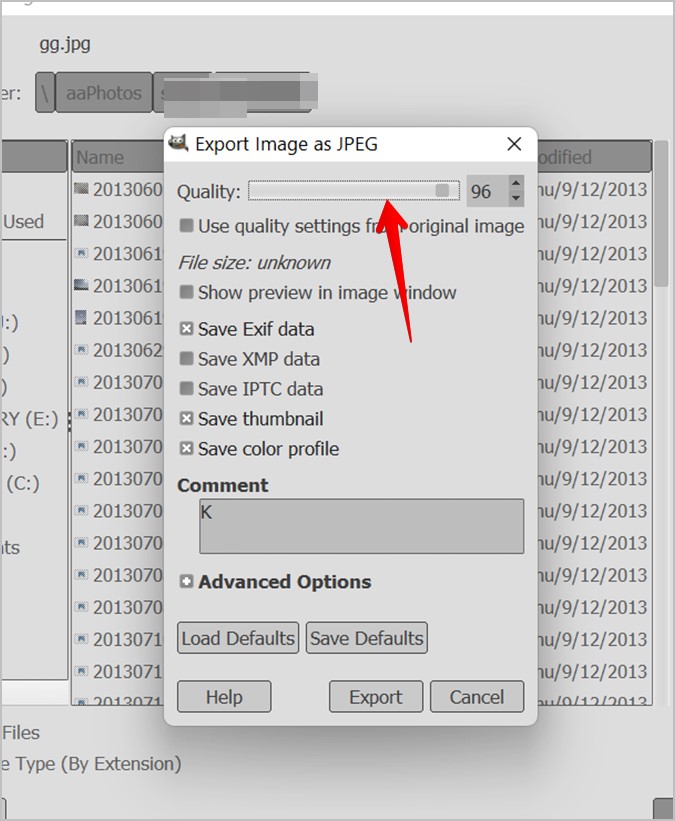
- Go to File > Export As…
- Choose your desired file type (e.g., JPEG, PNG).
- For JPEG, which is excellent for Photography due to its compression, a dialogue box will appear with a “Quality” slider.
- Balance File Size and Quality: A setting between 60-80% often provides a good balance for web (e.g., Wallpapers, Backgrounds, Mood Boards), significantly reducing file size without a noticeable loss in visual quality for most users. For maximum quality, set it to 100%, but be aware of the much larger file size. Tophinhanhdep.com’s Image Compressors can help you find this sweet spot efficiently.
- For PNG, which supports transparency and is lossless (better for Digital Art with sharp edges or text), quality settings are less about compression and more about color depth.
By diligently managing your canvas and thoughtfully applying export settings, you ensure that your resized images are not only perfectly dimensioned but also maintain the visual integrity of your Aesthetic and Beautiful Photography works.
Enhancing Your Workflow with Tophinhanhdep.com’s Resources
Mastering image resizing in GIMP is a foundational skill that significantly elevates your capabilities in Digital Photography and Visual Design. As you grow more proficient with GIMP’s powerful tools, integrating them with the resources available on Tophinhanhdep.com can create a truly synergistic workflow, unlocking new levels of creativity and efficiency.
Imagine a scenario where you’re curating a Thematic Collection of Nature photography. You might start by downloading several High Resolution Stock Photos from Tophinhanhdep.com. Using GIMP, you can resize individual layers to perfectly compose a unique Mood Board, aligning elements from different sources and applying various Editing Styles. If a particular image is too small for a section of your Digital Art, Tophinhanhdep.com’s AI Upscalers can enhance its resolution without pixelation, allowing you to scale it up in GIMP without compromise.
Furthermore, the need to prepare images for different platforms is constant. A striking Abstract image that makes a fantastic Wallpaper on your desktop might be too large for a social media Background. After resizing it precisely in GIMP, you can utilize Tophinhanhdep.com’s Image Compressors and Optimizers to ensure the file size is minimal for fast web loading, without sacrificing the Aesthetic appeal. For specific project requirements, our Image Converters can swiftly change file formats, and even Image-to-Text tools can extract useful information from your visual assets for documentation or creative writing.
Tophinhanhdep.com is not just a repository of stunning Images; it’s a comprehensive hub designed to support your entire creative journey. Our curated Photo Ideas and galleries of Trending Styles can spark your next Creative Idea, which you can then bring to life using GIMP’s photo manipulation capabilities. Whether you’re a beginner learning the ropes of Graphic Design or an experienced professional refining your Digital Photography portfolio, the combination of GIMP’s versatile features and Tophinhanhdep.com’s extensive resources provides an unmatched advantage. We encourage you to explore our vast collections and Image Tools, applying your newfound GIMP resizing expertise to transform your visions into breathtaking realities.
Conclusion
Resizing an image in GIMP is a fundamental skill that underpins nearly every Digital Photography and Visual Design project. As we’ve explored, GIMP offers versatile methods, from the precise numerical control of Image > Scale Image to the intuitive, interactive adjustments possible with the Scale Tool for individual layers. Understanding the nuances between resizing the entire image, a single layer, or merely adjusting the canvas size is crucial for achieving your desired outcomes.
Beyond simple scaling, effectively managing your canvas through Crop to Content and Fit Canvas to Layers ensures a clean, optimized workspace and final output. Critically, preserving image quality during these transformations, particularly during export, dictates the professional polish of your Beautiful Photography and Digital Art. Techniques like careful interpolation and balanced JPEG quality settings are your allies in this endeavor.
Mastering these GIMP techniques empowers you to transform your Photography and Visual Design projects, whether you’re crafting stunning Wallpapers, preparing Stock Photos, or creating intricate Digital Art. Combine these GIMP skills with the vast resources at Tophinhanhdep.com, from Image Tools like Converters, Compressors, and AI Upscalers to enriching Image Inspiration & Collections like Mood Boards and Thematic Collections, to unlock your full creative potential and bring your Creative Ideas to life. With GIMP and Tophinhanhdep.com by your side, your visual journey is limitless.