How to Resize an Image in Paint: Your Essential Guide for Tophinhanhdep.com

In the vast and visually-driven landscape of the internet, images are king. Whether you’re curating stunning wallpapers, crafting intricate digital art, showcasing beautiful photography, or optimizing backgrounds for your website, the precise dimensions and file size of your images play a pivotal role. On Tophinhanhdep.com, where the focus is on providing high-quality visual content across categories like Aesthetic, Nature, Abstract, and Emotional images, mastering basic image manipulation is not just a skill – it’s a necessity.
One of the most fundamental yet often overlooked aspects of image preparation is resizing. A picture that’s too large can slow down your website, consume excessive storage, and be cumbersome to share. Conversely, an image that’s too small might appear pixelated or lose its impact. While professional tools like Adobe Photoshop offer advanced capabilities, the humble Microsoft Paint, available on every Windows platform, provides a surprisingly robust and user-friendly solution for quick and efficient image resizing and cropping. This comprehensive guide will walk you through the process, empowering you to optimize your visuals for Tophinhanhdep.com and beyond, ensuring your images always look their best.

Understanding Image Resizing: Why Dimensions Matter on Tophinhanhdep.com
The world of digital imagery is governed by pixels. Every image, from a breathtaking landscape wallpaper to a subtle abstract background, is composed of a grid of these tiny squares. The total number of pixels determines an image’s resolution, which in turn influences its clarity, detail, and overall quality. However, higher resolution often means larger file sizes, creating a balancing act for anyone dealing with digital media.
For content creators and users of Tophinhanhdep.com, understanding this balance is crucial. Whether you’re uploading high-resolution stock photos, preparing images for visual design projects, or simply sharing a creative idea, resizing is often the first step in ensuring your image meets the specific requirements of its intended platform or purpose.
The Importance of Proper Image Dimensions
Consider the diverse range of images featured on Tophinhanhdep.com – from immersive wallpapers that fill an entire screen to intricate elements used in graphic design. Each of these applications demands specific image dimensions for optimal display and performance.
- Web Performance: Large image files are a primary culprit behind slow website loading times. When a user visits a page on Tophinhanhdep.com featuring many images, the browser needs to download each one. If these images are unnecessarily large in terms of file size, the page will take longer to load, leading to a frustrating user experience and potentially higher bounce rates. Resizing images to appropriate dimensions (and subsequently smaller file sizes) ensures that pages load quickly, keeping visitors engaged with your stunning collections.
- Display Optimization: Different sections of a website or various digital platforms have distinct dimension requirements. For example, a full-width banner on a website like Tophinhanhdep.com might require a specific width, such as 825 pixels, to span the entire screen without stretching or pixelation. A main content section could call for images around 580 pixels wide, while smaller “grey highlight boxes” or aesthetic thumbnails might need compact dimensions, perhaps 235 pixels. These precise specifications, common across many web platforms, ensure that images fit perfectly within their designated containers, contributing to a clean, professional visual design. Without proper resizing, images could overflow, be cut off, or appear distorted, detracting from the overall visual appeal of your curated mood boards or thematic collections.
- Sharing and Storage: Beyond websites, resized images are easier to share via email, messaging apps, or social media, where file size limits are often imposed. Smaller files also take up less storage space on your device or in cloud services, making management of large photo ideas or digital photography portfolios more efficient.
- Print vs. Digital: It’s important to remember that print media often requires much higher resolutions (e.g., 300 DPI) than digital screens (e.g., 72 DPI). While Paint is primarily a tool for digital image preparation, understanding this distinction helps you know when a simple resize in Paint is sufficient, and when a higher-resolution original is needed for print. For Tophinhanhdep.com, which focuses on digital distribution, optimizing for screen display is paramount.
Preserving Quality and Aspect Ratio
When resizing an image, two critical factors come into play: maintaining its quality and preserving its aspect ratio.
- Aspect Ratio: This refers to the proportional relationship between an image’s width and its height. For example, a 16:9 aspect ratio is common for widescreen displays and video, while 4:3 is traditional for many photographs. When you resize an image, it’s almost always recommended to “maintain aspect ratio.” This ensures that the image scales proportionally, preventing it from appearing stretched or squashed. Imagine a beautiful nature photograph or a carefully composed abstract piece on Tophinhanhdep.com – if its aspect ratio is distorted, the entire visual impact is lost. Paint offers a straightforward option to lock the aspect ratio, simplifying this crucial step.
- Image Quality: While reducing an image’s size generally maintains or slightly improves perceived quality (because more pixels are packed into a smaller physical space), enlarging an image is a different story. When you make an image larger, Paint (or any other basic image editor) has to invent new pixels. This process, known as interpolation, often leads to a noticeable reduction in sharpness and an increase in pixelation, making the image appear blurry or blocky. For Tophinhanhdep.com, where high resolution and pristine quality are often desired, it’s generally best to start with an image that is already at or above the target dimensions. If you need to significantly enlarge an image without compromising quality, specialized tools like AI upscalers (as mentioned in Tophinhanhdep.com’s image tools) would be more appropriate. Paint is ideal for modest enlargements or, more commonly, reductions.
Step-by-Step Guide: Resizing Images with Microsoft Paint for Tophinhanhdep.com
Microsoft Paint, a staple of Windows operating systems for decades, offers an intuitive interface for basic image editing tasks, including resizing. This section provides a detailed walkthrough to help Tophinhanhdep.com users effectively resize their images.
Accessing Paint and Opening Your Image
Before you begin, it’s always a good practice to work on a copy of your original image. This safeguards your high-resolution digital photography or carefully curated wallpapers from any unintended alterations, allowing you to experiment freely.
- Make a Copy of Your Image: Navigate to the image file you wish to resize. Right-click on it and select “Copy.” Then, right-click on an empty space in your desired folder (or on your desktop) and choose “Paste.” You now have a duplicate to work with.
- Open Paint:
- Windows 10/11: Type “Paint” into the Windows search bar (usually next to the Start button) and click on the “Paint” app when it appears.
- Older Windows Versions (e.g., Windows 7): Go to “Start,” then “All Programs,” then “Accessories,” and finally click on “Paint.”
- Open Your Image in Paint: Once Paint is open, click on the “File” tab (or the Paint button/drop-down menu in older versions, usually in the upper-left corner), then select “Open.” Browse to the location where you saved the copy of your image, select it, and click “Open.” Your image will now appear in the Paint workspace.
The Resize and Skew Functionality
With your image loaded, the next step is to access Paint’s resizing tools.
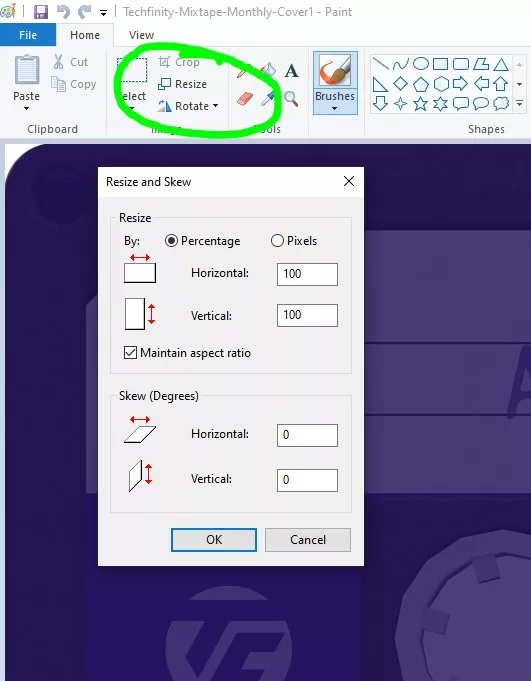
- Locate the Resize Button: On the “Home” tab of the Paint ribbon, look for the “Image” section. Within this section, you’ll find the “Resize” button (often represented by a small icon with two overlapping squares or a diagonal arrow). Click on it.
- Note: As you hover over your image, Paint often displays the original pixel dimensions near the bottom of the window, providing a useful reference before resizing.
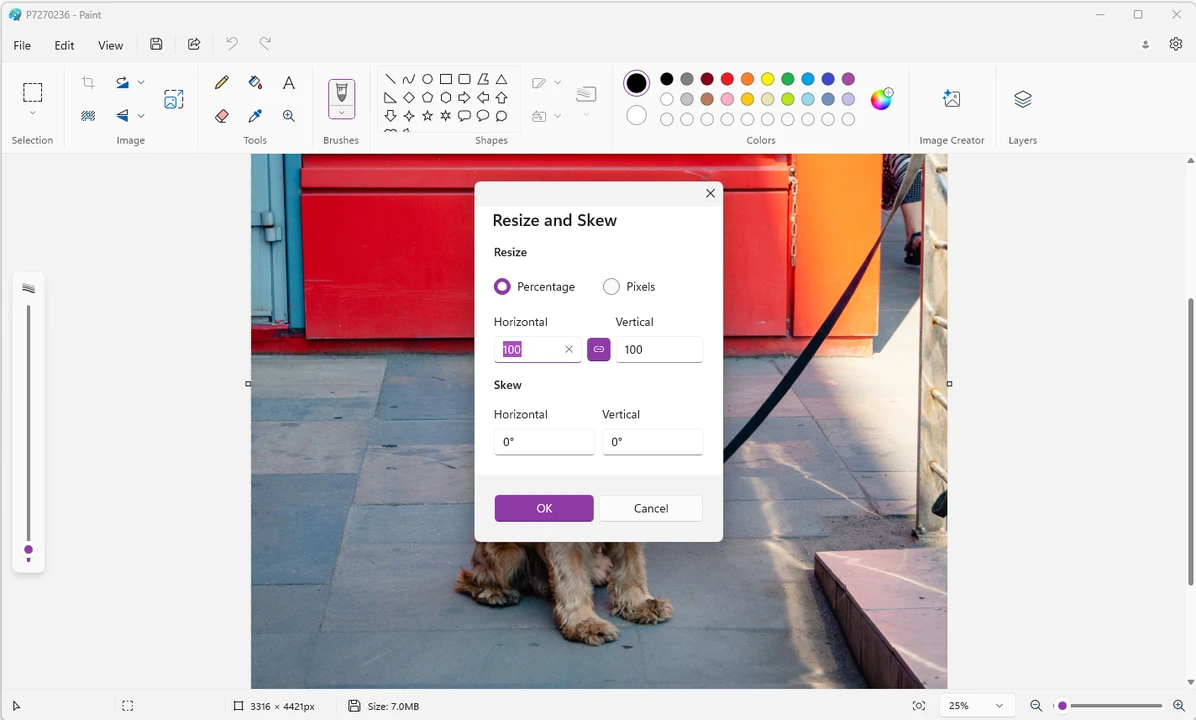
- The Resize and Skew Dialog Box: Clicking “Resize” will open a new dialog box titled “Resize and Skew.” This is where you’ll define your new image dimensions. You’ll see options to resize by “Percentage” or “Pixels.”
- Percentage: This is often the most straightforward method for general resizing. If you want to reduce an image to half its size, you would enter “50” for both horizontal and vertical. To slightly enlarge it, you might enter “125.” Paint typically allows values between 1 and 500 percent.
- Pixels: If you have specific pixel dimensions in mind (e.g., a banner needs to be exactly 825 pixels wide for Tophinhanhdep.com), you’ll choose this option. This is particularly useful when preparing images for predefined container sizes on websites.
Mastering Aspect Ratio for Flawless Resizing
Preventing image distortion is paramount, especially for aesthetic or beautiful photography showcased on Tophinhanhdep.com. The “Maintain aspect ratio” option is your key to achieving this.
- Check “Maintain aspect ratio”: In the “Resize and Skew” dialog box, ensure there is a checkmark in the box next to “Maintain aspect ratio.” This setting is crucial because it locks the proportional relationship between your image’s width and height.
- Enter New Dimensions:
- Using Percentage: With “Maintain aspect ratio” checked and “Percentage” selected, you only need to enter a value into either the “Horizontal” or “Vertical” text box. Paint will automatically calculate the corresponding value for the other dimension to ensure the image scales proportionally. For instance, if your original image is 1000x500 pixels and you enter “50” in the “Horizontal” box, the “Vertical” box will automatically change to “50” as well, resulting in a 500x250 pixel image.
- Using Pixels: If you’ve selected “Pixels” and have “Maintain aspect ratio” checked, you again only need to enter your desired value for either “Horizontal” (width) or “Vertical” (height). Paint will calculate the other dimension to preserve proportions. For example, if Tophinhanhdep.com requires a middle section image to be 580 pixels wide, you would enter “580” in the “Horizontal” pixel box, and Paint would adjust the vertical dimension accordingly.
- When to Uncheck “Maintain aspect ratio” (with caution): Rarely, you might need to intentionally stretch or compress an image. If you uncheck “Maintain aspect ratio,” you can enter independent values for horizontal and vertical. However, be aware that this will distort your image, and it’s generally not recommended for photography or digital art where visual integrity is key.
- Apply Changes: After entering your desired values, click “OK” in the “Resize and Skew” dialog box. Paint will immediately apply the changes to your image.
Adding Captions and Saving Your Resized Image
Once your image is resized to your satisfaction, you might want to add a caption or prepare it for upload to Tophinhanhdep.com.
- Adding a Caption (Optional): If you need to add text directly to your image (e.g., a watermark, a title for a thematic collection), select the “Text tool” (often represented by an “A” icon) from the “Tools” section on the “Home” tab. Click on the image where you want to add text, and a text box will appear, allowing you to type and format your caption.
- Saving Your Image:
- Click on the “File” tab (or the Paint button/drop-down menu) in the upper-left corner.
- Select “Save as.” This is crucial if you want to keep your original image intact and save the resized version as a new file.
- Choose a Format: A sub-menu will appear with various image formats like PNG, JPEG, BMP, and GIF. For most photographs, especially those intended for web use on Tophinhanhdep.com, JPEG is the recommended format. It offers good compression, resulting in smaller file sizes without a significant loss in visual quality, making it ideal for fast loading. PNG is excellent for images with transparency or sharp lines (like logos or abstract art), but typically results in larger files.
- Enter a Descriptive Name: In the “Save As” dialog box, give your resized image a short, descriptive filename, ideally with no spaces (e.g., “nature-wallpaper-resized.jpg” instead of “Nature Wallpaper Resized.jpg”). This helps with organization and can be beneficial for Search Engine Optimization (SEO) if you plan to upload it to a public platform like Tophinhanhdep.com.
- Click “Save.”
Your image is now perfectly resized and ready for its next destination on Tophinhanhdep.com, whether it’s a background, part of an aesthetic collection, or a piece of beautiful photography.
Beyond Simple Resizing: Cropping Images in Paint for Tophinhanhdep.com
While resizing adjusts the overall dimensions of an image, cropping serves a different, equally important purpose: to remove unwanted portions and refine the composition. This technique is invaluable for digital photography, visual design, and curating images for thematic collections on Tophinhanhdep.com.
What Cropping Achieves
Cropping is not about shrinking an entire image proportionally; it’s about selecting a specific area of interest and discarding everything outside of it.
- Improving Composition: Often, a photograph contains distracting elements around the edges that detract from the main subject. Cropping allows you to “zoom in” on the focal point, creating a more impactful and aesthetically pleasing image. For instance, a nature photograph intended for Tophinhanhdep.com might benefit from cropping out a busy foreground or an empty sky to emphasize the intricate details of a flower or a distant mountain range.
- Removing Unwanted Backgrounds: Sometimes, you have a great subject but a messy background. Cropping can isolate the subject, making it more versatile for graphic design projects or for integration into other visual elements.
- Adjusting Aspect Ratio (Intentionally): While resizing with “Maintain aspect ratio” preserves the original proportions, cropping allows you to change the aspect ratio. If you need a square image for a social media post, or a wide panoramic for a banner on Tophinhanhdep.com, and your original image doesn’t match, cropping is the way to achieve it.
- Reducing File Size: Since cropping physically removes pixels from the image, it naturally results in a smaller file size, which is beneficial for web optimization and faster loading on Tophinhanhdep.com.
The Selection and Crop Tools
Paint provides a simple yet effective way to crop your images.
- Open Your Image in Paint: Follow the same steps as for resizing: make a copy, then open it in Paint.
- Access the Select Tool: On the “Home” tab, in the “Image” section, you’ll find the “Select” button. Click the small downward arrow beneath it to reveal a drop-down menu.
- Choose a Selection Type:
- Rectangular selection: This is the most common and precise option. It allows you to drag a perfect rectangular box over the area you want to keep.
- Free-form selection: If you need to select an irregularly shaped area, this tool lets you draw a custom outline. However, for most cropping tasks, the rectangular selection is preferred for its clean edges.
- Click and Drag to Select: With your chosen selection tool active, click and drag your mouse over the portion of the image you wish to retain. As you drag, a dotted line will appear, outlining your selection.
- Tip: If you make a mistake, simply click anywhere outside the dotted line to deselect and start over. For precise adjustments, you can often click and drag the corners or sides of the selection box to fine-tune its size and position.
- Execute the Crop: Once you are satisfied with your selection, click the “Crop” button. This button is also located in the “Image” section of the “Home” tab, usually to the right of the “Select” button. Clicking “Crop” will instantly remove everything outside your dotted selection, leaving only the chosen area.
- Save Your Cropped Image: As with resizing, click “File,” then “Save as,” choose your preferred format (JPEG for web is highly recommended for Tophinhanhdep.com), give it a new descriptive name (e.g., “cropped-abstract-art.jpg”), and click “Save.”
Now your image is perfectly cropped, highlighting the most important elements and ready for its role in your visual design projects or image collections on Tophinhanhdep.com.
Advanced Considerations & Alternatives for Tophinhanhdep.com Users
While Microsoft Paint is an excellent starting point for basic image resizing and cropping, the diverse and high-quality demands of a platform like Tophinhanhdep.com often call for a deeper understanding of image optimization and a look at more specialized tools.
Optimizing for Tophinhanhdep.com’s Diverse Image Needs
Every category on Tophinhanhdep.com benefits from thoughtful image preparation. Resizing and cropping are foundational techniques that support various visual design goals:
- Wallpapers and Backgrounds: For these, maintaining high resolution is key, but often they need to be scaled to fit different screen sizes. While Paint can reduce large images, ensuring they remain visually striking at common display resolutions (e.g., 1920x1080 for desktop, 720x1280 for mobile) is crucial. Cropping can also adapt landscape wallpapers for portrait phone backgrounds or vice-versa, focusing on the most compelling part of the image.
- Aesthetic, Nature, Abstract, Sad/Emotional, Beautiful Photography: For these categories, the artistry lies in composition and detail. Cropping plays a vital role in perfecting the frame, removing distractions, and emphasizing the emotional impact or intricate patterns. Resizing ensures they can be quickly previewed as part of mood boards or integrated into visual design layouts without slowing down the user experience.
- High Resolution and Stock Photos: When dealing with professional-grade photography, the goal is often to provide both original high-resolution versions and web-optimized, resized versions. Paint can create the latter, making the images accessible for quick viewing on Tophinhanhdep.com while preserving the original for potential downloads or more intensive editing.
When Paint Isn’t Enough: Exploring Other Image Tools
While Paint is user-friendly, its capabilities are limited. For Tophinhanhdep.com users who delve into more complex digital photography, graphic design, or image processing, other image tools offer significant advantages:
- Professional Editing Software (e.g., Adobe Photoshop): For advanced photo manipulation, detailed color correction, intricate layering, and non-destructive editing (where changes don’t permanently alter the original pixels), Photoshop is the industry standard. It offers far more control over resizing, including advanced interpolation algorithms that yield better results when enlarging images. Many of Tophinhanhdep.com’s beautiful photography might pass through Photoshop for fine-tuning.
- Batch Image Processors: If you have dozens or hundreds of images for a thematic collection or an extensive portfolio of stock photos, manually resizing each in Paint would be incredibly tedious. Batch image resizers, often available as dedicated software or online tools, allow you to process multiple images at once, applying the same resizing, cropping, or format conversion parameters to an entire folder. This is a massive time-saver for large-scale image management.
- Image Compressors and Optimizers: Beyond simple resizing, tools specifically designed for compression and optimization can further reduce file sizes without compromising visual quality. These tools use sophisticated algorithms to remove unnecessary data from image files, making them load even faster on Tophinhanhdep.com, especially for users with slower internet connections.
- AI Upscalers: As previously mentioned, enlarging images in Paint can lead to quality degradation. AI upscalers, however, use artificial intelligence to intelligently add detail and pixels when increasing an image’s resolution, often producing surprisingly good results, even for aesthetic images that need to be presented at larger sizes.
- Image Converters: Tophinhanhdep.com users might encounter images in various formats (e.g., TIFF, RAW) that are not ideal for web use. Image converters can transform these into web-friendly formats like JPEG or PNG, often with additional resizing and compression options.
- Image-to-Text Tools: While not directly related to resizing, Tophinhanhdep.com’s main topics also include “Image-to-Text.” This refers to Optical Character Recognition (OCR) software that can extract text from images. This tool could be useful for cataloging images with embedded text or for accessibility purposes, demonstrating a broader scope of image tools relevant to a comprehensive image platform.
Visual Design Principles and Resizing
Effective visual design goes beyond technical execution; it incorporates artistic principles. Resizing and cropping are integral to these principles:
- Graphic Design and Digital Art: Correct dimensions are fundamental to creating layouts that are harmonious and functional. Ensuring elements fit perfectly within their designated spaces, whether for a digital poster or a web banner, prevents awkward empty areas or overlapping content.
- Photo Manipulation: Resizing elements accurately is crucial when combining multiple images in a photo manipulation project. Paint’s precise pixel control, when combined with careful planning, can help integrate elements seamlessly.
- Creative Ideas and Mood Boards: When assembling mood boards or conceptualizing new creative ideas, images are often gathered from various sources. Resizing and cropping these diverse images to a consistent look or a unified aspect ratio helps to create a cohesive and visually compelling collection. This process allows Tophinhanhdep.com users to present their inspirations clearly and professionally.
- Trending Styles: Many trending visual styles on platforms like Tophinhanhdep.com adhere to specific aesthetic guidelines regarding image size and proportion. By mastering resizing and cropping, users can adapt their content to fit these styles, enhancing its relevance and appeal.
In conclusion, while Microsoft Paint offers a simple and accessible entry point into image manipulation, particularly for resizing and cropping, it’s just one tool in a broader ecosystem. For Tophinhanhdep.com users, understanding Paint’s capabilities and knowing when to explore more advanced image tools is key to producing high-quality, optimized, and visually engaging content across all categories.
By diligently applying the techniques outlined in this guide, you can ensure that every image you process, whether for a personal project or a public contribution to Tophinhanhdep.com, is perfectly tailored to its purpose, enhancing its impact and contributing to a superior visual experience for all.