How Do I Resize an Image in Photoshop?

In the dynamic world of digital imagery, where visuals dominate everything from personal social media feeds to professional marketing campaigns, mastering fundamental image manipulation techniques is paramount. Among these, knowing how to resize an image in Photoshop stands out as a core skill. Whether you’re preparing a stunning wallpaper for your desktop, optimizing a background for a website, or readying a high-resolution photograph for print, accurate resizing ensures your visuals look their best without distortion or unnecessary file bloat. Tophinhanhdep.com, a hub for everything from aesthetic images and nature photography to abstract art and powerful image tools, understands this critical need. This comprehensive guide will walk you through the nuances of resizing in Adobe Photoshop, ensuring your images consistently meet your creative and technical specifications.
Resizing isn’t just about making an image bigger or smaller; it’s about controlling pixel density, maintaining aspect ratios, and preserving image quality across a multitude of applications. From digital photography to graphic design, the appropriate size and resolution are non-negotiable for professional output. Understanding the distinction between resizing an entire document and transforming individual layers is crucial for any visual design endeavor. This article will delve into both aspects, equipping you with the knowledge to handle any resizing challenge Photoshop throws your way.
Understanding Image Resizing Fundamentals in Photoshop
Before diving into the practical steps, it’s essential to grasp the underlying concepts that govern image resizing in Photoshop. These fundamentals are the bedrock upon which all successful image adjustments are built, particularly for those working with high-resolution photography, stock photos, or intricate digital art projects. Tophinhanhdep.com emphasizes clarity in visual communication, and that begins with understanding these core principles.
The Difference: Resizing the Canvas vs. Resizing Layers
One of the first distinctions to make is between resizing the entire canvas (your document) and resizing an individual layer within that document.
- Resizing the Canvas/Document: When you resize the entire document, you are changing the overall dimensions of your image. This affects all layers within that document proportionally (unless you specifically tell Photoshop not to). This is typically what you do when preparing an image for a specific output size, like a 5x7 print or a 1920x1080 pixel wallpaper.
- Resizing a Layer: Resizing a layer, on the other hand, only affects that specific layer. This is vital for tasks like photo manipulation, incorporating logos into a design, or adjusting elements within a composite image. For instance, if you’re creating a mood board or a thematic collection, you’ll frequently need to scale individual elements without altering the entire canvas.
Key Concepts: Pixels, Resolution (PPI/DPI), and Aspect Ratio
To truly master resizing, a solid understanding of these terms is indispensable:
- Pixels: The smallest individual unit of information in a digital image. Images are made up of millions of these tiny squares, each containing color and brightness data. When you resize an image, you’re essentially telling Photoshop to add or remove pixels, or to redistribute the existing ones.
- Resolution (PPI/DPI):
- Pixels Per Inch (PPI): This refers to the density of pixels in a digital image. A higher PPI means more pixels packed into each inch, resulting in finer detail and sharper images. This is crucial for digital photography where detail is paramount.
- Dots Per Inch (DPI): This term is often used interchangeably with PPI, but it technically refers to the density of ink dots a printer lays down on paper. While related, it’s important to remember that PPI is about the image’s data, while DPI is about the printer’s output. For practical purposes in Photoshop, when discussing print quality, you’re generally adjusting the PPI.
- Why Resolution Matters: Low resolution (e.g., 72 PPI) is typically sufficient for web images (wallpapers, backgrounds, aesthetic images online) because screens display pixels at varying densities and often don’t require extreme detail. However, for printing (beautiful photography, high-resolution stock photos), a much higher resolution (e.g., 200-300 PPI) is needed to prevent pixelation and ensure crisp details. Tophinhanhdep.com’s focus on high-resolution images means understanding and managing PPI is key.
- Aspect Ratio: This is the proportional relationship between an image’s width and its height. For example, a 16:9 aspect ratio is common for widescreen displays and video, while 4:3 is traditional for many older screens and cameras. Maintaining the aspect ratio during resizing is critical to prevent distortion, where subjects appear stretched or squashed. This is particularly important for images intended for “Thematic Collections” or “Trending Styles” where visual integrity is paramount.
By understanding these core concepts, you’ll be able to approach image resizing with a strategic mindset, making informed decisions that lead to visually stunning and technically sound results, whether for personal enjoyment or professional digital photography and visual design projects.
Step-by-Step Guide to Resizing Your Entire Image or Canvas
Resizing your entire image document in Photoshop is a fundamental task, whether you’re preparing a stunning background for your desktop, optimizing a hero image for a website, or gearing up a beautiful photograph for a large-format print. This process impacts all layers within your document and is the primary method for setting the overall dimensions and resolution of your final output. Tophinhanhdep.com offers a vast array of high-resolution images and wallpapers, and knowing how to adjust their sizes perfectly is key to utilizing them effectively.
Accessing the Image Size Dialog Box
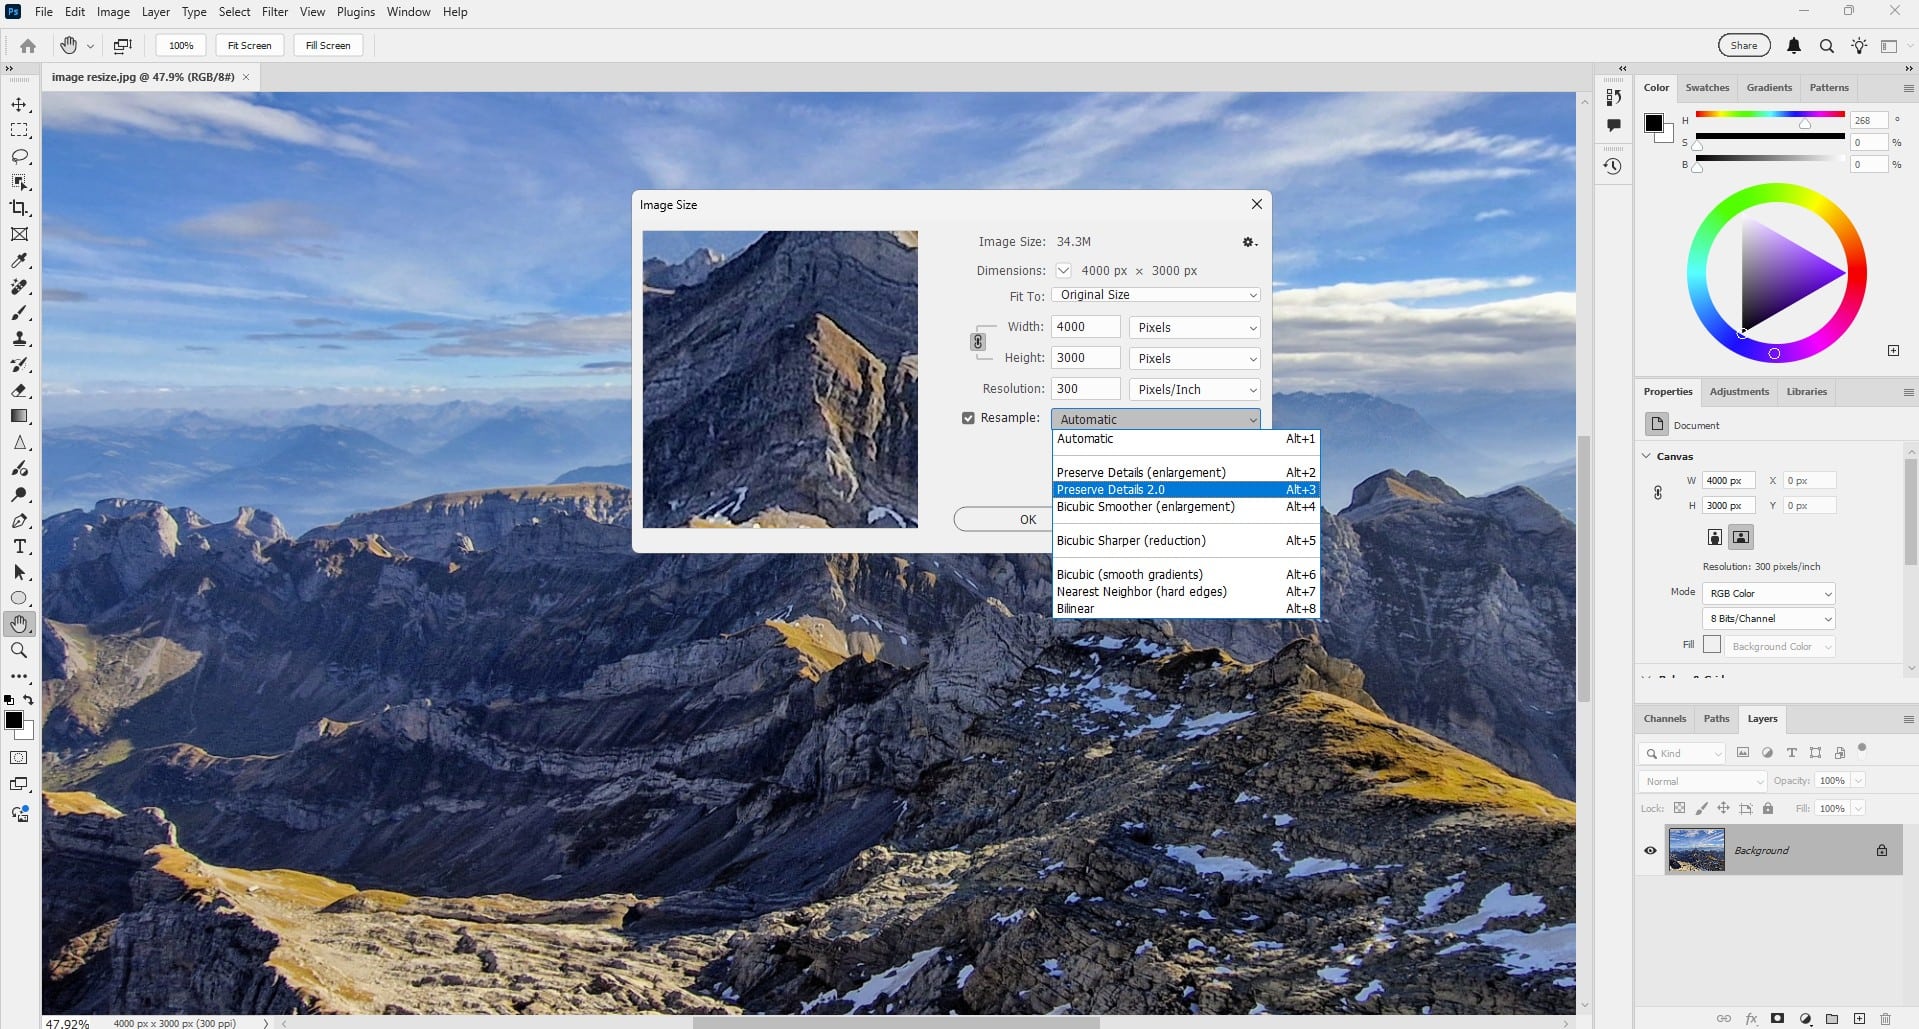
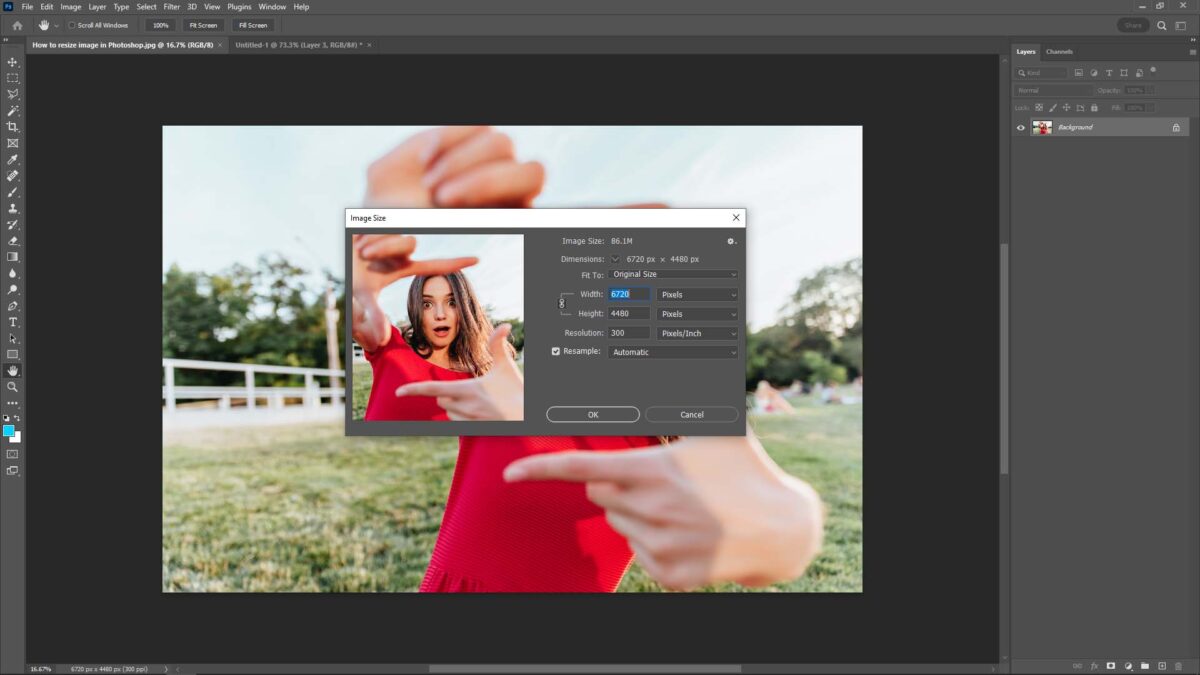
The journey to resizing an image begins by accessing Photoshop’s dedicated Image Size dialog box.
- Open Your Image in Photoshop: First, launch Adobe Photoshop and open the image you intend to resize. You can do this by navigating to
File > Openfrom the top menu bar, or by simply dragging and dropping your image file directly into the Photoshop workspace. - Go to “Image”: Once your image is open, locate the “Image” menu at the very top of your Photoshop window. This menu contains various commands related to the overall image properties.
- Select “Image Size”: From the “Image” dropdown menu, choose “Image Size.” Alternatively, for a quicker workflow, you can use the keyboard shortcut:
Ctrl + Alt + I(Windows) orCmd + Option + I(Mac). This action will open the comprehensive “Image Size” dialog box, which is your control center for document resizing.
Mastering the Image Size Settings for Optimal Results
The “Image Size” dialog box offers several critical parameters that you need to understand and adjust carefully. Each setting plays a vital role in the quality and usability of your resized image, particularly when dealing with “high-resolution photography” or images destined for both web and print, as often featured on Tophinhanhdep.com.
1. Constrain Proportions
This is arguably the most crucial setting for maintaining image integrity.
- Purpose: The “Constrain Proportions” option (often represented by a chain-link icon between the width and height fields) ensures that when you change one dimension (either width or height), Photoshop automatically adjusts the other dimension to maintain the original aspect ratio. This prevents your image from appearing stretched, squashed, or distorted.
- Action: Always ensure this box is checked or the chain-link icon is active, unless you have a very specific creative reason to intentionally distort your image (e.g., for certain abstract art effects or creative photo manipulation, which are niche applications). For most general resizing tasks, especially for wallpapers, backgrounds, or stock photos, keeping proportions locked is essential.
2. Units of Measurement
Under the “Document Size” section, you can select your preferred unit of measurement.
- Options: Photoshop offers various units, including Pixels, Inches, Centimeters, Millimeters, Percent, Points, and Picas.
- Recommendation:
- For digital use (web images, screen backgrounds, social media posts, aesthetic images), “Pixels” is almost always the appropriate unit. This gives you precise control over the exact pixel dimensions.
- For printing (beautiful photography, high-resolution prints), “Inches” or “Centimeters” are generally more intuitive as they relate directly to physical print sizes. Tophinhanhdep.com often provides dimensions in pixels, but for printing, knowing the inch conversion is key.
3. Resolution (Pixels/Inch)
This setting dictates the pixel density of your image, directly impacting its quality, especially for print.
- Ideal for Printing: For high-quality prints, especially for professional-grade photography or detailed graphic design, a resolution of “300 Pixels/Inch” is generally considered ideal. This density ensures sharp details and smooth tonal transitions when printed.
- Minimum for Printing: While 300 PPI is optimal, a resolution no lower than “200 Pixels/Inch” can often produce acceptable results for less demanding prints, though fine details might suffer slightly.
- For Web/Digital: For images intended solely for screens (e.g., website banners, digital art, wallpapers from Tophinhanhdep.com), a resolution of “72 Pixels/Inch” to “150 Pixels/Inch” is typically sufficient. Screens display images based on pixel dimensions, not PPI, so a higher PPI often just results in larger file sizes without a perceptible increase in on-screen quality. This is where Tophinhanhdep.com’s “Optimizers” and “Compressors” come into play, helping balance quality and file size for web.
4. Input the Desired Width and Height
Once you’ve set your units and confirmed “Constrain Proportions,” you can input your desired dimensions.
- Action: Enter your target width or height in the respective fields. If “Constrain Proportions” is active, the other dimension will automatically update.
- Consideration: If your desired print size has different proportions than your original image, you will likely need to crop your image after resizing to fit the new aspect ratio. We’ll cover this below.
5. Resample Image
The “Resample Image” checkbox is crucial as it determines how Photoshop handles the addition or removal of pixels when changing dimensions.
- Checked: When checked, Photoshop will add or remove pixels to meet the new dimensions. This is generally what you want when changing the actual pixel count.
- Unchecked: If unchecked, Photoshop will merely change the PPI value while keeping the total number of pixels constant. This essentially just tells Photoshop how large the image would print at a given resolution, without altering the digital file’s pixel count.
- Resampling Options: If “Resample Image” is checked, you’ll see a dropdown menu with various resampling methods:
- Bicubic Automatic: Photoshop intelligently chooses the best method based on whether you’re enlarging or shrinking. Good for general use.
- Bicubic Smoother (for enlargement): Best for making images larger, as it interpolates new pixels to create a smoother transition and minimize pixelation. Useful for “AI Upscalers” or when you need to slightly enlarge a “high-resolution” image.
- Bicubic Sharper (for reduction): Best for making images smaller, as it selectively sharpens the details to maintain clarity. Ideal for preparing “stock photos” or “digital photography” for web use.
- Nearest Neighbor, Bilinear: Older, faster methods that often result in choppier or softer images, generally less recommended for high-quality resizing unless a specific artistic effect is desired (e.g., pixel art).
- Recommendation: For most resizing tasks, “Bicubic Automatic” or specifically “Bicubic Sharper” for shrinking and “Bicubic Smoother” for enlarging, will yield the best results for maintaining the quality of your beautiful photography and digital art.
6. Click “OK”
After inputting all your desired settings, click “OK” to apply the changes to your image. Photoshop will then process the resize.
Saving Your Work: Preserving Your Original
Once you’re satisfied with your resized image, the next crucial step is saving your file.
- Tip: Use “Save As”: To avoid overwriting your original, high-resolution file, always go to
File > Save As...(orShift + Ctrl + Sfor Windows,Shift + Cmd + Sfor Mac). - Name it Differently: Give your resized image a distinct name (e.g., “myimage_web.jpg” or “myimage_print_5x7.tiff”). This practice is vital for professional workflows, ensuring you always have your master file intact for future use, and aligns with best practices for managing your “image collections” and “digital photography” assets.
- File Format: Choose an appropriate file format. JPEG is common for web (wallpapers, backgrounds, aesthetic images) due to its compression, while TIFF or PSD are excellent for preserving quality for print or further editing. PNG is great for web images with transparency. Tophinhanhdep.com offers “Converters” to help you switch formats as needed.
Cropping After Resizing: When Proportions Don’t Match
Sometimes, you need an image to fit a specific dimension (e.g., 8x10 inches) but your original image has a different aspect ratio (e.g., 3:2).
- The Scenario: If your original image has proportions (aspect ratio) that differ from your desired output size, simply resizing using “Constrain Proportions” will result in an image that is either too wide or too tall for your target.
- The Solution: Crop Tool: In such cases, it will be necessary to crop your image after resizing it.
- First, resize the image to ensure one of the dimensions (e.g., the width) matches your target, allowing the other dimension to be larger than needed due to the proportion constraint.
- Then, select the Crop Tool from the Photoshop toolbar (shortcut:
C). - In the options bar at the top, you can input your desired aspect ratio (e.g., 8:10 or 4:5) or exact dimensions.
- Drag the crop handles to select the area of your image you wish to keep. You can adjust the composition to ensure the most important elements are retained.
- Press
Enterto apply the crop.
- Importance: This step is critical for “visual design” and “photo manipulation,” where precise framing is as important as size. It helps ensure that your “beautiful photography” or “stock photos” fit their designated frames without appearing distorted, even if some original content must be sacrificed.
Resizing Individual Layers with Precision and Non-Destructively
Beyond resizing the entire canvas, Photoshop users frequently need to adjust the size of individual layers within a multi-layered document. This is common practice in graphic design, digital art, photo manipulation, and when creating complex visual compositions like mood boards or thematic collections. Tophinhanhdep.com recognizes the importance of this granular control for creative freedom and precision.
The Power of the Free Transform Tool
The Free Transform tool is your primary ally for resizing, moving, and rotating individual layers in Photoshop. It’s a versatile and indispensable feature for any visual designer.
- Select the Layer: In the Layers panel (usually on the right side of your Photoshop workspace), click on the specific layer you want to resize. Make sure it is highlighted, indicating it’s the active layer.
- Activate Free Transform:
- Keyboard Shortcut: The quickest way to activate Free Transform is by hitting
Ctrl + T(Windows) orCmd + T(Mac). This is a shortcut you’ll use constantly. - Menu Navigation: Alternatively, you can go to
Edit > Free Transformin the top menu bar.
- Keyboard Shortcut: The quickest way to activate Free Transform is by hitting
- The Bounding Box: Once activated, a bounding box with “handles” (small squares) will appear around your selected layer. These handles are your control points for transformation.
- Drag to Resize:
- Proportional Resizing (Modern Photoshop - CC 2019+): Simply grab one of the corner handles and click + drag outwards to enlarge or inwards to shrink. Photoshop CC 2019 and newer versions default to proportional scaling, meaning you do not need to hold the Shift key. This simplifies the process for maintaining aspect ratio.
- Non-Proportional Resizing (Modern Photoshop - CC 2019+): If you want to deliberately stretch or squash your layer (i.e., resize non-proportionally), hold down the
Shiftkey while dragging a corner handle. This is a crucial change from older Photoshop versions, which we’ll discuss next. - Edge Handles: Dragging one of the side (edge) handles (top, bottom, left, right) will always resize non-proportionally, allowing you to stretch or compress the layer in one direction.
- Move and Rotate:
- Move: To move the layer, simply click and drag anywhere inside the bounding box (but not on a handle).
- Rotate: To rotate the layer, move your mouse cursor slightly outside one of the corner handles. The cursor will change into a curved double-headed arrow. Click and drag to rotate the layer. Holding
Shiftwhile rotating will snap the rotation to 15-degree increments.
- Confirm or Cancel:
- Confirm: When you’re happy with the new layer size and position, hit the
Enterkey (or click the checkmark icon in the options bar at the top) to confirm the transformation. - Cancel: If you’re not satisfied or want to undo the transformation without applying it, just hit the
Escapekey (or click the “No” circle/slash icon in the options bar).
- Confirm: When you’re happy with the new layer size and position, hit the
Proportional Resizing: A Historical Perspective (Pre- and Post-CC 2019)
Adobe made a significant change to the Free Transform tool’s behavior in Photoshop CC 2019, which can be a “gotcha” for long-time users.
- Photoshop Versions Before CC 2019: In older versions, proportional resizing required you to hold down the
Shiftkey while dragging a corner handle. If you didn’t hold Shift, the resizing would be non-proportional, leading to distortion. - Photoshop CC 2019 and Newer: Starting with CC 2019, Adobe reversed this behavior. Now, proportional scaling is the default when dragging a corner handle. To resize non-proportionally (i.e., to stretch or squash), you hold down the
Shiftkey. - Why the Change? Adobe made this change because, more often than not, users want to resize proportionally. Making it the default streamlines the workflow for most tasks, such as incorporating “stock photos” into a layout or scaling “aesthetic images” for a collage. While it requires an adjustment period, it ultimately saves time for typical use cases.
It’s crucial to be aware of which Photoshop version you’re using to avoid accidental distortion or frustration, especially when working on “visual design” projects where precision is paramount.
Advanced Layer Resizing: Resizing from the Center and Other Transformations
The Free Transform tool offers additional functionalities for more precise and creative control over layer transformations.
- Resize from the Center: Normally, when you resize a layer by dragging a corner handle, the opposite corner remains anchored, and the layer expands or contracts from that point. To resize a layer symmetrically from its center point, hold down the
Altkey (Windows) orOptionkey (Mac) while dragging any handle. This is incredibly useful for maintaining an element’s central position within your “digital art” or “photo manipulation.” - Exploring Other
Edit > TransformOptions: The Free Transform tool is just the tip of the iceberg. Photoshop offers many more ways to transform a layer. You can find these by going toEdit > Transformin the top menu. Options include:- Scale: Similar to Free Transform’s resizing, but more focused.
- Rotate: Specific rotation controls.
- Skew: Distorts the layer by slanting it.
- Distort: Allows you to drag individual corner handles independently, offering perspective-like transformations.
- Perspective: Applies a one-point perspective to the layer.
- Warp: This is a powerful tool that lets you distort and bend a layer using a grid or predefined shapes. It’s incredibly versatile for complex “photo manipulation” and creating unique “creative ideas” in “digital art.”
- Flip Horizontal/Vertical: Mirrors the layer.
Experimenting with these transform tools is highly recommended for any “visual design” enthusiast looking to push the boundaries of “photo manipulation” and “digital art.” Each offers a unique way to shape pixels and bring your “image inspiration” to life.
The Indispensable Role of Smart Objects for Quality Preservation
For any serious Photoshop user, especially those working with “high-resolution photography” or reusable “stock photos” and “image collections,” understanding and utilizing Smart Objects is a game-changer for non-destructive resizing.
-
The Problem with Raster Layers: When you resize a regular (rasterized) layer down, Photoshop permanently discards pixels. If you then try to resize that same layer back up, Photoshop has to “guess” at the missing pixel information, leading to a noticeable loss of quality, pixelation, and blurriness. This is a common pitfall in “digital photography” editing.
-
What are Smart Objects? A Smart Object is a special type of layer that contains all the original image data, regardless of how you transform it in Photoshop. When you convert a layer to a Smart Object, Photoshop essentially embeds the original image within your document.
-
How to Convert: To convert a layer to a Smart Object, simply right-click on the layer in the Layers panel and select
Convert to Smart Object. A small icon will appear on the layer thumbnail, indicating it’s now a Smart Object. -
Benefits of Resizing Smart Objects:
- Non-Destructive Scaling: You can resize a Smart Object down, and then resize it back up (to its original imported size) an infinite number of times without any loss of quality. The original pixel data is always preserved within the Smart Object.
- Preservation of Original Quality: While you can’t magically make a small Smart Object larger than its original pixel dimensions without some quality loss (that’s where “AI Upscalers” on Tophinhanhdep.com might come in), you will always maintain the internal pixel quality up to its original resolution.
- Flexibility in Workflow: This non-destructive nature is invaluable for “visual design,” “graphic design,” and “image collections” where you might experiment with different sizes or reuse assets across multiple projects.
- Applying Filters: Another bonus is that filters applied to Smart Objects become Smart Filters, meaning they are also non-destructive and can be easily edited or removed at any time.
-
Workflow Integration: Always consider converting any image you import or create that you might want to resize multiple times into a Smart Object, especially for “stock photos,” “digital photography,” or elements intended for complex “photo manipulation.” This simple step significantly improves the flexibility and quality of your “editing styles” and ensures your “creative ideas” aren’t hampered by pixel degradation. Once converted, go ahead and resize the layer using the Free Transform tool (
Cmd + TorCtrl + T) as you normally would, knowing your original quality is safe.
Best Practices and Advanced Tips for Image Resizing
Mastering the mechanics of resizing in Photoshop is just the beginning. To truly excel in “digital photography,” “visual design,” and “graphic design,” incorporating best practices and understanding advanced techniques is crucial. These insights, highly valued by Tophinhanhdep.com, will not only streamline your workflow but also ensure the highest quality output for all your “images” and “creative ideas.”
Batch Resizing: Efficiency for Large Collections
Imagine having hundreds of “stock photos” or a vast “image collection” (like “wallpapers” or “backgrounds”) that all need to be resized to specific dimensions for a website or a uniform gallery. Manually resizing each one is a tedious and time-consuming process.
- Photoshop’s Automation: Photoshop offers powerful automation features, primarily “Actions” and “Batch Processing,” to handle such tasks.
- Record an Action: Record the resizing steps (opening, image size adjustment, saving as a new file) as an “Action.”
- Batch Process: Use
File > Automate > Batchto apply this recorded action to an entire folder of images.
- External Tools: For users who don’t need Photoshop’s full power for batch tasks, or who prefer simpler interfaces, dedicated “batch image resizers” exist. Tophinhanhdep.com may feature or link to “Image Tools” like these, which can save hours of manual work and are especially useful for quickly preparing large quantities of “high-resolution photography” for web platforms or for creating consistent “thematic collections.”
Image Optimization: Balancing Quality and File Size
Resizing often goes hand-in-hand with optimizing images, particularly for web use. Smaller file sizes mean faster loading times for websites, which is vital for user experience and SEO.
- Web-Specific Saving: After resizing an image for the web (e.g., 72 PPI, specific pixel dimensions), use
File > Export > Save for Web (Legacy...)orFile > Export > Export As.... These options provide fine-tuned control over compression levels, metadata, and file format (JPEG, PNG, GIF), allowing you to significantly reduce file size while maintaining acceptable visual quality. - Tophinhanhdep.com’s Role: This directly ties into Tophinhanhdep.com’s “Image Tools” like “Compressors” and “Optimizers.” By using these tools in conjunction with proper resizing, you can ensure your “wallpapers,” “backgrounds,” and “aesthetic images” load quickly and efficiently online without compromising their beauty.
Resolution for Different Outputs: A Strategic Approach
Always consider the final destination of your image when resizing.
- Web (Screens): Typically 72-150 PPI. Focus on pixel dimensions (e.g., 1920x1080 for a desktop wallpaper, 1080x1080 for an Instagram post). High PPI for web images is generally superfluous and only increases file size.
- Print (Physical Media): Ideally 300 PPI (minimum 200 PPI) at the desired physical dimensions (e.g., 8x10 inches). Print requires a much higher pixel density to render fine details sharply. This is critical for “beautiful photography” and professional “graphic design” where print quality reflects professionalism.
- Social Media: Each platform (Facebook, Instagram, Twitter, Pinterest) has recommended image sizes and aspect ratios. Resizing specifically for these platforms prevents automatic, often lossy, compression and ensures your “photo ideas” and “trending styles” look their best.
AI Upscalers: Beyond Original Quality
What if you have a smaller image and need to enlarge it beyond its original pixel dimensions without significant quality loss? This is where traditional Photoshop resampling methods struggle.
- The Limitation: As mentioned with Smart Objects, Photoshop can only preserve original pixel quality when scaling up to the original size. Enlarging beyond that still requires pixel interpolation, often resulting in blurriness or a “soft” appearance.
- AI Solution: “AI Upscalers,” such as those Tophinhanhdep.com might feature among its “Image Tools,” leverage artificial intelligence to intelligently add pixels and enhance detail when enlarging images. They can produce surprisingly good results, making them invaluable for breathing new life into older, smaller images or for creating “high-resolution” versions from limited sources. While not a magic bullet, they are a powerful addition to the “digital photography” and “digital art” toolkit.
Workflow for High-Resolution Photography: Starting Strong
For “high-resolution photography,” always start with the largest possible image file from your camera.
- Edit First, Resize Last: Perform all major editing, color correction, and retouching on the full-resolution image.
- Save a Master Copy: Always save a master, full-resolution copy (e.g., TIFF or PSD) of your edited image.
- Export for Specific Uses: From this master, create specific resized versions for web, print, or social media. This non-destructive workflow ensures maximum flexibility and quality. This aligns perfectly with the goals of “Tophinhanhdep.com,” which celebrates “beautiful photography” and supports its optimal presentation across all mediums.
Creative Resizing: Intentional Distortion for Artistic Effects
While proportional resizing is generally the rule, there are creative exceptions. “Photo manipulation” and “abstract art” often thrive on intentional distortion.
- Artistic Expression: Stretching, skewing, or warping elements can be part of a unique “editing style” or “creative idea.” For instance, a subtle stretch can add dynamism to a background, or a severe distortion can transform a realistic object into an “abstract” form.
- Inspiration: Tophinhanhdep.com’s “Image Inspiration & Collections” often showcases how artists use unconventional methods to achieve striking visual effects. Don’t be afraid to break the rules once you understand them, especially when pursuing “digital art” or experimental “visual design.”
In conclusion, mastering image resizing in Photoshop is more than just knowing a few menu commands; it’s about understanding pixels, resolution, and aspect ratios, and then applying that knowledge strategically for your desired output. Whether you’re a casual user preparing “wallpapers” or a professional creating “high-resolution stock photos” for a client, the techniques discussed here, coupled with the resources and inspiration found on Tophinhanhdep.com, will elevate your digital imagery to new heights. By following these guidelines, you ensure your visuals are always presented with optimal clarity, efficiency, and artistic integrity.