Mastering Image Rotation in Photoshop: A Comprehensive Guide for Tophinhanhdep.com Users

In the vibrant world of digital imagery, where every pixel contributes to a visual narrative, the ability to manipulate and refine images is paramount. For creators and enthusiasts utilizing Tophinhanhdep.com for their aesthetic wallpapers, high-resolution backgrounds, stunning nature photography, or intricate abstract art, understanding fundamental editing techniques in powerful software like Adobe Photoshop is indispensable. One of the most basic yet crucial skills in any digital artist’s toolkit is knowing how to rotate an image in Photoshop.
Whether you’re a professional photographer correcting a slightly crooked horizon in a majestic landscape, a graphic designer perfecting the alignment of text within a digital art piece, or simply someone wanting to adjust a photo for a new thematic collection on a mood board, rotation is a daily necessity. This comprehensive guide, tailored for the Tophinhanhdep.com community, will demystify the various methods of rotating and flipping images and layers in Photoshop, ensuring your visual design projects achieve their full creative potential. We’ll explore everything from quick, full-canvas adjustments to intricate layer manipulations, providing you with the knowledge to enhance your beautiful photography and craft compelling visual experiences.
Fundamental Principles: Understanding Rotation in Photoshop
Before diving into the practical steps, it’s essential to grasp the core concepts of how Photoshop handles rotation. This foundational understanding is key to making informed decisions that align with your specific visual design goals, whether you’re working on high-resolution stock photos or crafting unique creative ideas.
Distinguishing Between Canvas, Image, and Layer Rotation
Photoshop offers different levels of rotation, each with distinct effects on your overall project:
- Canvas Rotation: This refers to rotating the entire workspace, including all visible layers and the background. It’s like physically turning the paper your artwork is on. When you rotate the canvas, the dimensions of your image might change, and blank areas may appear around the rotated content, which will be filled with your selected background color. This is typically used when the entire composition needs a new orientation, such as converting a portrait photo to a landscape orientation by turning it 90 degrees.
- Image Rotation (Conceptual): While often used interchangeably with “canvas rotation” in a broader sense, specifically within Photoshop’s menus, “Image Rotation” applies to the entire composite image, flattening all layers if not handled carefully, or rotating all layers together. It’s an encompassing rotation that affects every pixel visible in your document.
- Layer Rotation: This is the most common and versatile form of rotation for visual design and photo manipulation. With layer rotation, you manipulate individual elements—a photo, a text box, a graphic—without affecting other parts of your composition. This allows for incredible flexibility in arranging elements, creating dynamic layouts, correcting isolated elements, or generating abstract patterns without disturbing the background or adjacent visuals.
Understanding this distinction is vital for avoiding unintended changes and for precisely executing your creative vision for Tophinhanhdep.com’s diverse image categories, from aesthetic backgrounds to complex digital art.
Why Rotation is a Core Skill for Tophinhanhdep.com’s Community
For the users of Tophinhanhdep.com, mastering image rotation isn’t just about technical proficiency; it’s about unlocking a new dimension of creative expression and precision.
- Perfecting Photography: A slightly tilted horizon in a breathtaking nature photograph can detract from its beauty. Rotating allows photographers to correct these minor imperfections, ensuring high-resolution images are impeccably framed. It also facilitates experimental editing styles, such as intentionally tilting photos for a dynamic, trending look.
- Elevating Visual Design: In graphic design and digital art, rotation is fundamental for layout. Elements like logos, text, or abstract shapes often need to be angled precisely to create balance, emphasize a focal point, or guide the viewer’s eye. Photo manipulation heavily relies on rotating composite elements to seamlessly integrate them into a new scene.
- Crafting Aesthetic & Thematic Collections: Whether you’re curating sad/emotional images for a specific mood board or organizing thematic collections of beautiful photography, consistent orientation and intentional tilts can significantly impact the overall aesthetic. Rotation helps in aligning elements to achieve a harmonious flow or to introduce creative ideas that make your collection stand out.
- Optimizing for Various Uses: A single high-resolution image might serve multiple purposes – as a wallpaper, a background, or part of an aesthetic collection. Knowing how to rotate it quickly and effectively ensures it fits diverse aspect ratios and display orientations, maximizing its utility on Tophinhanhdep.com.
By integrating rotation seamlessly into your workflow, you enhance the quality, versatility, and artistic impact of your creations, aligning perfectly with Tophinhanhdep.com’s mission to provide inspiring and high-quality visual content.
Method 1: Rotating and Flipping the Entire Image Canvas
Sometimes, the entire photographic composition or digital artwork needs a fundamental reorientation. This could be due to a camera held at the wrong angle, a scanned document appearing sideways, or a creative decision to view the entire piece from a different perspective. Photoshop’s “Image Rotation” menu offers a straightforward way to achieve these global adjustments, affecting every pixel in your document simultaneously.
To begin, ensure your image is open in Photoshop. You can do this by navigating to File > Open and selecting your desired image.
Preset Rotation Options: Quick Fixes for Common Orientations
The “Image Rotation” submenu provides several predefined options for rapid adjustments, perfect for common correctional needs in digital photography or for quickly reorienting an image for a wallpaper or background.
- “180 degrees”: This option performs a complete flip, turning your image halfway around a full circle. It’s incredibly useful for achieving symmetrical effects, creating inverted versions for abstract digital art, or simply correcting an image that was captured completely upside down. After applying, your original top will now be the bottom, and vice versa.
- “90 degrees CW (Clockwise)”: This is one of the most frequently used options, especially for correcting high-resolution photos taken in portrait mode that automatically saved as landscape, or vice-versa. Clicking this will rotate your entire canvas 90 degrees to the right, or clockwise. It’s a quick and easy way to adjust the orientation of your beautiful photography for a proper display.
- “90 degrees CCW (Counter-Clockwise)”: Conversely, this option rotates your image 90 degrees to the left, or counter-clockwise. It serves the same correctional purpose as 90 degrees CW but in the opposite direction, providing flexibility depending on the original orientation issue.
These preset rotations are ideal for rapid adjustments, especially when preparing large batches of stock photos or images for a thematic collection that needs uniform orientation.

Arbitrary Rotation for Precise Control: Tailoring to Your Creative Ideas
For those moments when a standard 90 or 180-degree turn isn’t quite enough, Photoshop’s “Arbitrary” rotation offers granular control, allowing you to specify an exact angle. This precision is invaluable for visual design, photo manipulation, and creating unique aesthetic effects that require a subtle tilt.
- Navigate to
Image > Image Rotation > Arbitrary.... - A “Rotate Canvas” dialogue box will appear. Here, you can input a specific numerical value in degrees for your rotation. For instance, entering “15” will tilt your image 15 degrees.
- You also have the choice to select the
CW (Clockwise)orCCW (Counter-Clockwise)direction. This flexibility allows for fine-tuning the tilt to match your creative ideas or to achieve specific editing styles. - Click
OKto apply the rotation.
A critical point to remember with arbitrary rotation is the emergence of “free space” around your photo. As the rectangular canvas rotates by an odd angle, corners of the original image might not fill the new canvas dimensions perfectly. This empty space will be filled with your current background color (which can be changed by clicking the background color swatch in the toolbar). For professional high-resolution photography or digital art intended for specific aesthetic uses like wallpapers, it’s often best to change the background color before rotating, or to crop the image afterwards to remove unwanted areas.
Flipping the Canvas for Mirroring Effects: A Tool for Unique Visuals
Beyond rotation, flipping provides a different kind of reorientation, creating a mirrored effect without changing the overall angle. This can be a powerful tool for visual design, particularly for creating symmetrical compositions or unusual abstract art.
- “Flip Canvas Horizontal”: This option mirrors the entire image from left to right. It’s as if you’re looking at the image’s reflection in a vertical mirror. This can be used to achieve perfect symmetry for backgrounds or wallpapers, or to create a dramatic, unsettling effect for sad/emotional imagery.
- “Flip Canvas Vertical”: This mirrors the entire image from top to bottom, as if reflecting it in a horizontal mirror. This can produce interesting abstract compositions or simply reverse the top-to-bottom orientation for specific creative ideas.
These flipping options are distinct from rotation in that they don’t change the spatial angle but rather the handedness or orientation of the content itself. They are valuable additions to your photo manipulation toolkit, enabling unique aesthetic outcomes.
After any rotation or flip, if you’re not satisfied with the result, remember Photoshop’s universal undo shortcut: Ctrl+Z (Windows) or ⌘ Command+Z (Mac). Once you’ve achieved the desired orientation, always save your work by going to File > Save As, choosing a suitable location, filename, and format for your newly adjusted image. This ensures your high-resolution images are ready for integration into Tophinhanhdep.com’s collections.
Method 2: Precision Rotation and Flipping of Individual Layers and Objects
While rotating the entire canvas is useful for global adjustments, the true power of Photoshop for visual design, digital art, and photo manipulation lies in its ability to isolate and manipulate individual elements. This precision is especially critical for Tophinhanhdep.com’s users who work with complex compositions, layering high-resolution stock photos, aesthetic elements, and detailed graphics. Rotating specific layers or objects allows for unparalleled creative control without disturbing other parts of your image.
The Power of Layers: Isolating Your Creative Adjustments
At the heart of Photoshop’s non-destructive editing is the Layers panel. If it’s not visible, activate it by going to Window > Layers. This panel is your control center for managing all individual components of your image.
- Selecting Single or Multiple Layers: To rotate or flip a single element, simply click on its corresponding layer in the Layers panel. To manipulate several elements simultaneously (e.g., a logo and its tagline), hold down
Ctrl(Windows) or⌘ Command(Mac) and click on each desired layer. This allows for synchronized movement and rotation, crucial for maintaining relationships between design elements. - Visibility for Focused Editing: The eye icon next to each layer thumbnail in the Layers panel controls its visibility. Clicking it will hide or show a layer. This feature is invaluable for focusing on a specific element without distractions, ensuring precise rotations and manipulations, especially in busy graphic design projects or intricate photo compositions.
- Unlocking Layers: If a layer displays a padlock icon next to its name, it’s locked and cannot be modified. Simply click the padlock icon to unlock it before attempting any transformations. This often applies to the initial “Background” layer, which might need to be converted to a regular layer (e.g., by double-clicking it) to enable transformations.
This granular control over layers is the cornerstone for creating dynamic and layered aesthetic backgrounds, complex digital art pieces, and seamless photo manipulations often seen in Tophinhanhdep.com’s diverse collections.
Utilizing the Transform Tool for Layer Manipulation
The Transform tool is your primary ally for rotating, scaling, skewing, and distorting individual layers and objects. It provides both quick presets and highly interactive visual control.
To access the transform options, select your desired layer(s) and then navigate to Edit > Transform. Here, you’ll find various options including Rotate, Rotate 180°, Rotate 90° CW, Rotate 90° CCW, Flip Horizontal, and Flip Vertical. These function similarly to the canvas-wide options but apply only to the selected layer(s).
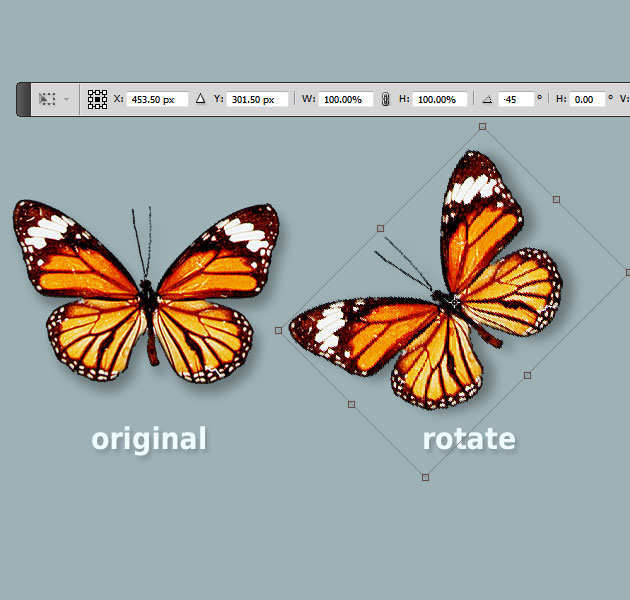
Free Transform (Ctrl+T / Cmd+T) for Intuitive Control
For most users, Free Transform is the go-to method for rotating layers due to its highly visual and interactive nature.
- Activate Free Transform: With your layer(s) selected, press
Ctrl+T(Windows) or⌘ Command+T(Mac). A bounding box will appear around your selected content, indicating it’s ready for transformation. - Visual Click-and-Drag Rotation: Hover your mouse cursor outside any of the four corner handles of the bounding box. The cursor will change into a curved, double-headed arrow, often referred to as a “rotating arrow.” Click and drag your mouse around the pivot point (the small target icon in the center of the bounding box) to visually rotate the layer. This intuitive method is perfect for fluid adjustments in digital art and creative photo manipulation.
- Holding Shift for Precise Increments: For more controlled rotation, hold down the
Shiftkey while dragging. This will “snap” your rotation to 15-degree increments, making it easy to achieve perfectly straight (90-degree) or consistently angled turns, ideal for aligning elements in graphic design or thematic photography. - Entering Exact Degrees in the Options Bar: For absolute precision—crucial for high-resolution stock photos or architectural graphic design—you can input a specific numerical value directly. In the Options Bar at the top of the Photoshop window (which appears when
Free Transformis active), locate the rotation field (often represented by a circular arrow icon). Type in your desired angle (e.g., “30” for 30 degrees clockwise, “-45” for 45 degrees counter-clockwise). This ensures pixel-perfect alignment for aesthetic compositions. - Understanding and Adjusting the Pivot Point: By default, the pivot point (the center around which the rotation occurs) is at the center of your selection. However, you can click and drag this small target icon to any other location on your canvas. This allows you to rotate an object around a specific anchor point—a corner, an edge, or another element in your design—offering an advanced layer of control in photo manipulation and digital art.
- Finalizing the Transformation: Once you are satisfied with the rotation, press
Enter(Windows) orReturn(Mac), or click the checkmark icon in the Options Bar, to commit the changes. To cancel, pressEsc.
Flipping Layers for Dynamic Visuals
The Free Transform tool also offers quick access to flipping layers:
- Activate
Free Transform(Ctrl+T/⌘ Command+T). - Right-click (Windows) or
Control+click(Mac) anywhere inside the bounding box. - From the context menu, choose
Flip HorizontalorFlip Vertical. This allows you to mirror specific elements, creating reflections, symmetrical patterns for abstract wallpapers, or altering the perceived direction of an object within a photo composition.
These layer-specific transformations are essential for Tophinhanhdep.com’s visual design goals, allowing you to create dynamic wallpapers, sophisticated abstract art, or perfectly aligned elements for mood boards and thematic collections.
Rotating Specific Selections, Shapes, and Text
Photoshop extends rotation capabilities beyond entire layers to specific selections, vector shapes, and even text, providing granular control over every element in your visual design.
- Rotating a Selection within a Layer: Sometimes, you only need to rotate a portion of an image within a single layer, such as a logo embedded in a larger texture, or a specific feature in a portrait.
- First, make your selection using any of Photoshop’s selection tools (e.g.,
Quick Selection Tool (W),Lasso Tool (L), orMarquee Tool (M)). - Once the selection is active, activate
Free Transform(Ctrl+T/⌘ Command+T). The bounding box will appear around your selection. - Proceed with rotation as described in the
Free Transformsection above. Be aware that rotating a selection will cut it from its original position within the layer and place it on a new sub-layer, potentially creating empty space that will be filled with transparent pixels or the background color, depending on the context. - Addressing the “White Space” Issue (Rotating a Logo): A common question is how to rotate a logo without introducing white space around it. The key is to first select only the logo itself. Use a precise selection tool like the
Quick Selection ToolorMagic Wand Tool(or evenPen Toolfor crisp edges) to create an outline directly around the logo. Then, applyFree Transform(Ctrl+T/⌘ Command+T). This ensures only the logo pixels are affected, and no extraneous background is included in the rotation, preventing unwanted white borders.
- First, make your selection using any of Photoshop’s selection tools (e.g.,
- Rotating Shapes: Whether you’re working with pre-set shapes (like rectangles or circles) or custom vector shapes, rotation is handled in the same way as any other object.
- Select the shape layer in the Layers panel.
- Activate
Free Transform(Ctrl+T/⌘ Command+T). - Visually rotate by dragging the corners, use
Shiftfor 15-degree increments, or input a precise degree in the Options Bar. This is essential for graphic design, creating dynamic layouts, or arranging abstract elements for a digital art piece.
- Rotating Text Layers: Text in Photoshop is treated as a distinct type of layer, but its rotation follows the same principles as other objects.
- Select the text layer in the Layers panel.
- Activate
Free Transform(Ctrl+T/⌘ Command+T). - Drag outside the bounding box to rotate the text visually, or use the Options Bar for precise angle input. Rotating text is a fundamental skill for creating compelling visual design, from magazine layouts to artistic captions on aesthetic photographs.
Mastering these layer-specific rotation and flipping techniques empowers Tophinhanhdep.com users to unleash their full creative potential, ensuring every element of their high-resolution images, backgrounds, and digital art is perfectly positioned and oriented.
Advanced Techniques and Workflow Optimization for Tophinhanhdep.com
For Tophinhanhdep.com users who consistently handle large volumes of high-resolution images, complex digital art compositions, or intricate photo manipulation projects, understanding advanced rotation techniques is crucial for optimizing workflow and maintaining quality. These methods not only enhance creative control but also significantly improve efficiency.
Working with Smart Objects for Non-Destructive Rotation
Smart Objects are a cornerstone of professional, non-destructive editing in Photoshop, offering immense advantages, especially when it comes to transformations like rotation.
- What are Smart Objects? A Smart Object is a layer that contains raster or vector image data from Photoshop or other Adobe applications (like Illustrator), which preserves the image’s source content with all its original characteristics. Instead of editing pixels directly, you edit the Smart Object, which internally refers to the original content.
- Benefits for Rotation:
- Quality Retention: When you rotate a regular pixel layer repeatedly, Photoshop has to resample the pixels each time, leading to a gradual loss of image quality, especially with high-resolution images. Smart Objects, however, retain their original data. You can rotate, scale, skew, or warp a Smart Object multiple times, and it will always render from the original, uncompromised source data, maintaining crispness. This is vital for stock photos, high-resolution wallpapers, and beautiful photography where fidelity is paramount.
- Easy Scaling and Rotation: You can experiment with different angles and sizes for graphic design elements or photo manipulation without fear of degradation. If you decide to revert to an earlier rotation or try a new one, the Smart Object remembers its original state.
- Updating Instances: If you duplicate a Smart Object, all instances are linked. Rotating one instance (or applying any other transformation) will not affect the others unless you edit the original Smart Object’s content. This is useful for thematic collections or mood boards where you might reuse elements with varied orientations.
- Workflow Integration: For Tophinhanhdep.com’s digital artists and photographers, converting key layers (like imported stock photos, complex logos, or frequently manipulated elements) into Smart Objects by right-clicking the layer in the Layers panel and selecting “Convert to Smart Object” is a best practice. This safeguards image quality through iterative editing styles and complex photo manipulation.
Batch Rotation for Efficiency in Large Collections
Managing extensive collections of images—be it nature photography, aesthetic backgrounds, or high-resolution stock photos—often requires applying the same rotation to many files. Photoshop’s batch processing capabilities, driven by Actions, can save countless hours.
- Automating Rotation: Imagine you have a folder of 100 portrait-oriented images that were incorrectly scanned sideways. Instead of opening and rotating each one individually, you can automate the process.
- Recording an Action:
- Go to
Window > Actionsto open the Actions panel. - Create a new Action set (optional, for organization) and then create a new Action.
- Click the “Record” button.
- Perform the desired rotation on a single sample image (e.g.,
Image > Image Rotation > 90 degrees CW). - Stop recording the Action.
- Go to
- Batch Processing:
- Go to
File > Automate > Batch.... - In the “Batch” dialogue box, select the Action you just recorded.
- For “Source,” choose “Folder” and navigate to the folder containing all the images you want to rotate.
- For “Destination,” choose “Folder” to save the rotated images to a new location (highly recommended to avoid overwriting originals), or “Save and Close” if you’re confident.
- Click
OK. Photoshop will then automatically open each image, apply the recorded rotation, and save it, dramatically streamlining your workflow for large thematic collections or preparing images for Tophinhanhdep.com.
- Go to
This feature is invaluable for photographers and content creators managing vast archives, ensuring consistency across their image collections and optimizing images for various uses, from wallpapers to digital art.
Canvas Rotation vs. View Rotation: A Crucial Distinction
When discussing “how do I rotate an image in Photoshop,” it’s critical to differentiate between rotating the actual image data and merely rotating your view of the canvas. This distinction impacts the final output for high-resolution images and visual design projects.
- Permanent Canvas Rotation (
Image > Image Rotation): As discussed in Method 1, this command physically reorients the pixels and the document’s dimensions. If you rotate an image 90 degrees, its width becomes its height and vice-versa (unless cropped). This is a permanent change to the image data and how it will be saved and displayed. It’s used when the image’s inherent orientation is incorrect or needs to be fundamentally altered for its intended use (e.g., a properly oriented wallpaper or background). - Rotate View Tool (
Rshortcut): This tool (View > Rotate Viewor pressingR) allows you to temporarily rotate your perspective of the canvas without affecting the actual image data. It’s like turning your monitor or tilting your head. This is incredibly useful for ergonomic editing, especially when working on detailed photo manipulation, digital art, or intricate graphic design where drawing or painting at an awkward angle is uncomfortable. You can freely rotate the view to find the most natural angle for your hand, then easily reset it to 0 degrees when done. The image itself remains unchanged and will export in its original orientation.
Understanding these two approaches ensures that your final high-resolution images are correctly oriented for their intended purpose on Tophinhanhdep.com, whether they’re aesthetic backgrounds, beautiful photography, or elements for a mood board. Permanent rotation is for final output, while view rotation is for comfortable and precise editing. Both contribute to a refined workflow, particularly when dealing with subsequent image tools like converters, compressors, or AI upscalers, as the orientation can impact their processing.
Conclusion: Elevating Your Visuals with Expert Rotation
The journey to mastering “how do I rotate an image in Photoshop” is a fundamental step for any digital artist or photographer, especially for the discerning community of Tophinhanhdep.com. We’ve traversed the various pathways Photoshop offers, from the straightforward global adjustments of the entire canvas to the intricate, layer-specific manipulations that define sophisticated visual design.
From correcting the slight tilt in a high-resolution nature photograph to precisely aligning elements within an abstract digital art piece, and from flipping a background for a unique aesthetic to batch-processing stock photos for an entire thematic collection, the power of rotation is undeniable. We’ve explored the direct Image Rotation menu for quick, predefined turns and arbitrary angles, delved into the versatility of the Transform and Free Transform tools for individual layers, shapes, and text, and touched upon advanced techniques like Smart Objects for non-destructive editing and Actions for workflow optimization. The crucial distinction between permanent canvas rotation and temporary view rotation was also highlighted, emphasizing the importance of intent in your editing styles.
For Tophinhanhdep.com users, every rotation isn’t just a technical adjustment; it’s a creative decision that impacts the overall impact and message of your images. Mastering these tools empowers you to elevate your beautiful photography, craft compelling graphic design layouts, execute flawless photo manipulation, and bring your most innovative creative ideas to life. Practice and experimentation are your greatest allies. Try out different angles, explore various flipping techniques, and integrate these methods into your daily workflow.
Tophinhanhdep.com is dedicated to providing inspiration and resources that empower you to create, share, and enjoy stunning visual content. By refining your Photoshop skills, starting with fundamental techniques like image rotation, you not only enhance the quality of your personal work but also contribute to a richer, more diverse collection of aesthetic wallpapers, high-resolution backgrounds, and captivating imagery for everyone to enjoy. Keep creating, keep exploring, and let your visuals speak volumes.