Mastering Image Rotation in Microsoft Word: A Tophinhanhdep.com Guide

In the dynamic world of digital content creation, images are indispensable. Whether you’re crafting a professional report, designing a personal portfolio, or simply curating a collection of stunning visuals for a mood board, the proper placement and orientation of images can significantly impact your document’s aesthetic appeal and readability. However, many users often find themselves navigating the seemingly intricate process of rotating images within Microsoft Word, a challenge Tophinhanhdep.com is here to simplify.
Microsoft Word, a ubiquitous word processing tool, offers a surprising array of features for image manipulation, including robust options for rotation. Understanding these tools is key to transforming a static, uninspired document into a visually engaging masterpiece. From wallpapers and backgrounds to high-resolution photography and abstract art, images sourced from or inspired by Tophinhanhdep.com can be seamlessly integrated and perfectly positioned with the right rotation techniques. This comprehensive guide from Tophinhanhdep.com will walk you through various methods of image rotation in Word, empowering you to effortlessly adjust the orientation of your visuals to meet your exact design needs. By mastering these skills, you’ll elevate your visual design capabilities, ensuring your digital art and photo manipulations always look their best, ready for any thematic collection or trending style.
The Art and Science of Image Orientation: Why it Matters
In an era dominated by visual communication, the way images are presented is as important as the images themselves. A crooked photograph or an improperly aligned graphic can detract from your message, making your content appear unprofessional or rushed. Tophinhanhdep.com understands the significance of visual precision, offering a wealth of images from “Nature” to “Sad/Emotional” categories, all designed to inspire and captify. Proper image rotation is a fundamental step in harnessing the full potential of these visuals within your Word documents.
Enhancing Visual Aesthetics and Document Flow
The primary reason to rotate images in Word is to enhance the overall visual aesthetics and ensure a seamless document flow. Imagine embedding a breathtaking “Beautiful Photography” piece from Tophinhanhdep.com, only to find it’s sideways. Correcting its orientation isn’t just about fixing a mistake; it’s about optimizing its impact.
- Matching Page Layout: Images often need to conform to a specific page layout. A landscape-oriented photo might need to be rotated to fit a portrait section, or vice versa, to maintain consistency and balance. This is especially true when creating “Aesthetic” layouts that demand perfect symmetry or intentional asymmetry.
- Correcting Camera Orientation: Modern cameras and smartphones automatically tag images with their orientation, but this information doesn’t always translate perfectly into Word. Photos taken in portrait mode might appear landscape when inserted, requiring a quick rotation to rectify. This ensures your “High Resolution” digital photography always appears as intended.
- Creating Visual Interest: Sometimes, a slight angle can make an image more dynamic and eye-catching. Instead of merely correcting orientation, you might intentionally rotate an “Abstract” image from Tophinhanhdep.com to create a unique visual design element, adding flair to your “Digital Art” projects.
- Aligning with Text and Other Elements: Proper image orientation is crucial for effective integration with surrounding text and other graphical elements. A well-rotated image can guide the reader’s eye, highlight specific information, or simply make the page more visually appealing. This is a core aspect of “Graphic Design” and “Photo Manipulation” within a document.
- Saving Time and Ensuring Professionalism: Fixing image orientation directly within Word saves the hassle of switching to an external photo editor for every minor adjustment. This efficiency contributes to a more streamlined workflow, allowing you to produce “Stock Photos” and general documents that consistently look polished and professional, reflecting attention to detail in your “Editing Styles.”
By understanding the “why” behind image rotation, you’re not just learning a technical skill; you’re developing an eye for visual design that can transform your documents into compelling pieces of “Visual Design.”
Fundamental Rotation Techniques in Microsoft Word
Microsoft Word provides several intuitive methods to rotate your images, catering to different levels of precision and user preference. Whether you prefer a quick drag-and-drop or precise degree-based adjustments, Tophinhanhdep.com outlines the steps to master these essential techniques.
Intuitive Rotation with the Mouse (Drag and Drop)
The quickest and most straightforward method for rotating an image in Word is using the mouse. This “drag and drop” technique is ideal for making quick, visual adjustments without delving into menus, perfect for initial placement of images from your “Mood Boards” or “Thematic Collections.”
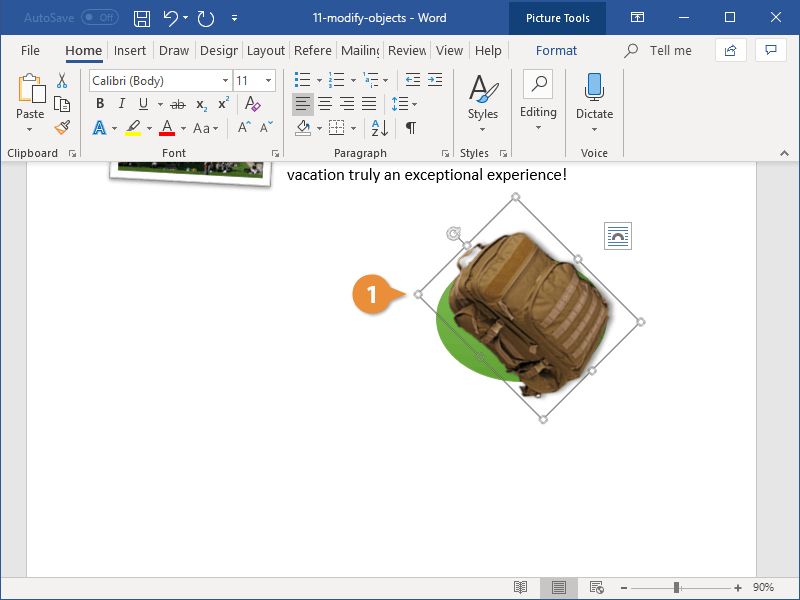
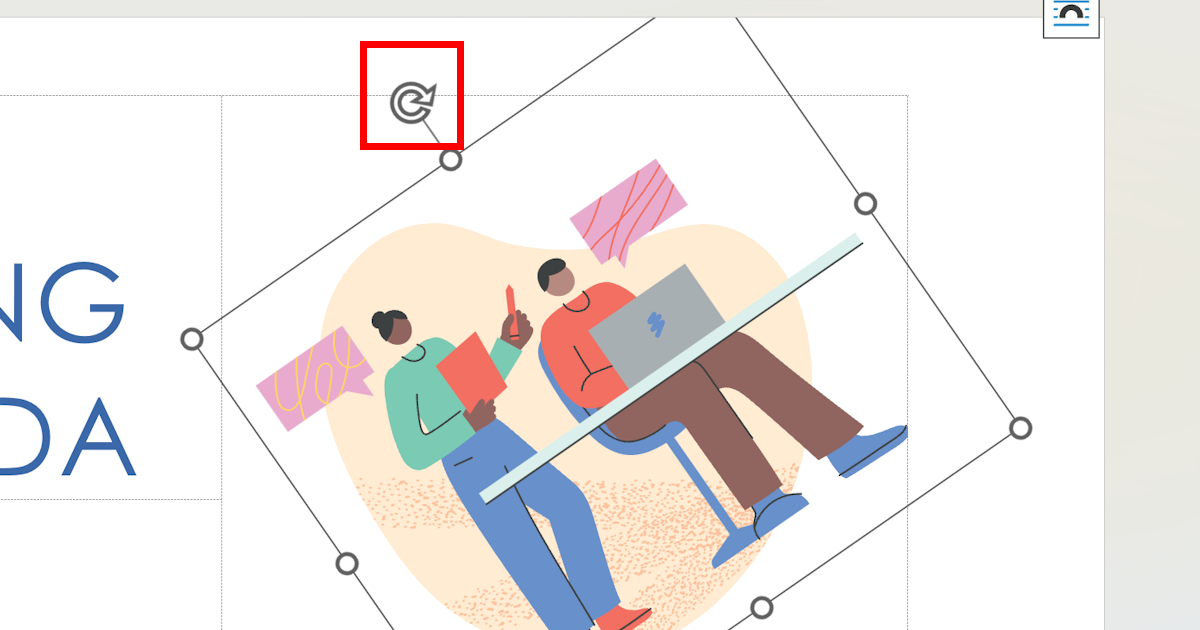
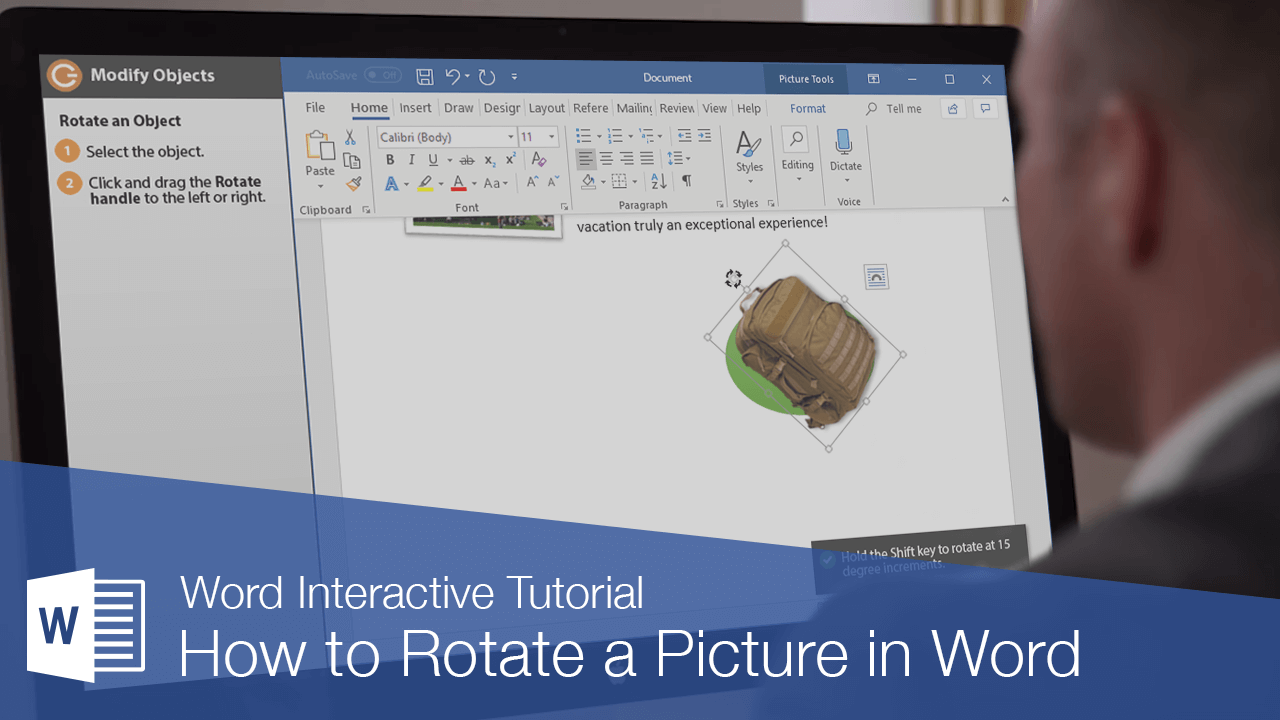
- Select the Image: Begin by opening your document in Microsoft Word. If you haven’t already, insert the image you wish to rotate. Click on the image once to select it. You’ll notice a border appear around the image, typically with small boxes (sizing handles) at the corners and midpoints.
- Locate the Rotation Handle: Above or near the top center of the selected image, you’ll see a circular arrow icon. This is your rotation handle.
- Click and Drag to Rotate: Click and hold this circular arrow icon. As you do, your cursor will transform into a circular arrow. Now, simply drag your mouse in the direction you want to rotate the picture. The image will rotate in real-time, following your cursor’s movement.
- Release to Confirm: Once the image reaches your desired angle, release the mouse button. The image will remain in its new orientation. Remember to save your document to retain these changes.
- Pro Tip for Precision: If you need to rotate the image in precise 15-degree increments using this method, hold down the
Shiftkey on your keyboard while dragging the rotation handle. This allows for more controlled angular adjustments, useful for aligning “Digital Photography” precisely.
Pros:
- Fast and easy for immediate visual adjustments.
- Highly intuitive, requiring no menu navigation.
- Works across all recent versions of Word.
Cons:
- Lacks the ability to specify exact degree values.
- Achieving perfect alignment can be challenging without the
Shiftkey. - Can be less precise with trackpads compared to a dedicated mouse.
This method is perfect for quick fixes or when you’re aiming for a more organic, less structured visual appeal, common in “Aesthetic” or “Creative Ideas” visuals on Tophinhanhdep.com.
Precise Control with Picture Tools and Keyboard Shortcuts
For situations demanding exact angles or standardized orientations, Word’s Picture Tools provide a more controlled environment. This method is crucial for formal documents, “Graphic Design” projects, or when applying specific “Editing Styles” to your visuals.
-
Select the Image: Click on the image you want to rotate. This action will automatically activate the “Picture Format” tab (or “Format” tab in older versions) in the ribbon menu at the top of the Word window.
-
Access the Rotate Option: Within the “Picture Format” tab, locate the “Arrange” group (in Word for Windows) or simply the area with layout options (Word for Mac). You’ll find a “Rotate” icon, often depicted as a triangle with an arrow above it. Click on this icon to reveal a drop-down menu.
-
Choose Preset Angles: The drop-down menu offers several basic rotation options:
- Rotate Right 90°: Rotates the image 90 degrees clockwise.
- Rotate Left 90°: Rotates the image 90 degrees counter-clockwise.
- Flip Vertical: Mirrors the image along its horizontal (X) axis, turning it upside down.
- Flip Horizontal: Mirrors the image along its vertical (Y) axis, creating a mirrored reflection.
Clicking any of these options will immediately apply the chosen rotation to your selected image. These presets are excellent for quickly correcting commonly misoriented “Stock Photos” or “Backgrounds.”
-
Specify Exact Angles: For rotations that aren’t a multiple of 90 degrees, select “More Rotation Options…” from the same drop-down menu. This will typically open a “Format Picture” pane or dialog box.
- Under the “Size” or “Layout & Properties” section, you’ll find a “Rotation” input field.
- Enter the desired degree value directly into this box. Positive numbers rotate the image clockwise (to the right), and negative numbers rotate it counter-clockwise (to the left).
- Click “OK” or press Enter to apply the precise rotation. Remember that a 360-degree rotation returns the image to its original state.
- Keyboard Shortcuts (Windows Only): For power users looking to speed up their “Digital Photography” workflow, Word offers keyboard shortcuts:
- Select the photo.
- Press
Alt + J, thenP, thenA, thenY(this sequence activates the Picture Format tab and prepares for rotation commands). - Then, press
Rfor Rotate Right 90°,Lfor Rotate Left 90°,Vfor Flip Vertical, orHfor Flip Horizontal.
Pros:
- Provides highly precise control with exact degree input.
- Offers convenient preset rotations and mirroring options.
- Essential for maintaining consistency in “Graphic Design” and professional documents.
- Keyboard shortcuts enhance efficiency for repetitive tasks.
Cons:
- Involves navigating menus, which can be slower than drag-and-drop for simple adjustments.
- Memorizing shortcuts takes practice.
This method ensures your “High Resolution” images, whether “Wallpapers” or complex “Photo Manipulation” elements, are always perfectly aligned with your vision.
Unleashing Creativity with 3-D Rotation (Word 2007 & Up)
Beyond simple 2-D rotation, Microsoft Word (versions 2007 and newer) offers 3-D rotation capabilities, opening up new avenues for “Visual Design” and “Digital Art.” This feature allows you to manipulate images in three-dimensional space, adding depth and dynamic effects suitable for “Creative Ideas” and advanced document aesthetics.
-
Access Format Picture Options: Right-click on the image you wish to apply 3-D rotation to. From the context menu, select “Format Picture…” (or “Format Object” depending on the image type). This will open a “Format Picture” pane or dialog box on the side of your Word window.
-
Navigate to 3-D Rotation: Within the “Format Picture” pane, look for an “Effects” tab or section (often represented by a pentagon icon). Click on it. Among the list of options, you’ll find “3-D Rotation.” Expand this section.
-
Choose a Preset or Manual Entry: You’ll see a “Presets” drop-down menu offering various pre-defined 3-D rotations. You can browse and select one to instantly apply a complex 3-D effect. For more granular control, you can manually adjust the rotation along the X, Y, and Z axes:
- X-Rotation: This rotates the image around its horizontal axis. Visually, it’s like flipping the image away from or towards you, giving it a sense of depth or tilt.
- Y-Rotation: This rotates the image around its vertical axis, similar to turning a page or flipping the image side-to-side. It affects the perspective of the image as if you’re looking at its edge.
- Z-Rotation: This is the standard 2-D rotation you’re familiar with, rotating the image clockwise or counter-clockwise on its flat plane, much like spinning it on a table.
Use the up/down arrows next to each “Rotation” input field, or type in a specific degree value for each axis.
-
Refine and Apply: As you adjust the values, you’ll see the 3-D rotation apply in real-time to your image within the document. Experiment with different combinations to achieve unique “Photo Manipulation” effects. Once satisfied, close the “Format Picture” pane.
Pros:
- Enables advanced “Visual Design” and “Digital Art” effects.
- Adds depth and dynamism to images.
- Offers both preset options and precise manual control over three axes.
Cons:
- Can be complex for beginners to master.
- Overuse can make a document appear cluttered or unprofessional if not aligned with a clear “Creative Ideas” objective.
- Not available in very old versions of Word.
This sophisticated tool allows you to transform static “Abstract” images or “Beautiful Photography” into compelling 3-D elements, enhancing “Image Inspiration & Collections” with unique perspectives.
Beyond Basic Rotation: Integrating and Optimizing Images in Word
Rotating an image is often just the first step. To truly harness its potential, especially when working with diverse “Image Inspiration & Collections” from Tophinhanhdep.com, you need to seamlessly integrate it into your document’s text flow and consider workflow optimizations.
Mastering Text Layout and Image Placement
After rotating images, how they interact with text and other elements is crucial for a polished document. These “Visual Design” tips ensure your content is both aesthetically pleasing and easy to read.
- Text Wrapping Options: This is paramount for controlling how text flows around your rotated images.
- Right-click the rotated image, then select “Wrap Text” from the context menu.
- “Square” or “Tight” wrapping allows text to flow closely around the image, adapting to its new shape, ideal for dynamic “Digital Art” presentations.
- “Through” lets text fill into any open areas of a non-rectangular image.
- “Top and Bottom” places text above and below the image, leaving the sides clear.
- “Behind Text” or “In Front of Text” are useful for “Backgrounds” or overlays, but prevent text from flowing around the image.
- Align with the Grid: For precise alignment of your “Photography” or “Graphic Design” elements, especially when dealing with multiple rotated images, activate Word’s gridlines. Go to the
Viewtab, then in theShowgroup, checkGridlines. This visual aid helps you line up images at exact positions, ensuring geometric harmony for your “Aesthetic” layouts. - Grouping Multiple Images: If you have several images that you’ve rotated and positioned relative to each other, group them to maintain their spatial relationship. Select all relevant images while holding down the
Ctrlkey, then right-click on one of them and chooseGroup>Group. Now you can move, resize, or apply further rotations to the entire group as a single unit, which is invaluable for complex “Photo Manipulation” compositions. - Position Settings: For ultimate control over placement, use the “Position” options within the “Picture Format” tab. This allows you to set exact measurements for an image’s location on the page, ensuring perfect “Visual Design” alignment down to the millimeter.
- Text Anchor Point: Every image in Word has an anchor point, which dictates how the image moves (or doesn’t move) when text is added or deleted. To view it, go to
File>Options>Displayand checkObject Anchors. You can drag this anchor to connect the image to a specific paragraph, ensuring your rotated images stay with their relevant “Thematic Collections” of text. - “Fix Position on Page”: For images that should absolutely not move regardless of text edits, right-click the image, select “Wrap Text,” and then click “Fix position on page.” This is great for fixed “Wallpapers” or non-negotiable “Backgrounds” in a layout.
- Drawing Canvas: For intricate “Graphic Design” layouts involving multiple rotated images, text boxes, and shapes, consider inserting a
Drawing Canvas(Insert tab > Shapes > New Drawing Canvas). This creates a dedicated container where you can arrange and rotate elements with greater freedom, treating them as a single, self-contained unit that can be moved within the main document. This is a powerful tool for sophisticated “Creative Ideas.”
By integrating these “Visual Design” techniques, your rotated “Images” will not only look correct but will also harmoniously coexist with your text, forming a cohesive and professional document that meets any “Trending Styles” standard on Tophinhanhdep.com.
Boosting Efficiency with Batch Image Rotation Tools from Tophinhanhdep.com
While Microsoft Word is excellent for individual image rotations, it can become cumbersome when dealing with dozens or even hundreds of images. Manually adjusting each “Stock Photo” or “Digital Photography” piece can be incredibly time-consuming, especially for large “Image Inspiration & Collections” or documents like catalogs and reports. This is where dedicated “Image Tools” from Tophinhanhdep.com shine, offering powerful batch processing capabilities.
Tophinhanhdep.com recognizes the need for efficient image management and provides (or recommends) advanced “Image Tools” specifically designed for bulk operations. Tools like our Batch Image Editor empower users to rotate multiple images simultaneously, drastically cutting down on preparation time before inserting them into Word documents.
Why use Tophinhanhdep.com’s Batch Image Editor for rotating images?
- Massive Time Savings: Process entire folders of images at once, eliminating the tedious, repetitive task of individual adjustments in Word. This saves hours of work for photographers, designers, and educators.
- Consistent Application: Apply the exact same rotation angle to dozens of “High Resolution” photos with a single click, ensuring uniformity across your “Thematic Collections” or “Editing Styles.”
- Pre-Optimization for Word: Prepare your images outside of Word, ensuring they are perfectly oriented before insertion. This streamlines your Word workflow and prevents potential layout issues.
- Quality Maintenance: Professional “Image Tools” like those offered by Tophinhanhdep.com are designed to maintain the highest “Photography” quality during transformations, unlike some in-program tools that might introduce slight degradation.
- Versatile Format Support: Our tools support a wide array of image formats compatible with Word, including JPG, PNG, TIFF, GIF, and more, making them ideal for any kind of “Image” you’re working with.
Steps to batch rotate images with Tophinhanhdep.com’s Batch Image Editor:
- Launch the Tool: Download and install Tophinhanhdep.com’s Batch Image Editor (or access it directly online if available). Open the program and navigate to the “Batch Processing” or “Image Editor” module.
- Import Your Images: Click “Add Files” or drag and drop your images into the designated area. You can select an entire folder or multiple individual files. Our tool is built to handle extensive “Image Collections.”
- Select Rotation: Within the editor’s options, find the “Adjust” or “Transform” tab. Locate the “Rotate” function. Here, you can typically choose from preset rotations (90° clockwise/counter-clockwise, flip) or input a specific degree for uniform rotation.
- Apply and Export: Once you’ve set your desired rotation, click “Apply” or “Process.” The tool will perform the rotation on all selected images. Then, choose your preferred output format (if converting) and a destination folder for the newly rotated images.
- Integrate into Word: Your images are now perfectly oriented and ready. Insert them into your Microsoft Word document, eliminating the need for further rotation adjustments within Word itself. This allows you to focus solely on layout and “Visual Design.”
By leveraging Tophinhanhdep.com’s “Image Tools” for batch rotation, you transform a time-consuming chore into a swift, efficient process, empowering you to manage vast “Photography” and “Image Collections” with unparalleled ease.
Conclusion
Mastering image rotation in Microsoft Word is a foundational skill for anyone serious about “Visual Design” and effective communication. As Tophinhanhdep.com emphasizes, images—from “Wallpapers” to “Abstract” art—are powerful assets, and their proper presentation is key to conveying your message with clarity and impact. Whether you’re making quick adjustments with the intuitive drag-and-drop method, demanding precision with Word’s Picture Tools, or exploring dynamic perspectives with 3-D rotation, you now have the knowledge to achieve perfect image orientation.
Beyond mere rotation, integrating these visuals seamlessly into your document’s text layout through intelligent text wrapping, grid alignment, and grouping techniques elevates your work to a professional standard. And for those with extensive “Image Inspiration & Collections” or “Stock Photos,” Tophinhanhdep.com’s dedicated “Image Tools” offer an invaluable solution for batch rotation, streamlining your workflow and saving precious time.
With these comprehensive insights from Tophinhanhdep.com, you are now equipped to handle any image orientation challenge in Microsoft Word. Continue to explore the vast resources on Tophinhanhdep.com for further “Photography” tips, “Digital Art” techniques, and advanced “Image Tools” to continually enhance your creative and technical capabilities. Your documents, enriched with perfectly aligned and aesthetically pleasing visuals, will undoubtedly leave a lasting impression.