How to Save an Image on Your Mac: A Comprehensive Guide for Visual Enthusiasts on Tophinhanhdep.com

In today’s visually-driven world, capturing and curating images is an essential part of our digital lives, whether for personal enjoyment, creative projects, or professional endeavors. Macs, renowned for their intuitive design and powerful visual capabilities, make saving images a seamless experience. As enthusiasts of beautiful photography, captivating wallpapers, and innovative visual design, we at Tophinhanhdep.com understand the importance of easily acquiring and managing digital imagery. This extensive guide will walk you through every method of saving images on your Mac, from simple drag-and-drop techniques to more advanced strategies for organizing and optimizing your visual assets, all while exploring how Tophinhanhdep.com serves as your ultimate resource for high-quality images and powerful image tools.
Whether you’re looking to download a stunning nature wallpaper for your desktop, collect abstract art for a mood board, save high-resolution stock photos for a graphic design project, or simply preserve a memorable image from an email, mastering the art of saving images on your Mac is a fundamental skill. Tophinhanhdep.com is dedicated to providing you with an expansive collection of images, from aesthetic backgrounds to poignant sad/emotional photography, along with cutting-edge image tools like AI upscalers and compressors. By the end of this article, you’ll not only be proficient in saving images to your Mac but also adept at leveraging them for your creative pursuits, supported by the vast resources available on Tophinhanhdep.com.
Fundamental Methods for Saving Images on Mac
Saving images on a Mac is surprisingly straightforward, offering several intuitive methods to suit different situations and user preferences. Unlike some non-Mac computers that rely heavily on a physical “right-click” button, Macs often employ contextual menus triggered by specific key combinations or trackpad gestures. Understanding these core methods is your first step to building a magnificent image collection, perhaps filled with trending styles and thematic collections found on Tophinhanhdep.com.
Using the Context Menu for Direct Downloads
The context menu, often referred to as the “right-click menu,” is perhaps the most common and versatile way to save an image from almost any source on your Mac. This method allows you to directly interact with an image and choose from a variety of actions, including saving it to your local storage.
Here’s how to use the context menu:
- Locate Your Desired Image: Open your web browser (like Safari, Chrome, or Firefox), an email client (such as the default Mail app or Gmail in a browser), or a document containing the picture you wish to save. This could be anything from a breathtaking landscape photograph from Tophinhanhdep.com’s nature collection to an abstract wallpaper that catches your eye.
- Initiate the Context Menu:
- With a mouse: Hold down the Control (Ctrl) key on your keyboard, then click the image.
- With a trackpad: Use two fingers to tap or click on the image. Many Mac users prefer this method for its speed and convenience.
- Force Touch trackpad: On newer MacBooks with a Force Touch trackpad, you might also achieve a context menu by clicking and holding the image with a firm press.
- Select “Save Image As…” or “Save Image to Downloads”:
- If you see “Save Image to Downloads” (common in Safari and some other browsers), clicking this will immediately download the image to your Mac’s default “Downloads” folder. This is a quick solution when you don’t need to specify a location or rename the file immediately.
- If you choose “Save Image As…” (or sometimes “Download Image As…”), a dialog box will appear. This option provides more control:
- Name: You can rename the image file to something more descriptive. This is excellent for organizing images, especially when collecting similar thematic collections from Tophinhanhdep.com.
- Where: You can select a specific folder on your Mac where you want to save the image. This could be your “Desktop,” “Pictures” folder, or a custom folder you’ve created for your visual design projects or mood boards.
- Format: In some cases, you might even have the option to choose a different file format (e.g., JPEG, PNG, WEBP), though this is less common for direct web downloads and more applicable to images you’ve edited.
- Confirm Your Choice: After selecting your preferred options, click “Save” to finalize the download. The image will now be stored on your Mac, ready for use as a wallpaper, a background, or as a component in your next creative idea.

The Efficiency of Drag-and-Drop
For an even faster and more visual way to save images, especially when you want to quickly place them on your desktop or into an open folder, the drag-and-drop method is invaluable. This technique is particularly popular among digital artists and graphic designers who frequently move visual elements around their workspace.
Here’s how to save an image using drag-and-drop:
- Locate Your Image: Find the image you want to save. Whether it’s high-resolution photography from Tophinhanhdep.com or an aesthetic graphic you’ve stumbled upon, make sure it’s displayed clearly in your browser or application.
- Prepare Your Destination: For maximum efficiency, ensure that your Mac’s desktop or the target folder is visible. You might need to resize your browser or application window slightly to reveal some of the desktop area or open the desired folder in a Finder window.
- Click and Hold: Place your mouse pointer over the image. Click and hold down the primary mouse button (or tap and hold with one finger on the trackpad).
- Drag the Image: While still holding down the click, drag the image away from its original location. You should see a transparent thumbnail or a ghosted version of the image moving with your cursor.
- Drop the Image: Drag the image to your desired location. This could be directly onto your desktop, into an open Finder window displaying a specific folder, or even into an application that accepts image drops (like the Photos app, a word processor, or a graphic design program). Once the cursor is over the target location, release the mouse button or lift your finger from the trackpad. You’ll usually see a green circle with a white plus sign (+) indicating that the image will be copied there.
The image file will immediately appear in the destination you chose. This method is incredibly intuitive for quickly populating a mood board folder or grabbing a beautiful background directly from Tophinhanhdep.com for immediate use.
Saving Images from Various Sources on Your Mac
Images come from countless sources across the digital landscape. While the fundamental saving methods (context menu and drag-and-drop) remain consistent, the specific steps or considerations can vary slightly depending on where you encounter the image. Tophinhanhdep.com emphasizes versatility in image acquisition, whether you’re sourcing inspiration from the web or receiving important attachments via email.
From Web Browsers: Safari and Beyond
The internet is an endless gallery of visual content. Tophinhanhdep.com itself is a prime example, offering a curated selection of wallpapers, backgrounds, and beautiful photography. Saving images from a web browser like Safari, Chrome, or Firefox is a common task.
- Find Your Image: Browse Tophinhanhdep.com or any other website until you find an image you want to save. Look for high-resolution images, as these offer the best quality for wallpapers, digital art projects, or potential AI upscaling later.
- Right-Click (Control-Click) or Two-Finger Tap: As described above, use your preferred method to open the context menu on the image.
- Choose Your Saving Option:
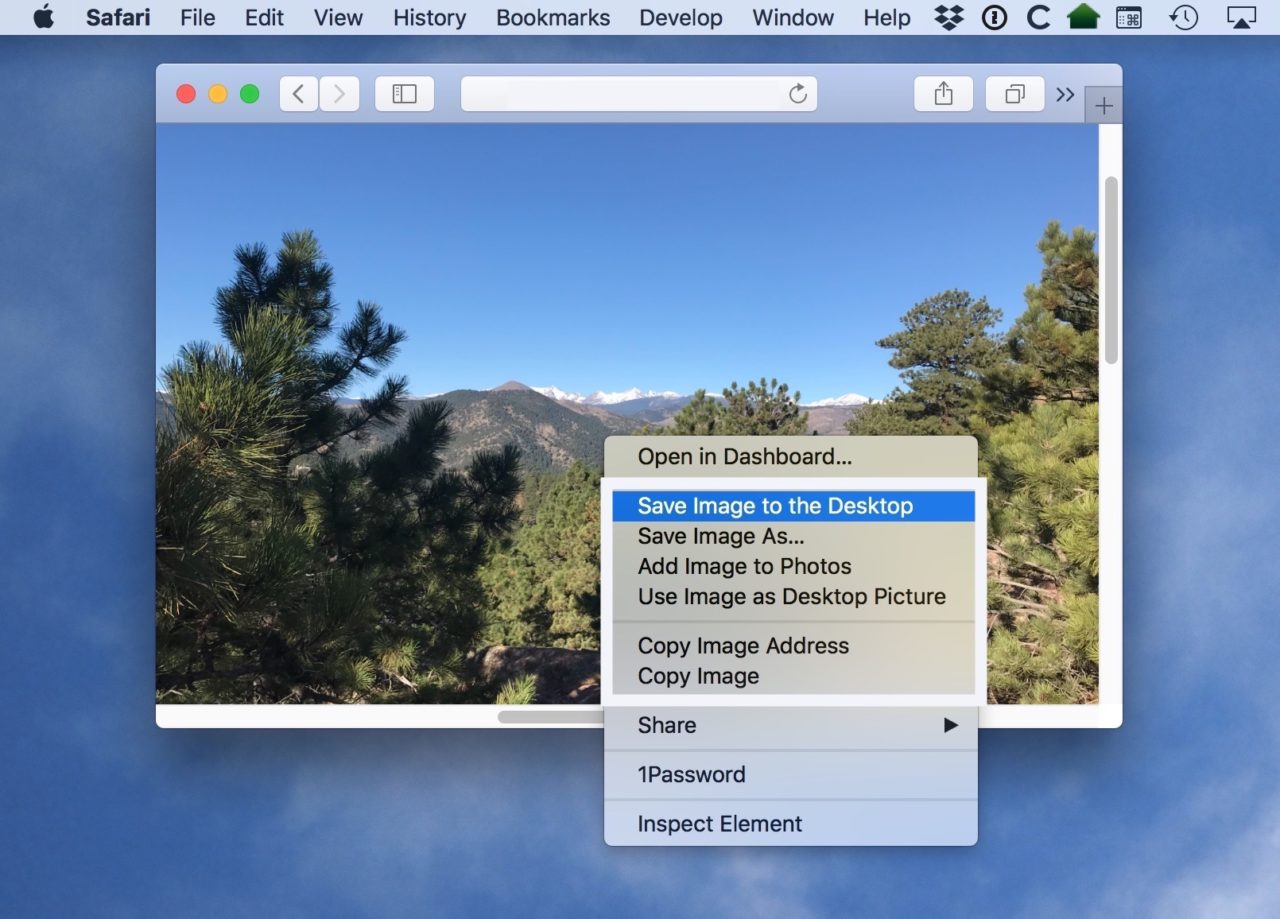
- “Save Image to the Desktop” (Safari Specific): This option, often appearing first in Safari’s context menu, provides an instant download to your desktop. It’s ideal for quick access if you plan to immediately open the image in an editing suite for photo manipulation or use it as a temporary background.
- “Save Image As…”: This is the more flexible option. It allows you to specify a file name and choose any destination on your Mac, including external drives or network-attached storage. This helps keep your digital photography collection organized and your desktop uncluttered.
- “Add Image to Photos”: This convenient option, particularly useful for personal collections, automatically imports the image directly into your Photos app library. This integrates the image with your existing photo management system, allowing for easy tagging, album creation, and sharing across your Apple devices (provided iCloud Photos is enabled). This is perfect for collecting aesthetic photos or thematic collections from Tophinhanhdep.com into a central hub.
- “Use Image as Desktop Picture”: A single click can transform your screen with a new wallpaper. macOS will automatically scale the image to fit your display. Be mindful of the image’s original resolution; a low-resolution image stretched across a large display might appear pixelated, diminishing the impact of what might have been a stunning nature image. For best results, seek out high-resolution wallpapers on Tophinhanhdep.com.
- Drag-and-Drop: Alternatively, simply drag the image from the browser window directly to your desktop or an open folder, as detailed in the previous section. This is often the fastest way to grab multiple images for a mood board or to gather photo ideas.
Email Attachments: Apple Mail, Gmail, and More
Receiving images via email is incredibly common, whether it’s beautiful photography from a friend or a graphic for a visual design project. Saving these attachments from various email clients on your Mac is straightforward.
Saving from Apple Mail (Default Mac Mail Client)
The default Mail app on your Mac offers several ways to handle image attachments, from individual saves to batch downloads.
- Open the Email: Launch the Mail app and select the message containing the images. Images might appear inline (within the body of the message) or as attachments at the bottom.
- Individual Image Save:
- Right-click (Control-click) on the image: If the image is inline, this will bring up a context menu.
- Select “Save Image As…”: Choose a location, rename the file if desired, and click “Save.”
- “Save to Downloads Folder”: A quicker option for direct download.
- “Export to Photos”: This is an excellent way to automatically add the image to your Photos app library, making it accessible across all your iCloud-connected devices. Ideal for pictures you want to integrate into your personal photography collection.
- Drag-and-Drop: You can also simply drag an inline image directly from the email body to your desktop or any open folder.
- Saving All Images (Batch Download): This is a huge time-saver if an email contains multiple photos, like a vacation album or a collection of aesthetic backgrounds from Tophinhanhdep.com that a colleague sent.
- Hover over the Subject Bar: Move your mouse cursor just below the email’s header information (sender, subject, date). An action bar will appear.
- Click the Paperclip Icon: This icon represents attachments. A drop-down menu will appear.
- Select “Save All…”: A dialog box will open, allowing you to choose a location on your Mac to save all the attached images. Click “Save” to download them as a collection. You can also “Export All to Photos” for seamless integration.
Saving from Gmail (Web-based)
If you access Gmail through your web browser, the process is slightly different but still very user-friendly.
- Open the Email: Sign in to Gmail.com and open the email that has the image attachments.
- Identify Attachments: Images might be displayed as thumbnails below the email body or as larger previews. A red icon with triangles often indicates an image attachment.
- View and Download:
- Click the Image Thumbnail: This will open the image in a new, full-screen view within Gmail.
- Click the Download Icon: In the upper-right corner of this new screen, you’ll see a down arrow icon (the download button). Clicking this will download the image to your Mac’s default “Downloads” folder.
- Right-Click/Drag-and-Drop: You can also right-click (Control-click) on the image preview within the email or in its full-screen view, and then choose “Save Image As…” or drag it directly to your desktop.
Leveraging the Messages App for Visual Content
The Messages app on your Mac is another frequent source of images, often containing personal photos, funny memes, or quick visual references. Saving these is as simple as saving from other sources.
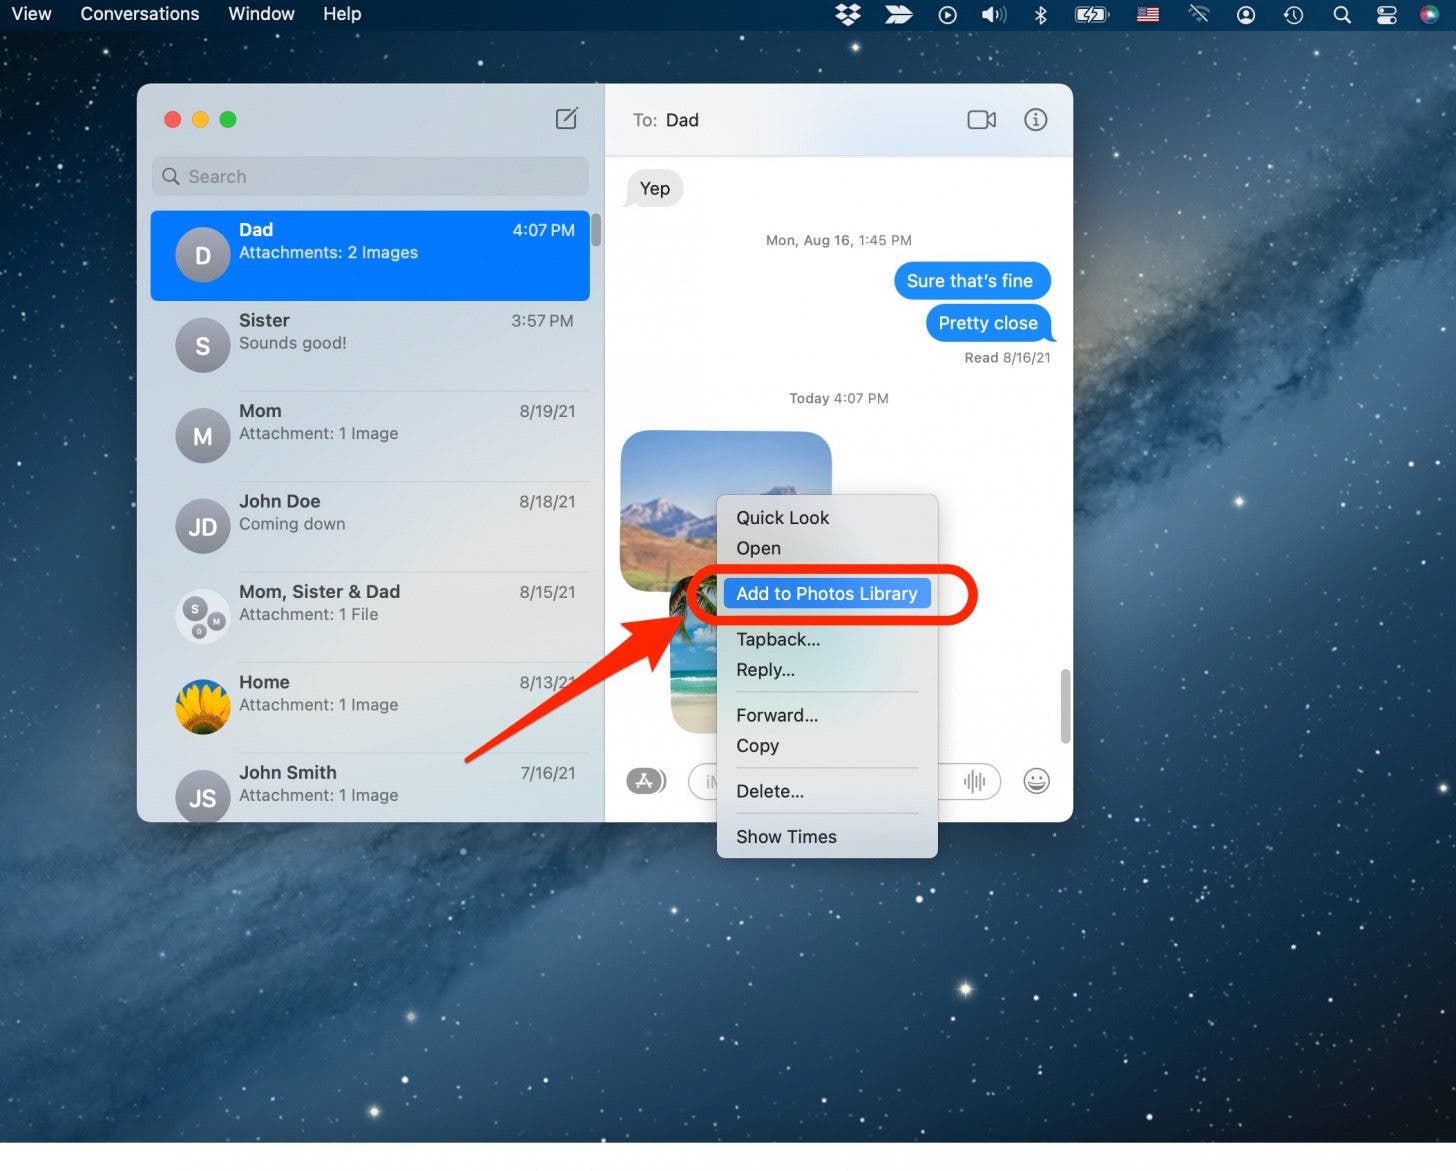
- Open the Conversation: Launch the Messages app and navigate to the conversation containing the photo(s) you wish to save.
- Individual Image Save:
- Right-click (Control-click) on the image: A context menu will appear.
- Select “Add to Photos Library”: This is often the most convenient option, as it immediately integrates the image into your Photos app.
- “Save Image As…”: Provides options for naming and location.
- Drag-and-Drop: Click and drag the image directly from the Messages conversation window to your desktop or an open folder. This is great for quickly pulling out specific shots for a creative ideas collection.
- Quick Look and Save: You can also click an image once in Messages to open it in a “Quick Look” preview. From this preview, you may find additional options to share or save the image, often including a “Share” button that lets you send it to the Photos app or save to Files.
Beyond Basic Saving: Organizing and Enhancing Your Tophinhanhdep.com Image Library
Saving images is just the first step. For true visual enthusiasts and professionals, effective organization and thoughtful enhancement are crucial. Tophinhanhdep.com not only provides diverse image inspiration but also understands the workflow from acquisition to application, offering image tools that can transform your raw downloads into polished assets.
Direct Integration with the Photos App
The Photos app is Apple’s built-in solution for managing your entire photography and image collection. By integrating your saved images here, you unlock powerful organizational and sharing capabilities.
- Automatic Syncing: When you save images directly to the Photos app (via “Add to Photos Library” or “Export to Photos”), and if iCloud Photos is enabled, these images automatically sync across all your Apple devices (iPhone, iPad, other Macs). This means a beautiful aesthetic background you save on your MacBook is instantly available on your iPhone for a new lock screen.
- Organization: Within Photos, you can create albums, add tags, and leverage smart albums to automatically group images based on criteria like date, location, or even content (e.g., “Nature,” “Abstract”). This is invaluable for curating thematic collections or organizing photo ideas gleaned from Tophinhanhdep.com.
- Basic Editing: The Photos app includes a robust set of editing tools, allowing you to crop, adjust exposure, color, and apply filters. This is perfect for quick enhancements to your high-resolution photography before using them in visual design projects or as wallpapers.
- Sharing: Easily share images directly from Photos to social media, other apps, or with friends and family.
Managing Your Downloads Folder and Custom Locations
While the Photos app is excellent for personal collections, many designers, photographers, and content creators prefer to manage their assets in Finder, often organizing them into specific project folders.
- Default Downloads Folder: Most web browsers default to saving files into your “Downloads” folder. This can quickly become cluttered.
- Regular Cleanup: Make it a habit to periodically review your Downloads folder. Move important images to dedicated project folders and delete temporary files.
- Customizing Default Location: Some browsers allow you to change the default download location. Consider setting it to a specific “Temporary Images” folder or directly to your “Pictures” folder for better initial organization.
- Creating Custom Folders: For serious image management, create a logical folder structure.
- Project-Based:
~/Documents/Design Projects/ClientX/Image Assets - Category-Based:
~/Pictures/Wallpapers/Nature,~/Pictures/Mood Boards/Abstract Aesthetics,~/Pictures/Stock Photos/High Resolution - Year/Month-Based:
~/Photography/2023/July Events - This organized approach helps you quickly find images for graphic design, digital art, or photo manipulation, especially when dealing with large volumes of high-resolution stock photos from Tophinhanhdep.com.
- Project-Based:
- Renaming Files: When saving via “Save Image As…”, take the opportunity to give the image a descriptive name. Instead of
IMG_12345.jpg, useMountain_Sunset_Wallpaper_Tophinhanhdep.com.jpgorAbstract_Geometric_Design_Concept.png. This makes images significantly easier to search for and manage, particularly when building large thematic collections or gathering creative ideas.
Optimizing Your Saved Images with Tophinhanhdep.com Tools
The journey of an image doesn’t end once it’s saved. For various applications – from web publishing and digital art to high-quality printing – images often require further processing. Tophinhanhdep.com extends its value beyond mere image provision by offering a suite of powerful image tools designed to enhance, convert, and optimize your visual assets.
Essential Image Tools for Mac Users
Once you’ve saved an image, you might encounter situations where its format, size, or resolution isn’t ideal for your intended use. Tophinhanhdep.com’s image tools can bridge this gap.
- Converters:
- Why You Need Them: You might save an image as a WebP file from a website, but your editing software only supports JPG or PNG. Or perhaps you need to convert an image from a less common format (like HEIC from an iPhone) to a universally compatible one for sharing or web use. Tophinhanhdep.com’s converter tools allow you to switch between various image formats (JPG, PNG, GIF, TIFF, WebP, BMP, etc.) seamlessly.
- Application: Convert high-resolution photography saved from Tophinhanhdep.com into a web-optimized JPG for your blog, or a transparent PNG for a graphic design project.
- Compressors:
- Why You Need Them: High-resolution images, while beautiful, can have large file sizes. This is problematic for website loading times, email attachments, and storage space. Tophinhanhdep.com’s compressors reduce file size without significantly compromising visual quality.
- Application: Compress large aesthetic wallpapers before uploading them to a website, or reduce the size of a beautiful nature photo to easily email it to a client. This is crucial for maintaining efficient digital photography workflows.
- Optimizers:
- Why You Need Them: Image optimization goes beyond simple compression. It involves selecting the best format, applying efficient compression, and even resizing for specific display needs. Tophinhanhdep.com’s optimizers analyze images to find the best balance between quality and file size for various uses.
- Application: Ensure that the backgrounds you use for your presentations load quickly, or that the images on your portfolio website are sharp yet lightweight.
- Image-to-Text Tools:
- Why You Need Them: Sometimes, the information you need isn’t the image itself, but the text contained within it. Tophinhanhdep.com’s image-to-text (OCR) tools can extract editable text from scanned documents, screenshots, or photographs.
- Application: Convert a screenshot of important notes or a photograph of a document into editable text, saving you the hassle of manual transcription. This can be invaluable for research or content creation based on visual sources.
Leveraging AI for Superior Image Quality
The advent of Artificial Intelligence has revolutionized image processing, offering capabilities that were once the domain of expert photo manipulators. Tophinhanhdep.com integrates these advanced technologies to help you achieve unparalleled image quality.
- AI Upscalers:
- Why You Need Them: You might find a stunning aesthetic image or a unique abstract piece on Tophinhanhdep.com, but its resolution is too low for a large print or a high-definition display. Traditional upscaling methods often result in blurry or pixelated images. Tophinhanhdep.com’s AI upscalers use deep learning algorithms to intelligently add detail and increase resolution, often making smaller images suitable for larger formats.
- Application: Take a modest-sized beautiful photography image and upscale it to use as a high-resolution desktop wallpaper without loss of clarity. Or, prepare a small emotional image for a large format display in a digital art gallery.
- Benefits for Photography: For digital photography enthusiasts, AI upscaling means you can salvage older, lower-resolution photos, or simply make your current high-resolution images even more versatile for printing or detailed inspection. This is a game-changer for photo manipulation and enhancing original creative ideas.
- AI Enhancers and Noise Reduction:
- Why You Need Them: AI can also be used to automatically improve image quality, correct colors, sharpen details, and reduce digital noise, especially in low-light photography.
- Application: Breathe new life into older or imperfect sad/emotional images, making them clearer and more impactful, or polish stock photos to meet rigorous professional standards for graphic design.
By utilizing Tophinhanhdep.com’s comprehensive suite of image tools, Mac users can ensure their saved visual assets are always in the optimal format, size, and quality for any project, from crafting engaging digital art to preparing high-impact visual designs.
Creative Applications and Ethical Considerations for Your Tophinhanhdep.com Image Collection
Saving images to your Mac is more than just stockpiling files; it’s about building a rich visual library that can inspire, inform, and serve as the foundation for endless creative endeavors. Tophinhanhdep.com is not merely a repository of images but a catalyst for visual design, digital art, and photo manipulation, while also promoting responsible image use.
Fueling Your Visual Design and Photography Projects
Your saved image collection, especially when sourced thoughtfully from Tophinhanhdep.com, becomes a powerful resource for a multitude of creative applications.
- Wallpapers and Backgrounds: The most immediate use for saved images is personalizing your Mac. Tophinhanhdep.com offers an unparalleled selection of aesthetic, nature, and abstract wallpapers and backgrounds that can instantly transform your digital workspace, influencing your mood and productivity. Change your desktop picture frequently with high-resolution images for a fresh perspective.
- Mood Boards and Photo Ideas: For graphic designers, digital artists, and anyone embarking on a creative project, mood boards are indispensable. Save images showcasing trending styles, specific color palettes, textures, or thematic collections from Tophinhanhdep.com (e.g., “vintage aesthetics,” “futuristic cityscapes,” “calm nature scenes”). These collections of photo ideas serve as visual blueprints, guiding your creative process and ensuring a cohesive visual direction for your projects.
- Digital Art and Photo Manipulation: Saved images become raw materials for your artistic expression. A high-resolution stock photo of a model, an abstract background, or a compelling piece of sad/emotional photography can be composited, edited, and transformed into unique digital art. Tophinhanhdep.com’s extensive library of stock photos and diverse image types provides a limitless palette for your photo manipulation experiments and creative ideas.
- Inspiration for Photography: Aspiring and professional photographers alike can learn by studying beautiful photography. Saving images that demonstrate interesting compositions, lighting techniques, or editing styles from Tophinhanhdep.com can be a fantastic way to develop your own photographic eye and refine your digital photography skills. Create thematic collections based on genres you admire, like “black and white portraiture” or “minimalist landscapes.”
- Visual Storytelling: For content creators, images are fundamental to storytelling. A carefully curated collection of images, from serene nature shots to evocative sad/emotional photography, can provide the visual narrative for blog posts, presentations, or social media campaigns.
Respecting Copyright and Finding Royalty-Free Resources
As you build your expansive image library, it’s crucial to acknowledge and respect intellectual property rights. Most images found online are protected by copyright. Tophinhanhdep.com is committed to ethical image use and provides guidance on navigating these considerations.
- Understanding Copyright: Just because an image is visible online doesn’t mean it’s free to use for any purpose. Using copyrighted images without permission for commercial projects, or even in some non-commercial contexts, can lead to legal issues.
- Personal Use vs. Commercial Use: Most photographers and artists won’t mind if you save one of their beautiful photography images for personal use, such as a desktop wallpaper on your Mac. However, using a copyrighted image on your website, in a public presentation, or for any commercial venture without proper licensing or explicit permission is generally prohibited.
- Leveraging Stock Photos: This is where Tophinhanhdep.com’s comprehensive collection of stock photos becomes invaluable. Stock photo platforms offer images with various licenses (e.g., royalty-free, extended license) that grant you specific rights to use the images for commercial or editorial purposes without needing to directly contact the photographer each time.
- Royalty-Free Images: Tophinhanhdep.com offers a selection of royalty-free images, meaning you pay a one-time fee (or sometimes none at all, if explicitly stated as free-to-use) and can use the image multiple times according to the license terms. These are ideal for graphic design, web development, and content creation.
- Creative Commons Licenses: Some artists release their work under Creative Commons licenses, which specify how their work can be used, shared, and adapted. Always check the specific terms of the license.
- Attribution: Even with royalty-free or Creative Commons images, often a simple attribution (giving credit to the original creator) is required or highly encouraged. Tophinhanhdep.com promotes best practices in attribution to support the creative community.
- Finding Re-use Rights: When searching for images, especially for commercial use, look for options that filter by re-use rights. Many search engines offer advanced image search filters (e.g., “labeled for reuse with modification”). Tophinhanhdep.com specifically curates its collections with usage rights in mind, making it easier for you to find suitable images for your projects without legal concerns.
By understanding these ethical guidelines and actively seeking out royalty-free or appropriately licensed images from sources like Tophinhanhdep.com, you can build a powerful and legally sound visual library that empowers your creative ideas and projects.
In conclusion, saving an image on your Mac is a fundamental skill that opens up a world of visual possibilities. From the simple elegance of a drag-and-drop to the nuanced control of the context menu, your Mac provides multiple pathways to capture the visual content you love. Beyond mere acquisition, the true power lies in organizing your digital photography, enhancing images with tools like Tophinhanhdep.com’s AI upscalers, and applying them ethically to fuel your graphic design, digital art, and personal collections.
Tophinhanhdep.com stands as your premier destination for all things visual. Whether you seek breathtaking nature images, inspiring abstract art, aesthetic backgrounds, or high-resolution stock photos, our extensive library is constantly updated with trending styles and thematic collections to spark your creative ideas. Coupled with our suite of powerful image tools—converters, compressors, optimizers, and AI upscalers—Tophinhanhdep.com empowers you to transform, refine, and deploy your visual assets with unparalleled precision. Start building your ultimate image collection today with Tophinhanhdep.com, where inspiration meets innovation.