How to Save an Image on Your Chromebook: A Comprehensive Guide for Visual Enthusiasts

In today’s visually-driven world, images are more than just static files; they are sources of inspiration, tools for communication, and integral components of our digital lives. Whether you’re curating the perfect aesthetic wallpaper, gathering high-resolution photography for a digital art project, or simply saving a funny GIF to share with friends, knowing how to efficiently manage images on your device is paramount. For Chromebook users, the simplicity and cloud-centric nature of ChromeOS make saving and organizing images a streamlined process, empowering you to collect, create, and customize your visual world with ease.
Tophinhanhdep.com serves as your ultimate resource for all things visual, offering an expansive collection of images ranging from breathtaking nature landscapes and captivating abstract art to emotionally resonant photography and trending thematic collections. Beyond just providing stunning visuals, Tophinhanhdep.com is dedicated to equipping you with the knowledge and tools to effectively work with these images. This comprehensive guide will walk you through every method for saving images on your Chromebook, ensuring that whether you’re sourcing beautiful photography for a mood board or compiling elements for graphic design, your workflow remains seamless and efficient. From direct downloads to clever screenshot techniques and cloud integration, we’ll cover it all, demonstrating how your Chromebook, combined with the resources at Tophinhanhdep.com, can become a powerful hub for visual creativity and organization.

Fundamental Methods for Saving Images from the Web
The internet is a vast gallery, brimming with images perfect for any project or personal preference. From a serene background you found on Tophinhanhdep.com to a high-resolution stock photo for your next presentation, saving these visuals to your Chromebook is a straightforward process. Understanding the fundamental methods ensures you can quickly and reliably capture the images you need, whenever inspiration strikes.
Direct Download: Right-Click and ‘Save Image As…’
This is arguably the most common and intuitive method for saving images from any webpage. It’s the go-to technique for acquiring individual pictures, and your Chromebook makes it exceptionally easy, whether you’re using a mouse, touchpad, or touchscreen.
To begin, navigate your Chrome browser to the webpage containing the image you wish to save. Perhaps you’ve stumbled upon a stunning piece of abstract art or a vibrant nature photograph on Tophinhanhdep.com that would make an ideal wallpaper. Once the image is in view:
- Locate the Image: Find the specific image you want to save on the page.
- Initiate the Save Command:
- With a Mouse/Trackpad: Position your cursor over the image. If you have an external mouse, simply right-click. If you’re using your Chromebook’s built-in trackpad, perform a two-finger tap on the image. This action will bring up a context menu.
- With a Touchscreen: If your Chromebook features a touchscreen, press and hold your finger on the image until the context menu appears.
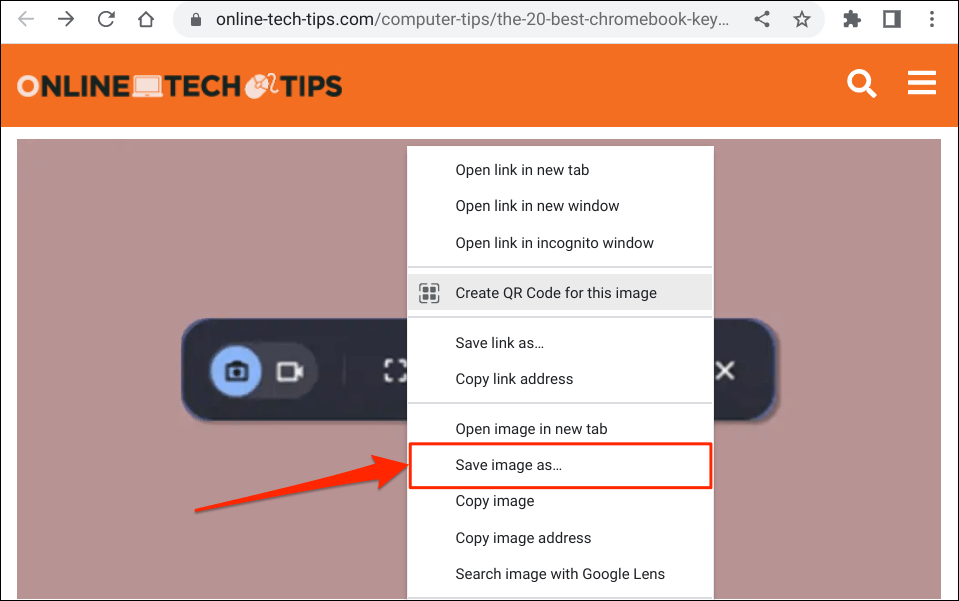
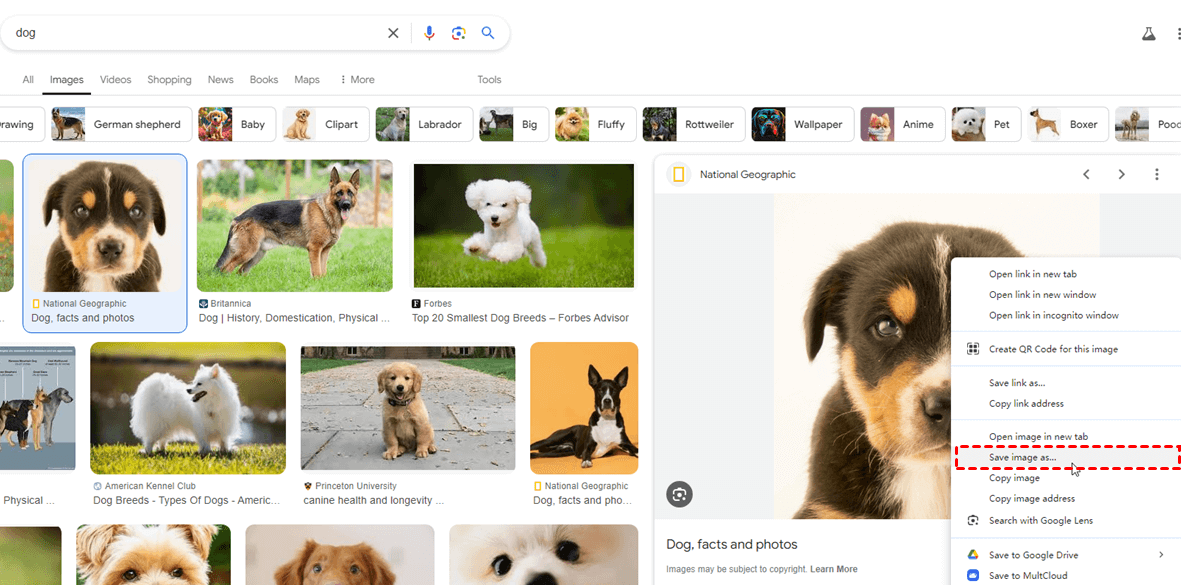
- Select ‘Save image as…’: From the context menu that appears, click or tap on the option labeled “Save image as…”
- Configure Save Options in the “Save file as” Window: A “Save file as” dialog box will pop up, presenting you with several important options:
- File Name: By default, the image will often have a generic or complex filename. This is your chance to rename it to something more descriptive and organized. For instance, if it’s a wallpaper from Tophinhanhdep.com, you might name it “Aesthetic_Sunset_Wallpaper_Tophinhanhdep.com.jpg”. This practice is crucial for maintaining an organized library, especially when dealing with collections like “Sad/Emotional” images for a personal project or various “Beautiful Photography” shots.
- Destination Folder: ChromeOS typically defaults to saving downloaded files in your “Downloads” folder. This is local storage on your Chromebook. However, you have the flexibility to choose an alternative location.
- Google Drive: For seamless access across all your devices and robust cloud backup, saving directly to your Google Drive is an excellent option. This is highly recommended for important assets like high-resolution digital photography or stock photos that you might need to access from a different computer or share with collaborators for visual design projects. You can select an existing folder within your Drive or create a new one, perhaps “Tophinhanhdep Wallpapers” or “Graphic Design Assets”.
- External Storage: If you have an external storage device connected, such as a USB drive or an SD card, you can opt to save the image there. This is particularly useful for archiving large collections of images, like extensive thematic collections or raw photography files, to free up internal storage.
- File Type: Note the file type (e.g., JPEG, PNG, WEBP). While ChromeOS handles many formats, some images from the web (especially older ones or those optimized for web speed) might be in formats like WEBP. We’ll discuss image conversion tools provided by Tophinhanhdep.com later, which can help if you need a different format for specific editing styles or visual design applications.
- Confirm and Save: Once you’ve chosen a name and destination, click the “Save” button or press “Enter” on your keyboard.
- Verify Download: A “Download complete” notification will briefly appear in the bottom-right corner of your screen (the status area). You can click “Show in folder” on this notification to immediately open the Files app and view your newly saved image in its designated location.
This direct download method is fundamental for building your image library, whether it’s for personal aesthetic backgrounds, professional graphic design elements, or enriching your collection of beautiful photography. Tophinhanhdep.com encourages users to utilize this method for high-resolution images that are intended for serious design work or as foundational elements for mood boards.
Copying Images to Your Chromebook’s Clipboard
Sometimes, you don’t need to permanently save an image to your local storage immediately. Instead, you might want to quickly insert it into a document, a presentation, or a simple photo editor. In these scenarios, copying the image to your Chromebook’s clipboard is a highly efficient method. This functionality is particularly useful for tasks related to visual design, digital art, or when compiling creative ideas where you need to move images around quickly without creating multiple files.
The process for copying an image is very similar to initiating a direct download:
- Locate the Image: Just as before, find the image on the webpage that you wish to copy. This could be a small icon for a visual design mock-up or a specific detail from an abstract image on Tophinhanhdep.com that you want to integrate into another application.
- Access the Context Menu:
- With a Mouse/Trackpad: Right-click or perform a two-finger tap on the image.
- With a Touchscreen: Tap and hold the image.
- Select ‘Copy image’: From the context menu, choose the “Copy image” option. Unlike “Save image as…”, this doesn’t prompt a save dialog; the image is immediately placed on your Chromebook’s clipboard.
- Paste the Image: Now, open the application or document where you intend to use the image (e.g., Google Docs, Google Slides, a web-based photo editor for basic photo manipulation, or even a note-taking app).
- Standard Paste: Place your cursor where you want the image to appear. Then, right-click (or two-finger tap/tap and hold) and select “Paste” from the context menu. Alternatively, you can use the universal keyboard shortcut: Ctrl + V.
- Using the ChromeOS Clipboard History: ChromeOS has a handy clipboard history feature. Press Search + V (the Search key is usually located where the Caps Lock key would be on a standard keyboard) to bring up a small pop-up displaying your recent clipboard items. If you’ve copied multiple items, you can then simply click or tap the desired image from this list to insert it. This is a huge time-saver when you’re working on complex visual design projects, allowing you to cycle through various images, snippets of text, and other elements you’ve copied.
Copying images to the clipboard is perfect for transient use or for building quick visual mock-ups. It integrates seamlessly into workflows for creating graphic design layouts, experimenting with digital art, or rapidly populating mood boards with various photo ideas and trending styles found on Tophinhanhdep.com. While it doesn’t create a permanent file, it’s an indispensable tool for dynamic and immediate visual work.
Leveraging Cloud and System Features for Image Management
Chromebooks excel in their integration with cloud services and provide robust built-in tools for image capture, making them ideal for managing and enhancing your visual assets. These methods go beyond simple web downloads, offering solutions for images stored in the cloud or for creating new images directly from your screen. This flexibility is crucial for anyone engaging with digital photography, visual design, or curating extensive image collections like those found on Tophinhanhdep.com.
Saving Pictures from Google Photos to Your Chromebook
Google Photos is a cornerstone of the Chromebook experience, often serving as the primary backup and organizational hub for personal photography and image collections. If you have your cherished beautiful photography, high-resolution digital photography, or any other images backed up to Google Photos, downloading them to your Chromebook’s local storage is straightforward. This is especially useful if you want to use a specific image as a wallpaper, perform offline photo manipulation, or transfer it to external storage.
Here’s how to save images from your Google Photos library to your Chromebook:
- Open the Google Photos App: Locate and launch the Google Photos application on your Chromebook. You can find it in your app launcher.
- Select the Desired Image: Browse through your albums or search for the specific image you wish to download. Click or tap on the image to open it in full view. This could be a scenic nature shot, an aesthetic photo you’ve saved, or a personal photograph you need for a project.
- Access More Options: Once the image is open, look for either an “Info” icon (often represented by a circle with an ‘i’ inside) or a “three-dot menu” icon (sometimes referred to as a kebab menu), usually located in the top-right corner of the screen. Click or tap on this icon to reveal additional options.
- Select ‘Download’: In the menu that appears, you will find the “Download” option. Click or tap it.
- Automatic Saving: The image will immediately begin downloading to your Chromebook. By default, it will be saved to your “Downloads” folder within the Files app.
- Verify and Access: Similar to web downloads, a “Download complete” notification will appear. You can click “Show in folder” to directly navigate to the image in the Files app. From there, you can move it to a different folder, upload it to Google Drive (if you prefer a different Drive folder than the default Photos sync), or transfer it to an external device.
This method ensures that your high-resolution photography and carefully curated image collections, which are safely stored in Google Photos, are readily available on your Chromebook for any offline tasks or creative endeavors. Whether you’re working on digital art, assembling a mood board with photo ideas, or need specific images for visual design, having direct access from Google Photos streamlines your workflow.
Capturing Screenshots: Versatility for Any Visual Content
Screenshots are an incredibly versatile tool for capturing anything displayed on your Chromebook’s screen. This isn’t just for errors or sharing desktop views; it’s a powerful way to extract specific visuals from documents, videos, or web pages when a direct download option isn’t available or suitable. For graphic designers, digital artists, or anyone collecting image inspiration, the ability to quickly snip parts of a screen is invaluable for creating mood boards, gathering trending styles, or capturing unique creative ideas.
ChromeOS offers a robust built-in screen capture tool with several options:
- Activating the Screen Capture Tool:
- Keyboard Shortcut: The most common method is to press Ctrl + Shift + Show Window keys simultaneously. The “Show Window” key often looks like a rectangle with two vertical lines on the right, typically located in the top row of your keyboard.
- System Tray: Alternatively, click on the date and time display in the bottom-right corner of your screen (the system tray) to open the Quick Settings panel. Here, you’ll find a “Screen capture” option.
- Choosing Your Capture Type: Once the screen capture tool is active, a toolbar will appear at the bottom of your screen with various options:
- Partial Screenshot: This is ideal for extracting a specific image or section. Select the icon that looks like a dotted rectangle or crosshair. Your cursor will turn into a crosshair; click and drag to draw a box around the image you want to capture. Release the mouse or lift your finger when you’ve outlined the desired area.
- Full Screen Screenshot: To capture everything visible on your screen, select the icon that looks like a solid rectangle. This will instantly take a screenshot of your entire desktop. The shortcut for this specific capture is often Ctrl + Show Window.
- Window Screenshot: If you want to capture just a single open window, select the icon that looks like a window. Then, click on the window you wish to capture.
- Screen Recording: The tool also allows for video recording of your screen, which can be useful for demonstrating visual design processes or creating tutorials.
- Saving the Screenshot:
- After selecting your area (for partial) or choosing full/window, click “Capture” (for partial) or the screenshot will be taken automatically.
- The screenshot is automatically saved as a PNG image file to your “Downloads” folder by default.
- Changing the Save Location (Optional): If you prefer to save screenshots to a different folder immediately, you can adjust this setting within the screen capture tool. Before taking the screenshot, click the gear icon (settings) on the snipping tool toolbar. From there, select “Select folder” and choose your preferred destination, such as a dedicated “Screenshots” folder in your Google Drive or an external drive.
- Tablet Mode Screenshot: For Chromebooks used in tablet mode, where the keyboard might be folded away or detached, there’s another convenient shortcut: press the Power button and the Volume Down button simultaneously. This will capture a full-screen screenshot. Remember that the orientation of the volume buttons doesn’t change with screen rotation, so always remember which button is “down.”
Screenshots are fantastic for quickly grabbing visual content. However, it’s important to remember that screenshots capture exactly what’s on your screen at its displayed resolution. While useful for quick grabs of aesthetic images or photo ideas, they might not always be high-resolution enough for professional digital photography or intricate graphic design work compared to directly downloaded original files from Tophinhanhdep.com. For critical assets, always prioritize direct downloads from high-resolution sources.
Enhancing Your Saved Images with Tophinhanhdep.com’s Image Tools & Design Principles
Saving images to your Chromebook is just the first step. To truly unlock their potential for visual design, digital art, or even just personalized wallpapers, you often need to refine, optimize, or transform them. This is where Tophinhanhdep.com extends its value beyond just image collections, offering insights into powerful image tools and design principles that elevate your visual projects.
Optimizing and Transforming Your Chromebook Images
The digital world demands flexibility. An image saved in one format or size might not be suitable for another application. Tophinhanhdep.com understands this need and emphasizes the importance of image tools that allow for seamless optimization and transformation.
- Image Converters: As noted in the saving process, you might encounter images saved in formats like WEBP. While WEBP offers excellent compression for web pages, it might not be universally compatible with all photo editors or visual design software. Tophinhanhdep.com highlights the use of online image converters or Chrome browser extensions to transform WEBP files into more common formats like JPEG, PNG, or even TIFF for high-quality printing. JPEG is ideal for most photography (like beautiful photography or nature shots), PNG for images requiring transparency (useful for graphic design elements), and TIFF for professional-grade digital photography archiving. Converting ensures your saved images are ready for any task.
- Image Compressors: High-resolution images, especially those intended for wallpapers, backgrounds, or detailed digital photography, can take up significant storage space. Furthermore, large file sizes can slow down website loading times if you’re using them in web projects or make sharing cumbersome. Tophinhanhdep.com recommends utilizing image compressors. These tools intelligently reduce file size without a noticeable loss in visual quality. This is crucial for managing large collections of stock photos or your personal high-resolution image archives, ensuring efficient storage and faster sharing.
- AI Upscalers: Sometimes, you find an image—perhaps an older photograph, a small aesthetic graphic, or a screenshot of a trending style—that isn’t quite high-resolution enough for your needs, like a large wallpaper or a detailed graphic design element. This is where AI upscalers, often available as online tools or advanced software, become invaluable. Tophinhanhdep.com points to these tools as a way to intelligently enlarge images and enhance their detail, making lower-resolution visuals more suitable for high-resolution displays or print, bridging the gap between found images and the demands of digital photography and visual design.
- Image-to-Text (OCR): While not directly related to image aesthetics, the ability to convert image content into editable text is a powerful utility. If you save an image containing text—perhaps a graphic with a quote, a scanned document, or a screenshot of important information—Optical Character Recognition (OCR) tools can extract that text. Tophinhanhdep.com recognizes its utility for researchers, content creators, or anyone needing to repurpose textual information embedded within images, streamlining workflows for creative ideas and content generation.
Tophinhanhdep.com serves as a gateway to finding and understanding these essential image tools, empowering you to optimize and transform every image you save on your Chromebook. This capability ensures that whether you’re working on graphic design, digital art, or simply personalizing your device, your visual assets are always in the perfect condition.
Integrating Saved Images into Visual Design Workflows
The true power of a well-curated image library on your Chromebook lies in its application. Saved images are not just digital trophies; they are building blocks for creativity. Tophinhanhdep.com encourages users to actively integrate their saved images into various visual design workflows, transforming raw visuals into compelling statements.
- Wallpapers & Backgrounds: The most immediate and personal use for your saved images is customizing your Chromebook’s desktop. An aesthetic nature scene, a vibrant abstract pattern, or a beautiful photography shot from Tophinhanhdep.com can profoundly change your user experience. With high-resolution images, you can ensure a crisp and visually appealing background that reflects your personal style or current mood. Regularly updating your wallpaper with images from Tophinhanhdep.com’s diverse collections is a simple yet impactful way to refresh your digital environment.
- Graphic Design & Digital Art: For aspiring and professional designers, saved images are foundational elements. Stock photos from Tophinhanhdep.com can be used as base layers, textures, or primary visual components in graphic design projects. Digital artists can draw inspiration from various editing styles found in saved beautiful photography, or incorporate elements from abstract and nature images into their compositions. Learning basic photo manipulation techniques in web-based or Android photo editors on your Chromebook allows you to combine, blend, and alter these saved images to create entirely new digital art pieces.
- Photo Manipulation & Creative Ideas: Beyond simple graphic design, saved images fuel more complex photo manipulation. Combining elements from sad/emotional photography with abstract backgrounds can evoke powerful narratives. Experimenting with different blending modes and effects on a collection of saved images can lead to unique creative ideas for posters, social media graphics, or personal artistic expressions. Tophinhanhdep.com emphasizes that every saved image, regardless of its original context, holds potential for transformation and innovative use.
- Image Inspiration & Collections (Mood Boards): One of the most potent uses of saved images is the creation of mood boards. By collecting photo ideas, trending styles, thematic collections (like “minimalist aesthetic” or “vintage photography”), and even snippets of visual design from Tophinhanhdep.com, you can build a powerful visual reference. These mood boards serve as guides for new projects, helping to define a visual language, explore color palettes, and articulate creative direction. Organizing these collections within dedicated folders on your Chromebook or Google Drive keeps your inspiration readily accessible for when you embark on new graphic design or digital art ventures.
By integrating these saved images into your daily creative practices, you move beyond merely collecting and into actively creating. Tophinhanhdep.com not only provides the raw materials—stunning images and comprehensive tools—but also inspires you to leverage these assets for meaningful visual expression, fostering your journey in photography, design, and digital art.
Best Practices for Managing Your Image Library on Chromebook
Having a wealth of images on your Chromebook, whether they are inspiring aesthetic wallpapers from Tophinhanhdep.com, high-resolution digital photography, or carefully curated mood boards, is fantastic. However, without proper management, this collection can quickly become unwieldy. Implementing best practices for organization and storage ensures that your image library remains a valuable asset, readily accessible for all your visual design projects, personal customization, and creative endeavors.
Organizing Your Downloads and Files
An organized image library saves time, reduces frustration, and makes your creative workflow much smoother. Chromebooks, with their integration with Google Drive and intuitive Files app, offer excellent capabilities for systematic organization.
- Consistent Naming Conventions: This is perhaps the most fundamental aspect of good file management. Instead of leaving images with default filenames like “image_001.jpg” or “screenshot_2023-10-27_10-30-05.png,” rename them immediately upon saving.
- Descriptive Names: Use names that clearly indicate the image’s content and source. For example, instead of “abstract.jpg,” use “Abstract_BlueWave_Tophinhanhdep.com.jpg” or “Nature_ForestPath_Wallpaper_4K.png.”
- Keywords/Tags: Incorporate keywords that you might search for later. If it’s a “sad/emotional” image, include those terms. If it’s a specific “editing style,” add that to the name.
- Dates: For digital photography, a date prefix (e.g., “20231027_Landscape_Beach.jpg”) can be incredibly useful for chronological sorting.
- Logical Folder Structures: Move beyond saving everything into the default “Downloads” folder. Create dedicated folders and subfolders within your Files app or, ideally, within Google Drive.
- Categorize by Type: Create main folders like “Wallpapers,” “Photography,” “Graphic Design Assets,” “Digital Art Projects,” “Mood Boards,” and “Inspiration.”
- Subcategories: Within these, create subfolders based on themes (e.g., “Wallpapers/Nature,” “Wallpapers/Abstract,” “Photography/Portraits,” “Photography/Landscapes”), projects (e.g., “Graphic Design Assets/Client_Project_X”), or image characteristics (e.g., “Inspiration/Aesthetic_Minimalist”).
- Tophinhanhdep.com Collections: Consider creating a dedicated folder for images sourced from Tophinhanhdep.com, perhaps “Tophinhanhdep.com_Collection,” with subfolders for “Trending Styles,” “Photo Ideas,” or “Thematic Collections.”
- Leveraging Google Drive for Accessibility and Backup: Chromebooks are designed to work seamlessly with Google Drive. Saving your image library to Drive offers several significant advantages:
- Automatic Syncing: Images saved to Drive are automatically synced across all your devices (other Chromebooks, PCs, smartphones), making your high-resolution photography and graphic design assets accessible from anywhere.
- Cloud Backup: Drive acts as a secure backup, protecting your valuable image collections against device loss or damage.
- Collaboration: Easily share specific folders or images with collaborators for visual design projects or group mood boards.
- Storage Management: While your Chromebook has local storage, relying on Google Drive for your primary image library offloads data from your device, keeping it nimble.
- External Storage for Archival: For extremely large volumes of images, such as extensive collections of stock photos, raw digital photography files, or deep archives of beautiful photography, external storage (like a large USB drive or SD card) can be a cost-effective solution. This frees up both local Chromebook storage and Google Drive space, especially if you have a free tier of Drive storage. Label your external drives clearly and ensure you have a backup strategy for these as well.
By dedicating a little time to organizing your images, you transform a potentially chaotic collection into a powerful, accessible resource that fuels your creativity and supports all your visual endeavors.
Beyond Basic Saving: Exploring Advanced Image Use
Once you’ve mastered saving and organizing images on your Chromebook, you can begin to explore more advanced applications that align with the diverse offerings of Tophinhanhdep.com.
- Digital Photography Workflow Integration: For photographers, a Chromebook can serve as an excellent companion device. While not typically running heavy desktop photo editing software, saved high-resolution digital photography can be quickly reviewed, sorted, and even subjected to basic editing styles using web-based editors (like Google Photos editor or various online tools often linked from Tophinhanhdep.com). More advanced users can leverage Linux app support on Chromebooks for more robust photo manipulation tools. Saving images from your camera’s SD card directly to Google Drive allows for immediate backup and access.
- Understanding Image Licensing (Creative Commons & Stock Photos): When saving images from the web, especially stock photos or general images from Tophinhanhdep.com that you intend to use for graphic design, digital art, or commercial projects, understanding licensing is crucial. Images are often protected by copyright. Tophinhanhdep.com provides resources and emphasizes the importance of checking image licenses (e.g., Creative Commons, public domain, royalty-free stock) to ensure appropriate and legal use. This knowledge is vital for professional visual design work to avoid legal complications.
- Aesthetic Curation and Personal Branding: Your saved image collection is a reflection of your aesthetic. Beyond just functional use, actively curating images, selecting beautiful photography, abstract art, or trending styles that resonate with you, helps develop your personal aesthetic. This curated collection can inspire personal branding efforts, inform your creative ideas, and even influence the visual design choices you make in all aspects of your life. Tophinhanhdep.com encourages this mindful approach to image collection, transforming it into a journey of self-expression.
- Creating Interactive Mood Boards: Take your mood boards a step further by using web-based collaboration tools or presentation apps (like Google Slides) to create interactive visual design boards. Combine saved photo ideas, aesthetic images, and thematic collections from Tophinhanhdep.com with notes, links, and even embedded videos to build dynamic sources of inspiration for your graphic design or digital art projects.
By delving into these advanced uses, your Chromebook becomes more than just a device for saving; it transforms into a powerful creative workstation, continually fed by the vast visual resources and comprehensive guidance provided by Tophinhanhdep.com.
Conclusion
Saving images on your Chromebook is a fundamental skill that opens up a world of creative possibilities. From the simplest right-click-and-save operation to utilizing sophisticated screenshot tools and seamlessly integrating with cloud services like Google Photos, your Chromebook offers versatile and efficient methods to capture and store any visual content you encounter. Whether you’re enhancing your device with stunning wallpapers, collecting high-resolution photography for a personal project, or building a library of aesthetic and nature images for inspiration, the process is designed to be intuitive and accessible.
But the journey doesn’t end with merely saving. The true power lies in how these images are then managed, optimized, and integrated into your creative life. Tophinhanhdep.com stands as your indispensable partner in this visual endeavor, providing not only a vast array of beautiful photography, abstract art, and thematic collections but also the essential knowledge and tools to transform your saved images. Through understanding image converters, compressors, AI upscalers, and principles of visual design and photo manipulation, you can elevate raw visuals into compelling statements, dynamic mood boards, and impactful digital art.
Your Chromebook, paired with the rich resources and practical advice from Tophinhanhdep.com, becomes more than just a computing device; it becomes a canvas for your imagination and a repository for your visual inspiration. Embrace the ease of saving, the power of organization, and the endless potential for creation. Dive into the world of images, experiment with new ideas, and let Tophinhanhdep.com guide you in making every pixel count. Explore, save, create, and inspire – your visual adventure starts now.