How to Save Images from Google: A Comprehensive Guide for Tophinhanhdep.com Users

In today’s visually-driven world, images are more than just embellishments; they are essential components of communication, creativity, and personal expression. Whether you’re a content creator, a digital artist, a student, or simply someone looking to personalize your device, the ability to find and save the perfect image is invaluable. From stunning wallpapers that transform your desktop to inspiring backgrounds for your next presentation, or perhaps a collection of aesthetic images for a mood board, Google is often the first port of call. At Tophinhanhdep.com, we understand the profound impact of compelling visuals, offering a vast array of beautiful photography, nature scenes, and abstract art to fuel your imagination.
However, the process of saving images from Google, especially from its various platforms like Google Search or Google Docs, isn’t always as straightforward as a simple right-click. While it may seem intuitive, Google often implements measures to protect content and streamline its ecosystem, which can make direct downloading a bit elusive. This guide aims to demystify these processes, providing a comprehensive overview of how to save images from Google’s different services. We’ll explore various methods, from quick desktop tricks to mobile workarounds, and discuss how these saved images can be integrated into your visual design projects, enhance your digital photography efforts, and contribute to your personal image inspiration & collections. Furthermore, we’ll touch upon the crucial aspect of image rights and the best practices for utilizing your saved visuals responsibly.
Capturing Visual Inspiration: Saving Images Directly from Google Search
When you embark on a quest for visual content, be it a serene nature shot, a striking abstract design, or specific stock photos for a commercial project, Google Images is an unparalleled resource. It presents a world of possibilities, from high-resolution landscapes to artistic renderings. For users of Tophinhanhdep.com, this section will illuminate the easiest and most direct ways to bring those captivating visuals from Google search results onto your device.
Instant Downloads: Saving to Your Local Device
The most common and immediate need is to save an image directly to your computer or mobile device. This is ideal for quickly acquiring a wallpaper or a background for personal use, or for downloading high-resolution images that you plan to incorporate into a larger graphic design project or edit using advanced photography editing styles.
On Desktop (Windows or Mac): The process here is remarkably simple.
- Perform a Google Image Search: Open your web browser and navigate to images.google.com or conduct a regular Google search and then click on the “Images” tab.
- Locate Your Image: Browse through the results until you find the image that perfectly aligns with your vision—perhaps a stunning piece of beautiful photography or a compelling aesthetic visual.
- Right-Click (or Control-Click on Mac): Click on the image thumbnail to expand it into a larger preview. Once expanded, right-click on this larger image. Mac users can achieve the same by holding down the Control key while clicking.
- Select “Save Image As…”: A context menu will appear. Choose the option “Save Image As…” (or “Save Picture As…” depending on your browser).
- Choose Location and Filename: A dialog box will open, prompting you to select a location on your computer where you wish to save the image and to provide a filename. For optimal organization, especially if you’re building thematic collections or curating photo ideas, give your image a descriptive name. This is particularly important for stock photos where proper naming aids in categorization.
- Click “Save”: Your image will now be downloaded to your specified folder.

This method typically saves the image in its original format and resolution from the Google server, ensuring you get the best possible quality for further digital photography work or as a striking wallpaper.
On Mobile (Android or iOS): Saving images on mobile devices follows a similar intuitive path.
- Open Google Images: Use your mobile browser or the Google app to perform an image search.
- Tap to Enlarge: Tap on the image thumbnail that catches your eye. This will open an enlarged view of the image.
- Long-Press: Press and hold your finger on the enlarged image.
- Select “Download Image” or “Save to Photos”: A pop-up menu will appear with options. Select “Download Image” (Android) or “Save to Photos” (iOS).
- Access from Gallery/Photos: The image will be saved directly to your device’s photo gallery or camera roll, ready for use as a background or for sharing.
Curating Digital Collections: Utilizing Google Collections
Beyond saving images to your device, Google offers a built-in feature called Google Collections. This cloud-based solution is excellent for users who want to create mood boards, organize photo ideas, or gather thematic collections of images without immediately downloading them to local storage. It’s a fantastic way to keep your image inspiration readily accessible across devices.
How to Save to Google Collections (Desktop & Mobile):
- Log in to Google Account: Ensure you are signed in to your Google account in your browser or Google app.
- Perform an Image Search: Navigate to Google Images and search for your desired visuals.
- Select and Expand Image: Click or tap on an image to view its expanded preview.
- Click/Tap “Add to” (Bookmark Icon): Below the expanded image, you will see an “Add to” button, typically represented by a bookmark icon. Click or tap this.
- Manage Collections:
- By default, images might save to a “Favorites” collection or the last collection you viewed.
- You’ll often see a notification confirming the save, with an option to “CHANGE” the collection.
- Tap or click “CHANGE” to select an existing collection or create a “New collection” for specific themes, like “Abstract Art for Tophinhanhdep.com” or “Nature Wallpapers.”
- View Saved Collections:
- On desktop, you can access Collections directly from Google.com by clicking the 3x3 grid of Google Apps (the “More” icon) and selecting “Collections.” Alternatively, from Google Image Search results, look for “Collections” below the search bar.
- On mobile, after an image search, tap the Menu icon (three horizontal lines) and then “Collections.”
- Here, you’ll see thumbnails of your most recent saves and a list of your curated collections, perfect for reviewing your creative ideas and trending styles.
Saving to Google Collections is a streamlined way to manage your visual assets, especially when brainstorming for visual design projects or compiling inspiration for digital art.
Mastering Image Extraction from Google Docs
Google Docs is a ubiquitous tool for drafting documents, collaborating on projects, and sometimes, even compiling digital photography portfolios or mock-ups for graphic design. You might embed various images—from high-resolution product shots to diagrams or personal aesthetic photos—within your documents. However, unlike traditional word processors, Google Docs doesn’t offer a direct “Save Image As” option when you right-click an embedded image. This can be frustrating, especially when you need to extract those images for other uses, perhaps for a blog post on Tophinhanhdep.com or for photo manipulation. This section provides several effective methods to retrieve images from your Google Docs.
Bulk Downloads: Efficiently Saving Multiple Images
When your Google Doc is brimming with images—perhaps a comprehensive guide featuring many nature or abstract visuals, or a collection of sad/emotional images for a thematic project—downloading them one by one can be incredibly time-consuming. These methods are designed for efficiency, allowing you to grab all or many images in a single action.
Method 1: Download as an HTML File (Web Page, .html, zipped) This is often the quickest and most convenient method for extracting all images from a Google Doc on desktop.
- Open Your Google Doc: Access the document containing the images you wish to download.
- Navigate to File Menu: Click on “File” in the top-left menu bar.
- Select Download Option: Hover over “Download.”
- Choose “Web Page (.html, zipped)”: Select this option from the sub-menu.
- Save the Zip File: Your browser will download a .zip file to your computer.
- Extract Images: Locate the downloaded .zip file (usually in your “Downloads” folder) and double-click it to unzip its contents. Inside, you’ll find a folder named “images” (or similar). Open this folder, and all your document’s images will be there, ready to be organized, renamed, or processed with image tools like converters or compressors.
Note: The images will often be named generically (e.g., image1.jpeg, image2.png) and may not be in chronological order of appearance in the document. You’ll need to sort and rename them if specific order or filenames are crucial for your visual design or photography workflow.
Method 2: Export to Microsoft Word for Advanced Control If you have Microsoft Word installed, this method provides flexibility, allowing you to save images individually or collectively with more format options.
- Download as .docx: In your Google Doc, go to “File” > “Download” > “Microsoft Word (.docx)”.
- Open in Word: Open the downloaded .docx file using Microsoft Word on your computer.
- Save Individual Images: Right-click on any image within the Word document and select “Save as Picture…”. You can then choose your desired format (PNG, JPEG, GIF, BMP) and filename. This is excellent for selecting specific beautiful photography pieces.
- Save All Images (as Web Page from Word): To save all images, go to “File” > “Save As” in Word. In the “Save As” dialog, choose “Web Page (.htm, .html)” from the “Save as type” dropdown. This will create an HTML file and an accompanying folder containing all embedded images, similar to Google Docs’ HTML export but offering Word’s handling of images.
Selective Saving: Retrieving Individual Images
Sometimes, you only need one or two specific images from a Google Doc—perhaps a single aesthetic graphic or a key high-resolution diagram. These methods are tailored for retrieving individual images without downloading the entire document or all its contents.
Method 1: Publish to the Web This method temporarily makes your document accessible via a unique web link, allowing you to use standard web image saving techniques.
- Open Your Google Doc.
- Go to “File” > “Publish to the web”.
- Click “Publish” in the dialog box, then confirm by clicking “OK” in the subsequent pop-up.
- Copy the Link: Google Docs will provide a link to the published version of your document. Copy this link.
- Open in New Tab: Paste the link into a new browser tab and press Enter. Your document will appear as a simple web page.
- Right-Click and “Save Image As…”: Now, you can right-click on any image on this web page and select “Save Image As…” to download it to your computer. This preserves original filenames, which can be very helpful for tracking photo ideas for Tophinhanhdep.com.
- Stop Publishing (Important!): Once you’ve saved your images, go back to your Google Doc, then “File” > “Publish to the web”. Click the “Stop publishing” button under “Published content & settings” to make your document private again.
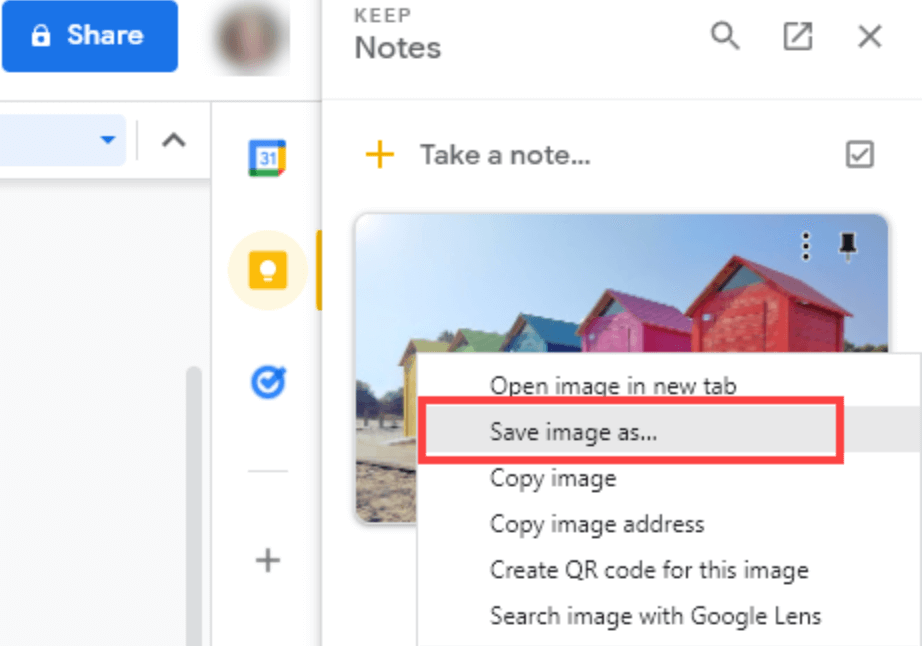
Method 2: Google Keep Integration Google Keep, Google’s note-taking service, is seamlessly integrated into Google Docs and offers a clever workaround for individual image extraction.
- Right-Click Image: In your Google Doc, right-click on the specific image you want to save.
- Select “Save to Keep”: A sidebar will appear on the right side of your screen, with your selected image automatically added as a new note in Google Keep.
- Right-Click in Keep Sidebar: Within the Google Keep sidebar, right-click on the image in the note.
- Select “Save image as…”: This will prompt you to save the image to your computer.
- Delete from Keep (Optional): After saving, you can delete the note from Google Keep if it was only for temporary extraction.
This method is efficient for single images, especially if you’re pulling a specific sad/emotional photo or a piece of digital art from a larger document.
Mobile-Specific Workarounds:
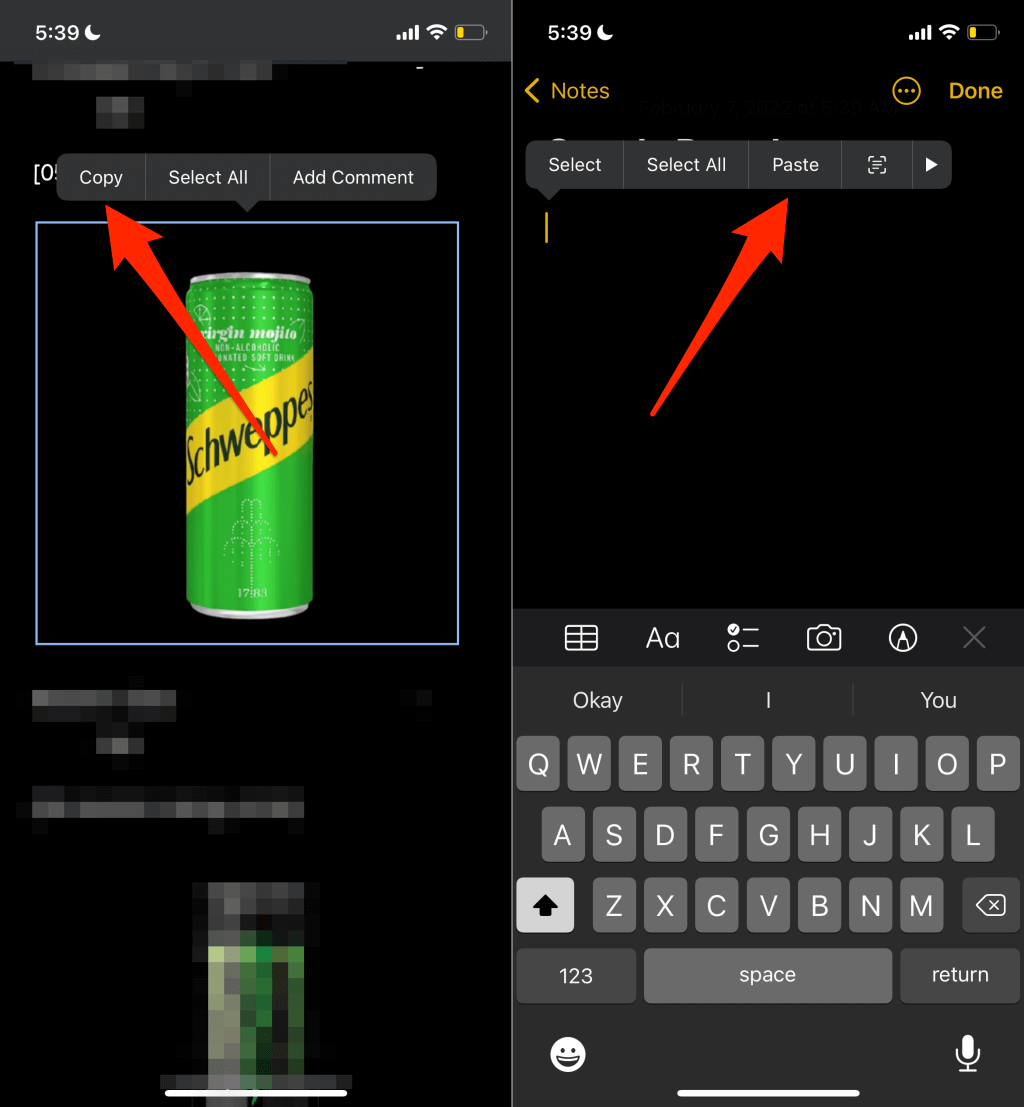
- For iPhone (using Notes app):
- Open the Google Docs app, long-press the image, and select “Copy.”
- Open the Apple Notes app, paste the image into a new note.
- Tap the image, then the share icon (square with an arrow), and select “Save Image.” This saves it to your Photos app.
- For Android (via Google Drive):
- In the Google Docs app, tap the three-dot menu next to the document, then “Send a copy.”
- Choose “Web page (.html, zipped)” and tap “OK.”
- Select “Drive” to upload the zipped file to your Google Drive.
- Once uploaded, locate the .zip file in Google Drive, tap its three-dot menu, and select “Download.”
- Use a file manager app on your Android device to open the downloaded .zip file and extract the images folder.
Enhancing Your Image Workflow: Beyond Basic Saving
Saving images is merely the first step in leveraging their full potential. For Tophinhanhdep.com users, optimizing and managing these visual assets is crucial, especially when aiming for professional photography results or polished visual design. Our platform not only inspires but also equips you with insights into image tools that can transform your saved graphics.
Optimizing Images for Performance and Quality
The images you save from Google, whether they are high-resolution stock photos or casual graphics, often require further processing, particularly if they are destined for web use or demanding digital art projects.
- Image Compression and Optimization: Large image files can significantly slow down website loading times, impacting user experience and search engine optimization (SEO). At Tophinhanhdep.com, we emphasize the importance of using compressors and optimizers to reduce file size without compromising visual quality. Many online tools and WordPress plugins (if you run a blog) can handle this, ensuring your beautiful photography and aesthetic images load quickly on any device.
- AI Upscalers: Sometimes, the perfect image you find might be of lower resolution, unsuitable for a large print or a high-resolution display. This is where AI upscalers come into play. These advanced image tools use artificial intelligence to intelligently enhance the resolution of images, adding detail and sharpness, making a previously unusable image a viable option for your graphic design or photo manipulation projects. Tophinhanhdep.com encourages exploring such tools to bring older or smaller visuals up to modern standards.
- Converters: You might encounter images in formats that aren’t ideal for your specific needs (e.g., WebP for older software, TIFF for web). Converters allow you to change image formats (e.g., from PNG to JPEG, or vice versa) to suit your project requirements, ensuring compatibility and optimal file size.
Leveraging Third-Party Tools and Extensions
The digital ecosystem is rich with tools that extend the functionality of standard saving methods, offering specialized solutions for image management and integration.
- Google Photos Integration (Chrome Extensions): For those who extensively use Google Photos for personal image inspiration & collections, an extension like “Save Image To Google Photos” can be a game-changer. Available on the Chrome Web Store, such extensions allow you to right-click on almost any image on the internet and save it directly to your Google Photos library, often with options to create new albums. This provides an unlimited and free storage solution for your wallpapers, backgrounds, and memorable photography, ensuring your visual assets are always backed up and accessible.
- Google Docs Add-ons: While we’ve generally recommended native Google Docs features, some third-party add-ons exist, such as “Image Extractor & Remover.” While they can simplify bulk image extraction, it’s paramount to exercise caution. Always review the permissions these add-ons request. Granting extensive access to your Google Drive files and personal information for a simple image saving function might be an unnecessary security risk. Always weigh the convenience against the privacy implications.
Navigating Copyright and Ethical Image Use
As Tophinhanhdep.com is dedicated to providing image inspiration & collections and insights into digital photography and visual design, it is crucial to address the ethical and legal aspects of using images found online. The ease of saving images from Google does not equate to the freedom to use them however you wish.
- Understanding Image Copyright: Most images you find online are protected by copyright. This means the creator or owner has exclusive rights to their use, reproduction, and distribution. Using copyrighted images without permission for commercial purposes, or even sometimes for public personal use (like on a blog or social media), can lead to legal issues.
- Best Practices for Sourcing and Attribution:
- Check Licenses: When searching for images, especially stock photos or images for graphic design projects, always look for images with specific licenses (e.g., Creative Commons, public domain, royalty-free). Google Images offers filter options for usage rights.
- Attribute When Required: If an image’s license permits use with attribution, always credit the source and creator properly. This is not only a legal requirement but also a professional courtesy within the photography and digital art communities.
- Personal Use vs. Public/Commercial Use: An image saved for a personal wallpaper or private mood board is generally acceptable. However, any public display or commercial application, such as on a website, blog, or product, requires explicit permission or a license.
- Consider Original Content: For complete peace of mind and unique visual design, consider creating your own digital art or photography. Tophinhanhdep.com provides ideas and inspiration to get you started on your creative journey.
- Royalty-Free Stock Photo Sites: Websites specializing in stock photos offer a safer alternative, providing licensed images for various uses, often for a fee or under specific free licenses.
By understanding and respecting image copyright, you contribute to a healthy and ethical digital environment, while still benefiting from the vast resources available on Google and platforms like Tophinhanhdep.com.
In conclusion, saving images from Google, whether from search results or within Google Docs, involves a range of methods tailored to different needs and platforms. From the quick right-click download for an immediate wallpaper to the multi-step process of extracting images from a Google Doc for a graphic design project, the options are plentiful. Mastering these techniques empowers you to effectively gather image inspiration, curate thematic collections, and manage your visual assets for any endeavor. Remember to always consider the ethical implications of image use, respecting copyright and intellectual property. As you continue to explore the world of visuals, Tophinhanhdep.com remains your go-to source for beautiful photography, aesthetic insights, and invaluable image tools to elevate your digital presence and creative work. Embrace these methods, and let your visual journey flourish with high-quality, inspiring imagery.