Mastering Image Sharpening in Photoshop: A Comprehensive Guide for Stunning Visuals

In the vast and intricate world of digital photography and visual design, the pursuit of crisp, clear, and impactful images is a constant endeavor. Whether you’re a seasoned professional meticulously crafting high-resolution stock photos or an enthusiastic hobbyist seeking to perfect your aesthetic backgrounds and nature shots, the ability to sharpen an image effectively in Photoshop is an indispensable skill. Often, our digital captures, despite being of high quality, can appear slightly soft, lacking the definitive edge contrast that brings subjects to life. This guide will delve deep into the various methods Photoshop offers for sharpening your images, transforming them from merely good to truly spectacular. We’ll explore traditional filters, advanced techniques, and even touch upon modern AI-driven alternatives, all while emphasizing non-destructive editing practices vital for any serious image manipulation.
Sharpening isn’t just about making things clearer; it’s about adding a dramatic flair, enhancing details in beautiful photography, and ensuring that every element in your visual design, from abstract art to emotional portraits, stands out with precision. On Tophinhanhdep.com, where we celebrate diverse image collections and inspire creative ideas, we understand the critical role that a perfectly sharpened image plays in captivating an audience. Let’s unravel the secrets to achieving that coveted sharpness, elevating your images across all categories.
Understanding the Art of Image Sharpening
Before we dive into the “how-to,” it’s crucial to grasp the fundamental concept behind image sharpening. Far from being a magical fix that restores lost detail, sharpening is an art of illusion—a clever manipulation of contrast along the edges of objects in your photograph.
What Does “Image Sharpening” Truly Mean?
At its core, image sharpening in Photoshop doesn’t create new detail; rather, it accentuates existing detail by increasing the contrast between neighboring pixels along discernible edges. Photoshop defines an “edge” as any area where there’s a significant, sudden change in brightness between adjacent pixels. When you sharpen an image, the software makes the lighter side of an edge even lighter and the darker side even darker. Your brain then interprets this heightened contrast as an increase in sharpness and clarity.
This subtle yet powerful effect can make subjects more prominent, add volume, and enhance the overall visual impact of your images. It’s particularly beneficial for high-resolution images, where fine details might otherwise be lost, or for stock photos where maximum clarity is paramount. For creators curating image inspiration or developing thematic collections for Tophinhanhdep.com, understanding this principle is key to applying sharpening effectively without introducing undesirable artifacts.
The Importance of Non-Destructive Sharpening
In any form of digital photography editing, whether it’s applying filters to enhance aesthetic visuals or performing complex photo manipulation, the principle of non-destructive editing is paramount. Non-destructive editing means making changes to your image in a way that doesn’t permanently alter the original pixel data. This provides maximum flexibility, allowing you to tweak, undo, or remove effects at any point without degrading your base image.
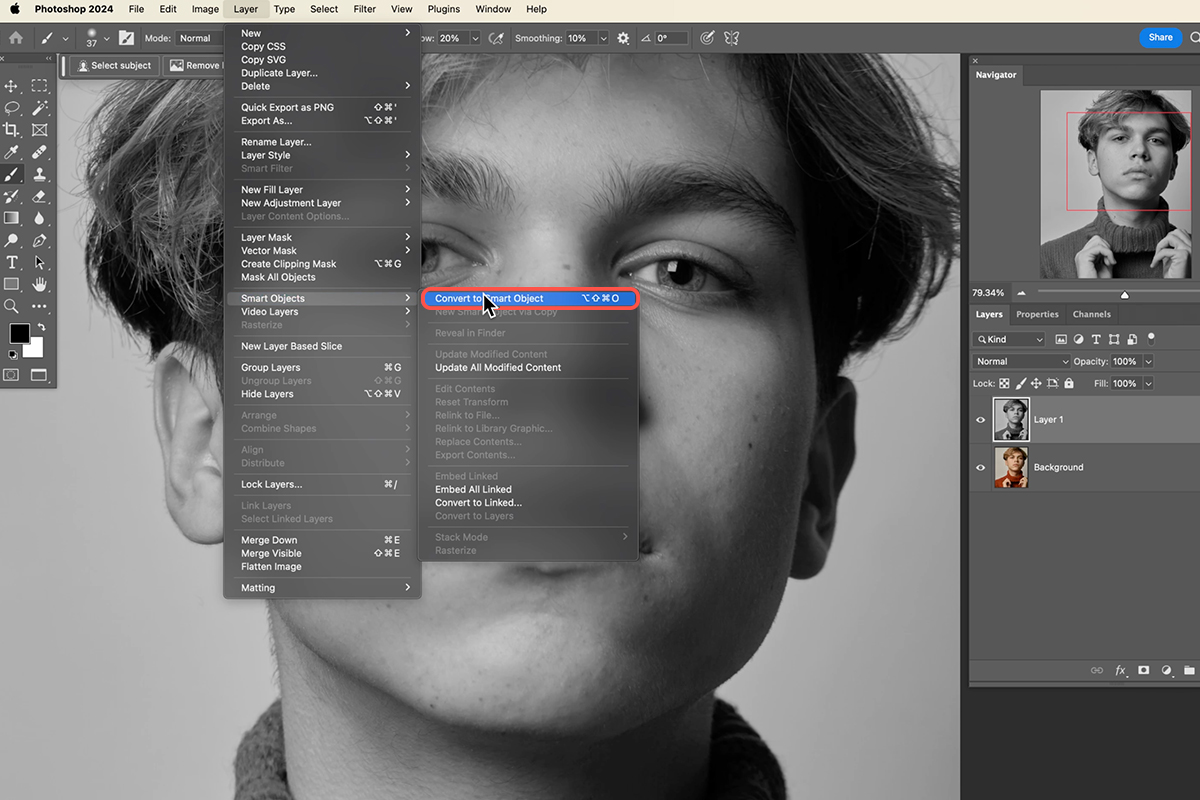
When sharpening in Photoshop, always strive for non-destructive methods. This often involves converting your image layer into a Smart Object before applying filters. Smart Objects allow filters to be applied as “Smart Filters,” which remain editable. If you need to refine the sharpening later, you can simply double-click the Smart Filter in the Layers panel to reopen its dialog box and make adjustments. This workflow is crucial for maintaining the integrity of your original photography and is a best practice for digital art and graphic design projects hosted on platforms like Tophinhanhdep.com.
Core Sharpening Techniques in Photoshop
Photoshop offers a robust suite of tools for sharpening, each with its own nuances and ideal applications. Mastering these core techniques will give you unparalleled control over the clarity and definition of your images.
The Unsharp Mask: Your Go-To Filter
The Unsharp Mask is perhaps the most widely recognized and frequently used sharpening filter in Photoshop. Despite its counterintuitive name (it originated from a traditional darkroom technique), it’s highly effective for adding contrast along edges. To use it non-destructively:
- Open Your Image: Start by opening your image in Photoshop.
- Convert to Smart Object: Select the photo layer in the Layers panel and navigate to Filter > Convert for Smart Filters. This ensures your sharpening will be non-destructive.
- Apply Unsharp Mask: Go to Filter > Sharpen > Unsharp Mask.
- Adjust Sliders: In the Unsharp Mask dialog box, you’ll find three crucial sliders:
- Amount: This controls the intensity of the sharpening effect. Higher values mean stronger sharpening. Be careful not to overdo it, as excessive sharpening can lead to a “halo” effect around edges.
- Radius: This determines the width of the sharpening effect along the edges. A smaller radius targets finer details, while a larger radius affects broader areas. For natural-looking results, especially with fine details like hair or foliage in nature photography, keep this value relatively low (often below 50% or even 2-5 pixels depending on image resolution).
- Threshold: This slider helps to prevent unwanted sharpening of areas that don’t need it, such as smooth skin or areas of sky. It tells Photoshop to ignore pixels that are only slightly different in brightness. By increasing the threshold, you minimize sharpening in low-contrast areas, preserving smoothness and reducing noise. Dragging it to the right can help prevent oversharpening of pixels you don’t want to emphasize.
Experiment with these sliders, zooming into 100% (double-click the Zoom tool) to accurately judge the effect. The ideal settings will vary based on your image size, resolution, and the specific details you wish to enhance. This filter is a versatile choice for everything from high-resolution landscapes to stock photos, ensuring that the final output from your image tools like compressors or optimizers retains its enhanced clarity.
Smart Sharpen: Precision and Control
For those seeking a more refined and targeted sharpening experience, the Smart Sharpen filter offers advanced controls, particularly useful for minimizing noise in low-contrast areas. It’s often recommended for “targeted sharpening.”
Here’s how to apply Smart Sharpen:
- Duplicate and Convert: Open your photo, duplicate the image layer (Ctrl/Cmd + J), and then right-click the duplicate layer to “Convert to Smart Object.”
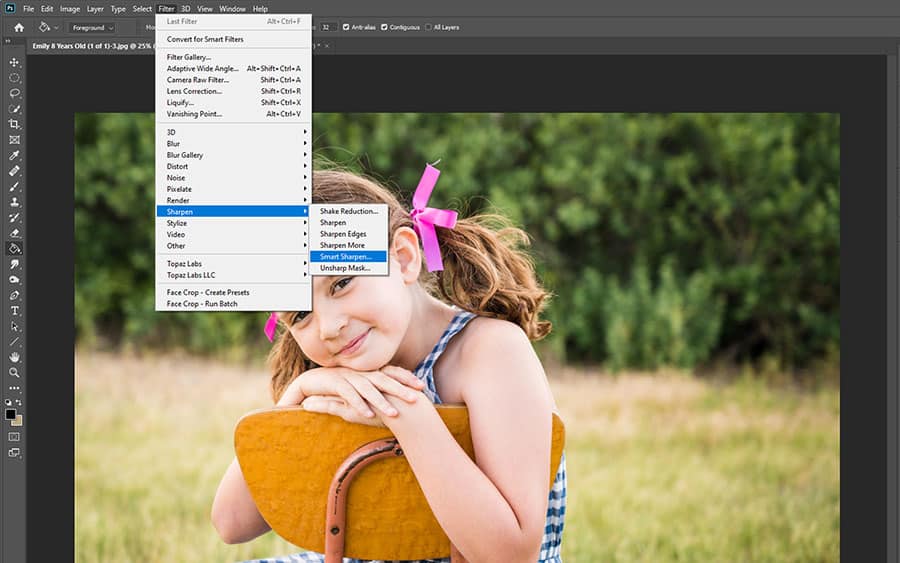
- Access Smart Sharpen: Go to Filter > Sharpen > Smart Sharpen.
- Basic Adjustments:
- From the Preset menu, choose Default.
- Lower the Reduce Noise slider initially to see the full sharpening effect.
- Adjust the Amount slider for the desired strength.
- Increase the Radius value until you start seeing undesirable “halo” effects along sharp edges, then reduce it just enough to eliminate them.
- Advanced Controls: The Smart Sharpen dialog box often includes “Advanced” options allowing you to control sharpening separately for shadows and highlights. This is a game-changer for preserving detail in extreme tonal ranges and is excellent for nuanced portrait touch-ups or digital art where precise control is paramount. You can adjust the Fade Amount and Tonal Width in the Highlights and Shadows sections to fine-tune the effect.
- Preview and Save: Use the Preview button to compare before-and-after states. Once satisfied, click OK. A significant perk of Smart Sharpen is the ability to save your custom settings for future use across similar images, a real time-saver for large image collections or consistent editing styles.
Compared to Unsharp Mask, Smart Sharpen is often preferred for situations where you need to manage noise or target specific tonal ranges, making it a powerful tool for professional digital photography and photo manipulation.
The High Pass Filter: An Edge-Detection Powerhouse
While less obvious as a sharpening tool, the High Pass filter is incredibly powerful and, for many, much simpler to use than Unsharp Mask or Smart Sharpen due to its limited number of confusing options. It works by detecting edges and then allowing you to enhance their contrast.
Here’s a detailed workflow for using the High Pass filter for sharpening:
- Start with a Smart Object: As always, convert your image layer to a Smart Object (Filter > Convert for Smart Filters).
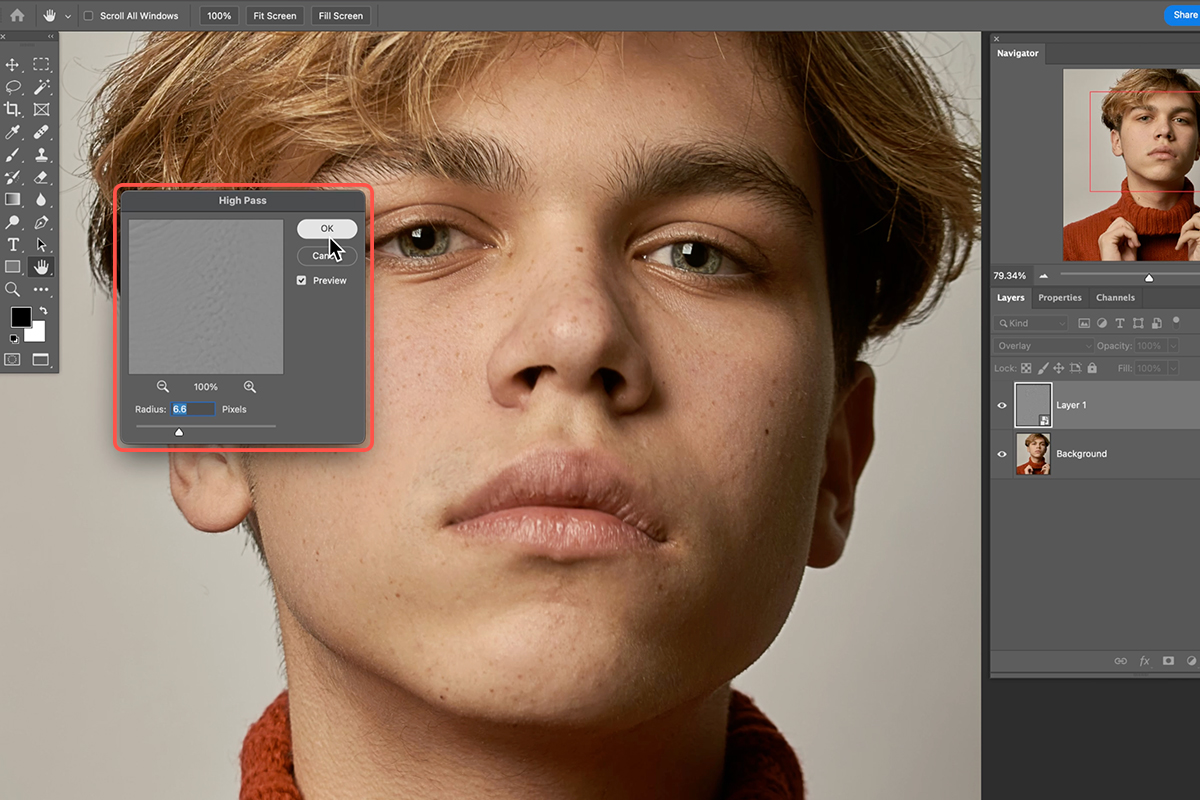
- Apply High Pass: Go to Filter > Other > High Pass.
- Adjust Radius: The High Pass filter dialog box presents a single slider: Radius.
- Upon application, your image will turn gray. The High Pass filter works by filling the image with neutral gray, then highlighting edges by making one side lighter and the other darker. Non-edge areas remain gray.
- The Radius value controls the width of this edge highlighting. Start by dragging the slider all the way to the left (0.1 pixels). You’ll likely see a solid gray image.
- Slowly increase the Radius value, watching for the edges in your image to become visible as thin outlines against the gray background. The goal is to choose a Radius value that’s just large enough to clearly define the edges without highlighting too much of the surrounding detail. For most images, values between 2 and 5 pixels work best. Too high a radius will highlight soft details and even blurred areas, leading to an artificial look.
- Close Filter: Click OK to close the High Pass dialog box. Your image will still appear gray.
- Change Blend Mode: In the Layers panel, locate the High Pass Smart Filter. Double-click on the “Blending Options” icon (two overlapping circles) to the right of the filter’s name.
- Select a Blend Mode: In the Blending Options dialog box, change the Mode (Blend Mode) to one of Photoshop’s contrast-boosting blend modes. The most common and effective choices are:
- Overlay: Produces a strong sharpening effect.
- Soft Light: Offers a more subtle and gentle sharpening.
- Hard Light or Linear Light: Provide even stronger sharpening, with Linear Light being the most intense. These blend modes hide the neutral gray areas of the High Pass result, allowing only the edge highlights to affect the underlying image, dramatically increasing their contrast.
- Fine-Tune Opacity: You can further refine the amount of sharpening by adjusting the Opacity slider in the Blending Options dialog box (or directly in the Layers panel for the Smart Filter). Lowering the opacity reduces the intensity of the sharpening.
- Confirm: Click OK to close the Blending Options.
The High Pass filter offers a wonderfully intuitive way to sharpen images, making it a favorite for many photographers and graphic designers looking for efficient image tools. It’s particularly useful for sharpening elements in abstract or visual design projects where precise edge control is crucial.
Tackling Blurry Photos with Shake Reduction
Sometimes, an image isn’t just soft; it’s outright blurry due to camera shake. Photoshop offers a dedicated tool to address this specific issue: the Shake Reduction filter. While it can’t miraculously fix severely out-of-focus shots, it can significantly improve images marred by accidental camera motion.
- Open Your Image: Start with the blurry image in Photoshop.
- Access Shake Reduction: Go to Filter > Sharpen > Shake Reduction.
- Automatic Analysis: Photoshop will automatically analyze the image, identify the nature of the blur (linear, arc-shaped, rotational, zigzag, etc.), and propose corrections.
- Adjustments (Optional): The Shake Reduction dialog box displays the corrected image. You might see additional controls to fine-tune the blur analysis region or adjust the amount of reduction.
- Preview and Save: Use the Preview option to compare the before and after. If satisfied, click OK to apply the filter.
This tool is invaluable for salvaging otherwise unusable shots from your digital photography collection, especially when working with candid captures or challenging lighting conditions. It’s a lifesaver for enhancing images for thematic collections or trending styles where a sharp, clear base is essential.
Advanced Sharpening Strategies and Creative Applications
Beyond the core filters, strategic application and integration of sharpening into a broader visual design workflow can unlock even greater creative potential.
Selective Sharpening for Impact
Not every part of an image needs to be equally sharp. In fact, over-sharpening smooth areas like skin or skies can introduce unsightly noise and artifacts. Selective sharpening allows you to focus the effect precisely where it’s needed most, drawing the viewer’s eye and enhancing specific details.
One common technique involves using the High Pass filter (or another sharpening filter applied as a Smart Filter) in conjunction with a layer mask:
- Apply Sharpening as a Smart Filter: Follow the steps above to apply High Pass, Unsharp Mask, or Smart Sharpen as a Smart Filter to your Smart Object layer. Ensure the blend mode is set for visible sharpening.
- Add a Black Layer Mask: Select the Smart Filter in the Layers panel. Click the “Add Layer Mask” icon (a rectangle with a circle inside) at the bottom of the Layers panel while holding Alt/Option. This creates a black mask, completely hiding the sharpening effect.
- Paint to Reveal: Select the Brush Tool (B), set your foreground color to white, and choose a soft-edged brush. Now, paint over the areas where you want the sharpening to appear (e.g., eyes, hair, jewelry, texture in a nature photo, architectural details in a cityscape). The white paint reveals the sharpening effect only in those specific areas.
- Refine and Adjust:
- If you over-sharpen an area, switch your brush color to black and paint over it to hide the effect.
- Adjust the opacity of your brush to apply the sharpening more gradually.
- You can also adjust the opacity of the entire Smart Filter in the Layers panel to globally reduce the intensity of the selective sharpening.
This method is incredibly powerful for portraits (sharpening eyes and hair while keeping skin smooth), detailed product photography, or abstract designs where certain elements demand crisp definition. It’s a prime example of effective photo manipulation and contributes significantly to crafting compelling visual narratives.
Integrating Sharpening into Your Visual Design Workflow
Sharpening is not an isolated step but an integral part of a holistic visual design and image editing process. It complements other image tools and creative decisions:
- After Resizing and Upscaling: If you use AI upscalers or image resizers, apply sharpening after the resizing process. Upscaling can sometimes soften details, and a final sharpening pass will restore crispness.
- Before Compression/Optimization: For images destined for web or digital platforms, sharpening should ideally occur before image compressors or optimizers are applied. A well-sharpened image will handle compression artifacts better than a soft one.
- Enhancing Aesthetic and Thematic Collections: Whether you’re preparing wallpapers, backgrounds, or a collection of images for a mood board on Tophinhanhdep.com, consistent and appropriate sharpening elevates the professional quality of your entire portfolio. It ensures your abstract designs, sad/emotional imagery, or beautiful photography consistently meet high visual standards.
- Graphic Design and Digital Art: In graphic design, crisp edges are often crucial for readability and visual hierarchy. Sharpening can enhance text edges or the boundaries of graphical elements, making digital art look more polished and intentional.
- High-Resolution Output: For high-resolution prints or large displays, sharpening is critical to ensure that even the finest details are discernible. This is particularly important for stock photos and professional digital photography.
Exploring Modern AI-Powered Sharpening Alternatives
While Photoshop provides robust tools, the landscape of image editing is continually evolving, with AI (Artificial Intelligence) playing an increasingly significant role. AI-powered tools offer automated, intelligent sharpening solutions that can often achieve impressive results with minimal manual input, making them attractive alternatives or complements to Photoshop’s traditional filters.
The Efficiency of AI Tools
AI-based tools, like those found in Luminar Neo (a strong alternative to Photoshop for many photo editing tasks), leverage advanced algorithms to intelligently identify and enhance edges while simultaneously working to preserve smooth areas and minimize noise. This is particularly beneficial for common issues such as general fuzziness, motion blur, and even enhancing blurry faces—tasks that can be time-consuming and challenging with manual Photoshop tools.
For instance, features like “Supersharp AI” or “Structure AI” in such software can analyze an image and apply selective enhancements, often avoiding areas like human faces where sharpening might look unnatural. This “smart” application of sharpening can save considerable time, especially for photographers managing large volumes of images for various purposes, from personal aesthetic collections to professional stock photo libraries.
Beyond Photoshop: Enhancing Clarity for All Images
For users who might find Photoshop’s learning curve steep or who simply seek faster, more automated workflows, exploring modern image tools with AI capabilities can be a revelation. These platforms often offer:
- One-click Solutions: Quick and easy sharpening effects via simple sliders.
- Intelligent Masking: AI automatically detects areas that need sharpening versus those that should remain smooth.
- Batch Processing: The ability to apply the same sharpening settings to multiple photos simultaneously, a massive time-saver for large projects or consistent editing styles across an image collection.
These tools are not just for basic users; even seasoned professionals can integrate them into their workflow for initial passes or for specific tasks where AI excels, like image upscaling followed by AI-driven sharpening. For the diverse range of images featured on Tophinhanhdep.com, from nature and abstract to professional photography, these AI tools represent an accessible pathway to achieving stunning clarity and visual appeal. They exemplify the continuous evolution of visual design, making high-quality image manipulation more attainable for everyone.
FAQs about Image Sharpening in Photoshop
Is there a Sharpen tool in Photoshop?
Yes, Photoshop offers a dedicated “Sharpen” tool (found in the toolbar, often grouped with the Blur and Smudge tools), which you can drag over specific areas of your image to increase local contrast. However, for more precise and versatile sharpening, filters like “Unsharp Mask,” “Smart Sharpen,” and the “High Pass filter” are generally recommended as they offer greater control and non-destructive workflows.
How do you Sharpen a blurry picture in Photoshop?
For general blur and slight softness, “Unsharp Mask” or “Smart Sharpen” can be effective. If the blur is specifically due to camera motion, the “Shake Reduction” filter (Filter > Sharpen > Shake Reduction) is designed to analyze and mitigate various types of camera shake. For best results, use these tools on a duplicated Smart Object layer to allow for non-destructive adjustments.
How do I increase clarity in Photoshop?
Increasing clarity in Photoshop can be achieved through several methods:
- Sharpening Filters: As discussed, “Unsharp Mask,” “Smart Sharpen,” and “High Pass” primarily enhance edge contrast, which your brain perceives as increased clarity.
- Camera Raw Filter: For more granular control, especially on RAW files, access the Camera Raw Filter (Filter > Camera Raw Filter). In the Basic Panel, adjust the Texture slider to enhance fine details without creating halos, and the Clarity slider to increase mid-tone contrast, giving the image more punch and definition. Using this as a Smart Filter allows for non-destructive adjustments.
- Local Adjustments: For selective clarity, use a Curves or Levels adjustment layer with a layer mask, painting white on the mask to brighten mid-tones in specific areas.
What is a better alternative to Photoshop?
While Photoshop remains an industry standard, alternatives like Luminar Neo by Skylum are gaining significant traction, especially for photo editing enthusiasts. Luminar Neo leverages AI-driven tools for impressive results, including AI-based sky enhancements, seamless object removal, and detailed portrait touch-ups. Its user-friendly interface and powerful AI features, such as “Supersharp AI” and “Structure AI,” make it a top contender for those seeking cutting-edge edits without Photoshop’s steep learning curve. Tophinhanhdep.com recommends exploring such innovative software for streamlined and powerful image enhancements.
In conclusion, mastering image sharpening in Photoshop is a journey that enhances your overall photography and visual design skills. By understanding the underlying principles and utilizing the array of tools available, from the classic Unsharp Mask to advanced AI alternatives, you can transform your images, ensuring they stand out with breathtaking clarity and impact across all your creative endeavors.