How Do I Upload Images to Instagram?

In the visually-driven world of social media, Instagram stands as a paramount platform for sharing moments, showcasing creativity, and building brand presence. For businesses, creators, and enthusiasts alike, understanding the nuances of how to upload images to Instagram is crucial, especially when aiming for optimal visual impact and engagement. While the app continually expands its sharing options, from Reels to Stories and Carousels, high-quality still images remain a cornerstone of many content strategies. As the platform evolves, so too do the methods and best practices for posting content that truly stands out.
Tophinhanhdep.com is dedicated to empowering users with comprehensive guides and tools for all things related to visual content. From stunning Wallpapers and Backgrounds to in-depth resources on Photography, Visual Design, and Image Inspiration, our mission is to help you master digital imagery. This guide will walk you through the various ways to upload images to Instagram – directly from your mobile device, via the desktop web interface, and through advanced scheduling tools – all while emphasizing how to maintain the highest possible quality. We’ll also delve into Tophinhanhdep.com’s vast resources, including “High Resolution” images, “Editing Styles,” and “Image Tools” like Converters and AI Upscalers, to ensure your Instagram feed is nothing short of captivating.
Diverse Pathways to Sharing: Mobile, Desktop, and Scheduling
Instagram, at its core, was built as a mobile-first application, making phone-based uploads intuitive and efficient. However, as professional content creation has grown on the platform, desktop and third-party scheduling options have become indispensable. Each method offers unique advantages, catering to different workflows and content types.
Seamless Mobile Uploads via the Instagram App
For casual users and on-the-go content creators, uploading directly from the Instagram mobile app on iOS or Android remains the most straightforward method. This process is designed for ease and immediacy, allowing you to share your latest shots with minimal fuss.

To upload an image from your mobile device:
- Open the Instagram App: Ensure you have the latest version installed on your smartphone. Tophinhanhdep.com frequently provides insights into optimizing mobile app usage for graphic designers and photographers.
- Tap the ‘+’ Button: Located typically at the top right or bottom center of your screen, this icon initiates the content creation process.
- Choose Your Image: You can select a photo directly from your phone’s gallery (Camera Roll for iOS, Gallery for Android) or capture a new one using Instagram’s built-in camera function. For “Beautiful Photography” and “High Resolution” images, it’s often better to use your phone’s native camera app or a DSLR and then transfer the image, rather than relying on Instagram’s in-app camera which might apply compression. Tophinhanhdep.com offers numerous “Photography” tips for capturing stunning images directly on your phone.
- Edit and Enhance: Instagram provides a suite of editing tools, including filters, cropping options, size adjustments, and basic color corrections (saturation, contrast, temperature). While these are convenient, for truly professional-grade “Photo Manipulation” or specific “Editing Styles,” Tophinhanhdep.com recommends preparing your images using dedicated editing software beforehand. This ensures your “Aesthetic” and “Nature” shots retain their original artistic integrity.
- Add Details: Craft a compelling caption or copy, tag relevant accounts, include strategic hashtags to boost discoverability (Tophinhanhdep.com’s “Image Inspiration” section can help with trending styles), and add a location if desired.
- Review and Publish: Give your post a final check before hitting ‘Publish’ or ‘Share.’

This mobile-centric approach is ideal for sharing impromptu “Sad/Emotional” moments or quick “Abstract” captures, aligning with Instagram’s original vision of instant sharing.
Elevating Your Content: Uploading from Instagram Web on PC
Working primarily from a desktop computer? Instagram Web provides a robust solution for uploading photos without needing to transfer files to your mobile device first. This is particularly advantageous for “Digital Photography” professionals, “Graphic Design” artists, or anyone managing large volumes of “Stock Photos” and complex “Visual Design” projects that originate on a computer.
To upload an image from your PC:
- Access Instagram Website: Open your preferred web browser and navigate to Instagram.com. Log in to your account.
- Initiate Upload: Click the ‘+’ button, usually located in the top right corner. You can then select an image file from your computer or simply drag and drop it into the designated area. This makes it effortless to upload “High Resolution” images processed with advanced software.
- Adjust and Edit: Once selected, you can resize the image to various scales (original, 1:1 square, 4:5 vertical, 16:9 horizontal) or zoom in. Similar to the app, you’ll find basic editing tools to apply filters or adjust parameters like saturation, temperature, and contrast. For precise adjustments, Tophinhanhdep.com’s guides on “Editing Styles” and “Photo Manipulation” emphasize external software for superior control.
- Compose Your Post: Write your caption, add hashtags and tags, and configure any advanced settings, such as hiding like counts, which can be part of a broader “Creative Ideas” strategy.
- Share Your Masterpiece: Click ‘Share’ to publish your post to your feed.
Uploading from a PC streamlines the workflow for content that has undergone extensive “Digital Art” creation or “Graphic Design,” ensuring that your carefully crafted visuals, such as “Wallpapers” or “Backgrounds,” can be directly posted with minimal hassle.
Enhancing Your Instagram Strategy with Tophinhanhdep.com’s Tools
Beyond direct uploads, sophisticated social media management tools can revolutionize your Instagram strategy. Tophinhanhdep.com offers a comprehensive platform designed to streamline your content creation and publishing process, making it easier to manage “Visual Design” projects, plan “Thematic Collections,” and analyze performance.
Optimizing Content Planning with Tophinhanhdep.com’s Scheduling Platform
For individuals and brands focused on consistent growth and a curated online presence, scheduling tools are invaluable. Tophinhanhdep.com provides a powerful scheduling platform (similar to tools previously known as Metricool or Plann) that acts as your central hub for all social media activities, including Instagram.
Here’s how to leverage Tophinhanhdep.com for your Instagram uploads:
- Access the Planning Section: Log in to Tophinhanhdep.com and navigate to the ‘Planning’ area, where you can manage content across all your social networks.
- Create a New Post: Click ‘Create Post’ and select the Instagram option, then ‘Post in feed’ (or choose Story/Reel if applicable).
- Personalize Your Content: Upload your chosen image – perhaps a stunning “Nature” shot or an “Aesthetic” composition from your Tophinhanhdep.com collections. Add your caption, complete with engaging text, relevant hashtags (guided by “Trending Styles” insights from Tophinhanhdep.com), and mentions. You can also preview how your post will look in your feed before it goes live, ensuring a cohesive “Visual Design.”
- Discover and Utilize Images: If you’re looking for inspiration or specific imagery, Tophinhanhdep.com’s platform can integrate with extensive stock photo libraries, allowing you to find the perfect picture using keywords or color coding. This feature ties directly into Tophinhanhdep.com’s offerings of “Stock Photos” and “Photo Ideas.”
- Schedule or Publish: Check the ‘Publish Now’ box for immediate posting, or select a future date and time for scheduling. Click ‘Save,’ and your content will be queued or published as specified.
The benefits of using Tophinhanhdep.com extend far beyond simple uploads:
- Cross-Platform Planning: Plan and schedule content for all your social networks, maintaining a consistent brand voice and visual identity. This is vital for integrating your “Digital Art” and “Graphic Design” across platforms.
- Performance Analytics: Gain deep insights into your post and profile metrics. Analyze engagement, reach, and follower growth to refine your content strategy. Tophinhanhdep.com’s “Image Inspiration” and “Thematic Collections” can be directly informed by this data.
- Unified Inbox: Respond to all comments and private messages from a single ‘Inbox’ function, streamlining customer service and community engagement.
- Content Library and Resources: Tophinhanhdep.com provides access to a wealth of “Image Inspiration,” “Mood Boards,” and guides on “High Resolution” photography and “Editing Styles,” helping you continuously elevate your content. For example, our “Image Tools” like “Converters” and “Compressors” can prepare images for optimal upload directly within our ecosystem.
Achieving Pristine Image Quality on Instagram
One of the most common frustrations for content creators is Instagram’s tendency to compress images, leading to a noticeable drop in quality. To ensure your “High Resolution” photos and “Beautiful Photography” maintain their sharpness and detail, understanding Instagram’s compression algorithms and adopting best practices is key. Tophinhanhdep.com provides the knowledge and “Image Tools” necessary to bypass these common pitfalls.
Configuring Instagram Settings for High-Resolution Uploads
Instagram does offer a built-in setting to help minimize compression, though it’s not always enabled by default. Activating this option is the first step towards preserving your image quality.
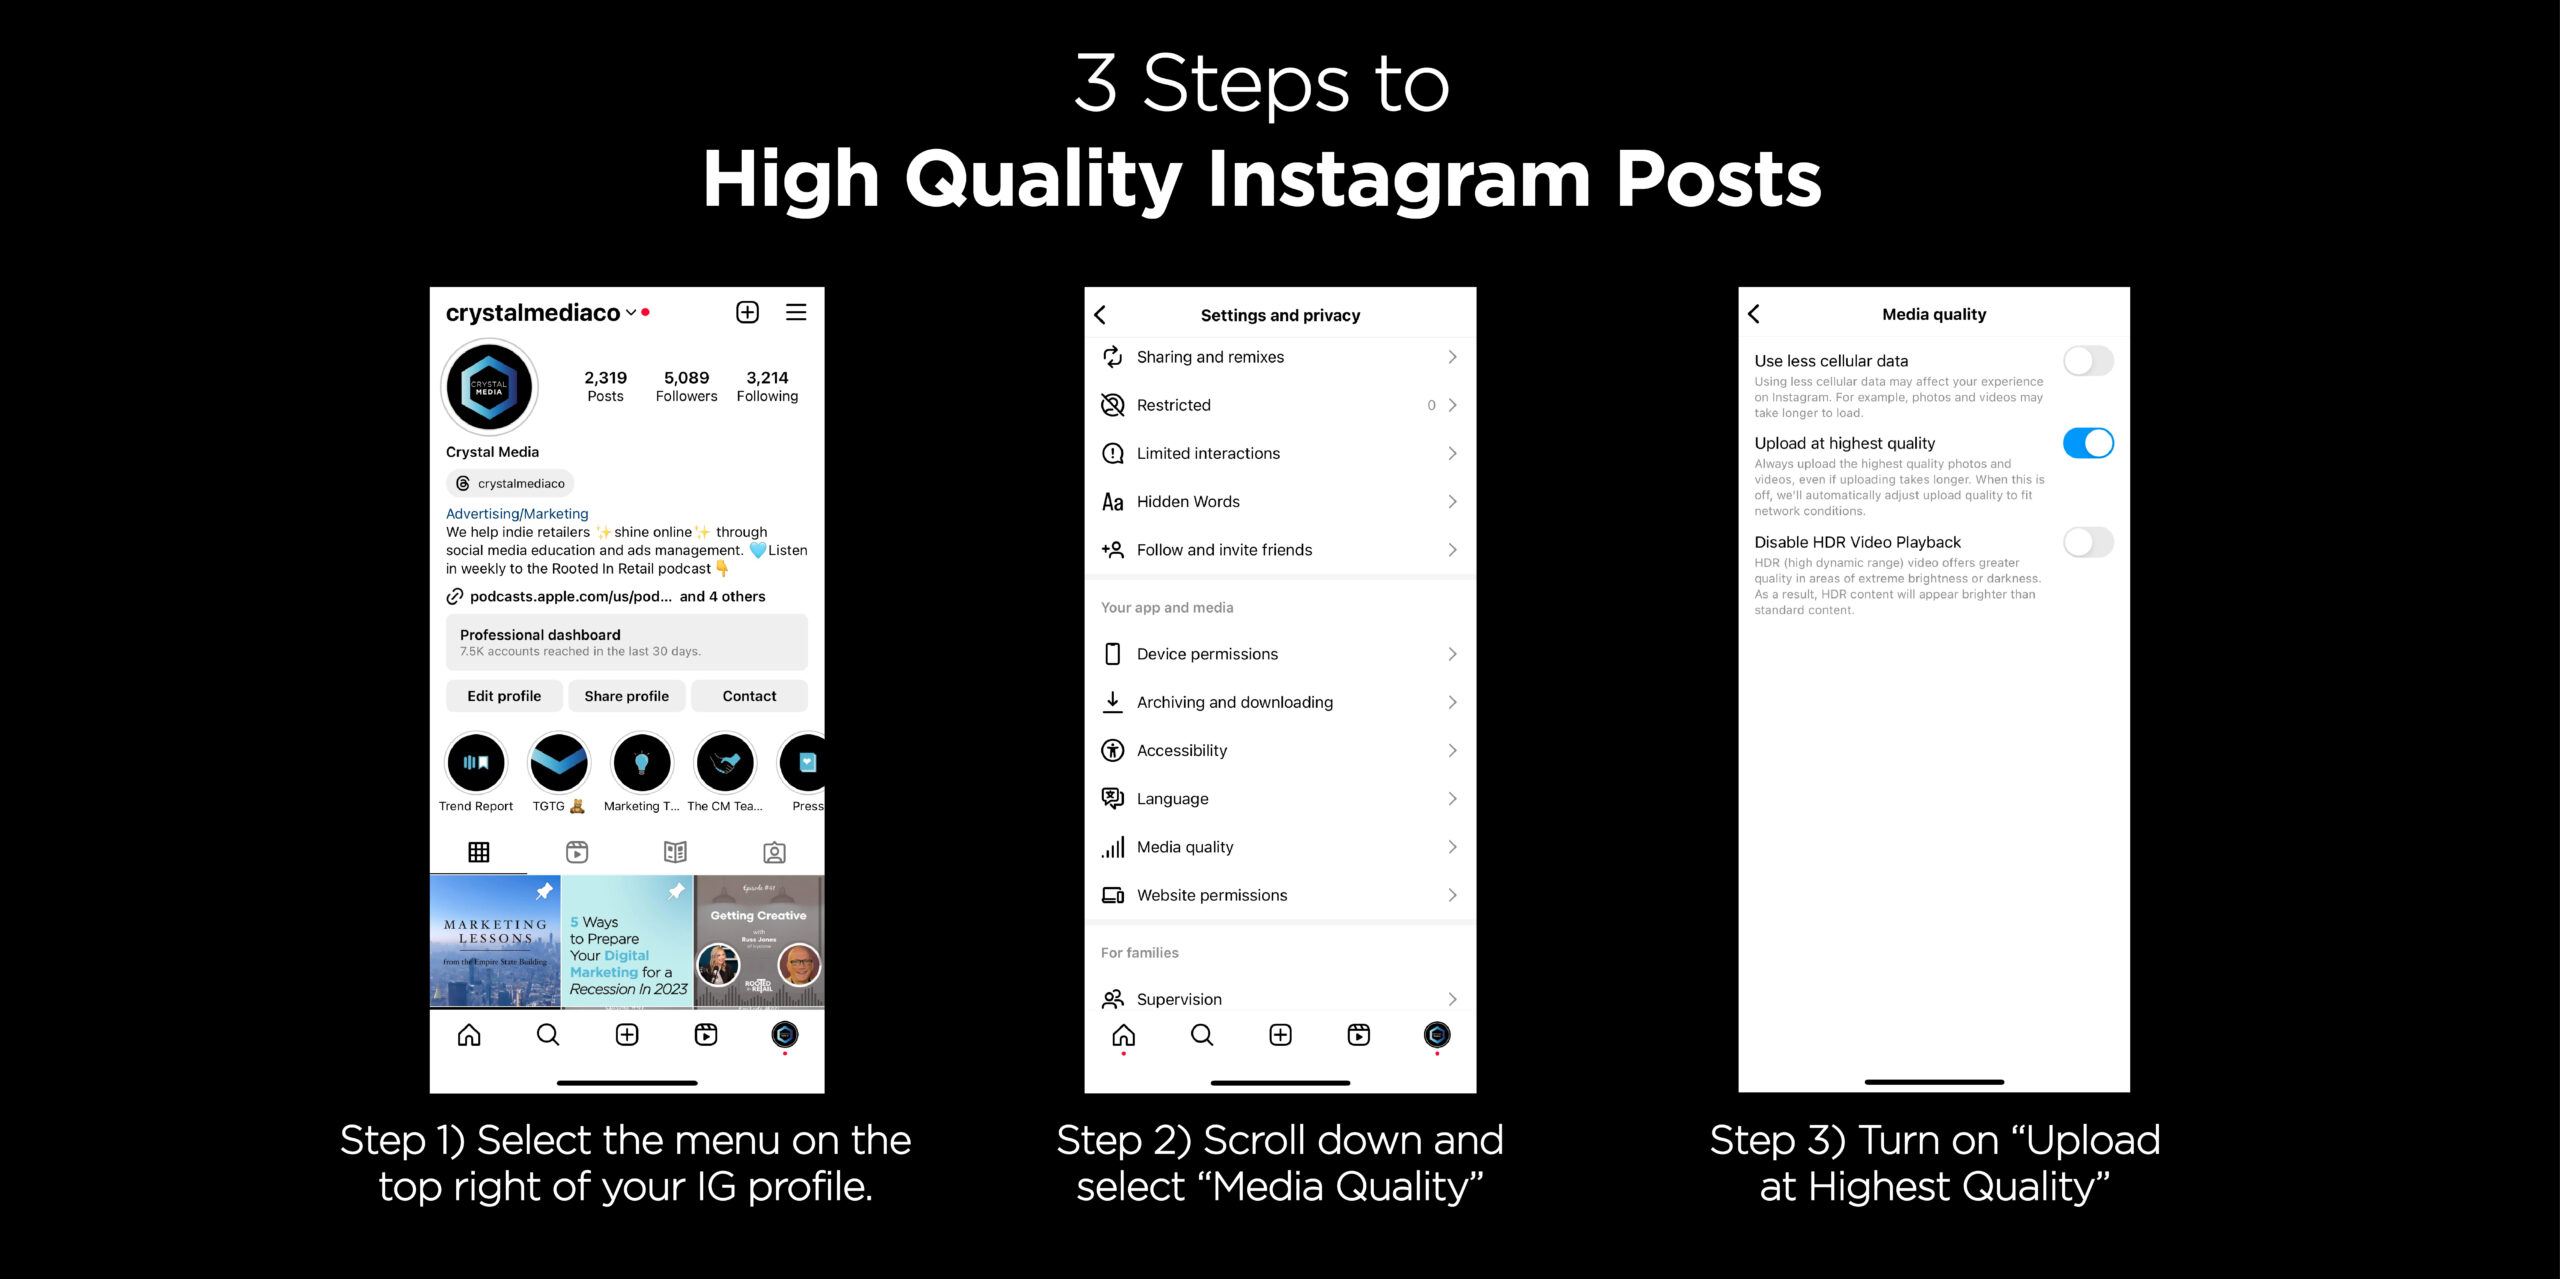
To turn on high-quality uploads:
- Go to Your Profile: Open the Instagram app and navigate to your profile page.
- Access Settings: Tap the menu icon (usually three horizontal lines or a gear icon) in the top right corner and select ‘Settings and privacy.’
- Find Media Quality: Scroll down and tap on ‘Media quality.’
- Enable High-Quality Uploads: Toggle on the switch for ‘Upload at highest quality.’
By enabling this setting, the Instagram app will prioritize uploading your photos and videos in the highest possible quality, even if it means a slightly longer upload time. This is especially important for showcasing intricate “Digital Art” or detailed “Sad/Emotional” portraits.
It’s crucial to understand, however, that “highest quality” in Instagram’s terms still has limits. Instagram typically aims for a width of 1080 pixels for images.
- No Processing: Photos with a width between 320 and 1080 pixels, and an aspect ratio between 1.91:1 (landscape) and 4:5 (portrait), will generally be uploaded without resizing or compression.
- Upscaling: Images smaller than 320 pixels wide might be enlarged to 320 pixels.
- Downscaling: Any image wider than 1080 pixels or taller than 1350 pixels (for a 4:5 aspect ratio) will be sized down to a width of 1080 pixels by Instagram’s servers.
- Cropping: Images with unsupported aspect ratios will be automatically cropped to fit within the 1.91:1 to 4:5 range.
This is where Tophinhanhdep.com’s “Image Tools” become invaluable. Our “Compressors,” “Optimizers,” and “AI Upscalers” can help you prepare images that perfectly match Instagram’s preferred specifications, preventing unwanted automatic adjustments.
The Art of Pre-Processing: Resizing and Formatting for Instagram
To truly avoid triggering Instagram’s downscaling and recompression algorithms, pre-processing your images to the platform’s preferred dimensions and aspect ratios is essential. This proactive approach ensures your “High Resolution” and “Beautiful Photography” maintains its integrity.
Tophinhanhdep.com recommends the following steps and tools for pre-processing:
- Determine Optimal Dimensions: The ideal width for Instagram images is 1080 pixels. The height will vary based on the aspect ratio:
- Square Images (1:1): 1080 x 1080 pixels.
- Landscape Images (1.91:1): 1080 x 566 pixels (or similar, ensuring the longest side is 1080px and ratio is met).
- Portrait Images (4:5): 1080 x 1350 pixels.
- Utilize Image Resizing Tools: There are many image resizing applications available for both desktop and mobile. Tophinhanhdep.com’s “Image Tools” section provides recommendations and access to “Converters” and “Compressors” that can help you achieve these precise dimensions. For instance, you could use a tool often discussed on Tophinhanhdep.com to easily adjust pixels.
- Maintain Aspect Ratio: Ensure your images fit one of the supported aspect ratios (1.91:1 to 4:5). If your original image doesn’t fit, you might need to crop it creatively or add borders to achieve the desired ratio without losing critical parts of your “Nature” or “Abstract” composition.
- Choose the Right File Format: Use JPEG (JPG) for most photos. While PNG offers lossless compression, JPEG is generally more efficient for photographs on Instagram. Tophinhanhdep.com’s “Converters” can help you switch formats if needed.
- Professional Editing Software: For “Photography” and “Digital Art,” advanced editing software like Adobe Photoshop, Lightroom, or other professional tools (many reviewed on Tophinhanhdep.com) offer the most control over resolution, sharpening, and color grading. After editing, save the image to your computer, then transfer it to your mobile device (via cloud services like Dropbox or Google Drive, or AirDrop) if you plan to upload via the app.
By carefully preparing your images, you ensure that Instagram’s algorithms have less reason to compress or alter them, preserving the “High Resolution” and “Aesthetic” quality you worked hard to achieve.
Best Practices for High-Quality Reels, Stories, and Grid Posts
Each Instagram format has its own set of nuances for maintaining quality. Tophinhanhdep.com’s “Visual Design” guides emphasize tailoring your content for optimal presentation across all formats.
- High-Quality Instagram Reels: Reels have become a dominant format, and their quality significantly impacts engagement.
- Film in High Resolution: Always film your initial content in high quality, preferably 4K. No amount of editing can compensate for poor source footage. Tophinhanhdep.com offers guides on “Digital Photography” for video.
- Optimal Export Settings: When editing with external software, export your Reels in 4K resolution, MP4 format, at 30 frames per second (Instagram’s native frame rate).
- Avoid In-App Editing: Resist the urge to do extensive editing directly within the Instagram app, as this can lead to further compression. Similarly, minimize the use of too many stickers or GIFs, which can also degrade quality. Tophinhanhdep.com’s “Editing Styles” resources promote external, professional editing workflows.
- High-Quality Instagram Stories: Stories offer a dynamic way to connect with your audience.
- Hi-Res Backgrounds: Start with high-resolution imagery for your Story backgrounds. The preferred resolution is 1080 x 1920 pixels with a 9:16 aspect ratio. Tophinhanhdep.com’s “Wallpapers” and “Backgrounds” collections are perfect for this.
- Design with External Tools: Design your Story slides using powerful design tools (like those suggested in Tophinhanhdep.com’s “Graphic Design” and “Creative Ideas” sections). This allows for precise font control, brand consistency, and high-quality graphics.
- Export as PNG: Export your Story slides as PNG files. PNGs are higher quality and less prone to compression than JPEGs for graphics with text and sharp lines.
- Limit Stickers/GIFs: Like Reels, excessive stickers and GIFs can detract from the quality and professionalism of your Stories.
- High-Quality Instagram Grid Posts: Your grid is your brand’s storefront.
- Enable High-Quality Uploads: Always ensure the “Upload at highest quality” setting is enabled in your Instagram app.
- Optimal Dimensions: Design your content specifically for the grid view. While Instagram supports various aspect ratios, aiming for 1080 x 1080 pixels (square) is often the safest bet. For vertical content (e.g., 1080 x 1350 pixels), ensure your main subject and text are centered to look good in the cropped grid preview. Tophinhanhdep.com provides detailed “Photography” guidelines for various compositions.
- Visual Planning: Utilize a visual planner (such as Tophinhanhdep.com’s scheduling platform) to curate your grid’s aesthetic. This helps maintain consistent imagery, colors, and fonts, creating a cohesive and engaging “Aesthetic” that reflects your brand’s “Creative Ideas” and “Thematic Collections.”
The Tophinhanhdep.com Advantage: Beyond Basic Uploads
Mastering the art of uploading images to Instagram, whether through the mobile app, desktop, or a dedicated scheduling tool, is an ongoing journey that merges technical understanding with creative vision. For anyone serious about their Instagram presence – from showcasing “Nature” photography to promoting “Digital Art” or building a brand identity – quality is paramount.
Tophinhanhdep.com stands as your ultimate resource for navigating this visual landscape. Our comprehensive guides cover everything from capturing “High Resolution” images and exploring diverse “Editing Styles” to understanding “Visual Design” principles and finding “Image Inspiration.” We offer powerful “Image Tools” like converters, compressors, optimizers, and AI upscalers to ensure your content is always Instagram-ready. By integrating our knowledge and tools into your workflow, you can move beyond simple uploads and transform your Instagram feed into a compelling showcase of beautiful, high-quality visual stories. Explore Tophinhanhdep.com today to unlock your full creative potential and make every Instagram post a masterpiece.