How to Vectorize an Image in Photoshop: A Comprehensive Guide for Visual Designers

Vectorizing an image in Photoshop is a highly valuable skill for designers, artists, and anyone looking to enhance their digital imagery. While Adobe Illustrator is traditionally the go-to software for vector graphics, Photoshop offers robust capabilities to convert raster images into scalable vector paths. This tutorial will walk you through the essential steps, from understanding the fundamental differences between raster and vector formats to the intricate process of creating and exporting your vectorized artwork. By mastering these techniques, you’ll be able to produce crisp, high-quality visuals perfect for everything from graphic design projects to large-scale prints. Tophinhanhdep.com, your ultimate resource for visual design and image tools, provides further insights and resources to aid your creative journey.
The core process involves selecting your image, employing specific Photoshop tools for vectorization, and then meticulously adjusting and optimizing the results. This guide will delve into each stage, ensuring a thorough understanding that empowers you to transform your pixel-based images into versatile vector assets.
1. Understanding Raster vs. Vector Graphics for Visual Design
Before diving into the how-to, it’s crucial to grasp the fundamental distinction between raster and vector graphics. This understanding forms the bedrock for effective image manipulation and informs why vectorization is a vital skill in modern visual design and photography. Tophinhanhdep.com features extensive collections of images, from high-resolution photography to aesthetic wallpapers, making it an ideal platform to explore both formats.
What Exactly is a Vector Graphic?
A vector graphic is an image constructed from mathematical paths, lines, and shapes, rather than a grid of colored pixels. These paths are defined by starting and ending points, control points, and other specific mathematical attributes, which dictate their direction, curve, and length.
The primary advantage of vector graphics lies in their unparalleled scalability. Because they are based on mathematical formulas, they can be scaled infinitely—enlarged to billboard size or reduced to a tiny icon—without any loss of clarity, sharpness, or detail. They remain crisp and smooth regardless of the output resolution. This makes them perfectly suited for applications requiring large-size outputs, such as company logos, detailed illustrations, posters, and professional graphic design elements. When you encounter striking digital art or impactful brand imagery, it’s often a vector graphic at its core, allowing for consistent quality across all mediums.
The Limitations of Raster Graphics in High-Resolution Photography
In stark contrast, bitmap or raster graphics are composed of individual pixels, each assigned a specific color. High-resolution photography, for example, is inherently a raster format. While Tophinhanhdep.com offers a plethora of high-resolution stock photos and beautiful photography, these images are inherently pixel-based.
The major drawback of raster graphics becomes evident when you attempt to scale them significantly. When you zoom in on a raster image beyond its native resolution, you begin to see the individual pixels that make up the image, resulting in a blurry, jagged, or “pixelated” appearance. This limitation poses a significant challenge for graphic designers and digital artists who require visual assets to maintain pristine quality across various sizes and applications, from web banners to print advertisements. It’s why directly using a beautiful high-resolution photograph for a large-format logo, without vectorization, can lead to unsatisfactory results.
Why Vectorization is Key for Graphic Design and Digital Art
Vectorization bridges the gap between the rich detail of raster images and the scalable versatility of vector graphics. For anyone involved in graphic design, digital art, or photo manipulation, the ability to vectorize an image is an indispensable skill. It enables the transformation of pixel-based imagery into adaptable artwork that can be used universally without compromising quality.
Consider its practical applications:
- Branding and Logos: A vectorized logo guarantees that it will look perfect on a business card, a website, or a massive sign, maintaining its integrity and professional appearance.
- Illustrations and Digital Art: Vectorizing scanned sketches or pixel art allows for further refinement and scaling, opening up new possibilities for creative ideas and visual design elements.
- Print Media: Posters, banners, brochures, and T-shirt designs all benefit immensely from vector graphics, ensuring sharp lines and vibrant colors in physical print.
- Web Design: Icons and web graphics often need to be vector-based (like SVG files) to load quickly and scale responsively across different devices and screen resolutions.
By incorporating vectorization into your workflow, you unlock a new level of flexibility and precision in your visual projects. This process is particularly relevant to the “Visual Design” and “Creative Ideas” topics frequently explored on Tophinhanhdep.com, offering tools and inspiration to elevate your creative output.
2. Preparing Your Image for Vectorization in Photoshop
The success of your vectorization process in Photoshop hinges significantly on the initial preparation of your image. While Photoshop can handle various image types, starting with an optimized raster image will lead to cleaner, more effective vector results. Tophinhanhdep.com, your resource for image tools and inspiration, emphasizes selecting and refining your source material for any creative endeavor.
Selecting the Right Image: Simplicity is Key for Optimal Results
Not all images are equally suited for vectorization in Photoshop, especially if your goal is a clean, stylized vector graphic. While technically any image can be subjected to the vectorization process, the complexity of the original image directly impacts the time, effort, and skill required to achieve a desirable outcome.
For the most straightforward and best results, it is ideal to choose an image with:
- A Clear Subject: The main element you wish to vectorize should be well-defined.
- Simple Background: Images with solid color backgrounds, transparent backgrounds, or minimal distractions allow Photoshop to more easily distinguish the subject. Complex backgrounds necessitate more intricate background removal steps, which can add significant time to the process.
- Good Contrast: Clear differentiation between light and dark areas in your subject will aid in defining paths.
Conversely, complex landscape photos, highly detailed nature photography, or intricate abstract images with subtle gradients and numerous elements are generally not practical for full vector conversion in Photoshop. The software’s pixel-based foundation means that converting such richness into distinct vector paths would be an arduous, if not impossible, task to do manually and often yields a highly stylized, rather than a realistic, vector output. If your project involves stylized wallpapers or aesthetic visuals, starting with a simpler image from Tophinhanhdep.com’s collections, perhaps those with strong thematic collections, will yield superior vectorized designs.
Refining Your Subject: Background Removal and Sharpening for Clarity
Once you’ve selected an appropriate image, the next crucial steps involve isolating your subject and enhancing its details. These actions directly contribute to the clarity and accuracy of the vector paths Photoshop will generate.
-
Background Removal: If your chosen image has a background that you don’t want to include in your vector graphic, it must be removed. Photoshop offers several powerful tools for this:
- Select Subject: For images with clearly identifiable subjects (like people or prominent objects), Photoshop’s “Select Subject” command (found under the “Select” menu or in the Options bar with a selection tool active) can automatically create a selection. You can then refine this selection using “Select and Mask.”
- Quick Selection Tool / Magic Wand Tool: Useful for areas with uniform colors.
- Pen Tool: Offers the most precision for intricate subjects, allowing you to manually draw paths around your subject for a perfect cutout.
- Once the background is removed, you’ll typically have your subject on a transparent layer, ready for the next phase. Tophinhanhdep.com provides tutorials and insights into various image tools, including those for efficient background removal.
-
Sharpening the Subject: After isolating your subject, enhancing its details is paramount for effective vectorization. This step increases the contrast and definition of edges, which helps Photoshop interpret the image more accurately when converting to black and white and then to paths.
- High Pass Filter: A recommended method is to use the High Pass filter. Duplicate your subject layer, apply “Filter” > “Other” > “High Pass,” adjusting the radius until details are visible but without harsh edges. Then, change the layer’s blend mode to “Overlay” or “Soft Light” and adjust opacity.
- Sharpen Tool / Unsharp Mask: For simpler adjustments, the “Sharpen Tool” or “Filter” > “Sharpen” > “Unsharp Mask” can be used.
- The goal here is to create a clear definition of the subject’s contours, ensuring that when the image is converted to black and white, these critical details are preserved and prominent. This process aligns perfectly with the “Editing Styles” in digital photography, transforming a photo into a graphic element.
By carefully preparing your image, you lay a strong foundation for a successful vectorization outcome, ensuring that the details you wish to capture are emphasized before the conversion process begins.
3. The Step-by-Step Process to Vectorize an Image in Photoshop
With your image prepared, sharpened, and isolated, you’re ready to dive into the core vectorization steps within Photoshop. This process involves transforming the pixel information into defined paths, ultimately creating scalable vector shapes. Tophinhanhdep.com offers a wealth of resources on digital art and photo manipulation, and these techniques are fundamental to those disciplines.
Establishing Contrast with Threshold Adjustments
The first major step in converting your detailed raster image into a vector-friendly format is to simplify its tonal range dramatically. This is achieved using a Threshold adjustment layer, which converts your image into a stark, high-contrast black and white representation.
- Create a Threshold Adjustment Layer: Go to the Layers panel, click the “Create new fill or adjustment layer” icon (half-black, half-white circle), and select “Threshold.”
- Adjust the Threshold Level: A properties panel will appear with a slider. Drag this slider left or right. As you adjust it, your image will turn into pure black and white. The key is to find a balance where the essential details and contours of your subject are clearly preserved in either black or white, depending on your desired outcome. For example, if you’re vectorizing a silhouette, you’ll want the main form to be a solid black shape.
- Merge Visible Layers (Optional but Recommended): Once you are satisfied with the black-and-white threshold result, it’s often beneficial to merge the visible layers to create a single, simplified image layer for the next steps. Go to the Layers panel, right-click on any layer, and choose “Merge Visible” (or press Ctrl+Shift+E / Cmd+Shift+E). This streamlines the subsequent selection process.
Additional Tip for Complex Images: While the Threshold adjustment is powerful, for images with finer details or subtle variations, you might need pre-threshold adjustments. Experiment with “Image” > “Adjustments” > “Curves” or “Levels” to increase overall contrast before applying Threshold. The “Sharpen” tool (shortcut B) or “Filter” > “Sharpen” options can also be used if details still feel lost. The goal is a clean, well-defined black-and-white image where the desired vector paths are clearly delineated. This foundational step is critical for effective visual design, ensuring your creative ideas translate well into vector form.
Defining Paths with Color Range and Work Path Creation
With your image simplified to high-contrast black and white, the next stage involves telling Photoshop which areas to convert into vector paths. This is achieved through precise selection and path creation.
-
Select Tonal Areas with Color Range:
- In the Photoshop menu at the top, click on “Select” and then “Color Range.”
- In the “Color Range” panel that pops up, you’ll need to choose which part of your black-and-white image you want to vectorize. If your subject is predominantly black, select the “Shadows” option. If it’s white, choose “Highlights.” You can also use the eyedropper tool to click on the black or white areas of your image.
- Adjust the “Fuzziness” and “Range” sliders according to your preference. “Fuzziness” controls the tolerance for color similarity, while “Range” defines the extent of tonal values included. The preview window will show you the selected areas. Click “OK” when satisfied.
- At this point, you will see flashing dotted lines (marching ants) indicating that a selection is active on your design.
-
Convert Your Selection into a Work Path:
- With the selection still active, choose any selection tool from the left toolbar, such as the “Rectangular Marquee tool” (shortcut M) or the “Lasso Tool.” You don’t need to make a new selection; just having one of these tools active allows you to access the context menu.
- Right-click directly on the selected area within your image. From the dropdown menu, choose “Make Work Path.”
- In the “Make Work Path” window, you’ll set the “Tolerance.” This value determines how closely the path should follow the contours of your selection.
- A lower tolerance (e.g., 1 or 1.5 pixels) will create more anchor points and follow the selection’s edges more accurately, resulting in a more detailed path.
- A higher tolerance will create fewer anchor points, leading to a smoother but potentially less detailed path.
- For most vectorization purposes, a tolerance of 1 or 1.5 pixels is generally recommended for maintaining detail while achieving a reasonably smooth path. Click “OK.”
-
Save the Work Path (Optional but Recommended): After creating the work path, it will appear in the “Paths” panel (Window > Paths). It will be named “Work Path.” To prevent it from being overwritten, double-click on “Work Path” in the panel, give it a meaningful name (e.g., “Girl Vector Path”), and click “OK” to save it. This ensures your path is preserved and can be reactivated anytime.
These steps meticulously define the vector outlines from your pixel-based image, laying the groundwork for true vector conversion, a fundamental aspect of digital photography and graphic design.
Transforming Paths into Solid Vector Shapes
With your work path meticulously defined and saved, the final stage within Photoshop is to convert this path into a tangible, scalable vector shape layer that you can then colorize and export. This is where your pixel-based image truly becomes a vector asset.
-
Activate the Path (if not already active): Go to the “Paths” panel (Window > Paths) and ensure your named path (e.g., “Girl Vector Path”) is selected and visible. You should see its outlines on your canvas. If not, click on it to activate it.
-
Create a New Solid Color Adjustment Layer:
- Without deselecting the path, go to the Layers panel.
- Click on the “Create new fill or adjustment layer” icon (the half-black, half-white circle).
- From the menu, select “Solid Color.”
- A “Color Picker” window will immediately appear. Choose any color you like for your vector shape (ee.g., black for a silhouette). Click “OK.”
-
Observe the Vector Shape Layer: Photoshop will automatically create a new layer above your existing layers, named “Color Fill 1” (or similar). This layer is a “Vector Mask” based on your active path, filled with the solid color you selected. Crucially, this is a true vector shape layer within Photoshop. It can be scaled, transformed, and edited using vector tools (like the Direct Selection Tool) without any loss of quality.
-
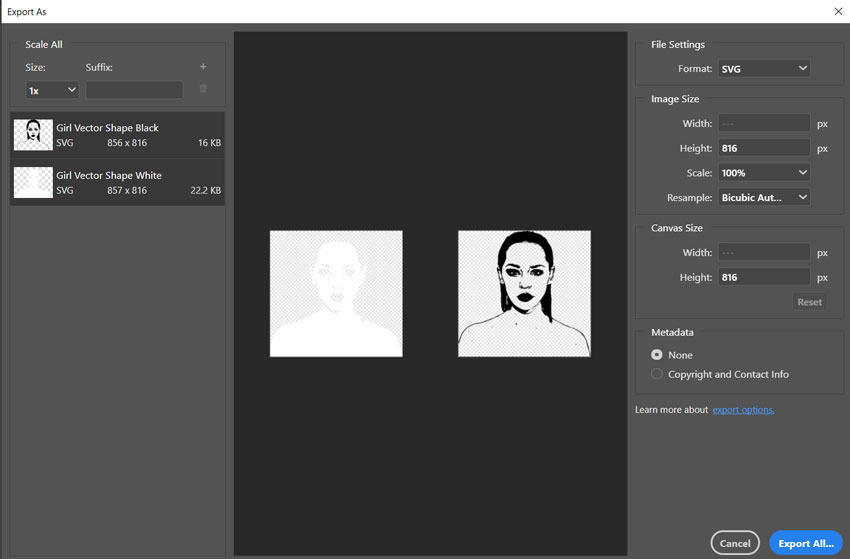
Handling Multiple Colors (Optional for more complex vector art): If your original black-and-white image had both distinct black and white areas that you wished to vectorize into separate colored vector shapes, you would repeat the “Color Range” and “Make Work Path” steps for the other tonal area (e.g., Highlights if you started with Shadows). Then, create a separate “Solid Color” adjustment layer for that new path, assigning it a different color. This allows for multi-color vectorization directly within Photoshop, expanding your creative ideas for visual design.
This new “Solid Color” layer is your vectorized image. It’s a scalable shape that can be further manipulated within Photoshop or prepared for export to other vector-friendly applications. This transformative step is central to photo manipulation and graphic design workflows, allowing you to convert complex pixel data into clean, adaptable vector elements.
4. Leveraging External Tools and Exporting Your Vector Art
While Photoshop offers powerful capabilities for creating vector paths and shapes, it’s important to understand its role within a broader design ecosystem. Knowing when to use Photoshop and when to transition to dedicated vector software, along with proper export techniques, is key to maximizing your vectorized assets. Tophinhanhdep.com, with its focus on image tools and editing styles, helps guide users through these crucial distinctions.
Why Adobe Illustrator Excels for True Vector Editing
It’s a common misconception that Photoshop is a primary vector editor. While it can create and manipulate vector paths, its core functionality is pixel-based, making it the industry standard for photo editing, raster graphics, and certain types of digital art. Adobe Illustrator, in contrast, is purpose-built from the ground up as a vector image editor.
Here’s why Illustrator is generally the better choice for extensive vector work:
- Native Vector Environment: Illustrator operates entirely on mathematical formulas, meaning every element is a vector path by default. This provides unparalleled precision and flexibility for creating and editing complex vector illustrations.
- Comprehensive Vector Tools: Illustrator boasts a more extensive and refined set of tools specifically designed for drawing, manipulating, and aligning vector shapes, paths, and text.
- Scalability and Print Quality: While Photoshop can export vector formats, Illustrator ensures that all elements remain truly vector throughout the entire design process, guaranteeing the highest quality for print and large-scale applications.
However, since both Illustrator and Photoshop are integral parts of Adobe Creative Cloud, they are designed to work seamlessly together. Photoshop is excellent for preparing the raster image, isolating the subject, and generating the initial paths, as we’ve learned. Illustrator then becomes the ideal environment for further refining, combining, and colorizing these paths into sophisticated vector artwork. This collaborative workflow is essential for modern graphic design and digital art.
Exporting Your Vector Graphic from Photoshop
Once you’ve created your vector shape layer in Photoshop, you have several options for exporting it, depending on your intended use. These methods ensure your vectorized artwork retains its scalability.
-
Exporting Paths to Illustrator:
- If you have Adobe Illustrator installed and want to continue working on your vector graphic in a dedicated vector environment, this is the most direct method.
- Ensure your vector shape layer is selected or that the path is active in the “Paths” panel.
- Go to “File” > “Export” > “Paths to Illustrator.”
- Photoshop will create an .AI file containing your vector paths, which can be opened and edited directly in Illustrator.
-
Saving as Photoshop EPS Format:
- EPS (Encapsulated PostScript) is a widely recognized vector file format, often used for print.
- With your vector shape layer in Photoshop, go to “File” > “Save a Copy.”
- In the “Save a Copy” dialog box, choose “Photoshop EPS” from the “Format” dropdown menu.
- This will save your entire Photoshop document, including any raster layers, but the vector shape layer will remain scalable within the EPS file.
-
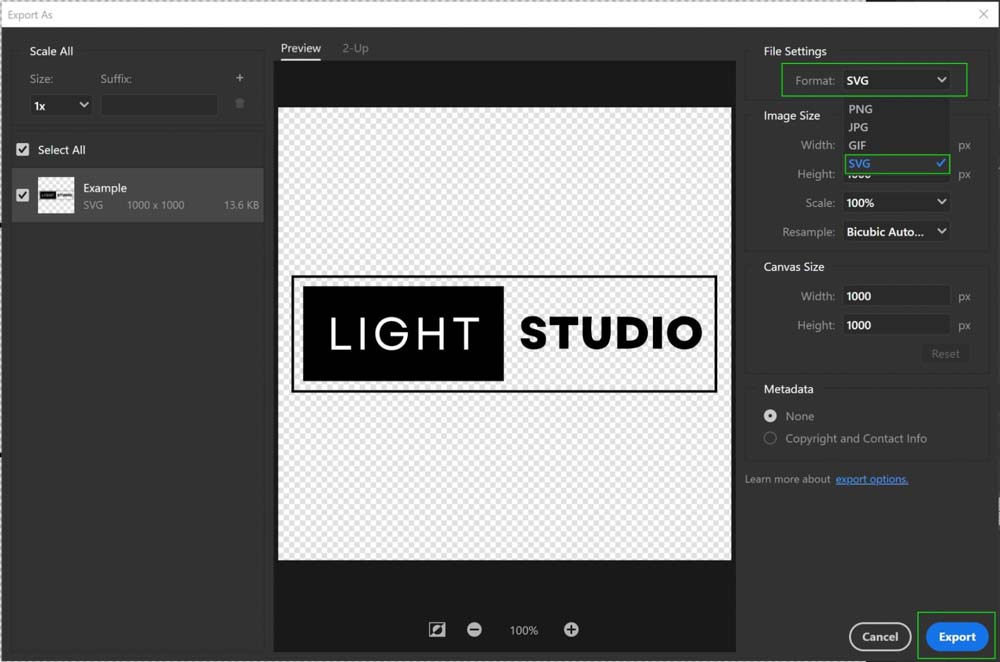
Exporting as SVG (Scalable Vector Graphics):
- SVG is an XML-based vector image format ideal for web use, icons, and illustrations because it scales perfectly in browsers and can be styled with CSS.
- Right-click on your vector shape layer in the Layers panel.
- Choose “Export As…” (or go to “File” > “Export” > “Export As…”).
- In the “Export As” dialog, select “SVG” from the “Format” dropdown.
- This will export just the selected vector shape layer as a standalone SVG file. This is particularly useful for web designers and digital artists creating trending styles or icon sets.
Each export option caters to different needs, offering flexibility for your vectorized creations whether for high-resolution photography projects or abstract designs.
Enhancing Your Creative Workflow with Tools like TourBox
For professionals and enthusiasts engaging in frequent image editing, photo manipulation, or digital art, optimizing workflow is paramount. This is where specialized hardware, like the TourBox creative console, comes into play, seamlessly integrating with software like Photoshop to enhance efficiency.
The TourBox is a customizable creative console designed to streamline tasks for photographers, graphic designers, digital artists, and content creators. Instead of relying solely on keyboard shortcuts and mouse clicks, TourBox allows for intuitive, one-handed control over various parameters.
How TourBox improves your Photoshop workflow, especially during vectorization and detailed image editing:
- Brush Control: When cleaning up threshold images with the Brush tool or refining paths, TourBox enables instant adjustment of brush size, opacity, flow, and hardness using its knobs and dials, without interrupting your drawing flow.
- Tool Switching: Quickly switch between selection tools (Marquee, Lasso, Pen Tool), the Brush tool, or the Direct Selection Tool with a single press or turn, significantly speeding up the vectorization process.
- Custom Macros: Program complex sequences of actions into a single button. For instance, you could create a macro to apply the Threshold adjustment, then immediately open the Color Range panel, saving numerous clicks and menu navigations.
- Ergonomics: Its ergonomic design reduces hand fatigue, allowing for longer, more comfortable creative sessions, particularly beneficial for intricate tasks like defining precise vector paths.
Whether you choose the powerful Bluetooth TourBox Elite or the more accessible TourBox Lite (perfect for first-time users), these devices transform your interaction with Photoshop. They make intricate tasks, such as pixel clean-up or precise path adjustments, incredibly smooth, allowing you to focus more on creative ideas and less on navigating menus. This commitment to efficiency aligns with Tophinhanhdep.com’s mission to provide comprehensive image tools and resources for all levels of creative professionals.
5. Optimizing Your Workflow and Creative Potential with Tophinhanhdep.com
Vectorizing images in Photoshop is more than just a technical process; it’s a strategic skill that opens up new avenues for creative expression and ensures the longevity and versatility of your visual assets. By mastering this technique, you not only enhance your Photoshop abilities but also expand your overall visual design toolkit. Tophinhanhdep.com is dedicated to providing inspiration and practical guides for all aspects of imagery, photography, and digital art, helping you apply these advanced skills.
Common Questions About Vectorization Answered
To further solidify your understanding, let’s address some frequently asked questions about vectorizing images:
-
What Is a Vector Image? A vector image is fundamentally composed of paths or line segments, which are defined by mathematical formulas. Unlike pixel-based raster images, vector graphics can be scaled infinitely—made larger or smaller—without any loss of clarity, sharpness, or quality. They always remain crisp and smooth.
-
Why Vectorize Images in Photoshop? Vectorizing images allows your designs to maintain perfect clarity and sharpness at any size or resolution. This capability is exceptionally valuable for projects that demand large-scale output, such as banners, billboards, posters, or T-shirt designs. It ensures your branding, digital art, or illustrations look professional and polished across all mediums, making it a critical skill for graphic design.
-
Can Any Image Be Vectorized? In theory, almost any raster image can be subjected to a vectorization process. However, the practical application varies significantly with complexity. Simple images with clear subjects and high contrast are relatively easy to vectorize with good results. Complex images with intricate details, subtle gradients, or busy backgrounds will require considerably more time, skill, and often a more stylized outcome rather than a direct, realistic conversion. The aesthetic and nature photography found on Tophinhanhdep.com often provides excellent source material for stylized vector art.
-
How to Tell If an Image Has Been Successfully Vectorized? The most straightforward way to verify successful vectorization is to zoom in very closely on the image. If the image remains perfectly clear, with smooth, sharp lines and no discernible pixelation or blurriness, it has been successfully vectorized. If you see jagged edges or a breakdown into individual squares, it indicates either the image is still raster or the vectorization was incomplete.
Expanding Your Visual Design Skills with Tophinhanhdep.com
Learning how to vectorize an image in Photoshop is a significant step forward in your journey as a visual designer, digital artist, or photographer. It equips you with the ability to create adaptable, high-quality visuals that are indispensable in today’s diverse media landscape.
Tophinhanhdep.com serves as an invaluable companion in this journey, offering a wealth of resources across its main topics:
- Images (Wallpapers, Backgrounds, Aesthetic, Nature, Abstract, Sad/Emotional, Beautiful Photography): Discover stunning source images that can be transformed into unique vector art or used to inspire new creative ideas for thematic collections.
- Photography (High Resolution, Stock Photos, Digital Photography, Editing Styles): Understand how vectorization complements digital photography by converting high-resolution images into scalable graphic elements suitable for various editing styles.
- Image Tools (Converters, Compressors, Optimizers, AI Upscalers, Image-to-Text): Explore a wide array of tools that can optimize your images before and after vectorization, ensuring the best possible quality and performance.
- Visual Design (Graphic Design, Digital Art, Photo Manipulation, Creative Ideas): Deepen your understanding of graphic design principles and digital art techniques, leveraging vectorization to execute your creative ideas with precision and impact.
- Image Inspiration & Collections (Photo Ideas, Mood Boards, Thematic Collections, Trending Styles): Find fresh photo ideas and trending styles that can be adapted and enhanced through vectorization, allowing you to build compelling mood boards and thematic collections.
By integrating the techniques learned here with the extensive resources available on Tophinhanhdep.com, you can continuously expand your creative horizons, refine your image manipulation skills, and produce outstanding visual content. Whether you’re creating a new logo, a striking illustration, or preparing an image for large-scale print, the power of vectorization in Photoshop, supported by the knowledge and tools from Tophinhanhdep.com, will be an indispensable asset in your creative toolkit.