Master the Art of Adding Images Through Text in PowerPoint

PowerPoint presentations are no longer just about conveying information; they are powerful visual narratives designed to captivate and engage audiences. In an increasingly visual world, static text on a slide can often fall flat. To truly make your message resonate and leave a lasting impression, it’s essential to infuse your presentations with creative visual elements. One of the most striking and effective techniques is to integrate images directly into your text, or strategically place them behind it, transforming ordinary words into dynamic design statements. This approach not only adds a sophisticated flair but also ensures that your key messages are not just read, but truly seen and remembered.
This comprehensive guide, brought to you by Tophinhanhdep.com, will walk you through the process of adding pictures to your text in PowerPoint, covering various methods, design considerations, and advanced tips. Whether you’re aiming for a minimalist, modern aesthetic or a vibrant, attention-grabbing display, mastering this technique will undoubtedly elevate your presentation skills and help you harness the full power of visual communication.
Elevating Your Presentations with Picture-Filled Text
The magic of placing an image inside text lies in its ability to blend information with visual appeal seamlessly. Instead of having separate text boxes and image placeholders, this technique creates a unified, impactful visual element. It’s a subtle yet powerful way to add “pizzazz” to your PowerPoint text, drawing the audience’s eye and adding a unique touch that can significantly enhance engagement.
Why Integrate Images Directly into Text?
Integrating images directly into text serves multiple strategic purposes in presentation design:
- Enhanced Visual Appeal: It instantly transforms plain text into an artistic element. This is crucial for capturing and holding audience attention, especially when dealing with dense information or a crucial slide title. It adds an aesthetic dimension that traditional text fills cannot match.
- Reinforced Message: A carefully chosen image within text can powerfully support the word’s meaning. For instance, using a picture of a bustling cityscape within the word “GROWTH” or a serene nature scene inside “PEACE” creates an immediate, intuitive association that strengthens your message. This kind of visual reinforcement is a cornerstone of effective visual design and image inspiration.
- Modern and Professional Look: This technique lends a contemporary and polished feel to your presentations. It shows attention to detail and a commitment to high-quality visual communication, setting your presentation apart from generic slides.
- Space Efficiency: Instead of consuming valuable slide real estate with separate graphics, embedding images into text allows you to convey both textual and visual information within the same space, contributing to a clean and uncluttered design. This aligns with principles of effective visual design where every element serves a purpose.
Selecting the Right Font and Background for Maximum Impact
For your picture-filled text to truly stand out, careful consideration of font style, size, and the slide background is essential. The goal is clarity and impact.
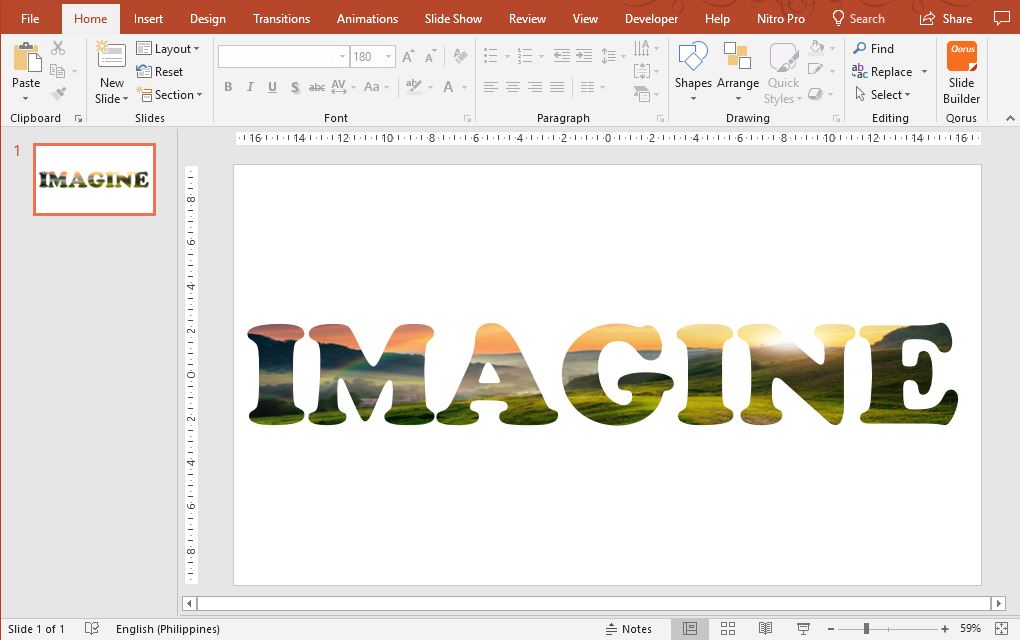
- Font Choice is Paramount: The most critical factor for successful image-in-text is choosing the right font. Opt for fonts that are large, bold, and have thick lines. Examples like Arial Black, Broadway, Impact, or even many sans-serif fonts work exceptionally well. Thicker fonts provide more “canvas” for your image to show through each letter, making the picture visible and recognizable. Finer, delicate fonts will obscure the image, making the effect less pronounced or even illegible. Tophinhanhdep.com often showcases aesthetic fonts and graphic design tips that emphasize legibility and visual strength.
- Font Size: Correspondingly, the text itself should be relatively large on the slide. This isn’t just for visibility; a larger text box allows for a larger image fill, offering greater detail and impact from your chosen picture.
- Background Simplicity: To ensure your picture-filled text remains the focal point, a clean, plain, solid-color background is often ideal. Busy or patterned backgrounds can compete with the intricate text effect, leading to visual clutter and reduced readability. While modern and geometric backgrounds can work, they require careful balancing to ensure visual harmony. The aim is to create an aesthetic balance, allowing your unique text effect to shine without distraction. Think of it as creating a mood board where the central element is highlighted.
Step-by-Step Guide: Inserting an Image Inside Text
Creating this striking visual effect in PowerPoint is surprisingly straightforward. These instructions apply to various PowerPoint versions, including 2019, 2016, 2013, 2010, 2007; PowerPoint for Microsoft 365, and PowerPoint Online, though some menu names might vary slightly.
Preparing Your Text for the Picture Fill
Before you even think about the image, you need to set up your text correctly.
- Start with a Blank Slide: Open your PowerPoint presentation to the desired slide, or create a new blank slide.
- Add Your Text:
- Using a Text Box: Go to the Insert tab, select Text Box, and either click to place a text box or drag to draw one on your slide. Type your desired word or short phrase.
- Using WordArt: For a more stylized starting point, go to the Insert tab, choose WordArt, and pick one of the pre-designed styles. This automatically places a text box with placeholder text on your slide, which you can then edit.
- Format Your Text:
- Select the Text: Click on the text box containing your word or phrase to select it.
- Adjust Font and Size: Go to the Home tab (or the Drawing Tools Format tab if you used WordArt). In the Font section, choose a bold, thick font (e.g., Arial Black, Impact, Broadway). Increase the font size significantly. The larger and fatter the font, the more of your chosen image will be visible inside each letter, making the final effect clear and impactful. Experiment with different styles to see what works best for your chosen image and message, drawing inspiration from various graphic design principles.
Applying the Picture Fill Effect
Once your text is formatted, it’s time to bring in the image.
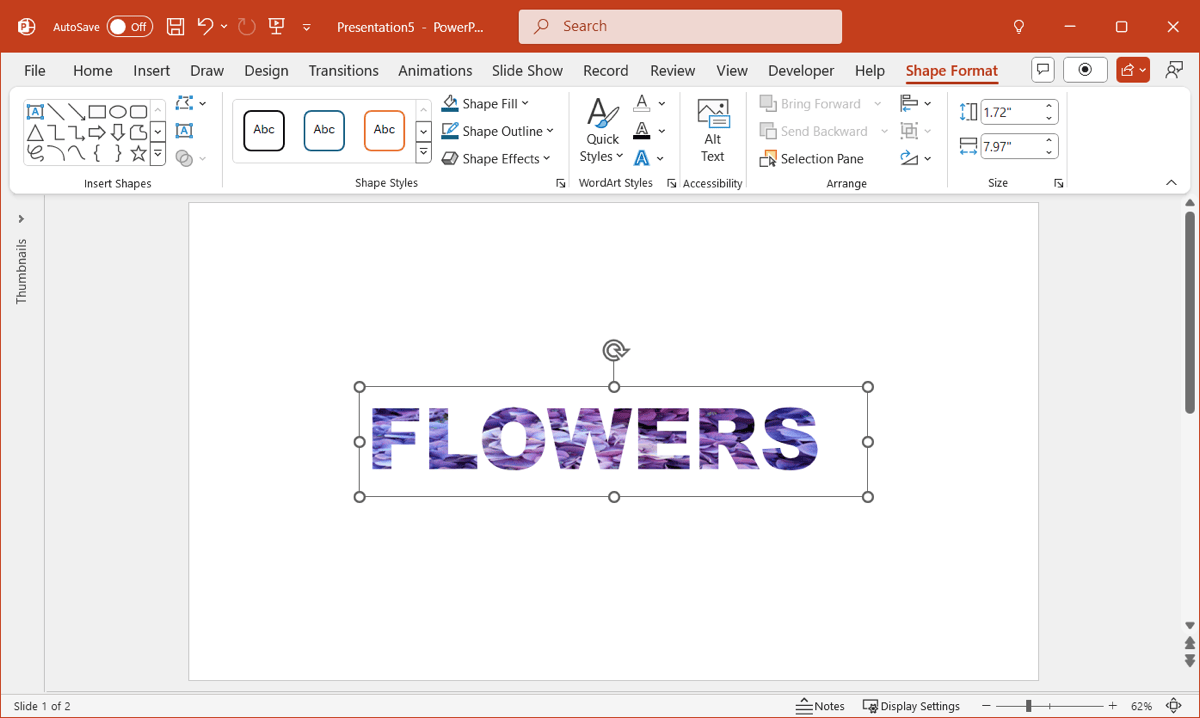
- Access Formatting Options: With your text box still selected, navigate to the Shape Format tab (or Drawing Tools Format tab in older versions) on the Ribbon.
- Locate Text Fill: In the WordArt Styles group, find the Text Fill dropdown arrow. Click it to reveal various fill options.
- Choose Picture: From the dropdown menu, select Picture. This action will open the “Insert Pictures” dialog box.
Sourcing Your Images: From Local Files to Online Collections
The “Insert Pictures” dialog box provides several options for finding the perfect image. Tophinhanhdep.com emphasizes the importance of high-resolution photography and stock photos for professional results.
-
From a File (Your Computer):
- Select From a File (or “From this Device” in newer versions).
- Browse your computer’s folders to locate the image file you wish to use.
- Select the picture and click Insert.
- This is ideal for wallpapers, backgrounds, or beautiful photography you’ve curated yourself.
-
Online Pictures (Bing Image Search):
- Select Online Pictures (or “Bing Image Search” in older versions).
- A search bar will appear. Enter keywords for the type of image you’re looking for (e.g., “nature landscape,” “abstract patterns,” “sad emotional scenery,” “aesthetic backgrounds”).
- Important Tip: To avoid copyright issues, make sure the “Creative Commons only” filter is enabled. Tophinhanhdep.com always advocates for respecting image rights, and platforms often provide excellent collections of royalty-free stock photos.
- Scroll through the results, select your desired image, and click Insert. This provides access to a vast library of images, from nature and abstract to specific thematic collections.
-
From OneDrive - Personal (Cloud Storage):
- If you have images saved in your Microsoft OneDrive account, select OneDrive - Personal. (In PowerPoint 2019 and newer, you might access this via “From a File” if OneDrive is synced, or “Online Pictures” may have a OneDrive option).
- Navigate through your OneDrive folders to find the picture.
- Select the image and click Insert.
Once you click “Insert,” your chosen image will instantly appear as the fill for your selected text. If the result isn’t exactly what you envisioned, don’t worry! You can easily press Ctrl+Z (Cmd+Z on Mac) to undo the action and repeat the steps with a different picture until you achieve the perfect visual design. Experimentation is key to discovering striking photo ideas and trending styles.
Beyond Picture Fill: Placing Images Behind Text for Dynamic Backgrounds
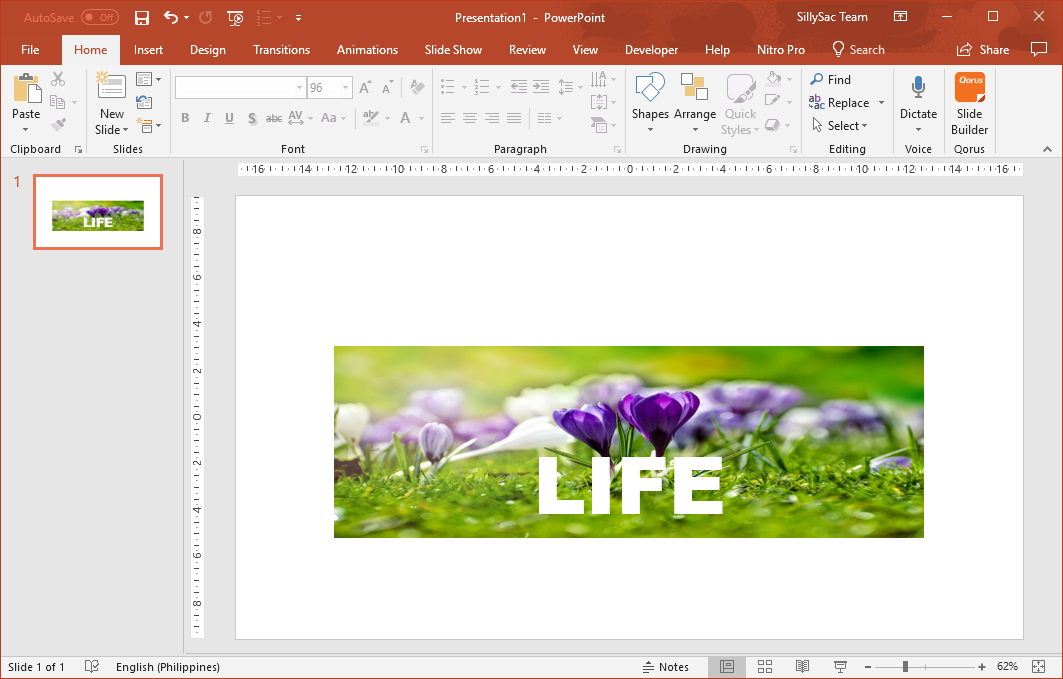
While embedding an image inside text creates a bold statement, there’s another powerful technique for combining images and text: placing an image behind the text. This allows the text to remain a solid color (or transparent) while the image acts as a captivating background element specifically for that text block, or even for the entire slide behind the text. This is an effective way to introduce visual depth without making the text itself overly complex, ideal for titles, headings, or important quotes.
Creating a Text Background with an Image
This method is commonly referred to as using a “picture as text background” and creates a different, yet equally striking, visual effect compared to the picture fill technique.
- Add Your Text:
- Begin by inserting a Text Box (Insert > Text Box) or WordArt (Insert > WordArt) onto your slide. Type your message.
- Format your text: Choose a font, size, and color that will contrast well with your intended background image. Bold, clear fonts are still preferable for readability.
- Insert Your Image:
- Go to the Insert tab.
- In the Images group, select Pictures.
- Choose your image source (From a File, Stock Images, Online Pictures). Select the desired image and click Insert. The image will appear on your slide, likely covering your text.
- Send the Image to the Back: This is the crucial step.
- Option 1 (Right-Click): Right-click on the newly inserted image. From the contextual menu, hover over Send to Back, then choose either Send Backward (moves it one layer back) or Send to Back (sends it behind all other objects on the slide). For this effect, Send to Back is usually the most effective choice.
- Option 2 (Picture Format Tab): With the image still selected, go to the Picture Format tab on the Ribbon. In the Arrange group, click the Send Backward dropdown menu, and select Send to Back.
You will now see your text clearly displayed on top of your chosen image. This technique is excellent for creating visually rich titles or important callouts where the image adds context or mood without interfering with text legibility. Tophinhanhdep.com provides numerous high-resolution backgrounds and wallpapers perfect for this purpose, from abstract designs to stunning nature photography.
Ensuring Readability and Visual Harmony
When using an image as a text background, readability is paramount. An image that is too busy or too bright can make your text disappear, defeating the purpose of your presentation.
- Contrast is Key: Ensure there is sufficient contrast between your text color and the background image. If your image is dark, use light-colored text; if the image is light, use dark text.
- Simplify Complex Images: If your chosen image is visually complex, consider applying some adjustments:
- Transparency: Select the image, go to the Picture Format tab, and use the Transparency option to make the image slightly see-through. This can soften its impact and allow the text to pop.
- Color Overlay: Place a semi-transparent colored shape over the image (before sending the image to the back) to create a uniform backdrop for your text.
- Blur Effect: Apply a subtle blur to the background image (Picture Format > Artistic Effects > Blur) to maintain its aesthetic while reducing distracting details.
- Font Adaptability: For busy backgrounds, simple, sans-serif fonts (like Arial or Calibri) in bold will usually offer the best readability. Save more decorative fonts for simpler, cleaner backgrounds. This thoughtful approach to visual design ensures your message always remains clear.
Advanced Techniques and Modern Enhancements
Beyond the basic application, there are several ways to further refine and enhance your image-through-text effects, leveraging both PowerPoint’s built-in capabilities and cutting-edge tools. Tophinhanhdep.com explores these avenues to empower your creative expression.
Enhancing Visuals with Shadows and Bevels
Once you’ve filled your text with an image or placed an image behind it, you can add subtle yet impactful effects to the text itself.
- Text Effects: With your text box selected (or WordArt), go to the Shape Format tab. In the WordArt Styles group, click on Text Effects.
- Shadow: Adding a subtle shadow can give your text depth and make it stand out more, especially against a slightly busy background.
- Bevel: A bevel effect can give your text a three-dimensional, embossed, or engraved look, making it appear as if it’s raised from the slide or cut into it.
- Shape Effects (for text backgrounds): If you’ve used an image as a background for a text box (rather than filling the text itself), you can also apply shape effects to the text box itself, creating a framed look. For instance, a subtle glow or soft edges could make the text box and its image background blend more smoothly with your overall design. Ellen Finkelstein from Slidecow suggests making the shape slightly bigger than the text area to allow effects on the outer edges to show without obscuring the letters.
These additions fall under the umbrella of creative ideas and photo manipulation, helping to create digital art within your presentations.
Streamlining Content Creation with AI-Powered Tools
In today’s fast-paced world, efficiency in content creation is invaluable. This is where AI-powered tools come into play, significantly reducing the time and effort required to produce high-quality presentations. Tools like Plus AI for PowerPoint (as mentioned in a reference) can revolutionize how you develop your slides.
- Automated Content Generation: Imagine simply providing a descriptive prompt, and an AI generates an entire slide outline, complete with text, relevant images, and even metrics. This ability to transform “image-to-text” ideas into full presentations is a game-changer for digital photography and graphic design workflows.
- Intelligent Image Selection: AI can help you find suitable images based on your text, suggesting aesthetically pleasing and contextually relevant stock photos or digital art. This aligns perfectly with the website’s focus on images (wallpapers, backgrounds, aesthetic, nature, abstract) and photography (high resolution, stock photos).
- Content Refinement: AI can also assist in editing existing slide content—adding detail, shortening lengthy paragraphs, or even translating text, ensuring your message is clear and concise.
- Visual Design Assistance: Beyond text and images, AI can help with overall visual design, suggesting layouts, color schemes, and even applying creative ideas to ensure a cohesive and impactful presentation. This bridges the gap between raw data and polished visual design, incorporating aspects of image inspiration and creative trends.
Utilizing such tools allows you to focus more on the strategic aspects of your presentation and less on the laborious process of formatting and sourcing, turning your ideas into stunning visual narratives with unprecedented speed. Tophinhanhdep.com constantly explores how image tools, including AI upscalers and smart content generators, can enhance visual projects.
Conclusion
Adding images through text in PowerPoint is more than just a visual gimmick; it’s a sophisticated technique that can dramatically enhance the impact and memorability of your presentations. Whether you choose to fill your text with a captivating image or place a powerful picture strategically behind your words, these methods transform ordinary slides into engaging visual experiences.
By carefully selecting fonts, considering backgrounds, and leveraging the diverse range of images available—from high-resolution photography to curated aesthetic collections—you can craft presentations that truly resonate. Furthermore, embracing modern image tools, including AI-powered assistants, can streamline your creative process, allowing you to focus on the message while intelligent technology handles the design intricacies.
Remember, the goal is always clear, compelling communication. By mastering these visual design techniques, you’ll not only add “pizzazz” but also ensure your audience remains captivated, absorbs your message effectively, and remembers your presentation long after the slides have moved on. Continue exploring creative ideas and trending styles on Tophinhanhdep.com to keep your visual storytelling fresh and impactful.