Mastering Image Blending in Photoshop: A Comprehensive Guide by Tophinhanhdep.com

In the realm of digital art and photography, a single image often tells a compelling story. Yet, imagine the narratives that unfold when two, three, or even more images are seamlessly interwoven, creating a visual tapestry that transcends individual captures. This is the profound power of image blending in Photoshop, a skill that transforms ordinary photographs into extraordinary composites, digital artwork, and captivating visual narratives. Whether you’re aiming to craft surreal double exposures, integrate textures for added depth, or meticulously combine elements from disparate scenes, understanding how to blend images is fundamental to advanced photo manipulation and visual design.

At Tophinhanhdep.com, we champion the creation of breathtaking visuals, from “Wallpapers” and “Backgrounds” to “Aesthetic” and “Abstract” art, and showcasing “Beautiful Photography” with “High Resolution” quality. The techniques explored in this guide are not just technical steps; they are gateways to unlocking new dimensions of “Creative Ideas” and shaping unique “Editing Styles” that resonate with emotion and artistic intent. Photoshop stands as the premier “Image Tool” for such intricate work, offering a diverse array of methods to merge and blend images with precision and creativity. This article, curated by Tophinhanhdep.com, will walk you through the most essential and powerful blending techniques: Layer Opacity, Blend Modes, and Layer Masks, along with advanced strategies like ‘Blend If’ and combining these methods for truly dynamic results.
Setting the Stage: Essential Workflow for Image Blending
Before diving into the intricacies of blending, a robust and efficient workflow is crucial. This foundational step ensures that your creative process is smooth, non-destructive, and adaptable, allowing for endless experimentation without compromising your original assets. As a hub for “Digital Photography” and “Image Tools,” Tophinhanhdep.com emphasizes practices that safeguard your “Stock Photos” and high-resolution captures while encouraging daring “Photo Manipulation.”
The journey begins by opening the images you wish to blend directly into Photoshop. It’s imperative that each image resides on its own distinct layer within a single document. While the initial stacking order of these layers might not seem critical, it will significantly influence the outcome, especially with certain blend modes. A common practice is to position the image you intend to modify or overlay as the “top layer” and the base image as the “background layer.”
Once your images are loaded, a critical step for any serious “Visual Design” project is to duplicate your original layers. This practice, known as non-destructive editing, ensures that your original images remain untouched, providing a safety net if you decide to revert or explore alternative creative paths. Simply select a layer and press Ctrl+J (Windows) or Cmd+J (Mac) to create a duplicate. It’s also wise to rename your layers (e.g., “Background Copy,” “Overlay Image”) for clarity, particularly when dealing with complex compositions involving multiple layers.
With your layers prepared, you’re ready to explore the powerful blending tools Photoshop offers. Each technique provides a unique approach to integrating images, from subtle transparency adjustments to complex pixel interactions.
Fundamental Blending Techniques in Photoshop
Photoshop offers a trio of core techniques for blending images, each providing distinct advantages for different creative goals. Understanding these fundamentals is the cornerstone of effective photo manipulation and digital art.
Harnessing Layer Opacity for Seamless Fades
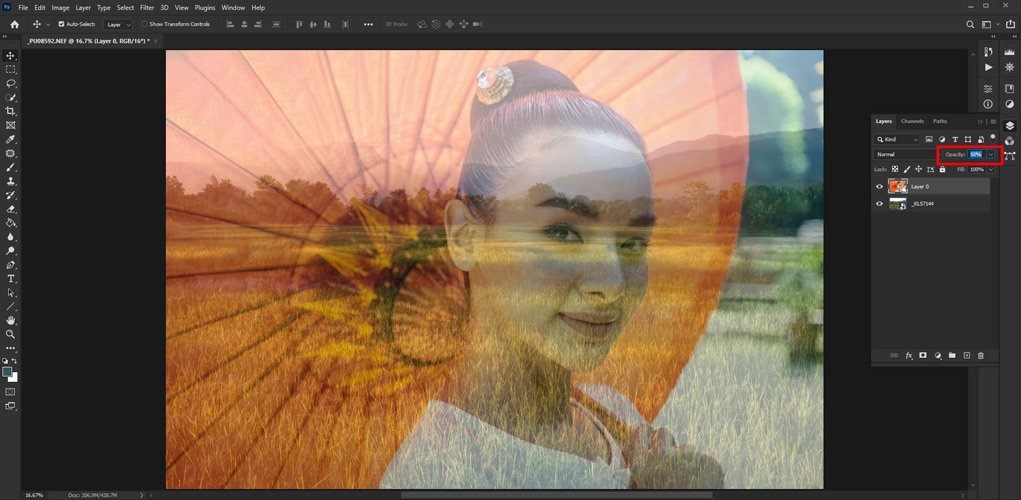
Layer Opacity is arguably the simplest yet most effective method for blending images, often serving as the gateway to more complex compositing. It controls the overall transparency of a layer, allowing the underlying layers to show through. This technique is incredibly versatile for creating soft overlays, ghosting effects, subtle textures, or even integrated “Watermarks” as discussed on Tophinhanhdep.com’s resources.
How it Works: When you adjust the opacity of a layer, you’re essentially dictating how much of that layer’s pixels are visible. A 100% opacity means the layer is fully opaque, completely obscuring anything beneath it. Conversely, 0% opacity renders the layer entirely transparent. Values in between create a semi-transparent effect, allowing both the foreground and background images to contribute to the final visual.
Step-by-Step Implementation:
- Select the Top Layer: In your Layers panel, click on the thumbnail or name of the layer you wish to make semi-transparent.
- Adjust the Opacity Slider: Located at the top of the Layers panel, you’ll find an “Opacity” slider (typically set to 100% by default). Drag this slider to the left to decrease the opacity, or type in a specific percentage.
- Observe the Blend: As you lower the opacity, the underlying image will gradually become visible, creating a smooth blend between the two layers.
Creative Applications:
- Subtle Textures: Overlay a texture image (e.g., concrete, distressed paper, clouds) onto a photograph and reduce its opacity to subtly enhance mood and detail, perfect for “Aesthetic” or “Nature” themed composites.
- Double Exposure Effects: Combine two distinct images, like a portrait and a cityscape, by lowering the opacity of the top layer. This creates the iconic double exposure look, a trending style in “Digital Art” and “Creative Ideas.”
- Ghosting and Ethereal Effects: By using very low opacity, you can make elements appear translucent or spectral, adding a dreamlike quality to your “Beautiful Photography.”
- Background Integration: Integrate a new background or a “Wallpaper” seamlessly by gently fading its edges and reducing its overall prominence with opacity adjustments.
Experiment with different opacity levels to achieve varying degrees of blending. Even small adjustments can dramatically alter the mood and visual impact of your composite, aligning with the diverse “Editing Styles” promoted by Tophinhanhdep.com.
Mastering Blend Modes for Artistic Effects
Beyond simple transparency, Photoshop’s Blend Modes offer a sophisticated array of options for how pixels on one layer interact with pixels on the layers beneath it. These modes utilize complex mathematical equations to determine the resulting color and luminosity, leading to incredibly diverse and artistic effects. For “Visual Design” and “Graphic Design” professionals, understanding blend modes is crucial for pushing creative boundaries. Tophinhanhdep.com frequently showcases how these modes can transform “Abstract” concepts into tangible visuals.
Photoshop organizes its 27 Blend Modes into intuitive categories based on their general effect:
- Normal Blend Modes: (Normal, Dissolve) – These are standard modes. Dissolve changes with opacity, creating a pixelated dither effect.
- Darken Blend Modes: (Darken, Multiply, Color Burn, Linear Burn, Darker Color) – These modes primarily darken the image, making lighter pixels disappear and darker ones combine. Multiply is particularly popular for rich shadows and integrating textures, often used in double exposure effects or for creating dramatic skies.
- Lighten Blend Modes: (Lighten, Screen, Color Dodge, Linear Dodge (Add), Lighter Color) – The inverse of darken modes, these brighten the image, making darker pixels disappear and lighter ones combine. Screen is excellent for luminous effects, combining light sources, or brightening underexposed areas.
- Contrast Blend Modes: (Overlay, Soft Light, Hard Light, Vivid Light, Linear Light, Pin Light, Hard Mix) – These modes increase contrast by darkening dark areas and lightening light areas, but in varying degrees of intensity.
- Overlay: Gentle contrast enhancement, often used to boost colors and tones without overdoing it.
- Soft Light: Similar to Overlay but even softer, ideal for subtle enhancements.
- Hard Light: More intense contrast, creating a bold, vibrant effect, often used for dramatic lighting or “light painting” techniques.
- Linear Light: Very strong contrast, impacting both shadows and highlights significantly.
- Inversion Blend Modes: (Difference, Exclusion, Subtract, Divide) – These modes create unique, often surreal effects by calculating the difference or division between pixel values. Difference can be used for aligning images or creating abstract color inversions.
- Component Blend Modes: (Hue, Saturation, Color, Luminosity) – These modes allow you to target specific aspects of color information.
- Color: Transfers the color from the top layer to the bottom, preserving the luminosity. Great for color grading or changing the color of an object.
- Luminosity: Transfers the brightness (luminosity) from the top layer, preserving the color of the bottom layer. Useful for contrast adjustments without affecting color.
- Saturation: Transfers the saturation from the top layer.
- Hue: Transfers the hue (color shade) from the top layer.
Step-by-Step Implementation:
- Set up Layers: Ensure your images are layered as described in the workflow section.
- Select Top Layer: Click on the layer you wish to apply the blend mode to.
- Choose Blend Mode: In the Layers panel, above the Opacity slider, you’ll see a dropdown menu (defaulting to “Normal”). Click this menu and select a blend mode.
- Combine with Opacity/Fill: Many blend modes can be further fine-tuned by adjusting the Opacity and/or Fill sliders. For some “Special Blend Modes” (like Color Burn, Linear Burn, Vivid Light, etc.), the Fill slider might produce a different effect than Opacity, allowing for nuanced control over the blend.
Creative Applications:
- Dramatic Skies: Replace a bland sky with a more dramatic one using Multiply (for dark, stormy skies) or Screen (for bright, sunny skies), perfect for enhancing “Nature” photography.
- Texture Overlays: Overlay grunge textures or light leaks using Overlay or Soft Light to add grit or a vintage feel to “Sad/Emotional” or “Aesthetic” images.
- Color Grading and Mood: Use Color or Luminosity blend modes with solid color fill layers or adjustment layers to subtly shift the overall color palette or contrast without over-saturating.
- Light Painting & Dodging/Burning: Create a new blank layer, set its blend mode to Overlay or Soft Light, and paint with white (to lighten/dodge) or black (to darken/burn) to selectively enhance highlights and shadows. This technique adds depth and dimension to your “Beautiful Photography.”
Experimentation is key with blend modes. What works for one image might not for another. Tophinhanhdep.com encourages artists to try different modes, combine them with opacity/fill, and discover their unique “Editing Styles.”
Precision with Layer Masks
While Opacity and Blend Modes affect an entire layer based on pixel values, Layer Masks offer a highly precise and non-destructive way to control the visibility of specific areas within a layer. This is the ultimate tool for “Photo Manipulation” and creating complex, realistic composites. A Layer Mask works with shades of black, white, and gray to reveal or conceal parts of a layer, making it indispensable for achieving “seamless integration” between images.
How it Works: A Layer Mask is essentially a grayscale image attached to a layer.
- White: Areas painted white on the mask are fully visible on the layer.
- Black: Areas painted black on the mask are completely transparent, revealing the layer beneath.
- Grays: Shades of gray create varying degrees of translucency, allowing for soft transitions.
This non-destructive approach means you’re never permanently deleting pixels; you’re simply hiding them. You can always refine your mask by painting with different shades, making it incredibly flexible for “Visual Design” projects.
Step-by-Step Implementation:
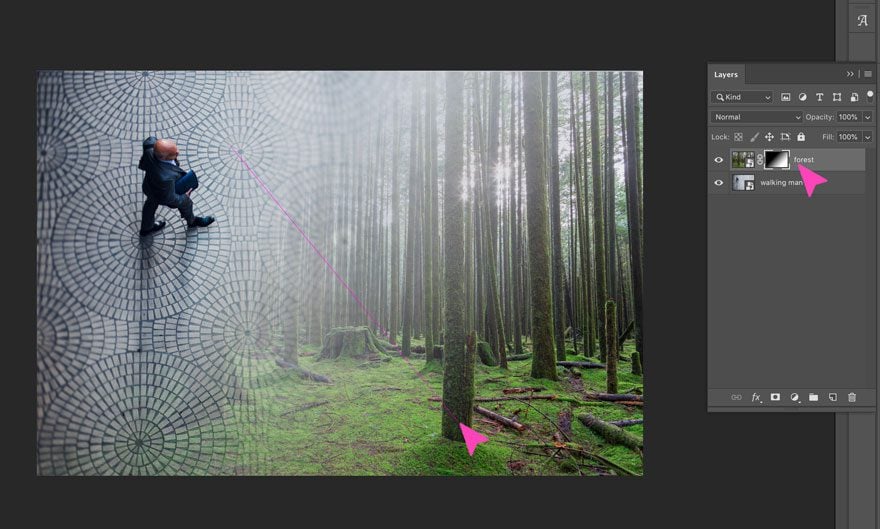
- Open and Layer Images: Ensure your images are in separate layers within Photoshop. For this example, let’s assume you have a “Forest” layer above a “Man Walking” layer, and you want to blend the forest into the upper part of the man’s image.
- Add a Layer Mask: Select the top layer (e.g., “Forest”). At the bottom of the Layers panel, click the “Add Layer Mask” icon (a white rectangle with a black circle inside). A white thumbnail will appear next to your layer thumbnail, indicating a fully visible mask.
- Select the Gradient Tool: With the mask thumbnail selected (a white border appears around it), choose the Gradient tool (
Gon your keyboard) from the toolbar. - Set Foreground/Background Colors: Ensure your foreground color is black and your background color is white. You can quickly switch between them by pressing
X. - Apply the Gradient: With the Gradient tool active and the mask selected, click and drag across your image. For instance, to blend the top of the “Forest” layer into the “Man Walking” layer below, drag from the top of the image downwards. Where you drag the gradient will determine the smooth transition from transparent (black) to opaque (white).
- Refine with the Brush Tool: For more specific or irregular blending, switch to the Brush tool (
Bon your keyboard).- Paint with Black: With the mask selected and black as your foreground color, paint over areas of the top layer you want to hide (to reveal the layer below). Adjust brush hardness (soft edges for smooth blends, hard edges for crisp cuts) and opacity for precise control.
- Paint with White: If you make a mistake or want to reveal parts of the top layer, switch your foreground color to white and paint over those areas on the mask.
- Paint with Gray: Use shades of gray for semi-transparency in specific areas.
- Combine with Blend Modes (Optional): After masking, you can further enhance the blend by applying a Blend Mode to the masked layer itself (e.g., “Hard Light” to the “Forest” layer to add contrast and vibrancy to the integrated elements), creating a sophisticated composite.
Creative Applications:
- Seamless Composites: Combine elements from different “Stock Photos” or “High Resolution” images to create entirely new scenes, like placing a person in a fantastical landscape.
- Selective Enhancements: Apply an adjustment layer (e.g., Curves, Hue/Saturation) and then mask it to only affect specific parts of an image, perfect for local “Editing Styles.”
- Creating Double Exposures: Beyond opacity, a layer mask can be used to precisely define which parts of the overlay image are visible within the contours of the base image (e.g., a landscape within a portrait silhouette).
- Complex Photo Manipulations: Essential for detailed work in “Graphic Design” and “Digital Art,” such as replacing skies, removing distractions, or combining diverse “Visual Design” elements.
Layer masks are the hallmark of professional “Photo Manipulation” and allow for endless creative possibilities, transforming disparate images into cohesive and impactful visuals, a core tenet of Tophinhanhdep.com’s vision.
Advanced Applications and Creative Compositing
Once you’ve mastered the foundational blending techniques, Photoshop opens up avenues for even more sophisticated image manipulation. The true artistry often lies in combining these methods and exploring advanced tools designed for intricate blending.
Strategic Use of ‘Blend If’ for Complex Extractions
The ‘Blend If’ feature, found within the Layer Style dialog box (double-click a layer thumbnail or go to Layer > Layer Style > Blending Options), is a powerful tool for blending layers based on their luminosity or color channels. It allows you to automatically hide or reveal pixels on a layer based on how light or dark they are, or based on specific color ranges, effectively performing complex background removal without needing manual selections or masks. This is a game-changer for “Editing Styles” that demand precise integration.
How it Works: ‘Blend If’ operates on two sliders: “This Layer” and “Underlying Layer.” Each slider has two markers that represent the range of pixel values (from darkest to lightest) that will be affected.
- “This Layer” Slider: Controls which pixels on the current layer (the one you’re applying ‘Blend If’ to) will blend with the layers below. For example, if you drag the left marker (dark pixels) to the right, the dark pixels on “This Layer” will start to disappear, revealing the “Underlying Layer.”
- “Underlying Layer” Slider: Controls which pixels on the underlying layers will cause the current layer to blend. If you drag the left marker (dark pixels) to the right, the areas where the “Underlying Layer” is dark will cause “This Layer” to become transparent.
The magic happens when you split the slider markers by holding down Alt (Windows) or Option (Mac) and dragging one half. This creates a feathered transition, making the blend incredibly smooth and natural. You can apply ‘Blend If’ to the composite RGB channel or individual color channels (Red, Green, Blue) for even more control.
Creative Applications:
- Seamless Sky Replacement: Remove a bright sky from a landscape or a dark foreground from a night sky image with impressive accuracy, creating stunning “Nature” or “Beautiful Photography” composites.
- Integrating Challenging Elements: Easily blend elements with complex edges (e.g., hair, trees, smoke) into a new background by selectively hiding pixels based on their luminosity difference from the background.
- Adding Subtle Overlays: Integrate dust, light leaks, or film grain textures, making them interact realistically with the tones of the underlying image.
- Quick Background Removal: For elements on a simple, contrasting background (e.g., a light object on a dark background), ‘Blend If’ can offer a rapid and effective way to extract the subject.
‘Blend If’ requires some practice to master, but its ability to automatically blend based on pixel values provides unparalleled control, opening up new possibilities for “Photo Manipulation” and “Digital Art” showcased on Tophinhanhdep.com.
Combining Techniques for Dynamic Visuals
The true mastery of image blending in Photoshop lies not in using techniques in isolation, but in artfully combining them. Each tool complements the others, allowing for multi-layered effects and highly refined composites that perfectly embody “Visual Design” principles. A single, static effect rarely achieves the depth and realism that a combination of methods can.
Example: A Sophisticated Double Exposure:
Consider creating a double exposure effect where a lush forest image is blended over a portrait, resulting in “Aesthetic” and “Nature”-inspired imagery.
- Start with Layer Opacity: Place the forest image on top of the portrait. Reduce the Opacity of the forest layer slightly (e.g., 70%) to immediately start seeing both images. This gives you a preliminary blend.
- Apply a Blend Mode: Change the blend mode of the forest layer to Screen (to brighten and reveal highlights) or Multiply (to darken and emphasize shadows). This will dramatically alter how the forest pixels interact with the portrait, enhancing the artistic effect. Adjust the Fill or Opacity further to fine-tune the intensity of the blend mode.
- Refine with a Layer Mask: Add a Layer Mask to the forest layer. Use a soft black brush on the mask to gently conceal parts of the forest that obscure the subject’s face or other important features in the portrait. This ensures the human element remains prominent while the forest details appear within and around them. You might also use a gradient on the mask to create a natural fade from the bottom of the portrait up into the forest, enhancing the sense of integration.
- Incorporate ‘Blend If’ (Optional, for advanced control): If the forest image has a bright sky that clashes with the portrait, use ‘Blend If’ on the forest layer to make its brightest pixels transparent, allowing more of the portrait’s details to show through. Split the sliders for a smooth transition.
- Add Adjustment Layers (Masked): Further enhance the composite with adjustment layers (e.g., Curves, Color Balance, Hue/Saturation). Clip these adjustment layers to your blended layers or apply masks to them, allowing you to selectively adjust colors, tones, and contrast in specific areas of the composite without affecting others. This contributes to a cohesive “Editing Style.”
This multi-faceted approach creates a rich, complex image that is far more compelling than what any single blending technique could achieve. It’s about building layers of adjustments and effects, each contributing to the overall visual narrative and achieving the “Creative Ideas” fostered by Tophinhanhdep.com.
Elevating Your Visuals with Tophinhanhdep.com’s Core Principles
The mastery of image blending in Photoshop is not merely a technical pursuit; it’s a creative journey that directly aligns with the core principles and extensive resources offered by Tophinhanhdep.com. Our platform is dedicated to empowering individuals to create, enhance, and share stunning visual content, and image blending is a cornerstone of this mission.
By understanding how to combine and manipulate images, you gain the ability to:
- Craft Aesthetic and Emotional Imagery: Blending techniques are perfect for creating “Aesthetic” backgrounds, emotive “Wallpapers,” and “Sad/Emotional” compositions that evoke powerful feelings. Double exposures, for instance, often merge human figures with natural elements, creating profound visual metaphors.
- Produce Diverse Photography and Digital Art: Whether you’re working with “High Resolution” “Stock Photos” or your own “Digital Photography,” blending enables you to transcend the original capture. You can transform realistic scenes into “Abstract” art, infuse “Nature” photography with ethereal qualities, or design intricate “Graphic Design” layouts that stand out.
- Utilize Image Tools to Their Full Potential: Photoshop, as a premier “Image Tool,” becomes an extension of your creative will. Each blending technique discussed—Opacity, Blend Modes, Layer Masks, and ‘Blend If’—is a sophisticated instrument in your digital toolkit, allowing for unparalleled “Photo Manipulation.”
- Generate Inspiration and Thematic Collections: The ability to blend images fuels “Photo Ideas” and facilitates the creation of unique “Mood Boards” and “Thematic Collections.” You can merge historical textures with modern portraits, combine celestial bodies with landscapes, or create surreal juxtapositions that define your signature “Trending Styles.”
Tophinhanhdep.com provides the knowledge and inspiration for you to push the boundaries of your visual creations. Through mastering these blending techniques, you are not just editing images; you are crafting visual stories, building digital worlds, and defining your unique artistic voice in the expansive universe of “Visual Design.”
Conclusion
The journey of learning “how do you blend images in Photoshop” is an exhilarating exploration into the heart of digital creativity. From the subtle nuances of Layer Opacity to the powerful pixel interactions of Blend Modes and the surgical precision of Layer Masks, each technique offers a unique approach to transforming disparate images into cohesive, captivating composites. Advanced tools like ‘Blend If’ further expand these possibilities, allowing for intricate extractions and blends based on color and luminosity.
The true magic unfolds when these techniques are combined, creating layers of visual interest and complexity that simple adjustments cannot replicate. This synergistic approach is the hallmark of professional “Photo Manipulation” and “Digital Art,” empowering you to bring your most ambitious “Creative Ideas” to life.
As a resource dedicated to inspiring and equipping visual creators, Tophinhanhdep.com encourages you to embrace experimentation. Don’t be afraid to try different blend modes, adjust opacity levels, and meticulously paint on layer masks. Each image is a new canvas, and every combination is an opportunity to discover a unique “Editing Style” and contribute to the vast library of “Beautiful Photography.” So, grab your images, fire up Photoshop, and start blending. The possibilities are boundless, and your next stunning visual masterpiece awaits.