How to Blend Two Images in Photoshop Creatively

The digital canvas of Photoshop offers boundless opportunities for visual storytelling, and few techniques are as transformative as blending two or more images into a single, cohesive masterpiece. Whether you’re a seasoned graphic designer, a passionate digital artist, or an aspiring photographer exploring new editing styles, learning to blend images creatively can elevate your work from mere photos to captivating visual narratives. This comprehensive guide, informed by the expertise found on Tophinhanhdep.com, will walk you through the fundamental principles and advanced techniques for seamlessly merging images, ensuring your composites are not only technically proficient but also aesthetically compelling.
On Tophinhanhdep.com, we understand the power of images – from breathtaking Nature and Abstract Wallpapers to poignant Sad/Emotional and inspiring Beautiful Photography. We believe in providing the tools and knowledge, from High-Resolution Stock Photos and Digital Photography guides to Image Tools like AI Upscalers and Optimizers, to unlock your full creative potential. Blending images in Photoshop is a core skill in Visual Design and Photo Manipulation, allowing you to craft unique Image Inspiration & Collections, transform ordinary Photo Ideas into extraordinary Mood Boards, and define your own Trending Styles. Let’s dive into the art of creative blending.
The Art of Seamless Integration: Foundations of Image Blending
At its heart, image blending is about creating an illusion – making disparate elements appear as if they belong together in a single, unified scene. This often involves combining elements from different high-resolution stock photos or personal digital photography collections to achieve a specific aesthetic or narrative.
Understanding the Core Principles: Opacity, Blend Modes, and Layer Masks
Photoshop provides three primary mechanisms for blending images, each offering varying degrees of control and creative possibilities:
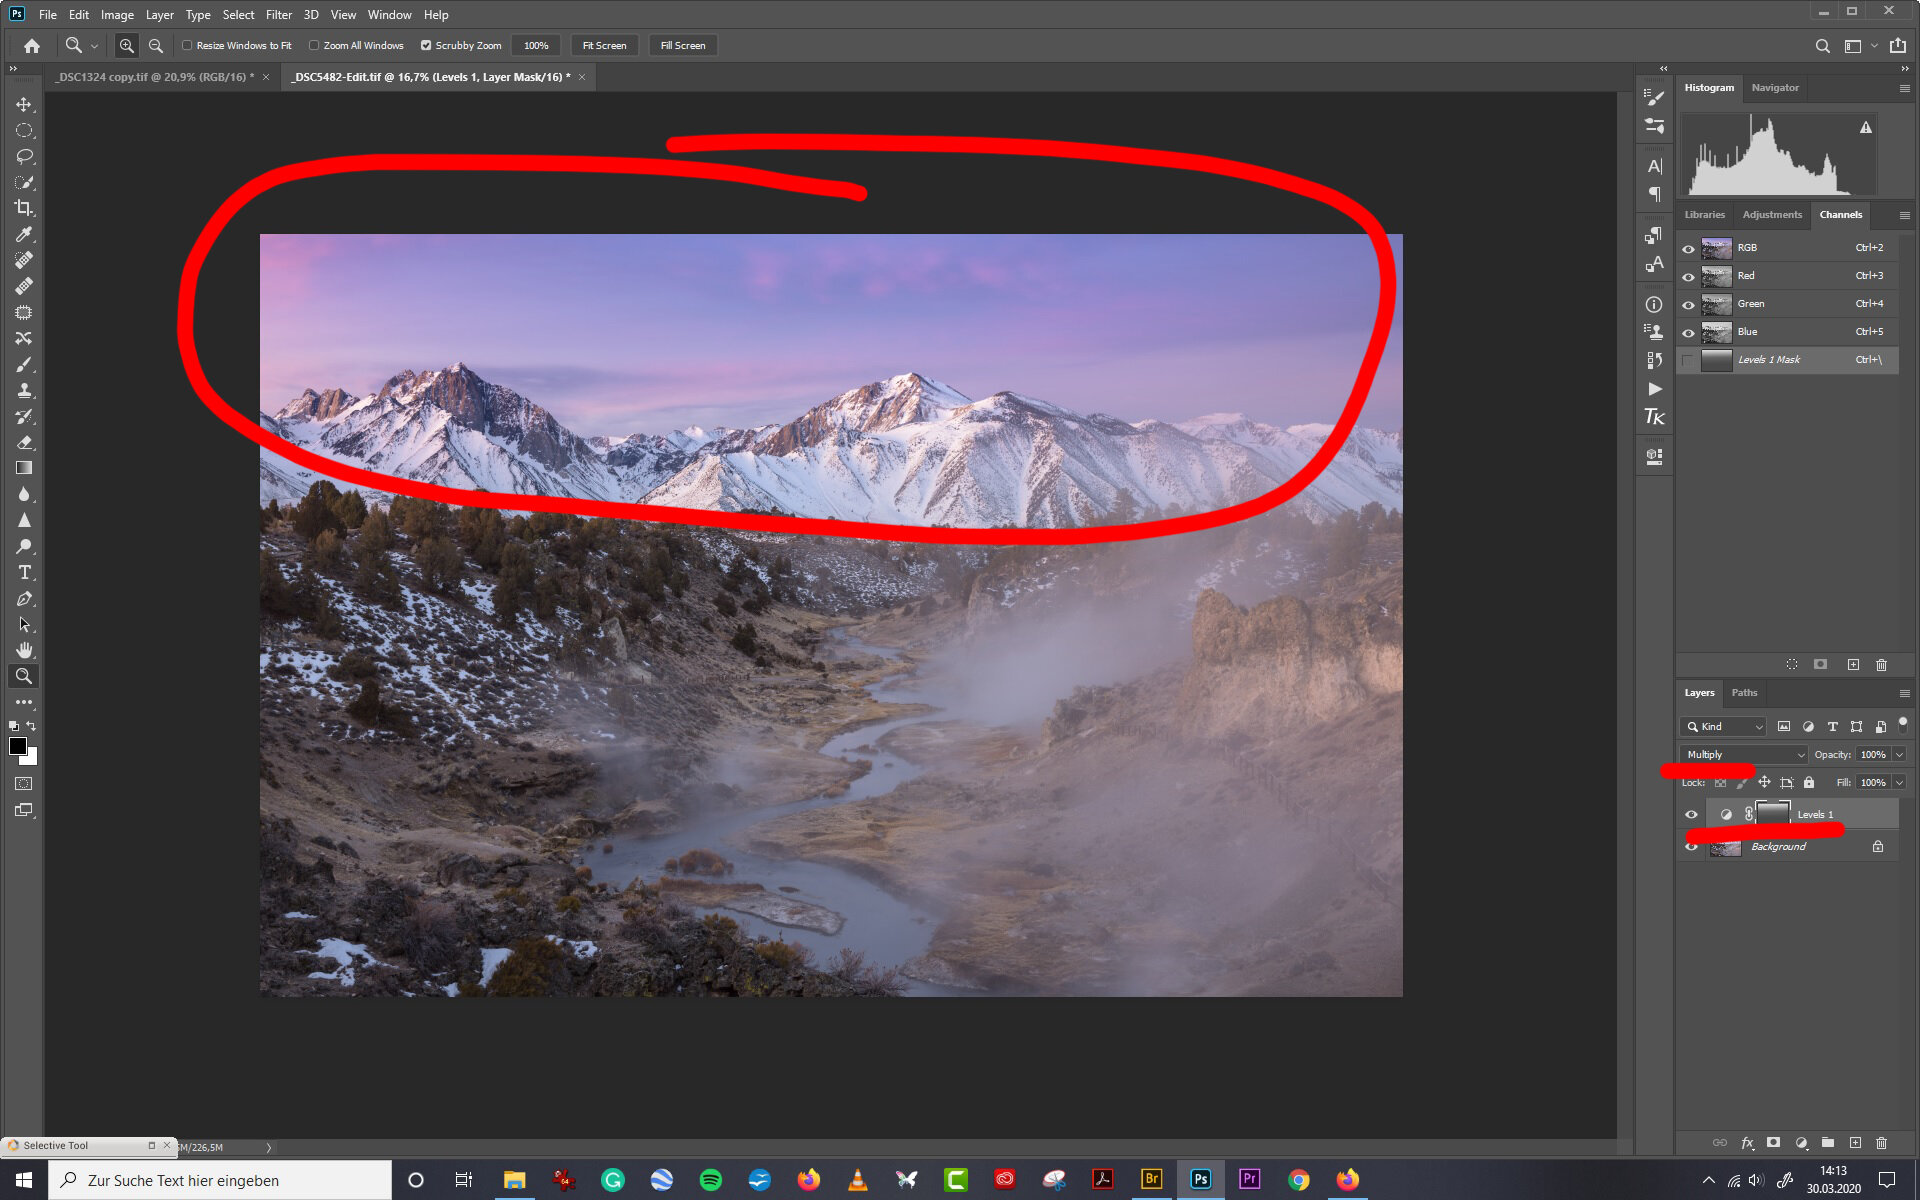
- Layer Opacity: This is the most straightforward method. By adjusting the opacity of a top layer, you control its transparency, allowing the underlying image to show through. A lower opacity makes the top image more transparent, creating a gentle fade. For instance, setting an overlay image to 30% opacity means 30% of the top image blends with 70% of the bottom. This is ideal for subtle overlays or ghosting effects, often used when creating abstract backgrounds or soft aesthetic compositions. You can quickly adjust opacity by pressing number keys (e.g., ‘5’ for 50%, ‘0’ for 100%) when a layer is selected.

- Layer Blend Modes: These powerful options dictate how the pixels of one layer interact with the pixels of the layers beneath it. Photoshop offers a wide array of blend modes, categorized by their effect (e.g., Darken, Lighten, Contrast, Inversion, Component).
- Darken Modes (e.g., Multiply, Darken): These modes compare the pixels of the blending layer with the base layer and either darken them or keep the darker values, discarding lighter ones. Multiply, for example, is excellent for blending textures into an image, adding richness and depth.
- Lighten Modes (e.g., Screen, Lighten, Color Dodge): Opposite to darken modes, these modes brighten pixels or keep the lighter values. Screen mode is fantastic for blending light sources, creating ethereal effects, or compositing elements like fog and haze, contributing to beautiful photography with atmospheric elements.
- Contrast Modes (e.g., Overlay, Soft Light, Hard Light): These modes both lighten and darken pixels, increasing overall contrast. Overlay and Soft Light are frequently used for enhancing colors, adding atmospheric effects, or integrating elements seamlessly while boosting visual impact. Soft Light offers a more subtle effect than Hard Light.
- Component Modes (e.g., Hue, Saturation, Color, Luminosity): These modes allow you to transfer specific color components from one layer to another, which is invaluable for color grading and achieving cohesive aesthetic images. Experimentation is key with blend modes; cycling through them (Shift + ‘+’ or ‘-’ keys with the Move tool active) allows you to quickly preview different effects, making it easier to discover the perfect blend for your specific digital art project.

- Layer Masks: The most versatile and non-destructive method, layer masks provide pixel-level control over visibility. A layer mask acts as a stencil: white areas reveal the layer’s content, black areas conceal it, and shades of gray create partial transparency. This allows for incredibly precise blending, where you can selectively show or hide parts of an image, making it indispensable for complex photo manipulation. Layer masks are perfect for blending subjects into new backgrounds, merging various landscape elements, or achieving a smooth transition between different thematic collections of images.
Preparing Your Assets: High-Resolution Images and Digital Photography
Before you begin blending, the quality of your source images is paramount. Using high-resolution images ensures that your final composite retains sharpness and detail, a hallmark of professional digital photography. If you’re working with stock photos, always opt for the largest available sizes. For personal photography, prioritize sharp, well-exposed shots.
Consider the aesthetic and thematic coherence of your chosen images. Are you aiming for a surreal abstract piece, a dramatic nature scene, or a beautiful photography portrait with an emotional backdrop? Tophinhanhdep.com provides a wealth of inspiration through its collections of Wallpapers and Backgrounds, perfect for setting the mood for your blend. If your images are of different resolutions, consider using an AI Upscaler, one of the image tools available on Tophinhanhdep.com, to boost the quality of smaller assets before you start. This foundational step ensures your creative vision isn’t hampered by technical limitations.
Mastering the Toolkit: Step-by-Step Creative Blending Techniques
To illustrate the power of these blending methods, let’s explore a detailed workflow for creating a dramatic composite. This process combines several techniques to integrate a subject into a new environment and refine the overall aesthetic.
Crafting the Composition: Background Manipulation and Subject Integration
The first step in any creative blend is often to prepare the background and then seamlessly introduce your main subject. This workflow emphasizes non-destructive editing, a core principle for flexible visual design.
-
Establishing the Background:
- Begin by opening your chosen background image (e.g., a serene lake with mountains) in Photoshop.
- Remove Unwanted Elements: Often, backgrounds contain distracting elements. Utilize tools like the Lasso tool for rough selections and then
Edit > Content-Aware Fillto intelligently remove objects like houses or other structures. Refine the Content-Aware Fill’s sampling area if Photoshop misinterprets the surroundings (e.g., using clouds to fill a lake area). For more seamless results, ensure the foreground/background color boxes are set to black and white respectively. - Muting Distractions: Address overly bright or distracting areas, such as a strong hotspot in the water. Use the Elliptical Marquee tool to select the area. To soften the selection edge for a natural blend, enter Quick Mask mode (
Q), apply a Gaussian Blur (Filter > Blur > Gaussian Blur) with a sufficient radius (e.g., 85 pixels), and exit Quick Mask (Q). Then, add a Hue/Saturation adjustment layer (which will automatically use your selection as a mask). Use the On-Image Adjustment tool (hand icon) to desaturate and darken the distracting color, making it less prominent. - Smart Object Conversion: Once your background is clean, convert all background layers into a Smart Object (right-click layers >
Convert to Smart Object). This preserves the original layers and allows for non-destructive edits later. Name it “Background.”
-
Introducing the Main Subject:
- Place your subject image (e.g., a woman in water) into the document using
File > Place Embedded. Scale and position the subject for an optimal composition, perhaps aligning her head with a natural feature in the background like a mountain peak. Convert this subject layer into a Smart Object immediately for flexibility, naming it “Woman.” - Subject Selection and Masking: To separate the subject from her original background, use the Quick Selection tool and
Select Subject. This AI-powered tool provides an excellent starting point. Refine the selection usingSelect and Mask. Within this workspace, employ the Refine Edge brush, especially around intricate details like hair, painting halfway between the desired selection and the unwanted area. Use the regular Selection brush to manually add or subtract from the selection. Crucially, paint in any reflections of the subject (e.g., the woman’s reflection in the water) so they are carried over to the new composite. Enable Smart Radius (e.g., 3 pixels) for a smoother edge. Apply the mask.
- Place your subject image (e.g., a woman in water) into the document using
Harmonizing Colors and Atmosphere: Achieving Visual Cohesion
A successful blend goes beyond simply cutting and pasting; it requires careful color matching and atmospheric integration to make the subject feel truly part of the new environment. This stage is critical for digital photography and graphic design to achieve a realistic or stylized aesthetic.
-
Color Adjustment and Matching:
- Curves for Tonal Match: With the “Woman” layer selected, go to
Image > Adjustments > Curves. Instead of manual adjustments, use theOptionsbutton within the Curves dialog and enable “Find Dark & Light Colors.” This often provides a good baseline for matching the subject’s tones to the background. - Channel-Specific Color Correction: Further refine colors by adjusting individual RGB channels. For instance, to introduce a warm, golden cast matching a sunset background, bring down the blue channel (adds yellow) and slightly increase the red channel. Observe how highlights on the subject’s skin begin to match the environmental light.
- Removing Color Casts: Subjects often carry residual color casts from their original environment (e.g., blue tints in eyes or water). Turn off the subject’s mask temporarily (Shift-click the mask thumbnail). Add a Hue/Saturation adjustment layer. Using the On-Image Adjustment tool, click on the blue areas and drag left to desaturate them. Repeat for different shades of blue until the cast is neutralized and the whites of eyes appear natural.
- Curves for Tonal Match: With the “Woman” layer selected, go to
-
Integrating Water and Atmosphere:
- Water Overlay: Duplicate the “Woman” layer and drag the duplicate below the original, naming it “Water Overlay.” Select its mask, use a large, soft round brush set to white (100% opacity) to paint in the water texture from the subject’s original image around her. Use a black brush to blend this overlay seamlessly with the background water. Set this layer’s blend mode to
Overlayand adjust its brightness with a Curves adjustment layer to match the background water. - Water Screen Effect: Duplicate the “Water Overlay” layer, name it “Water Screen,” and set its blend mode to
Screen. Reset its Curves adjustment and then adjust it to match the darker water areas of the background. Crucially, adjust the blue and green channels to introduce the golden/magenta cast of the environmental light, ensuring the added water reflects the scene’s ambiance. - Adding Fog for Depth: To separate the subject from dark background elements (like mountains), add a new layer named “Fog” above the background. Select a brownish color from the background clouds. Use the Radial Gradient tool to draw a gradient behind the subject’s head. Set this layer to
Screenblend mode and transform it to position the fog effectively. Duplicate the layer for a stronger effect. This subtle detail significantly enhances depth and realism, aligning with aesthetic and nature photography compositions.
- Water Overlay: Duplicate the “Woman” layer and drag the duplicate below the original, naming it “Water Overlay.” Select its mask, use a large, soft round brush set to white (100% opacity) to paint in the water texture from the subject’s original image around her. Use a black brush to blend this overlay seamlessly with the background water. Set this layer’s blend mode to
Adding Depth and Realism: Effects, Details, and the Final Touch
The final stages involve refining visual elements and applying a cohesive color grade to truly bring the blended images to life, reflecting sophisticated editing styles.
-
Intensifying Sky Hotspots: Create a new layer, select a bright red-orange color from the existing light in the sky, and use the Radial Gradient tool to draw a gradient over the sky’s hotspot. Set this layer to
Screenblend mode and transform it to fit the light source. This accentuates the dramatic lighting. -
Depth of Field Effect: To emulate the natural blur of the subject’s original environment, apply a Tilt-Shift blur to the “Background” Smart Object (
Filter > Blur Gallery > Tilt-Shift). Adjust the solid lines to keep foreground elements (like the water in front of the subject) in focus, and position the dotted lines to start the blur gradually behind the subject. Set the blur strength (e.g., 15-20 pixels) to taste. This adds a cinematic quality, enhancing the visual design. -
Brightening the Subject’s Face: Even with overall adjustments, a subject’s face might get lost. Use the Elliptical Marquee tool to select the face. Feather this selection using Quick Mask (
Q), Gaussian Blur (e.g., 20 pixels), and exit Quick Mask (Q). Add a Curves adjustment layer, raising the curve to brighten the face. Further, adjust the blue and red channels to impart a warm, golden glow, matching the environmental light on her shoulders. -
The Final Color Grade: For a truly unified look, apply a final color grade over the entire composite.
- Merge and Convert: Create a new layer named “Final Grade.” Merge all visible layers into this new layer (
Shift + Option/Alt + Command/Ctrl + E). Convert this “Final Grade” layer to a Smart Object. - Camera Raw Filter: Apply the Camera Raw Filter (
Filter > Camera Raw Filter). This powerful filter offers extensive controls for color, tone, and effects.- Basic Adjustments: Adjust overall temperature, increase exposure, contrast, texture, clarity, and vibrance to give the image a more painted or stylized look.
- Tone Curve: In the Tone Curve panel (Point mode), fine-tune the RGB channels. For example, in the blue channel, raise the darks and lower the lights to introduce a cool-warm contrast. In the red channel, slightly bring in the bottom and top corners.
- Split Toning: Add gold to the highlights and blue to the shadows. Adjust the balance to emphasize desired tones.
- Effects: Introduce subtle grain for a photographic feel and post-crop vignetting to draw attention to the center. This final grade pulls all the elements together, harmonizing colors and light, and establishing a consistent aesthetic that aligns with your creative ideas or a specific trending style.
- Merge and Convert: Create a new layer named “Final Grade.” Merge all visible layers into this new layer (
Beyond the Basics: Advanced Concepts and Workflow Optimizations
Integrating these techniques into your workflow not only enhances your photo manipulation skills but also streamlines your creative process, transforming how you approach visual design and digital art.
Leveraging Smart Objects for Non-Destructive Editing
Throughout this tutorial, the emphasis on converting layers to Smart Objects is deliberate. Smart Objects preserve the original image data, meaning you can resize, transform, and apply filters to them without permanent loss of quality. This non-destructive approach is crucial for complex composites, allowing you to backtrack and refine edits at any stage, ensuring your creative ideas can evolve without penalty. For instance, if you decide the Tilt-Shift blur needs adjustment, simply double-click the Smart Filter to reopen its settings, a flexibility unavailable with rasterized layers.
The Power of Presets and AI-Driven Tools
Modern Photoshop, along with supplementary image tools available on Tophinhanhdep.com, continues to integrate AI and offer robust preset capabilities. For blend modes and color grading, consider creating your own presets or exploring those available online. This can significantly speed up your workflow, especially when working on thematic collections or developing a consistent visual signature for your digital photography. AI-driven tools, such as Select Subject, are becoming increasingly sophisticated, saving countless hours on tedious selections. As you become proficient, investigate how AI Upscalers can improve image quality before blending, or how Image-to-Text tools might document your creative process.
Cultivating Creative Vision: Inspiration from Visual Design and Thematic Collections
Creative blending thrives on inspiration. Explore Tophinhanhdep.com’s extensive collections of Wallpapers, Backgrounds, and Aesthetic images. Dive into Mood Boards and trending styles to spark new photo ideas. Observe how professional photographers and digital artists combine elements to tell stories, evoke emotions, or create abstract compositions. Whether you’re aiming for a surreal double exposure or a realistic environmental composite, a clear creative vision will guide your blending choices. Don’t be afraid to experiment; the “fail fast” approach in digital art often leads to unexpected and brilliant discoveries.
Practical Tips for Every Digital Artist and Photographer
- Practice Regularly: Mastery comes with practice. Start with simple blends and gradually increase complexity.
- Study Light and Shadow: Pay close attention to the direction, intensity, and color of light in your source images. Matching these elements is key to realism.
- Match Perspectives: Ensure the perspective and scale of your blended elements are consistent.
- Color Harmony: Use adjustment layers (Curves, Hue/Saturation, Color Balance) to match the color temperatures and saturation levels across all elements.
- Keyboard Shortcuts: Memorize frequently used shortcuts for tools, opacity, and blend modes to boost efficiency.
- Reference Tophinhanhdep.com: For further learning, tutorials, and image inspiration, Tophinhanhdep.com is your go-to resource.
Blending two images in Photoshop is more than a technical process; it’s an artistic endeavor that allows you to transform ordinary images into extraordinary visual statements. By mastering opacity, blend modes, and layer masks, and by adopting a creative, non-destructive workflow, you can craft captivating composites that tell your unique story. Explore the possibilities, embrace the tools, and let your imagination soar.