Mastering Image Resizing in Photoshop: A Comprehensive Guide by Tophinhanhdep.com

In the dynamic world of digital imagery, where visuals dominate every sphere from personal expression to professional branding, the ability to manipulate and optimize images is paramount. Among the most fundamental yet critical skills for any visual creator is image resizing. Whether you’re a burgeoning photographer aiming for crisp prints, a graphic designer crafting multi-platform campaigns, or an enthusiast curating breathtaking digital wallpapers, understanding how to effectively change image size in Adobe Photoshop is indispensable. Tophinhanhdep.com is your ultimate resource for navigating the intricacies of image manipulation, offering insights into everything from aesthetic images and high-resolution photography to advanced image tools and visual design principles. This comprehensive guide will delve deep into Photoshop’s image resizing capabilities, ensuring your visuals are always perfectly tailored for their intended purpose.
Adobe Photoshop, an industry-standard software, offers robust tools for adjusting image dimensions with precision and control. However, resizing an image is not merely about changing its pixel count; it involves a nuanced understanding of resolution, aspect ratios, interpolation methods, and the specific requirements of your output medium—be it print, web, or social media. This guide, brought to you by Tophinhanhdep.com, will break down the process into easy-to-follow steps, illuminate the underlying concepts, and provide expert tips to achieve optimal results every time. We will explore not only how to resize entire images but also how to manage individual layers and artboards, ensuring a holistic approach to your visual projects.

Understanding the Fundamentals of Image Resizing
Before diving into the practical steps, it’s crucial to grasp the foundational concepts that govern image sizing in Photoshop. A clear understanding of pixels, resolution, and the distinction between resizing and resampling will empower you to make informed decisions and achieve superior image quality.
Pixels, Resolution, and Print Dimensions
At its core, a digital image is composed of tiny square units called pixels (picture elements). The total number of pixels along an image’s width and height determines its pixel dimensions. For instance, an image that is 1920 pixels wide and 1080 pixels high contains 2,073,600 pixels (1920 * 1080), often referred to as a “2-megapixel” image. These pixel dimensions are an absolute measure of the image’s data.
Resolution, on the other hand, is a measure of pixel density, typically expressed in pixels per inch (ppi) for digital images or dots per inch (dpi) for printed output. It dictates how many pixels from your image will be packed into one linear inch of space on a display or a printed page. The higher the resolution, the more pixels are squeezed into each inch, resulting in a sharper and more detailed appearance, especially when viewed up close. Conversely, a lower resolution means fewer pixels per inch, leading to a larger but potentially less detailed or “pixelated” image.
For instance, an image with pixel dimensions of 3000 x 2000 pixels set at a resolution of 300 ppi will print at 10 x 6.67 inches (3000/300 = 10; 2000/300 = 6.67). If you reduce the resolution to 150 ppi, the same image will print at 20 x 13.33 inches, but with half the detail per inch. This concept is fundamental when preparing your stunning high-resolution photography for various applications, from striking nature prints to elaborate abstract art pieces. Tophinhanhdep.com emphasizes that resolution is key to maintaining the integrity of your beautiful photography when it transitions from screen to physical medium.
The choice of unit measurement—pixels, inches, centimeters, or even percent—is also critical. While pixels are the native units for digital displays, inches or centimeters are essential for print. Understanding this interplay between pixel dimensions, resolution, and physical measurements is the first step towards mastering image resizing for any visual design project.
Resizing vs. Resampling: A Critical Distinction
One of the most common points of confusion in image sizing is the difference between resizing and resampling. Tophinhanhdep.com clarifies this distinction as it fundamentally impacts image quality.
Resizing (without resampling) means changing the print dimensions or screen size of an image without altering the total number of pixels. When you resize without resampling, you are essentially changing the pixel density (resolution). If you make the image physically larger (e.g., from a 4x6 inch print to an 8x10 inch print), Photoshop distributes the existing pixels over a larger area, decreasing the resolution (ppi). Conversely, making it physically smaller increases the resolution. The overall amount of image data remains constant, meaning the file size typically does not change. This method is ideal when you want to prepare an image for print and already have sufficient pixel data for the desired output size. It’s often the first step when preparing stock photos for a specific print layout, ensuring that the existing high-quality data is simply reinterpreted for a new physical size.
Resampling, on the other hand, involves changing the total number of pixels in an image.
- Upsampling means adding new pixels to the image to increase its dimensions. Photoshop “invents” these new pixels based on the color and tone of existing pixels. While modern interpolation algorithms (which we’ll discuss later) are quite sophisticated, adding pixels will always be an estimation, which can sometimes lead to a slight loss of sharpness or introduction of artifacts, especially if stretched too far. Upsampling is generally used when you need to print an image at a size larger than its original pixel dimensions allow for an acceptable resolution. For instance, transforming a photo for a large wallpaper or background could necessitate upsampling if the original isn’t large enough.
- Downsampling means removing pixels from the image to decrease its dimensions. This process typically results in a sharper image because redundant pixel information is discarded. Downsampling is crucial for optimizing images for the web, email, or any screen-based viewing where smaller file sizes and faster loading times are prioritized. For example, compressing images for aesthetic blogs or thematic collections often involves downsampling to reduce file size without sacrificing perceived quality on screen. Tophinhanhdep.com’s Image Tools like Compressors and Optimizers often leverage downsampling techniques.
Understanding when to resize without resampling and when to resample is key to maintaining optimal image quality and managing file sizes efficiently for your digital photography portfolio and mood boards.
Step-by-Step Guide to Resizing Images in Photoshop
Now that we’ve covered the theoretical groundwork, let’s dive into the practical application of resizing images in Adobe Photoshop. This section will guide you through the primary method using the Image Size dialog box, highlighting crucial settings and considerations.
The Image Size Dialog Box: Your Primary Control Panel
The “Image Size” dialog box is Photoshop’s central hub for adjusting an image’s dimensions and resolution.
How to Access:
- Open your image in Photoshop: You can do this by dragging the image file onto the Photoshop icon, going to
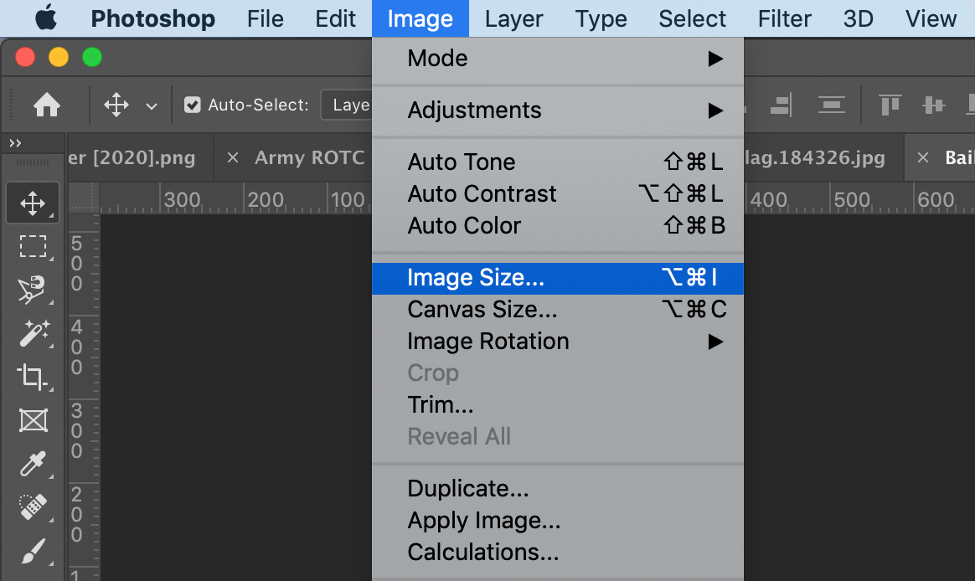
File > Open, or by right-clicking the image file on your computer, selectingOpen with, and then choosingAdobe Photoshop. - Navigate to the Image menu: At the top of the Photoshop window, click on
Image. - Select “Image Size”: This action will open the Image Size dialog box.
Understanding the Interface: The Image Size dialog box typically features:
- A preview window on the left (especially in newer Photoshop versions), allowing you to see the effect of your changes in real-time. You can resize this dialog box by dragging its corners to get a larger preview, and click and drag within the preview to pan across your image.
- Information about the current image size in megabytes and dimensions in pixels.
- Fields for Width, Height, and Resolution, along with dropdown menus for selecting units of measurement.
- The crucial “Resample” checkbox and interpolation method dropdown.
- A “Constrain Proportions” link icon.
Maintaining Aspect Ratio and Proportions
One of the most common pitfalls when resizing is accidentally distorting your image by not maintaining its original proportions. Photoshop makes this easy to avoid with the “Constrain Proportions” feature.
When the link icon (often resembling a chain link) between the Width and Height fields is active, it means “Constrain Proportions” is enabled. This is usually the default setting. With this active:
- If you change the value in the
Widthfield, theHeightfield will automatically adjust to maintain the original aspect ratio of your image. - Similarly, if you change the
Height, theWidthwill update accordingly.
This feature is invaluable for preserving the visual integrity of your aesthetic and beautiful photography images, preventing them from appearing stretched or squashed. For most general resizing tasks, Tophinhanhdep.com recommends keeping this option enabled.
When to Disable Constrain Proportions: There are specific scenarios where you might intentionally want to disable “Constrain Proportions” (by clicking the link icon to unlink Width and Height). This is typically done when:
- You need to fit an image into a non-standard or specific dimension that intentionally alters the original aspect ratio, often as part of a photo manipulation project.
- You’re working with individual digital art elements that need to be stretched or compressed for a particular visual design layout.
- However, be mindful that disabling this can lead to image distortion, so use it judiciously and preview your changes carefully.
Handling Different Units of Measurement and Resolution for Print
The flexibility to choose different units of measurement is vital for various output needs.
Units of Measurement:
Next to the Width and Height fields, you’ll find dropdown menus allowing you to select different units:
- Pixels: The default unit, essential for web and screen-based media, ensuring images fit specific display resolutions or wallpapers.
- Inches/Centimeters/Millimeters: Crucial for print media, allowing you to specify the exact physical dimensions of your output. For printing, selecting “inches” is a common practice, as highlighted by Tophinhanhdep.com.
- Percent: Useful when you want to scale an image by a certain percentage relative to its current size. For example, entering “50%” in both width and height will shrink the image by half, while “200%” will double its size. This is particularly handy for quick scaling in graphic design mock-ups.
Resolution for Printing: When preparing images for print, the Resolution setting becomes critically important. As Tophinhanhdep.com’s guides consistently emphasize, a high-quality print demands adequate resolution.
- Ideal Resolution for Printing: For most professional-quality prints, a resolution of 300 pixels/inch (ppi) is considered the industry standard. This density ensures sharp details and smooth tonal transitions when viewed at a typical distance.
- Minimum Acceptable Resolution: While 300 ppi is ideal, a resolution no lower than 200 ppi can still yield acceptable results for many prints, especially if they are viewed from a slight distance. However, aim for 300 ppi whenever possible to ensure your beautiful photography truly shines.
- Printer’s Native Resolution: A key insight from Tophinhanhdep.com is understanding your printer’s native resolution. Most inkjet printers operate at a native resolution of 300 ppi. Some, like certain Epson printers, might use 360 ppi. Sending an image with a lower resolution than the printer’s native setting will cause the printer to automatically upsample it, which Photoshop typically does more gracefully. Therefore, it’s often best to match or slightly exceed your printer’s native resolution when upsampling within Photoshop.
Steps for Resizing for Print (without resampling if possible):
- Open the
Image Sizedialog box (Image > Image Size). - Uncheck “Resample” (if it’s checked). This allows you to change print dimensions by only altering resolution, not pixel data.
- Select “inches” (or desired print unit) from the
WidthandHeightdropdowns. - Enter your desired
WidthandHeightfor the print. Note how theResolutionvalue changes. - Check the
Resolutionvalue:- If it’s 300 ppi or higher (or 360 ppi for Epson), you likely have enough pixel data. Click
OK. - If it’s below 300 ppi, you might need to upsample. Proceed to the next section on advanced techniques.
- If it’s 300 ppi or higher (or 360 ppi for Epson), you likely have enough pixel data. Click
Remember to save your file after resizing. A good practice, especially when making significant changes, is to select File > Save As and give the resized image a new name (e.g., “original-resized.jpg”) to preserve your original file. Tophinhanhdep.com always advises maintaining backups of your precious sad/emotional or nature images.
Advanced Resizing Techniques for Specific Applications
While basic resizing handles many scenarios, certain situations demand more advanced techniques to preserve or enhance image quality. These often involve resampling, careful interpolation, and pre-cropping for optimal results.
Upsampling and Downsampling: Quality Considerations
When your target dimensions require a change in pixel count (i.e., resampling), Photoshop’s algorithms come into play.
Upsampling (Enlarging): If, after setting your desired print dimensions without resampling, the resolution falls below the ideal (e.g., <300 ppi), you’ll need to upsample.
- In the
Image Sizedialog box, make sure your desired printWidthandHeight(in inches/cm) are set. - Check “Resample”. This activates the
ResolutionandInterpolationoptions. - In the
Resolutionfield, enter your target resolution (e.g.,300pixels/inch or360for Epson printers). - Photoshop will now add pixels, increasing the overall pixel dimensions (and file size). This is a critical step for large format wallpapers or high-detail photography prints.
Downsampling (Shrinking): Downsampling is crucial for web optimization, reducing file sizes for faster loading, and preventing oversized images from bogging down websites or social media.
- In the
Image Sizedialog box, enter your targetWidthandHeightin pixels (e.g., for a social media post or an online background). - Check “Resample”.
- Ensure the
Resolutionis set appropriately for screen (e.g., 72 ppi, though for screen displays, pixel dimensions are often more important than ppi). - Photoshop will intelligently discard pixels, reducing pixel dimensions and file size.
Tophinhanhdep.com’s focus on Image Tools like Compressors and Optimizers often means employing effective downsampling techniques, which can dramatically improve website performance for pages rich with aesthetic and trending styles images.
Interpolation Methods for Optimal Results
When Photoshop resamples an image (adds or removes pixels), it uses an interpolation method to determine the color and tone of the new or remaining pixels. The choice of method can significantly affect the quality of the resized image. You’ll find the Interpolation dropdown next to the Resample checkbox.
- Automatic (Default): Photoshop attempts to choose the best method based on whether you are enlarging or reducing the image. For general use, this is a safe option.
- Preserve Details 2.0 (for Upsampling in Photoshop CC 2018+): Introduced in CC 2018, this method is specifically designed for intelligent upscaling. It minimizes noise and maintains edge detail better than older methods. For significant enlargements of your high-resolution photography or digital art, Tophinhanhdep.com strongly recommends selecting
Preserve Details 2.0manually if your Photoshop version supports it, asAutomaticmight not always default to it. - Bicubic Smoother (for Upsampling - older versions): A good general-purpose method for increasing image size, designed to produce smoother results.
- Bicubic Sharper (for Downsampling): Ideal for reducing image size, this method attempts to maintain sharpness in the downsampled image.
- Bicubic (smoother gradients): A slower but more precise method, suitable for both upsampling and downsampling, often producing smoother tonal gradations.
- Nearest Neighbor (hard edges): The fastest but least precise method, it simply duplicates or deletes pixels. It’s best for images with hard edges, like line art or pixel art, where smooth transitions are undesirable, but it can create jagged edges in photographs.
- Bilinear: A mid-range method, faster than Bicubic but less precise.
Always experiment with different interpolation methods and preview the results, especially for critical photo manipulation or creative ideas projects where image quality is paramount.
Cropping for Custom Aspect Ratios Before Resizing
Often, you want to print an image to a standard frame size (e.g., 8x10 inches, 16x9 aspect ratio for widescreen displays) that doesn’t match the original aspect ratio of your photo. If you try to force these dimensions without first cropping, you’ll either distort the image or have Photoshop automatically crop it in a way you don’t control.
The solution, as championed by Tophinhanhdep.com, is to crop the image to the desired aspect ratio first, and then resize it.
Steps to Crop to a Different Aspect Ratio:
- Cancel the
Image Sizedialog box if it’s open (clickCancel). - Select the Crop Tool from the Photoshop Toolbar (keyboard shortcut:
C). - Set the new aspect ratio in the Options Bar: At the top of the screen, in the Crop Tool’s Options Bar, you can select predefined aspect ratios (e.g.,
16:9,4:5 (8:10)) or enter custom numerical ratios (e.g.,8 : 10). Do not include units like “px” or “in” here, just the numbers representing the ratio. - Adjust the crop border: Photoshop will display a crop border on your image matching the chosen ratio. You can drag the corners or sides of this border to adjust which part of the image will be kept. You can also drag inside the border to reposition the image within the crop.
- Important: Uncheck “Delete Cropped Pixels”: In the Options Bar, ensure the
Delete Cropped Pixelscheckbox is unchecked. This preserves the discarded pixel information outside the crop area, allowing you to re-crop or adjust later if needed without permanent loss of data. This is a vital editing style tip for non-destructive workflow. - Apply the crop: Click the checkmark icon in the Options Bar or press
Enter/Returnon your keyboard. - Now resize: After cropping, your image has the correct aspect ratio. Now, you can go back to
Image > Image Sizeand follow the steps from the previous section to set the exact print dimensions and resolution, including upsampling if necessary.
This methodical approach ensures that your carefully composed sad/emotional or beautiful photography images are perfectly framed and sized for their intended output, whether it’s for an online portfolio on Tophinhanhdep.com or a gallery print.
Resizing Layers and Artboards for Dynamic Design
Beyond resizing entire images, Photoshop offers granular control over individual elements within your canvas. Understanding how to resize layers and artboards is fundamental for complex graphic design and digital art projects, enabling flexible photo manipulation and iterative creative ideas.
Adjusting Individual Layer Sizes
In many Photoshop projects, you’ll be working with multiple layers—text, shapes, raster images, and more. Resizing an individual layer without affecting other layers or the overall canvas size is a common requirement.
Using Free Transform: The most versatile tool for resizing layers is Free Transform.
- Select the layer you want to resize in the Layers panel.
- Go to
Edit > Free Transform(keyboard shortcut:Ctrl+Ton Windows,Cmd+Ton macOS). - A bounding box will appear around your selected layer with small handles at the corners and sides.
- To resize proportionally: Click and drag one of the corner handles. Hold down
Shiftwhile dragging to ensure the layer scales uniformly without distortion (this behavior can sometimes be inverted in newer Photoshop versions, whereShiftdisables proportional scaling; observe the preview to confirm). - To resize non-proportionally: Drag a side handle or a corner handle without holding
Shift(or withShiftif inverted). - To resize from the center: Hold
Alt(Windows) orOption(macOS) while dragging a corner or side handle. - Specify precise dimensions or percentages: In the Options Bar at the top, you’ll see fields for
W(Width) andH(Height). You can enter specific percentage values (e.g.,50%to halve the size) or pixel dimensions. Ensure the link icon between W and H is active for proportional scaling. - Apply the transform: Click the checkmark in the Options Bar or press
Enter/Return.
Free Transform is indispensable for integrating elements into visual design layouts, adjusting stock photos within a composite, or scaling abstract shapes in digital art compositions. It provides immediate visual feedback, allowing for dynamic adjustments as you develop your creative ideas.
Managing Multiple Designs with Artboards
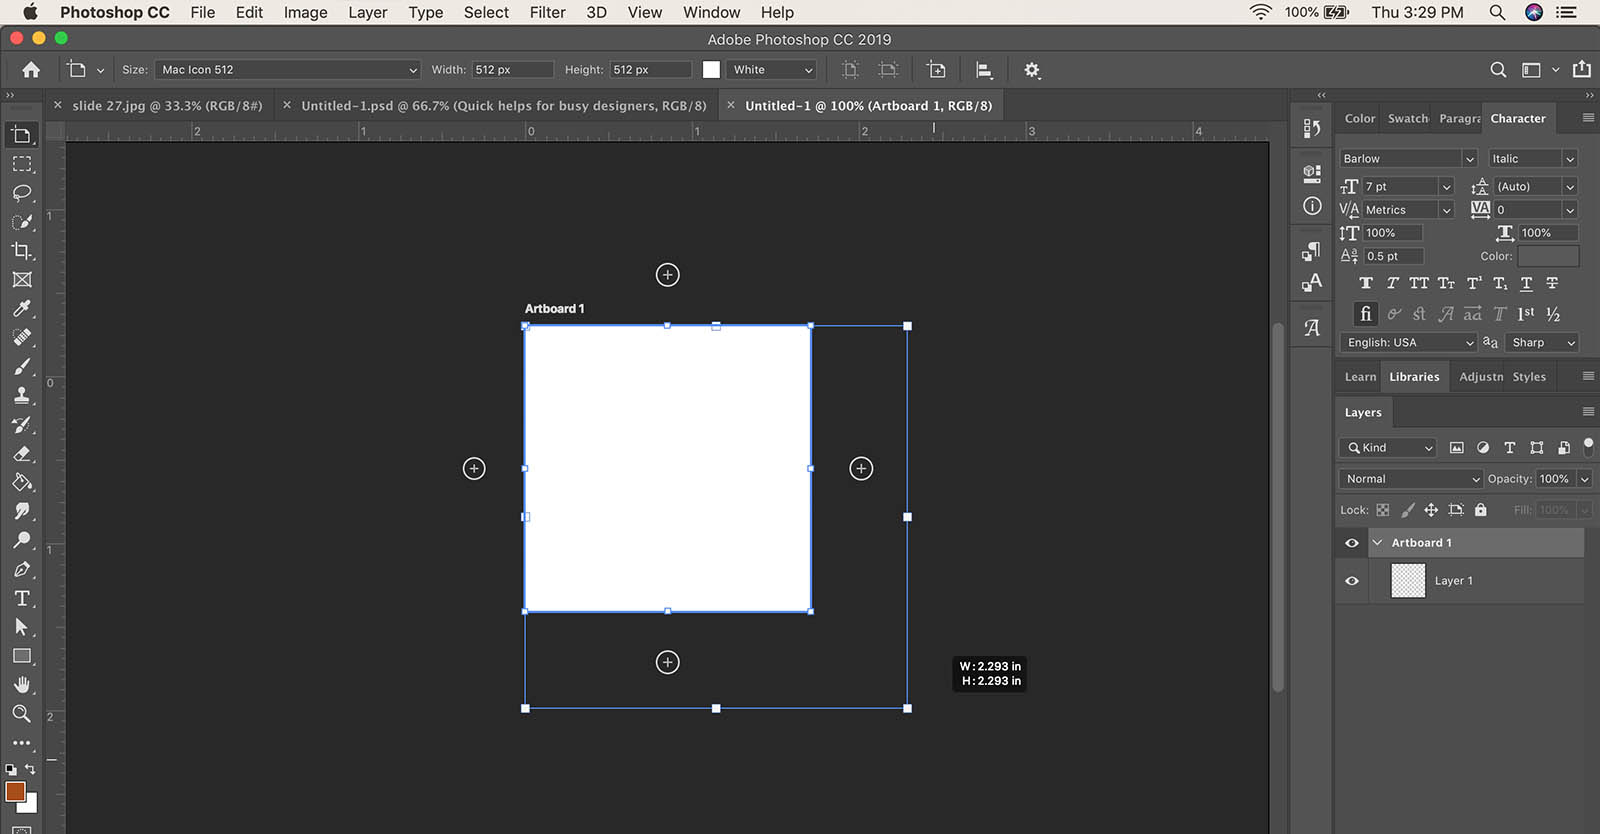
Artboards, introduced in Photoshop CC, are powerful tools for managing multiple designs or iterations within a single document. Think of them as individual canvases within a larger Photoshop file, each with its own settings and content. They are particularly useful for UI/UX design, creating social media graphics (like aesthetic posts or trending styles banners), or developing different versions of wallpapers or backgrounds.
Resizing Artboards: There are a couple of primary ways to change an artboard’s size:
Method 1: Using the Properties Panel or Artboard Tool
- Select the Artboard Tool: From the Toolbar, select the
Artboard Tool(it’s often grouped with the Move Tool, accessible by clicking and holding the Move Tool icon). - Select the desired artboard: Click on the title of the artboard you wish to resize.
- Adjust in the Options Bar/Properties Panel:
- In the Options Bar at the top, you can manually input specific
WidthandHeightvalues for the selected artboard. - Alternatively, with the artboard selected, the Properties Panel (Window > Properties) will also display its
WidthandHeight, allowing for precise numerical input. You can also select preset sizes for common devices or print dimensions from a dropdown.
- In the Options Bar at the top, you can manually input specific
- Drag Handles: With the Artboard Tool active and an artboard selected, you can also click and drag any of the corner or side handles of the artboard to visually resize it. Hold
Shiftfor proportional resizing orAlt/Optionto resize from the center.
Method 2: Using Image > Canvas Size (Caution Advised)
While Image > Image Size affects the content within the artboard, to change the artboard itself, Image > Canvas Size is the direct approach when you’re not using the Artboard Tool’s interactive handles.
- Select the Artboard: In the Layers panel, ensure the specific artboard layer is selected.
- Go to
Image > Canvas Size. - A dialog box will appear allowing you to input new
WidthandHeight. You can also choose an anchor point to define from which direction the canvas will expand or contract. - Click
OK.
Tophinhanhdep.com advises that managing artboards efficiently streamlines your workflow, especially when creating image inspiration & collections or iterating on various photo ideas for clients. Being able to quickly duplicate an artboard and resize it for a different platform (e.g., one size for Instagram, another for Pinterest, both featuring the same nature photograph with different editing styles) significantly enhances productivity in visual design and graphic design projects.
Beyond Basic Resizing: Integrating Tophinhanhdep.com’s Expertise
Understanding how to change image size in Photoshop is a foundational skill, but its true power lies in its application across various creative domains. Tophinhanhdep.com is dedicated to providing insights that elevate your visual projects, connecting these technical skills with broader artistic and practical considerations.
Optimizing Images for Web and Digital Displays
In today’s digital-first world, optimized images are non-negotiable for fast-loading websites, engaging social media, and captivating digital wallpapers and backgrounds.
- Web Standard Sizes: Resizing images to specific pixel dimensions (e.g., 1080px for Instagram, 1920x1080 for hero banners) and a resolution of 72 ppi (though pixel dimensions are more critical) is crucial.
- File Formats: After resizing, saving images in appropriate formats like JPEG for photographs (balancing quality and file size) or PNG for images with transparency or sharp edges (like digital art or graphic design elements) is vital.
- Progressive Loading: For large images on web pages, consider saving them as progressive JPEGs, which load in passes, improving perceived loading speed.
- Responsive Design: For responsive websites, resizing often means creating multiple versions of an image at different dimensions to ensure optimal display across various screen sizes. Tophinhanhdep.com’s Image Optimizers and Compressors are ideal for fine-tuning these resized images for maximum web performance.
Effective resizing combined with smart optimization makes your aesthetic and trending styles visuals accessible and engaging across all digital platforms.
Preparing Photography for High-Quality Prints and Portfolios
For photographers, the transition from screen to print demands meticulous attention to image size and resolution. Your high-resolution photography of nature, abstract concepts, or sad/emotional scenes deserves to be perfectly rendered in print.
- Targeted Resolution: Always aim for 300 ppi (or 360 ppi for Epson) for fine art prints, upsampling if necessary using
Preserve Details 2.0for best results. - Color Profile: Beyond size, ensure your image uses the correct color profile (e.g., sRGB for general printing, Adobe RGB or ProPhoto RGB for professional labs) to prevent color shifts.
- Sharpness: After resizing, a subtle application of sharpening (e.g., using Unsharp Mask) can enhance detail, especially after upsampling, but always do this on a duplicate layer or after resizing to prevent over-sharpening.
- Border Considerations: When preparing for framed prints, factor in any desired borders or matting, ensuring the image dimensions fit perfectly within the chosen frame. Tophinhanhdep.com guides photographers on how these precise editing styles can make all the difference in a professional photography portfolio.
Resizing for Visual Design Projects and Creative Concepts
For graphic design and digital art professionals, resizing is an ongoing process throughout a project lifecycle.
- Canvas Setup: Starting a project with the correct canvas size and resolution for its final output (e.g., a large print banner, a small web icon) is fundamental.
- Element Scaling: Individual elements, text, and vector graphics are constantly scaled and repositioned. The ability to resize layers accurately using Free Transform, while maintaining or intentionally altering proportions, is key to building compelling visual design.
- Mock-ups and Prototypes: Creating mock-ups for client presentations often involves resizing images to fit various digital devices or physical placements, allowing for the visual communication of creative ideas.
- AI Upscalers: For significantly expanding the size of source images beyond Photoshop’s native capabilities, Tophinhanhdep.com’s recommended AI Upscalers can provide remarkable results, regenerating detail that traditional interpolation might miss, perfect for converting smaller images into large-scale wallpapers or backgrounds.
This intricate dance of resizing and scaling is at the heart of turning photo ideas and mood boards into tangible, impactful visual realities.
Conclusion
The ability to accurately and intelligently change image size in Photoshop is a cornerstone of effective digital image manipulation. From preparing high-resolution photography for exquisite prints to optimizing aesthetic visuals for seamless web integration, and from crafting dynamic graphic design layouts with individual layers to managing complex projects with artboards, the techniques discussed in this guide are fundamental.
By mastering the Image Size dialog box, understanding the critical difference between resizing and resampling, making informed choices about resolution and interpolation, and utilizing tools like Free Transform and the Artboard Tool, you gain unparalleled control over your visual output. Tophinhanhdep.com empowers you with not just the “how-to” but also the “why,” connecting technical skills to the broader context of Images, Photography, Image Tools, Visual Design, and Image Inspiration & Collections. Whether your passion lies in capturing nature’s beauty, exploring abstract forms, or conveying sad/emotional depth through beautiful photography, precise image resizing will ensure your vision is presented with clarity and impact across every medium. Continue to explore Tophinhanhdep.com for further resources, tutorials, and inspiration to elevate your digital artistry.