Mastering Image Combination in Photoshop: Your Essential Guide

In the vast and ever-evolving world of digital creativity, the ability to combine images in Photoshop stands as a foundational skill, unlocking an endless realm of possibilities for photographers, graphic designers, and digital artists alike. Whether your goal is to create stunning composite images, build intricate visual narratives, enhance beautiful photography, or simply place two related photos side by side for a compelling visual, Photoshop provides the robust tools necessary to achieve your vision.

At Tophinhanhdep.com, we understand the power of compelling visuals – from breathtaking wallpapers and aesthetic backgrounds to high-resolution stock photos and inspiring digital art. This guide delves deep into the techniques for merging, blending, and seamlessly integrating multiple images, transforming individual photographs into cohesive and impactful visual stories. We’ll explore practical, step-by-step methods that are crucial for anyone looking to master photo manipulation and create truly unique visual designs, drawing inspiration from thematic collections and trending styles.
The techniques covered here are not just for professional photo manipulation; they are invaluable for anyone exploring creative ideas, refining their photography editing styles, or simply making their images more engaging. You might combine serene nature backgrounds with abstract elements, or merge different expressions to convey complex emotions. After mastering the art of combining images, you can then leverage other tools available on Tophinhanhdep.com, such as image compressors, optimizers, and even AI upscalers, to prepare your newly crafted composites for any platform, ensuring they retain their high resolution and visual integrity.

Let’s embark on this journey to transform your individual images into extraordinary visual masterpieces using Adobe Photoshop.
Combining Images Side-by-Side for Dynamic Visuals
Often, the simplest way to combine images is to place them next to each other, creating a comparative or complementary visual. This technique is particularly effective for showcasing photos that share a common subject or theme, enhancing their impact when viewed together. Tophinhanhdep.com recognizes the value of such simple yet powerful compositions, whether for aesthetic backgrounds or showcasing elements of digital photography.
Loading Multiple Images into a Single Document
By default, Photoshop opens each image in its own separate document. However, for any form of image combination, all images must reside within the same Photoshop file. This is where a clever script comes into play, streamlining the initial setup.
To begin:
- Go to File > Scripts > Load Files into Stack.
- In the “Load Layers” dialog box, ensure “Use” is set to Files, then click Browse.
- Navigate to the photos you wish to combine. Select your first image, then press and hold the Shift key and click on the second image to select both. Click Open.
- Back in the “Load Layers” dialog box, you’ll see the names of your selected images. Crucially, leave the options “Attempt to Automatically Align Source Images” and “Create Smart Object after Loading Layers” unchecked for side-by-side placement. Click OK.
Photoshop will now load both images into the same document, with each photo appearing on its own layer in the Layers panel. Initially, they might be stacked on top of each other, meaning only the top layer is visible. Don’t worry; this is expected. You can toggle the visibility of the top layer by clicking its eye icon in the Layers panel to confirm both images are present.
Arranging and Resizing Your Photos
Once both images are in the same document, the next step is to arrange them side-by-side and adjust their scale as needed. This process also often involves expanding the canvas to accommodate the new layout, a fundamental aspect of visual design.
- Select the Move Tool (V) from the toolbar.
- Ensure that Photoshop’s “Snap” and “Snap To Document Bounds” options are enabled. You can check this by going to View > Snap and View > Snap To > Document Bounds. These should have checkmarks next to them. If not, click to enable them.
- In the Layers panel, select the top image layer.
- With the Move Tool active, click on the image in the document window and begin dragging it to the left or right of the visible image. To ensure a perfectly straight drag, press and hold your Shift key as you move the image. You’ll notice the image temporarily disappearing off the canvas – this is fine.
- As you drag closer to the document’s edge, the image will “snap” into place. Release your mouse button, then release the Shift key. The image is now positioned just outside the visible canvas.
- To reveal both images and automatically resize the canvas, go to Image > Reveal All. Photoshop will instantly expand the canvas to fit both images, placing them perfectly side-by-side.
For optimal results when combining photos this way, Tophinhanhdep.com recommends using images that are already in the same orientation (portrait or landscape) and have similar dimensions. If your images need resizing or cropping, it’s best to do this beforehand to maintain high resolution and visual quality.
Swapping Image Placement for Optimal Composition
After arranging your images, you might decide that swapping their positions would create a more impactful or aesthetically pleasing composite. Fortunately, Photoshop makes this adjustment quick and easy.
- Ensure the Move Tool (V) is still selected in the toolbar.
- Go to Select > All to select the entire canvas. A selection outline will appear around the document edges. This step is crucial because the alignment options in the Options Bar (which only become active with the Move Tool and a selection) will use the canvas edges as reference points.
- In the Layers panel, click on the top image layer to select it.
- In the Options Bar (at the top of your Photoshop window, usually below the menu bar), you’ll see alignment icons. If your selected image is on the right and you want to move it to the left, click the Align Left Edges icon. Photoshop will snap the left edge of that image to the left edge of the canvas.
- Now, select the bottom image layer in the Layers panel.
- To move this image to the right, click the Align Right Edges icon in the Options Bar. Photoshop will align its right edge to the canvas’s right edge.
- Finally, to deselect the canvas, go to Select > Deselect, or press Ctrl+D (Win) / Command+D (Mac).
This simple swap allows you to quickly experiment with different compositions, ensuring your side-by-side images from Tophinhanhdep.com’s collections or your personal photography truly shine.
Unleashing Creativity with Layer Masks for Seamless Blending
While placing images side-by-side is straightforward, the true magic of photo manipulation in Photoshop often lies in seamlessly blending elements from different images to create a unified, photorealistic, or fantastical composite. This technique is central to visual design and creating compelling digital art, allowing you to combine nature backgrounds with abstract elements or integrate subjects from beautiful photography into new scenes.
The Power of Layer Masks: Selective Transparency
Layer masks are arguably the most versatile and powerful tool for combining images in Photoshop. Unlike simply adjusting layer opacity (which applies transparency uniformly across an entire layer), layer masks offer granular control over which parts of a layer are visible or hidden, and to what degree. This non-destructive editing method is ideal for creating complex compositions and is a cornerstone of advanced photography editing styles.
Here’s how layer masks work:
- A layer mask is a grayscale image attached to a layer.
- Black areas on the mask hide the corresponding parts of the layer.
- White areas on the mask reveal the corresponding parts of the layer.
- Grayscale tones on the mask create partial transparency, allowing the underlying layers to show through.
To use a layer mask for blending:
- Open Images in Separate Tabs: Start by opening both your background image and the subject image (the one you want to overlay) in separate tabs in Photoshop (File > Open).
- Combine Images into One Document: Select the Move Tool (V). Click on the background layer of your subject image, drag it over the tab of your background image until that tab opens, and then drag it onto the canvas. Hold Shift while releasing the mouse button to center the subject image.
- Scale the Subject (if necessary): If the subject image is incorrectly sized, press Ctrl+T (Win) / Command+T (Mac) to activate the Free Transform tool. Click and drag corner handles to resize, holding Shift to maintain aspect ratio and Alt/Option to resize from the center. Press Enter to apply.
- Add a Layer Mask: With the subject layer selected in the Layers panel, click the Add a Layer Mask icon (a rectangle with a circle inside) at the bottom of the Layers panel. A white thumbnail will appear next to your layer thumbnail, indicating the mask is active and fully revealing the layer.
- Conceal with Black: Select the Brush Tool (B). Ensure your foreground color is set to Black (press D to reset to default black/white, then X to swap if white is foreground). With the layer mask thumbnail selected, paint over the areas of the subject layer you wish to hide. The black brush strokes will reveal the background image beneath.
- Reveal with White: If you make a mistake, simply swap your foreground color to White (press X) and paint over the areas on the mask to reveal parts of the subject layer again.
Refining Edges with Brushes and Gradients
Achieving a truly seamless blend often requires more than just broadly hiding or revealing parts of a layer. It demands precision in refining edges and creating gradual transitions. This is where different brush settings and the gradient tool become invaluable, allowing for nuanced photo manipulation.
-
Using Gradients for Smooth Transitions:
- With the layer mask selected, choose the Gradient Tool (G).
- Ensure your foreground color is black and background color is white.
- In the Options Bar, select a “Foreground to Background” gradient and choose a soft gradient type (e.g., Linear Gradient).
- Click and drag on your image to apply the gradient. Dragging from the area you want hidden towards the area you want revealed will create a smooth fade. This is excellent for blending skies, horizons, or other large areas where a gradual transition is desired.
- Experiment with different gradient styles (Radial, Reflected) and directions to find the best blend for your specific images, whether it’s an abstract composition or a nature scene.
-
Using Brushes for Detailed Edge Work:
- Select the Brush Tool (B).
- Adjust the Size and Hardness of your brush in the Options Bar or by right-clicking on the canvas. For blending, a soft-edged brush (0% Hardness) is almost always preferred to avoid harsh lines.
- Adjust the Opacity and Flow of the brush. For delicate blending, start with a low opacity (e.g., 10-30%) and build up the effect with multiple strokes. This allows for precise control, especially when blending fine details like hair, fur, or complex textures found in beautiful photography.
- Zoom In: For intricate areas (like the feet of an animal in grass, as discussed on Tophinhanhdep.com for creative ideas), zoom in significantly (Ctrl/Command + +) to work with extreme precision.
- Match Background Elements: To make a subject appear grounded, like an elephant standing in tall grass, use a soft black brush on the mask around its feet to subtly hide parts of the subject, making it appear as if the grass is overlapping. For even more realism, you can add brush effects like grass brushes on a new layer (sampling colors from the background grass) to further integrate the subject into the scene. Tophinhanhdep.com offers various digital art brushes and tools that can enhance such details.
By combining the selective control of layer masks with the finesse of brushes and gradients, you can achieve truly seamless and realistic image composites, elevating your photo manipulation skills and contributing to your unique editing styles.
Mastering Blend Modes and Opacity for Artistic Image Merges
Beyond layer masks, Photoshop offers another powerful set of tools for combining images: Blend Modes and Layer Opacity. These features allow you to dictate how the pixels of one layer interact with the pixels of the layers beneath it, opening up a vast array of creative possibilities for visual design and digital art. Tophinhanhdep.com encourages experimentation with these tools to create unique aesthetic compositions.
Leveraging Layer Opacity for Faded Effects
Layer Opacity is the simplest way to introduce transparency into a layer. While not as selective as a layer mask, it’s incredibly effective for creating subtle overlays, faded effects, or ghosting.
- Setup Layers: Ensure your two (or more) images are in the same Photoshop document, each on its own layer, as described in previous sections. The image you want to make transparent should be on the top layer.
- Adjust Opacity: In the Layers panel, with the top layer selected, locate the Opacity slider at the top right. This slider ranges from 0% (completely transparent) to 100% (fully opaque).
- Create Faded Effects: Drag the Opacity slider to the left to reduce the transparency of the top layer. As you decrease the opacity, the underlying image will become increasingly visible. This is perfect for subtle textures, watermarks, or ghost-like effects often seen in abstract and aesthetic images.
The beauty of Opacity is its simplicity, providing quick adjustments to overall layer visibility. This can be combined with other techniques to build complex visual designs.
Exploring Photoshop’s Diverse Blend Modes
Blend Modes are where the artistic magic truly happens. They change the way colors and tones from one layer interact with those of the layers below it, based on mathematical algorithms. Photoshop offers dozens of blend modes, categorized by their effect:
- Normal: No blending, only opacity affects visibility.
- Darken, Multiply, Color Burn, Linear Burn, Darker Color: These modes darken the composite image, useful for integrating shadows or creating dramatic mood boards.
- Lighten, Screen, Color Dodge, Linear Dodge (Add), Lighter Color: These modes lighten the composite, perfect for adding highlights, glows, or creating ethereal effects.
- Overlay, Soft Light, Hard Light, Vivid Light, Linear Light, Pin Light, Hard Mix: These are contrast-enhancing modes, blending based on the lightness or darkness of the pixels. They are excellent for adding textures, enhancing mood, or integrating subtle light effects into beautiful photography.
- Difference, Exclusion, Subtract, Divide: These modes create more extreme, often abstract, visual effects by comparing pixel values.
- Hue, Saturation, Color, Luminosity: These modes transfer specific color attributes from the blending layer to the base layer, ideal for color grading, tinting, or harmonizing colors across different images.
To use Blend Modes:
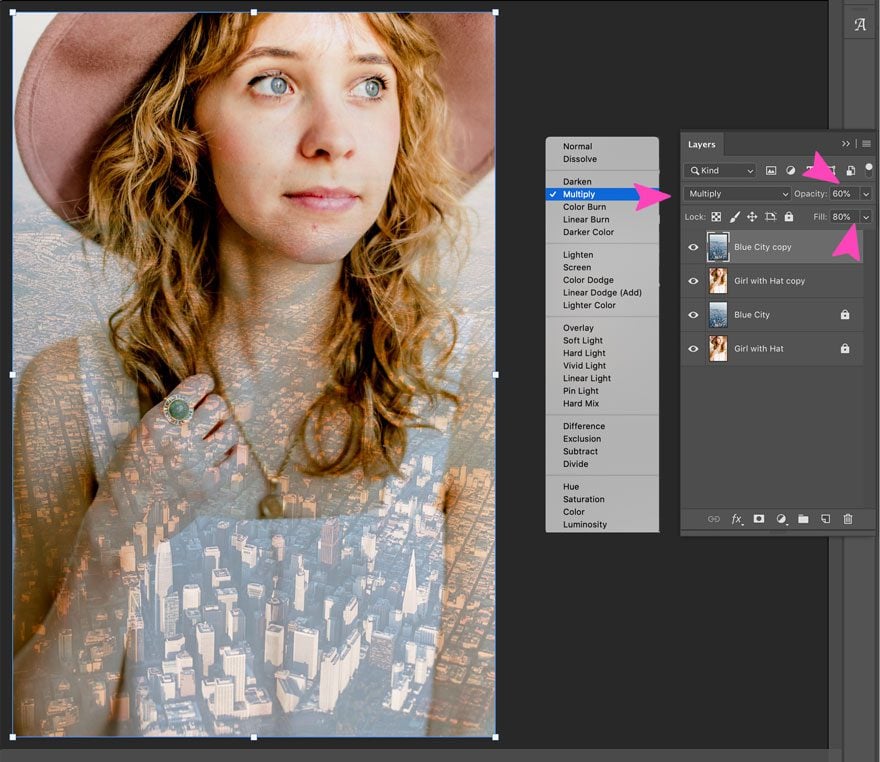
- Select Layer: In the Layers panel, select the top layer (the one you want to blend).
- Choose Blend Mode: Click on the drop-down menu in the Layers panel, which usually says “Normal” by default. This will reveal the full list of blend modes.
- Experiment: Click through different blend modes to see how they affect your composite. The visual result will change dramatically with each selection. For a quicker workflow, ensure the Move Tool is active, then hold Shift and press the + or – keys on your keyboard to cycle through the blend modes.
Combining Blend Modes with Opacity: The real power emerges when you combine a blend mode with an adjusted opacity. For instance, using a “Multiply” blend mode with 50% opacity can create a softer shadow effect, while “Screen” with 70% opacity can introduce a gentle glow. Tophinhanhdep.com encourages artists to experiment endlessly with these combinations to develop their unique creative ideas and editing styles.
Remember, you can also apply blend modes and opacity to multiple layers, building complex layered compositions. This allows for intricate visual design, transforming individual stock photos or wallpapers into a cohesive piece of digital art.
Achieving Photorealistic Composites Through Color and Tone Matching
One of the greatest challenges in combining images in Photoshop is ensuring that all elements appear to belong to the same scene. This often hinges on perfectly matching the colors, tones, and lighting conditions of the source images. A poorly matched composite immediately breaks the illusion of realism, regardless of how expertly the edges are blended. Tophinhanhdep.com emphasizes that attention to these details is what separates good photo manipulation from truly exceptional digital art.
Synchronizing Colors with Match Color Adjustment
Photoshop’s “Match Color” adjustment is a powerful tool for quickly harmonizing the color palette of a subject layer with its background. This can significantly reduce the visual discrepancy between images originating from different lighting environments or cameras.
- Select Subject Layer: In the Layers panel, select the thumbnail of your subject image layer (make sure the layer mask, if present, is not selected, but rather the image thumbnail itself).
- Access Match Color: Go to Image > Adjustments > Match Color.
- Define Source: In the “Match Color” dialog box, at the bottom under “Image Options”:
- Set the Source drop-down menu to the name of your current Photoshop document (where both images are combined).
- Set the Layer drop-down menu to your background layer (the layer whose colors you want to match).
- Observe and Adjust: As soon as you select the background layer as the source, Photoshop will automatically attempt to match the colors of your subject layer to it. Often, this initial match can be too intense.
- Refine with Sliders: The most critical slider for fine-tuning is Fade. Dragging this slider to the right will reduce the intensity of the color matching effect, allowing you to find a natural balance. You can also experiment with the Luminance (overall brightness) and Color Intensity sliders to further refine the match.
- Click OK to apply the changes.
The “Match Color” adjustment is an excellent starting point for color harmonization, especially for beginners. It works well for a wide range of images, from nature backgrounds to abstract compositions, ensuring a more cohesive visual design.
Fine-Tuning with Curves and Solid Color Adjustment Layers
While “Match Color” provides a good foundation, achieving true photorealism or a specific aesthetic often requires more granular control over tones and colors. This is where Curves and Solid Color adjustment layers become indispensable, offering non-destructive ways to manipulate image characteristics. These tools are vital for advanced photography editing styles and creating unique visual art.
Using Curves Adjustment Layer for Tonal Balance:
Curves adjustment layers allow you to precisely control the tonal range of an image, from shadows to highlights, and manipulate individual color channels (Red, Green, Blue). This is crucial for matching the lighting and contrast between combined images.
- Add Curves Adjustment Layer: Click the Adjustment Layer icon (a half-filled circle) at the bottom of the Layers panel and select Curves.
- Clip to Subject Layer: To ensure the Curves adjustment only affects your subject layer and not the entire composite, click the Clipping Mask icon (a square with a downward-pointing arrow) in the Properties panel of the Curves layer. This will “clip” the adjustment to the layer directly below it.
- Adjust Tonal Ranges: In the Curves Properties panel, you’ll see a graph. Dragging points along this curve allows you to:
- Shadows: Adjust the lower-left part of the curve.
- Midtones: Adjust the middle of the curve.
- Highlights: Adjust the upper-right part of the curve.
- You can also select individual color channels (Red, Green, Blue) from the drop-down menu to fine-tune color balance. For instance, if your subject looks too cool compared to a warm background, you might boost the Red channel in the midtones.
- Carefully adjust the curve to match the lighting and contrast of your subject to the background. Pay close attention to how shadows fall and how highlights shine, contributing to the overall aesthetic and realism of your beautiful photography.
Using Solid Color Adjustment Layer for Mood and Cohesion:
A Solid Color adjustment layer, combined with blend modes and opacity, is a fantastic way to introduce a unified color cast or mood to your composite, further blending the elements into a single scene or applying a specific trending style.
- Add Solid Color Adjustment Layer: Click the Adjustment Layer icon at the bottom of the Layers panel and select Solid Color.
- Choose a Color: In the Color Picker, select a color that complements or harmonizes with your background, or one that conveys the desired mood (e.g., warm reds/oranges for a sunset, cool blues/purples for a nocturnal scene). Click OK. The entire canvas will be filled with this color.
- Change Blend Mode: In the Layers panel, with the Solid Color layer selected, change its Blend Mode (from “Normal”) to Color. This mode will apply only the hue and saturation of the solid color, preserving the luminosity of the underlying layers.
- Adjust Opacity: Reduce the Opacity of the Solid Color layer to a lower percentage (e.g., 10-30%) until the color cast subtly blends into the composite, unifying the separate images.
- Refine with Mask: For even more control, use the Solid Color layer’s mask (it’s automatically created). Select the mask thumbnail, pick a soft black brush, and paint over areas where you want to reduce or remove the color cast (e.g., to bring out original warm tones in specific areas of a nature background). Adjust the brush’s opacity to paint with varying intensities.
By combining these powerful adjustment layers, you gain unparalleled control over the final look of your composite. This meticulous attention to color and tone is what truly elevates image combination into a refined art form, allowing you to create high-resolution digital photography that looks utterly seamless and utterly captivating. These techniques are fundamental for anyone engaged in serious photo manipulation, striving for creative ideas that truly resonate with an audience seeking visual inspiration and thematic collections on Tophinhanhdep.com.
Final Thoughts on Creative Compositing
The journey of combining images in Photoshop is one of continuous learning and boundless creative exploration. From simple side-by-side displays to intricate photorealistic blends, each technique offers a unique pathway to transforming individual images into captivating visual narratives. Tophinhanhdep.com is dedicated to providing inspiration and tools for all your visual needs, whether you’re looking for stunning wallpapers, aesthetic backgrounds, or the latest trends in digital art and beautiful photography.
Mastering layer masks, blend modes, and color adjustments is not merely about technical proficiency; it’s about developing an artistic eye, understanding light, shadow, and color harmony, and bringing your creative ideas to life. Experimentation is key – don’t be afraid to try different combinations, push boundaries, and discover your unique photography editing styles.
After crafting your masterpiece in Photoshop, remember that Tophinhanhdep.com offers a suite of image tools, including converters, compressors, optimizers, and AI upscalers, to ensure your high-resolution images are perfectly prepared for any use. Dive into the world of visual design, unleash your imagination, and let your combined images tell stories that inspire and captivate. The tools are at your fingertips; the only limit is your creativity.