How Do You Compress an Image? Unlocking Efficiency and Visual Appeal for Digital Content

In our increasingly visual digital world, images are paramount. From stunning wallpapers and aesthetic backgrounds to captivating nature shots, abstract art, sad/emotional imagery, and beautiful photography, visuals communicate messages, evoke emotions, and enhance user experiences. Digital photography has empowered everyone to capture high-resolution moments, and stock photo libraries offer an endless supply of visual assets. However, the sheer size of these high-quality images often presents a significant challenge: while they look incredible, large files can cripple website loading speeds, clog inboxes, and consume valuable storage space. This is where image compression becomes an indispensable skill, transforming bulky files into lean, optimized assets without noticeably sacrificing visual integrity.
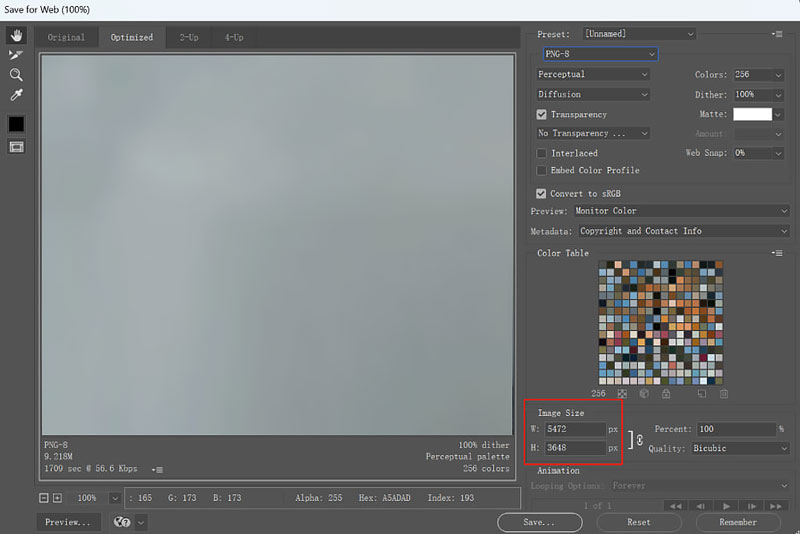
Image compression is the art and science of reducing the file size of an image, finding that delicate balance between visual quality and data efficiency. For creators, photographers, and designers, understanding how to compress photos is not just a technicality; it’s a critical component of effective visual design and digital content management. Whether you’re optimizing images for a graphic design project, preparing high-resolution photos for online galleries, or simply sharing personal snapshots, mastering compression techniques ensures your visuals load quickly, display beautifully, and perform optimally across all platforms. At Tophinhanhdep.com, we understand the importance of vibrant, efficient imagery in everything from thematic collections to trending styles, which is why we champion accessible and effective image compression strategies.
The Fundamental Principles of Image Compression
To effectively compress an image, it’s crucial to understand the underlying mechanisms that allow digital images to shrink in size. These mechanisms fall into two primary categories: lossy and lossless compression. Each has distinct characteristics, offering different trade-offs between file size reduction and image quality.
Lossy Compression: Strategic Data Reduction
Lossy compression methods are designed to significantly reduce file size by intelligently discarding certain “non-essential” data from the original image. The term “lossy” indicates that some of the original information is permanently removed, meaning the compressed image will never be an exact replica of the original. However, the goal of lossy compression is to remove data in a way that is least perceptible to the human eye, striving for a balance where the quality difference is negligible for most practical purposes.
This type of compression is particularly effective for complex photographic images, such as nature scenes, beautiful photography, or aesthetic wallpapers, where slight variations in color or detail might not be noticed. Techniques like chroma subsampling take advantage of human eye physiology, which perceives changes in brightness more acutely than changes in color. Transform encoding, often used in JPEG, averages out colors into small blocks, reducing the total number of distinct shades. The higher the compression ratio, the more data is removed, leading to a smaller file but a greater potential for noticeable artifacts like pixelization or blockiness. Despite the irreversible quality loss, lossy compression is a cornerstone for web images, emails, and any scenario where file size and loading speed are prioritized over absolute pixel-for-pixel fidelity.
Lossless Compression: Preserving Every Detail
In contrast, lossless compression aims to reduce file size without discarding any data from the original image. It achieves this by identifying and eliminating redundant information, essentially repackaging the image data more efficiently. When a lossless compressed image is decompressed, it is perfectly reconstructed, identical to the original. This makes it the preferred method for applications where data integrity is paramount.
Lossless compression is often employed for images used in professional digital photography, graphic design elements like logos, digital art, or any visual asset that might undergo future editing. For example, if you’re creating abstract art or detailed photo manipulations, preserving the original quality is crucial. Common lossless formats include run-length encoding for simple graphics with long streams of identical data, and DEFLATE, which is widely used for PNG images and in general-purpose compression methods like Gzip and ZIP. Limpel-Ziv-Welch (LZW) is another lossless algorithm found in GIF and TIFF formats, performing limited data analysis to achieve compression. While lossless compression offers less dramatic file size reductions compared to its lossy counterpart, its ability to maintain perfect image fidelity makes it invaluable for archival purposes and high-quality source material.
Navigating Image Formats for Optimal Results
Choosing the right image format is as important as the compression method itself. Each format is designed with specific characteristics, making it more suitable for certain types of images and uses. Understanding these formats is key to achieving the best balance of quality and file size for your visual content.
JPEG: The Standard for Photographic Images
The Joint Photographic Experts Group (JPEG) format is perhaps the most ubiquitous lossy compression format, dominating the landscape for digital photography. Its strength lies in its ability to compress complex images with millions of colors, such as high-resolution stock photos, scenic nature shots, or vibrant beautiful photography, into relatively small files. JPEG offers a significant degree of control over the compression level; users can adjust a “quality” slider to determine how much data is discarded. A quality setting of 80% often provides a good balance between visual quality and file size for web use. However, aggressive compression can lead to visible artifacts, such as blockiness or color banding, particularly in areas of subtle color gradients or sharp contrasts. Despite this, JPEG remains the go-to for wallpapers, backgrounds, and any image where rich color depth and photographic detail are essential, especially for web optimization.
PNG & GIF: Ideal for Graphics and Transparency
The Portable Network Graphics (PNG) format stands out as the most popular lossless compression format, specifically developed to overcome the limitations of GIF. PNG excels in handling images with sharp edges, areas of uniform color, and most notably, transparency. This makes it ideal for graphic design elements, such as logos, icons, abstract designs, or images with text overlays, where clarity and precise edges are crucial. While PNG offers superior quality retention and transparency support compared to JPEG, its lossless nature means that complex photographic images will typically result in larger file sizes than their JPEG equivalents.
The Graphics Interchange Format (GIF) supports 8-bits per pixel, limiting images to a palette of 256 colors. While this color limitation makes it less suitable for high-quality photography, GIF remains popular primarily for its ability to support simple animations. For small, low-color animations or icons, GIF is an efficient choice, but for detailed visual content, PNG or JPEG are generally preferred.
Modern Formats: WebP and HEIC for Next-Gen Optimization
As digital demands evolve, newer image formats have emerged, offering even greater compression efficiency. WebP, developed by Google, is a modern format that boasts superior lossy and lossless compression capabilities compared to older formats like JPEG and PNG. It supports transparency and animation, making it a versatile option for nearly all types of web imagery, from wallpapers to digital art. While browser support for WebP has steadily increased, ensuring universal compatibility might sometimes require fallback options. Integrating WebP can significantly enhance web performance, a key factor for any online platform showcasing image collections or photo ideas.
HEIC (High-Efficiency Image Container) is Apple’s proprietary format, introduced with iOS 11. It leverages advanced compression techniques to store high-quality images in significantly smaller files than JPEG, without a noticeable loss in visual fidelity. HEIC is particularly beneficial for iPhone users looking to free up storage space for their vast collections of personal photography. While its primary ecosystem is Apple, tools exist to convert HEIC to more universally compatible formats when sharing or uploading to non-Apple platforms. Both WebP and HEIC represent the forefront of image compression technology, enabling even richer visual experiences with greater efficiency.
Practical Tools and Methods for Image Compression
Once you understand the principles and formats, the next step is to apply these concepts using practical tools. Whether you prefer the convenience of online services, the control of desktop software, or integrated workflow solutions, Tophinhanhdep.com and similar platforms offer a range of options for compressing your images.
Online Compression Services: Instant Solutions
For quick, hassle-free image compression, online tools are often the most accessible option. Platforms like Tophinhanhdep.com’s dedicated image compressor allow users to reduce file sizes directly from their web browser, without the need for software installation. The process is typically straightforward:
- Upload: Select one or multiple images (JPEG, PNG, GIF, WebP, HEIC, etc.) from your computer. Many services support batch processing, allowing you to compress up to 20 images at once.
- Adjust Quality: Most online compressors provide a “quality” slider. Dragging this slider allows you to intuitively control the level of compression. You can preview the image side-by-side to see the trade-off between file size and visual quality. This is particularly useful for optimizing wallpapers or backgrounds where slight quality adjustments might not be noticeable.
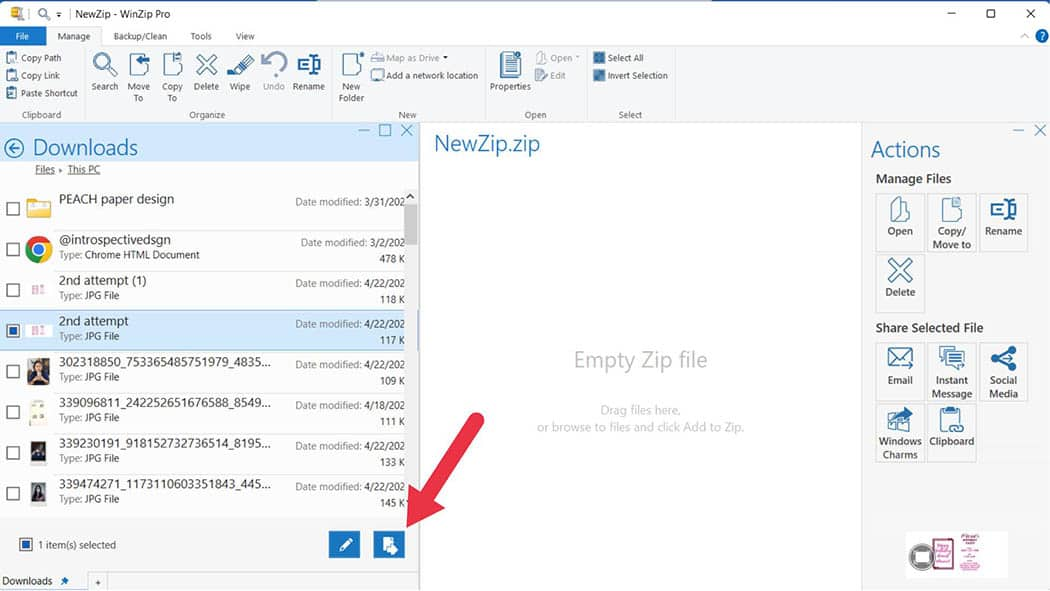
- Download: Once satisfied, you can download the compressed images, often packaged into a convenient ZIP folder.
These tools are excellent for general use, preparing images for emails, social media, or basic website uploads. However, for sensitive high-resolution photography or large thematic collections, always consider privacy implications when uploading files to third-party servers.
Desktop Applications: Built-in and Professional Options
For more control, offline capabilities, or processing large volumes of high-resolution images, desktop applications offer robust solutions.
On Windows (Photos App)
Windows includes built-in functionality for basic image compression. The Photos app, for instance, allows users to resize images to smaller predefined sizes.
- Open Photo: Double-click to open your image in the Photos app.
- Resize Option: Look for a “Resize” or “Export” option within the menu (often accessible via “⋯”).
- Select Size: Choose from predefined sizes (e.g., S for small, M for medium). This typically scales down the image dimensions and applies some compression.
- Save As: Save the compressed version with a new file name to avoid overwriting your original. While convenient, the Photos app offers less granular control over compression quality compared to other tools.
On Mac (Preview App, Photos App, Quick Actions)
Mac users have several powerful built-in options for image compression:
- Preview App: This versatile tool allows for both single and batch compression.
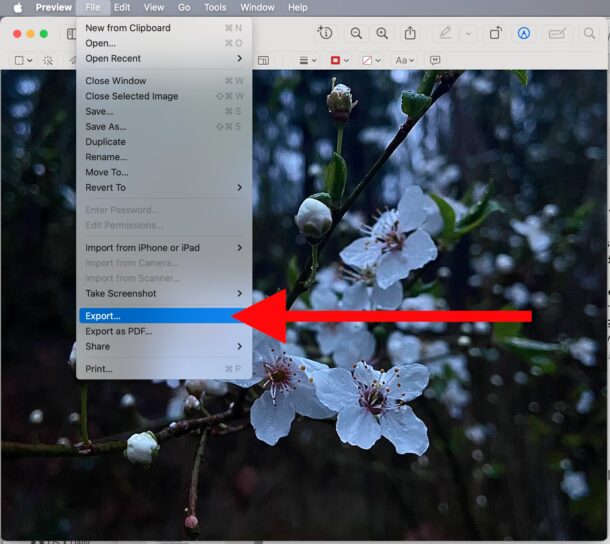
- Compress One Image: Open the image in Preview, go to File > Export, then adjust the “Quality” slider (for JPEG) or change the format.
- Batch Compress: Select multiple images in Finder, right-click and choose “Open With > Preview.” Then select all thumbnails in the sidebar (Command + A), go to File > Export Selected Images, and adjust settings as desired.
- Photos App: Similar to Windows, the Photos app on Mac lets you export images with various compression settings.
- Export Options: Select photos, then go to File > Export > Export Photos. You can then choose the “Photo Kind” (format), “Quality,” and “Size” to compress your images.
- Finder Quick Actions: For quick, on-the-fly compression (macOS Monterey and later), right-click on an image (or multiple images) in Finder, choose “Quick Actions > Convert Image,” select a target format (like JPEG), and choose an image size (Small, Medium, Large). This is exceptionally fast for common tasks. These Mac tools provide excellent balance between ease of use and control, making them ideal for managing personal photos, backgrounds, and general visual design assets.
Professional Photo Editing Software (e.g., Tophinhanhdep.com’s integrated editor)
For professional digital photography, graphic design, and photo manipulation, advanced image editors offer the highest level of control. Using a tool like Tophinhanhdep.com’s integrated editor, or any professional photo editing software:
- Open Image: Load your high-resolution photo or digital art piece.
- “Save for Web” / “Export As”: Access dedicated export functions, often labeled “Save for Web (Legacy)” or “Export As.”
- Fine-tune Settings: Here, you can precisely control the output format (JPEG, PNG, WebP), compression quality, image dimensions, color space, and even remove metadata. This allows for tailored optimization for specific platforms or client requirements, ensuring your creative ideas are presented optimally.
Specialized Tools for Workflow Integration
Beyond general-purpose applications, specialized tools and plugins cater to specific workflows:
- CMS Plugins: For websites built on content management systems like WordPress, plugins (e.g., Optimus) can automatically optimize images upon upload, converting them to efficient formats like WebP. This streamlines image management for large collections of wallpapers, thematic content, or trending styles.
- Batch Processors & Command-line Tools: Dedicated image optimizers (e.g., Image_optim, or similar tools available through Tophinhanhdep.com) can process entire folders of images with pre-defined settings, ideal for managing large archives of stock photos or digital art. Command-line tools offer advanced users unparalleled automation capabilities.
- Image Converters & Upscalers: Tophinhanhdep.com also offers Image Tools like Converters to change formats and AI Upscalers to enhance resolution, helping to mitigate perceived quality loss after compression or prepare images for various uses.
Mastering Compression for Specific Applications
The “best” way to compress an image isn’t universal; it depends heavily on its intended use. Different applications have unique requirements, and tailoring your compression strategy can significantly impact performance and visual appeal.
Enhancing Web Performance and User Experience
For any image displayed on a website, whether it’s a stunning nature wallpaper, an aesthetic background, or a high-resolution stock photo, web performance is paramount. Large image files are often the biggest culprit behind slow page loading times, which can deter visitors and negatively impact search engine rankings.
- Matching Dimensions: An expert tip from professional photographers is to always size your image to the exact dimensions the website or display area requires. Uploading a 4000px wide image into a 800px wide display slot is inefficient; the browser will still download the larger file and then scale it down, wasting bandwidth and time. Tophinhanhdep.com’s “Resize Image” tool can help with this.
- Optimal Compression: Use appropriate lossy compression (JPEG for photos, WebP for mixed content) with a quality setting that maintains visual appeal without excessive file size. Tools like Tophinhanhdep.com’s compressor allow fine-tuning for this balance.
- Lazy Loading & CDN: Implement lazy loading for images (loading them only when they enter the viewport) and consider using a Content Delivery Network (CDN) to serve images faster to users globally.
Efficient Sharing for Email and Social Media
Sharing images via email or messaging apps requires careful compression to avoid long upload/download times and exceeding file size limits.
- Email Attachments: For emailing, reduce images to a “medium” or “large” setting. Many email clients, including phone-based Mail apps, offer to compress images upon sending. Tophinhanhdep.com’s compressor is excellent for preparing batches of photos for email.
- Social Media: Social platforms often apply their own compression, which can sometimes degrade image quality. To mitigate this, consider pre-compressing your images to the platform’s recommended dimensions and a moderately high quality (e.g., JPEG at 70-80% quality) before uploading. This gives you more control over the final look of your aesthetic or beautiful photography, ensuring your photo ideas retain their impact.
Maintaining Quality for Professional Photography and Graphic Design
For digital photography, graphic design, and photo manipulation, maintaining image quality is often the highest priority, especially for high-resolution images and creative ideas that may involve future editing.
- Master Files: Always preserve original high-resolution files (e.g., RAW, TIFF, or highest quality JPEG) as “master” copies. These uncompressed or minimally compressed versions are your source for all future projects.
- Client Deliverables: When delivering images to clients, provide versions specifically optimized for their intended use (e.g., web-optimized JPEGs for online galleries, high-quality TIFFs or print-ready JPEGs for printing).
- Editing Styles & Mood Boards: For creating mood boards or experimenting with different editing styles, start with high-quality source images. Apply compression only at the final export stage, once all creative adjustments and photo manipulations are complete.
- Tophinhanhdep.com’s Tools: Leverage Tophinhanhdep.com’s suite of tools, including AI Upscalers, to enhance details or converters to adapt formats, ensuring your images meet diverse professional needs. Our “Image-to-Text” feature can also be useful for cataloging extensive collections.
The Inevitable Trade-off: Balancing Quality and File Size
A crucial warning reverberates across all discussions of image compression: compressing a photo, especially using lossy methods, inherently involves removing pixels and data. This results in a loss of quality, and once a photo has been compressed in a lossy manner, there is no way to perfectly scale back up to its original, uncompressed quality. The goal is not to achieve absolute pixel perfection in every compressed image, but rather to strike an optimal balance where the reduction in file size is significant, and the loss of quality is either imperceptible to the human eye or acceptable for the image’s specific purpose.
Think of it as creating an efficient version of your image. For high-resolution photography meant for print, you’ll opt for minimal compression or lossless formats. For a web background or a social media post showcasing a trending style, a moderately compressed JPEG or WebP will suffice, prioritizing loading speed. While Tophinhanhdep.com offers advanced tools like AI Upscalers that can intelligently add detail and increase resolution, these do not “uncompress” an image. Instead, they use artificial intelligence to extrapolate and generate new pixel information, effectively creating a higher-resolution version, but not restoring the original data that was discarded during lossy compression.
Therefore, a fundamental principle for anyone working with digital visuals is to always retain a master copy of your original, high-resolution images. This ensures you have an uncompromised source file for any future needs, allowing you the flexibility to re-compress for different applications without starting from a degraded source. Mastering this trade-off is central to becoming a proficient digital content creator and photographer.
In conclusion, understanding how to compress an image is a vital skill in the digital age. It’s the key to unlocking efficient digital content management, facilitating faster sharing, and ensuring your visual design elements maintain their impact. By grasping the distinctions between lossy and lossless compression, wisely selecting appropriate image formats like JPEG, PNG, WebP, or HEIC, and utilizing a range of practical tools—from online compressors to desktop applications and specialized software—you can optimize your images for any platform or purpose. Always remember the inherent trade-off between quality and file size, and prioritize keeping original high-resolution files. Explore Tophinhanhdep.com’s comprehensive suite of image tools to find the perfect solution for your wallpapers, backgrounds, aesthetic shots, nature photography, abstract art, high-resolution stock photos, and all your creative visual endeavors. Mastering image compression is not just about making files smaller; it’s about making your digital world better.