How to Crop an Image in Adobe Illustrator: A Comprehensive Guide for Visual Designers

In the dynamic world of visual content creation, the ability to precisely manipulate and refine images is paramount. Whether you’re crafting stunning wallpapers, designing captivating backgrounds, curating aesthetic collections, or preparing high-resolution stock photos for various applications, cropping images is an indispensable skill. While many everyday tools like Microsoft PowerPoint or Canva offer rudimentary cropping functionalities, professional-grade software such as Adobe Illustrator provides a versatile suite of methods tailored to the sophisticated needs of graphic designers, digital artists, and photographers. For users accustomed to other image editing platforms, knowing “how to crop an image in Illustrator” might seem like a nuanced topic, especially considering its historical evolution. However, modern Illustrator versions, and even older ones with clever workarounds, offer multiple intuitive ways to achieve impeccable results, aligning perfectly with the diverse image and visual design needs championed by Tophinhanhdep.com.

This comprehensive guide will demystify the art of cropping in Adobe Illustrator, outlining three primary methods—the dedicated Crop Image function, the flexible Clipping Mask, and the artistic Opacity Mask—along with a practical approach using Artboards for export. Each technique offers distinct advantages, catering to different design requirements, from simple rectangular cuts on your beautiful photography to intricate shape-based crops for abstract compositions. By mastering these approaches, you’ll elevate your photo manipulation skills, streamline your workflow, and unlock new creative ideas for all your visual projects.
The Essentials of Image Cropping in Adobe Illustrator
Cropping in Adobe Illustrator extends far beyond merely cutting off unwanted edges; it’s a fundamental aspect of visual composition and digital artistry. For anyone working with images—be it nature photography, emotional landscapes, or compelling abstract designs—cropping defines focus, refines aesthetic appeal, and prepares visuals for their intended context. On Tophinhanhdep.com, where high-resolution images, diverse backgrounds, and inspiring visual design are key, understanding Illustrator’s cropping mechanisms is vital for anyone aiming to produce polished and professional-grade content.
Historically, Illustrator was predominantly a vector editing program, meaning its strengths lay in scalable graphics rather than raster image manipulation. This led many designers to use Adobe Photoshop for raster image cropping before importing into Illustrator. However, recognizing the integrated nature of modern design workflows, Adobe has significantly enhanced Illustrator’s capabilities. Newer versions (CC 2017 and above) introduced a dedicated “Crop Image” tool, while older versions still benefit from powerful, non-destructive methods like clipping and opacity masks. The core distinction often lies in whether you’re working with a raster image (pixel-based, like .jpg, .png) or a vector graphic (path-based, infinitely scalable). While the Crop Image tool is exclusively for raster images, clipping and opacity masks are versatile enough for both, offering unparalleled flexibility in graphic design and photo manipulation.
When you import an image into Illustrator, it can be either linked or embedded. A linked image references an external file, keeping your Illustrator document size smaller. An embedded image is directly contained within the Illustrator file, making the document self-contained. When you use the “Crop Image” function, linked images will be automatically embedded, ensuring the cropped version is part of your project while the original file on your computer remains untouched. This distinction is crucial for understanding how Illustrator handles your valuable image assets, whether they are stock photos or personal beautiful photography.
Mastering Basic Rectangular Crops: The ‘Crop Image’ Function
For quick, straightforward rectangular or square crops, the “Crop Image” function introduced in Adobe Illustrator CC 2017 and later is your go-to tool. This method is exceptionally efficient for tasks like fitting high-resolution images into specific layout dimensions, trimming aesthetic backgrounds, or precisely framing elements within your nature photography. It’s designed specifically for raster images—such as JPEG, PNG, or rasterized EPS files—and provides a direct, visually interactive way to define your desired image area.
Step-by-Step Guide to the Crop Image Tool (Illustrator CC 2017+)
This function streamlines the process by offering an intuitive interface to reshape your image boundaries. Here’s how to use it:
- Prepare Your Image: Begin by opening your Adobe Illustrator project. If your image isn’t already in the document, go to File > Place (or Shift + Command/Ctrl + P), select your image file (.jpg, .png, etc.), and click Place. Then, click on your artboard to position the image.
- Select the Image: Using the Selection Tool (the black arrow icon in the toolbar, or press V on your keyboard), click on the raster image you wish to crop. A bounding box will appear around it.
- Activate the Crop Function: With the image selected, locate the “Crop Image” button in the Control Panel at the top of your screen, just below the menu bar. Alternatively, you can go to Object > Crop Image from the top menu.
- Confirm Embedding: If your image was linked, a prompt might appear, informing you that cropping will embed a copy of the image. Click OK to proceed. It’s important to remember that while the image within your Illustrator file will be cropped, your original source file on your desktop remains unaltered.
- Adjust the Cropping Area: Once activated, a bounding box with adjustable handles (corners and sides) will appear around your image, often with black dotted lines. Click and drag these handles to define the desired cropping area. The lighter, transparent area outside the dotted box indicates what will be removed.
- Apply the Crop: After you’ve positioned the cropping box to your satisfaction, click the “Apply” button (often a checkmark icon or labeled “Apply”) in the Control Panel or press Enter/Return. Your image will instantly be cropped to the defined area, leaving only your selected content visible on the artboard.
This method offers a fast and straightforward way to handle precise cuts, making it ideal for standard photo editing needs and ensuring your image collections maintain a consistent editing style.
Resizing and Positioning for Optimal Composition
Before applying the final crop, effective visual design often requires preliminary adjustments to the image’s size and position within your artboard. This ensures that the elements you wish to retain are perfectly framed and that the overall composition adheres to your creative ideas.
- Initial Image Sizing: If your image is too large or too small for your intended canvas, use the Selection Tool (V) to click on it. Then, hover your cursor over one of the corner handles of the bounding box. Press and hold the Shift key while dragging inwards or outwards to resize the image proportionally. This prevents distortion and maintains the integrity of your high-resolution photography.
- Repositioning: To move the image around the artboard, simply click and drag it with the Selection Tool until the desired area is visible and framed appropriately for your crop.
- Considering Compositional Rules: As you resize and position, think about principles of photography and visual design like the rule of thirds, leading lines, or negative space. These considerations ensure that even a simple crop enhances the visual impact of your wallpapers, backgrounds, or stock photos. For instance, if you’re cropping a beautiful photograph of nature, you might want to adjust its size to emphasize a particular element like a distant mountain or a vibrant flower, making it a compelling aesthetic image.
By taking these preliminary steps, you can set up your image perfectly before executing the crop, achieving optimal results that align with Tophinhanhdep.com’s focus on quality visual content.
Creative Cropping with Precision: Utilizing Clipping Masks
When your creative vision calls for more than just a rectangular cut, or when you need to maintain the flexibility to adjust your crop later, the Clipping Mask technique in Adobe Illustrator becomes invaluable. This method allows you to crop images and vector graphics into any conceivable shape – circles, stars, custom hand-drawn paths, or complex geometric designs. It’s an essential tool for digital art, intricate photo manipulation, and creating truly unique image collections, offering a non-destructive approach to image transformation.
Shaping Your Vision: Clipping Masks for Irregular Forms
The power of a clipping mask lies in its ability to use any vector shape as a “window” through which your underlying artwork is viewed. Anything outside this shape is hidden, not deleted, preserving your original image data. This is particularly useful for aesthetic designs or abstract compositions where dynamic, non-standard frames are desired.
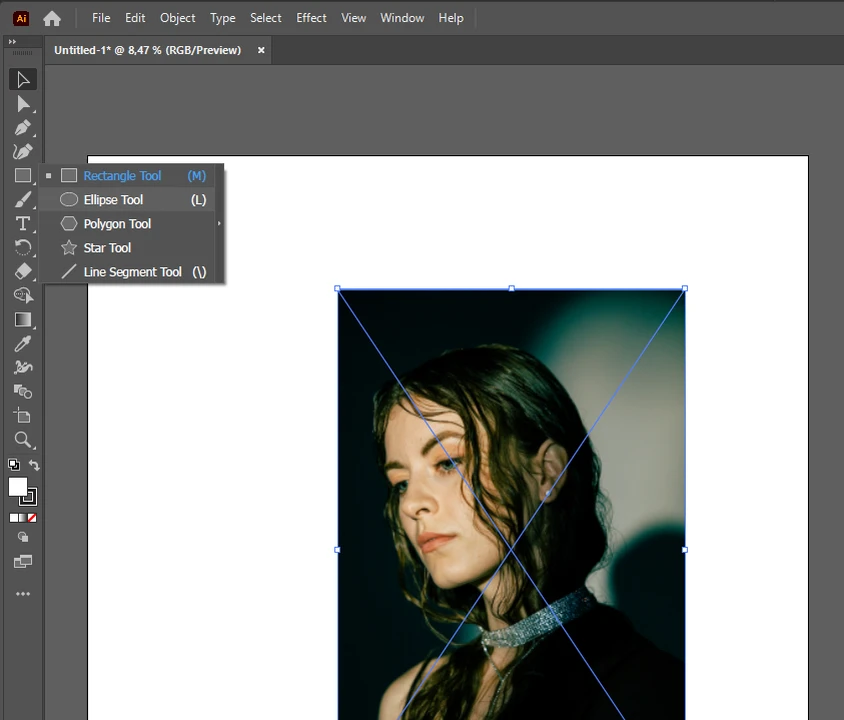
- Prepare Your Artwork: First, ensure you have your raster image (e.g., a high-resolution photograph or a stock photo) or vector graphic positioned on your artboard.
- Create Your Masking Shape: Select a shape tool (e.g., Rectangle Tool (M), Ellipse Tool (L)) from the toolbar, or use the Pen Tool (P) to draw a custom, irregular shape. This shape will define your crop. Draw this shape directly on top of the area of the image or graphic you wish to keep. Crucially, the masking shape must be a closed path.
- Pro Tip: To easily see the underlying image while drawing your mask, you can remove the fill color from your masking shape and apply a visible stroke color instead.
- Position the Mask: Ensure that your masking shape is on a layer above the image or graphic you intend to crop. If it’s not, select the shape, go to Object > Arrange > Bring to Front.
- Select Both Elements: Use the Selection Tool (V) to select both your image/graphic and the masking shape. You can do this by clicking on the image, holding down Shift, and then clicking on the shape, or by drawing a selection marquee around both.
- Create the Clipping Mask: With both objects selected, navigate to the top menu bar and click Object > Clipping Mask > Make. Alternatively, use the keyboard shortcut Command + 7 (Mac) or Control + 7 (Windows).
Instantly, your image will be “cropped” into the shape of your vector mask. The beauty of this method is its non-destructive nature: you can always release the clipping mask (Object > Clipping Mask > Release) to reveal the full original image, or select the masked object and use the Direct Selection Tool (A) to adjust the clipping path or move the image within the mask. This flexibility is perfect for iterative visual design and photo manipulation, allowing for endless creative ideas without fear of permanent alteration.
Advanced Control: Flattening Transparency for Permanent Crops
While the non-destructive nature of clipping masks is a significant advantage, there might be instances where you require a truly “permanent” crop, effectively deleting the hidden portions of the image. This can be useful for file optimization (compressors, optimizers) or for preparing elements for export to platforms that don’t fully support live clipping masks. This is where the “Flatten Transparency” trick comes into play, transforming your clipped image into a fully cropped raster asset.
- Apply a Clipping Mask: First, follow the steps above to create your desired clipping mask.
- Access Transparency Panel: With the clipped object selected, open the Transparency panel (Window > Transparency).
- Adjust Layer Transparency (Optional but Recommended): In the Transparency panel, ensure the clipped object is selected. You might notice blend modes or opacity settings here. For a clean permanent crop, sometimes setting the blend mode to “Normal” and opacity to “100%” is a good start, though specific adjustments can vary based on your visual design intent.
- Flatten Transparency: With the clipped object still selected, go to Object > Flatten Transparency…. A dialog box will appear. Adjust the settings as needed (often the default High Resolution settings are fine for images), and click OK. This action essentially “bakes” the clipping mask and any transparency effects into the image, converting all elements within the mask into a single raster object and discarding areas outside the mask.
- Expand (Final Step): After flattening transparency, the object might still be treated as a group. To ensure it’s a single, permanently cropped raster image, with the object still selected, go to Object > Expand. In the dialog box, ensure “Object” and “Fill” are checked, and click OK. This step solidifies the transformation, giving you a self-contained, cropped raster image where the previously hidden areas are now truly removed.
This process is particularly useful when you need to hand off files to clients, export images for specific online tools, or compress images where the underlying hidden data is no longer necessary, aligning with the image tools aspect of Tophinhanhdep.com.
Dynamic Visual Effects: Leveraging Opacity Masks
The Opacity Mask in Adobe Illustrator is arguably the most artistically flexible cropping method, pushing beyond simple cuts to enable dynamic visual effects, graded transparency, and sophisticated blending. This technique is indispensable for digital art, creating aesthetic backgrounds with soft fades, or infusing beautiful photography with subtle, emotional transitions. Unlike clipping masks which create a hard edge, opacity masks use grayscale values to control the transparency of underlying artwork, allowing for incredibly nuanced and creative ideas.
Graded Transparency and Selective Visibility with Opacity Masks
Opacity masks work by interpreting the luminance (brightness) of a masking object. White areas in the mask make the underlying artwork fully opaque (visible), black areas make it fully transparent (invisible), and shades of gray create varying degrees of translucency. This makes it perfect for creating soft vignettes, feathered edges, or complex fading effects in your image collections.
- Prepare Your Image: Place your raster image or vector graphic onto your artboard. This will be the artwork you intend to apply the opacity mask to.
- Create Your Masking Shape: Similar to a clipping mask, draw a closed vector shape over the area of the image you want to affect. This shape will become your opacity mask. You can use any shape tool or the Pen Tool.
- Fill the Masking Shape with Grayscale: This is the critical step for opacity masks.
- To make parts of your image fully visible (opaque), fill areas of your masking shape with white.
- To make parts of your image fully transparent (invisible), fill areas of your masking shape with black.
- To create gradients or feathered effects, use shades of gray or gradients (e.g., a white-to-black gradient) within your masking shape.
- Ensure the masking shape has no stroke.
- Position the Mask: As with clipping masks, ensure your masking shape is on a layer above the artwork it will mask.
- Select Both Elements: Using the Selection Tool (V), select both your artwork and the grayscale masking shape.
- Make Opacity Mask: Go to Window > Transparency to open the Transparency panel. With both objects selected, click the “Make Mask” button in the Transparency panel.
- In the Transparency panel, ensure the “Clip” checkbox is selected (this will clip the mask to the bounding box of the top object) and, if you want to invert the mask’s effect (white becomes transparent, black becomes opaque), check “Invert Mask.”
- Adjust Opacity (Optional): Once the mask is applied, you’ll see a thumbnail representation of your artwork and the mask in the Transparency panel. You can select the mask thumbnail (it will have a bold border) and use the Fill/Stroke panels to further refine the grayscale values or gradients within your mask. You can also adjust the overall opacity of the masked object using the Opacity slider in the Transparency panel for even finer control.
This technique is incredibly versatile for creating abstract designs, integrating images seamlessly into complex layouts, or adding an ethereal quality to sad/emotional imagery. The ability to control transparency with such precision makes opacity masks a powerful tool for visual designers focusing on advanced photo manipulation and expressive creative ideas.
Streamlined Workflow: Cropping with Artboards for Export
While the dedicated cropping tool and masks offer detailed control within Illustrator, sometimes the most pragmatic approach to “cropping” an image for final output involves utilizing the Artboard tool. This method is less about internal manipulation and more about defining the final dimensions for your exported image, making it a “quick and dirty” solution for preparing images for web, digital photography collections, or specific print sizes. It’s particularly useful when you need to quickly save a section of your artwork for use as wallpapers, backgrounds, or to upload as high-resolution stock photos.
Preparing Images for High-Resolution Export and Online Use
The Artboard acts as your canvas, and anything outside its boundaries will not be included when you export your file with the “Use Artboards” option enabled. This provides a straightforward way to define the visible area of your artwork for external use, streamlining the process of optimizing images and generating specific output sizes for Tophinhanhdep.com.
- Place Your Image: Import your image (File > Place) onto your Illustrator artboard. Let it extend beyond the artboard boundaries if needed.
- Select the Artboard Tool: Activate the Artboard Tool (Shift + O) from the toolbar. This will show handles around your current artboard, allowing you to manipulate its size and position.
- Adjust Artboard to Desired Crop: Click on the artboard that contains your image. You can now:
- Manually Resize: Click and drag the corner or side handles of the artboard to resize it, effectively framing the portion of your image you want to “crop.”
- Fit to Artwork: If you want the artboard to perfectly fit a selected object or the entire artwork, select the object(s) with the Selection Tool (V), then switch to the Artboard Tool (Shift + O). In the Properties panel or Control Panel, there might be options like “Fit to Selected Art” or “Fit to Artwork Bounds” which will automatically adjust the artboard to the selection. Alternatively, go to Object > Artboards > Fit to Artwork Bounds or Fit to Selected Art.
- Specific Dimensions: With the Artboard Tool active, you can also input precise width and height values in the Control Panel at the top of the screen to achieve exact dimensions for your export.
- Export the Cropped Image: Once your artboard is sized and positioned to frame your desired image area, go to File > Export > Export As… or File > Export > Save for Web (Legacy)…
- In the Export dialog box, select your desired file format (e.g., JPEG, PNG, TIFF).
- Crucially, check the “Use Artboards” option. This tells Illustrator to only export the content within the active artboard’s boundaries, effectively cropping your image to those dimensions.
- If you have multiple artboards and only want to export a specific one, enter its range (e.g., “1-1” for the first artboard) in the “Range” field.
- Click Export.
This method is highly efficient for generating optimized images for web use or for creating consistent-sized digital photography. After exporting, you can delete the original oversized image from your Illustrator project and place the newly cropped, exported file back in if needed. This workflow is a practical application of Tophinhanhdep.com’s emphasis on image tools that aid in image optimization and high-resolution output, ensuring your visual content is always perfectly presented.
In conclusion, Adobe Illustrator offers a robust array of cropping methods, each suited to different design challenges and creative aspirations. From the straightforward precision of the Crop Image tool for rectangular cuts, to the artistic freedom of Clipping Masks and Opacity Masks for intricate shapes and dynamic transparencies, to the practical utility of Artboards for efficient export, you have an extensive toolkit at your disposal. By understanding and applying these techniques, you can master photo manipulation, enhance your digital art, and elevate the aesthetic quality of all your visual content, whether for professional projects or personal image collections. Experiment with these methods, push the boundaries of your creative ideas, and unlock the full potential of your images, ensuring they always look their best on Tophinhanhdep.com and beyond.