How to Crop an Image in InDesign: A Comprehensive Guide to Mastering Your Visual Layouts

In the dynamic world of graphic design and desktop publishing, Adobe InDesign stands as an undisputed titan for creating stunning layouts for everything from magazines and brochures to interactive PDFs and digital publications. A fundamental skill for anyone leveraging this powerful tool is the ability to effectively manipulate images, and at the core of image manipulation in InDesign lies the art of cropping. Cropping isn’t just about cutting away unwanted parts; it’s a strategic decision that shapes composition, enhances focus, and aligns visuals with your overall design narrative.
At Tophinhanhdep.com, we understand that exceptional visual content is the cornerstone of compelling communication. Whether you’re working with breathtaking “Beautiful Photography,” impactful “Stock Photos,” or creating “Aesthetic” compositions, how you present your images within your design is paramount. This guide will delve deep into the mechanics of cropping images in InDesign, explaining its nuances and demonstrating how this essential technique can elevate your “Visual Design” projects and bring your “Creative Ideas” to life. By mastering InDesign’s cropping functionalities, you ensure that every image, from a vibrant “Nature” shot to an intricate “Abstract” piece, serves its purpose perfectly within your layout.
Understanding InDesign’s Cropping Philosophy
Before diving into the practical steps of how to crop an image in InDesign, it’s crucial to grasp the unique way InDesign handles images. Unlike raster-based programs such as Photoshop, which often involve destructive editing where pixels are permanently removed, InDesign employs a non-destructive approach to image manipulation. This distinction is vital for maintaining the integrity and flexibility of your design assets, especially when dealing with “High Resolution” images sourced from Tophinhanhdep.com.
The Difference Between Cropping and Resizing
One of the most common misconceptions beginners encounter is conflating cropping with resizing. While both affect how an image appears on your page, their functions are distinct:
- Cropping focuses on the visible area of an image. When you crop in InDesign, you’re essentially adjusting the boundaries of the image frame, deciding which parts of the original image are shown and which are hidden. The underlying image data remains intact, allowing you to readjust the crop at any time. This is invaluable when you’re experimenting with “Photo Ideas” or refining “Thematic Collections” for a “Mood Board,” giving you the freedom to tweak compositions without starting over.
- Resizing (or scaling) alters the dimensions of an image, making it larger or smaller. When you scale an image, you’re changing its physical size on the page without necessarily changing what parts of the image are visible. Proper resizing is critical for maintaining image quality, particularly with “Digital Photography” that might be used across various mediums. Scaling up a low-resolution image can lead to pixelation, an issue that Tophinhanhdep.com’s “AI Upscalers” can help mitigate before you even bring the image into InDesign.
Understanding this fundamental difference ensures you apply the correct operation for your desired outcome, contributing to a polished and professional “Graphic Design” output.
Frame vs. Content: The Core Concept
InDesign operates on a “frame-based” system. When you place an image, you’re not placing the image directly onto the page; instead, you’re placing it into a container, or a frame. This frame is what you interact with to move, resize, and most importantly, crop your image.
- The Frame (Container): This is the visible border you see when you select an image. It dictates the boundaries of what’s displayed on your page. When you use the Selection tool (black arrow), you are primarily interacting with this frame.
- The Content (Image Itself): This is the actual image data residing within the frame. When you use the Direct Selection tool (white arrow) or the Content Grabber, you are interacting with the image content inside the frame.
The beauty of this system is its non-destructive nature. Cropping in InDesign means adjusting the frame to show only a portion of the content. The hidden parts of your image are still there, safely tucked away within the frame, ready to be revealed if you decide to change your crop. This flexibility is a designer’s dream, especially when iterating on “Creative Ideas” or adapting “Trending Styles” where compositions might evolve. It means your original “High Resolution” “Backgrounds” or “Wallpapers” remain untouched, allowing for seamless adjustments.
Step-by-Step Guide to Cropping Images in InDesign
InDesign offers several intuitive methods to crop images, catering to different needs and levels of precision. Each method leverages the frame-based system, giving you fine control over your visual assets.
Cropping Manually with the Selection Tool
This is arguably the most common and straightforward method for basic cropping:
- Place Your Image: Go to
File > Place...(Ctrl/Cmd + D), navigate to your desired image, and click to place it on your InDesign page. Remember, for optimal results, always start with quality images from Tophinhanhdep.com’s extensive “Beautiful Photography” or “Digital Photography” collections. - Select the Image Frame: With the Selection tool (black arrow, V key), click once on the image. You will see a blue bounding box around the image – this is the frame.
- Crop the Frame:
- Hover your mouse over one of the handles (the small squares) on the sides or corners of the bounding box.
- Your cursor will change to a double-headed arrow.
- Click and drag the handle inward to crop the image. As you drag, you’ll see the frame shrink, hiding parts of the image. The image content inside will remain its original size, effectively being “cropped.”
- To maintain the aspect ratio of the frame while cropping (preventing distortion of the frame itself, not the content), hold down the
Shiftkey while dragging a corner handle. - To crop symmetrically from opposing sides, hold down
Alt/Optionwhile dragging a side handle. CombineShiftandAlt/Optionfor symmetrical aspect-ratio-preserving corner crops.
- Reposition the Content (Optional): After cropping the frame, you might find that the desired part of the image content is no longer centered or visible. To adjust the content within the cropped frame:
- While the image frame is selected, hover your mouse over the center of the image until the Content Grabber (a circular icon) appears.
- Click and drag the Content Grabber. You’ll notice the content (the actual image) moving independently within the frame. This allows you to precisely position the focus of your “Sad/Emotional” or “Aesthetic” image within the new cropped area.
- Alternatively, you can select the Direct Selection tool (white arrow, A key) and then click on the image. You’ll see an orange bounding box representing the actual image content. You can then drag this orange box to reposition the image within the blue frame.
This manual method offers intuitive control, making it perfect for quick adjustments to your “Wallpapers” or “Backgrounds” to fit specific layout elements.
Using the Content Grabber for Precision
The Content Grabber is a powerful feature unique to InDesign that streamlines the process of manipulating image content independently of its frame.
- Select the Image Frame: Use the Selection tool (black arrow) to click on your image.
- Activate the Content Grabber: A circular icon will appear in the center of the image. This is the Content Grabber. You can click on it directly, or simply hover over the image content and it will appear.
- Move the Content: Once the Content Grabber is active, you can click and drag it to move the image inside its frame. This is extremely useful for fine-tuning the composition after you’ve adjusted the frame dimensions.
- Scale the Content (while grabbing): While the Content Grabber is active (meaning you’re controlling the image content, not the frame), you can also scale the image itself.
- Hold
Ctrl/Cmd + Shiftand drag one of the corner handles of the orange bounding box (which appears when the Content Grabber is active). This will scale the image content proportionally within the frame. This is a common method if you need to zoom in on a specific detail of a “Beautiful Photography” piece after you’ve cropped its frame.
- Hold
The Content Grabber bridges the gap between frame and content manipulation, providing a fluid workflow for sophisticated “Photo Manipulation” within your layout.
Cropping Numerically via the Control Panel
For highly precise cropping, or when you need to match exact dimensions, the Control Panel offers a numerical approach.
- Select the Image Frame: Use the Selection tool (black arrow) to click on your image.
- Access the Control Panel: Look at the Control Panel, typically located at the top of your InDesign workspace.
- Adjust Frame Dimensions:
- Ensure the
Reference Point(a grid of nine squares) is set to the desired point from which you want to make adjustments (e.g., the top-left corner). - Locate the
W(width) andH(height) input fields. These represent the dimensions of your frame. - Enter precise numerical values into these fields. As you change
WorH, the frame will resize, effectively cropping the image to those exact dimensions. - To constrain proportions of the frame, click the
Constrain Proportionslink icon between the W and H fields.
- Ensure the
- Adjust Content Dimensions/Position: The Control Panel also allows you to manipulate the content (the image itself) within the frame.
- Look for the
XandYfields for the frame’s position on the page. - Below these, you’ll find similar
XandYfields, andWandHfields, but these apply to the content inside the frame. - By changing these values, you can numerically move the image content (
XandY) or scale it (WandH). For scaling content proportionally, ensure theConstrain Proportionslink icon is active for the content dimensions. - You can also use the
Frame Fitting Options(the icon resembling a small picture frame with arrows) for automated fitting, which we’ll discuss next.
- Look for the
This numerical precision is invaluable for “Graphic Design” projects requiring strict adherence to grid systems or when ensuring images like “Wallpapers” or “Backgrounds” fit exact specifications. It’s an integral part of maintaining consistency across “Thematic Collections” and professional “Visual Design” outputs.
Advanced Cropping Techniques and Considerations
Beyond the basic cropping methods, InDesign provides powerful tools to refine your image placements and ensure they integrate seamlessly into your design. These techniques are particularly useful when curating “Image Inspiration & Collections” or fine-tuning “Photo Manipulation” to achieve a specific effect.
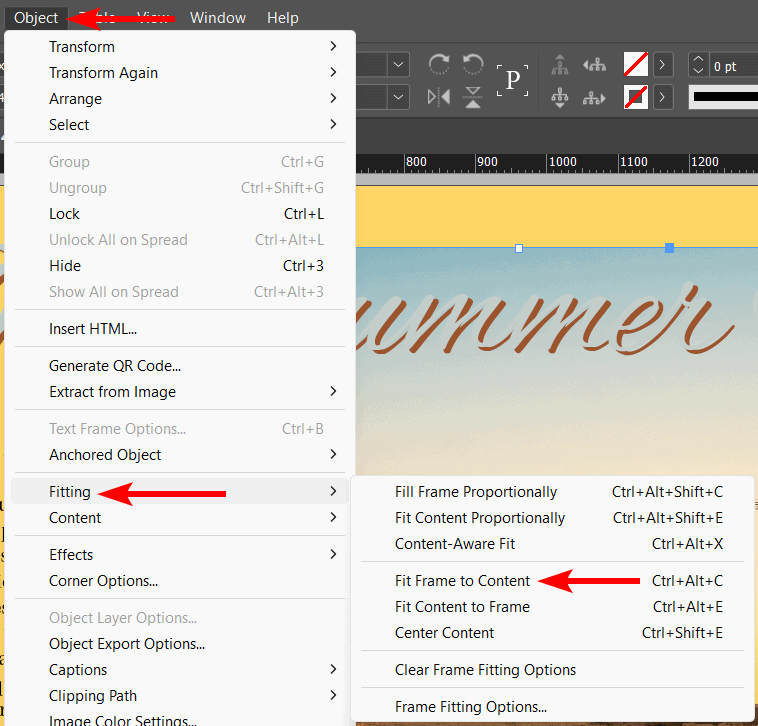
Fitting Options for Automated Cropping
InDesign’s Fitting options offer automated ways to scale and crop images within their frames, saving time and ensuring consistency. These options are accessible from the Object menu (Object > Fitting) or directly from the Control Panel when an image frame is selected.
- Fill Frame Proportionally (Ctrl/Cmd + Alt/Option + Shift + C): This is one of the most frequently used options. It scales the image content to fill the entire frame, ensuring no empty space, but it might crop parts of the image if its aspect ratio doesn’t match the frame’s. This is excellent for ensuring “Backgrounds” or “Wallpapers” completely fill their designated areas, even if some edge content is lost.
- Fit Content Proportionally (Ctrl/Cmd + Alt/Option + Shift + E): This scales the image content to fit entirely within the frame, maintaining its original aspect ratio. This means you might end up with empty space (letterboxing or pillarboxing) if the image’s aspect ratio differs from the frame’s. Ideal for preserving the entirety of a “Beautiful Photography” piece or “Stock Photos” where no content should be cropped.
- Fit Content to Frame (Ctrl/Cmd + Alt/Option + F): This scales the image content to fit the frame without preserving its aspect ratio, potentially distorting the image. Generally, this should be avoided for photographic content unless a specific “Digital Art” or “Photo Manipulation” effect is desired.
- Fit Frame to Content (Ctrl/Cmd + Alt/Option + C): This resizes the frame to perfectly match the dimensions of the image content. Useful when you want to show the entire image and then crop it manually from there.
- Center Content (Ctrl/Cmd + Shift + E): This simply centers the image content within its frame without scaling. This is a quick way to adjust focus after you’ve manually cropped the frame.
These fitting options are powerful accelerators for tasks like creating “Mood Boards” where images need to be quickly arranged and presented cohesively. They also ensure consistency when preparing “Thematic Collections” for “Trending Styles.”
Maintaining Aspect Ratios While Cropping
Maintaining the aspect ratio of an image is crucial for preventing distortion, especially with “Beautiful Photography” or “High Resolution” “Stock Photos.” While you can manually crop the frame by holding Shift to maintain the frame’s aspect ratio, it’s equally important to consider the content’s aspect ratio.
- Cropping and Scaling Content Together: If you want to crop the frame and then scale the content proportionally to fill that new frame, the
Fill Frame Proportionallyfitting option is your best friend. - Manual Proportional Scaling of Content: If you’re manually adjusting the image content within a frame using the Direct Selection tool or the Content Grabber, always hold down
Ctrl/Cmd + Shiftwhile dragging a corner handle of the orange bounding box (content) to ensure proportional scaling.
By consistently maintaining aspect ratios, you preserve the visual integrity of your images, which is fundamental to professional “Visual Design” and impactful “Graphic Design.”
Cropping for Specific Visual Design Needs
Cropping is not merely a technical task; it’s a design decision. Consider the following when cropping:
- Composition and Rule of Thirds: Use cropping to align your image’s focal point with the rule of thirds, leading the viewer’s eye. A “Nature” photo might benefit from cropping to place a horizon line along a third.
- Eliminating Distractions: Crop away busy backgrounds or irrelevant elements to focus attention on your subject. This is particularly useful for enhancing the impact of “Sad/Emotional” or specific “Aesthetic” images.
- Creating Visual Flow: Crop images to guide the viewer’s eye from one element to another in a multi-image layout. This contributes to the overall “Creative Ideas” and flow of your publication.
- Adapting to Layouts: Different layouts might require different aspect ratios. A portrait image might need to be cropped to fit a landscape banner, or vice versa. Tophinhanhdep.com offers a vast range of images, and understanding how to adapt them through cropping is key to versatility in your “Graphic Design” projects.
- Whitespace and Balance: Cropping can introduce or eliminate whitespace around your subject, affecting the balance and breathing room of your design.
By treating cropping as an active design choice, you transform it from a simple editing step into a powerful tool for visual storytelling and enhancing “Photo Ideas.”
Optimizing Cropped Images for Your Projects
Once you’ve meticulously cropped your images in InDesign to perfection, the journey towards a flawless final product continues with optimization. This final stage is crucial for ensuring your “Visual Design” maintains its quality while being efficient for output, whether for print or digital distribution.
Enhancing Visuals for Aesthetic Appeal
While InDesign isn’t a dedicated image editor like Photoshop, it does offer some basic image adjustments that can complement your cropping efforts:
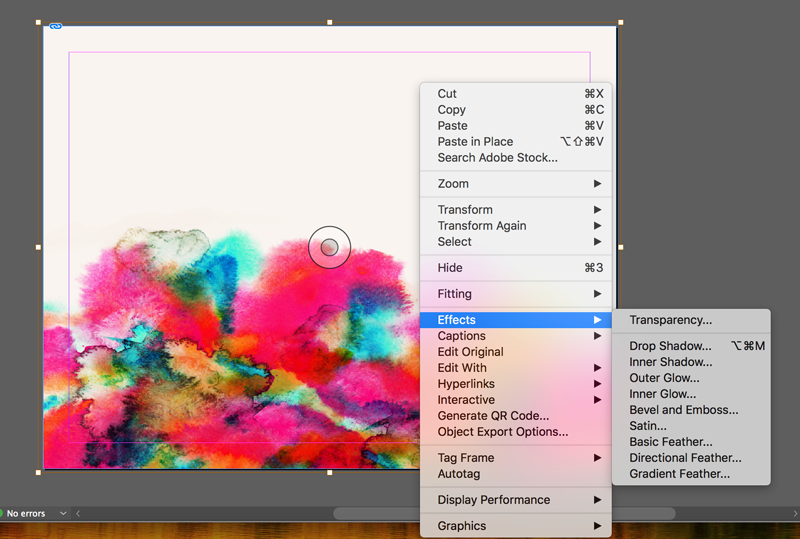
- Effects Panel (
Window > Effects): You can apply various effects to your image frames or the images themselves, such as drop shadows, bevel and emboss, or inner glow, to enhance their integration into the design. - Object Styles (
Window > Styles > Object Styles): For consistency, especially across “Thematic Collections” or “Mood Boards,” you can create object styles that include specific cropping parameters (via frame fitting options), effects, and stroke/fill settings. This ensures all your “Aesthetic” images follow a unified presentation. - Color Adjustments (Limited): InDesign’s primary role is layout, so for significant color correction or advanced “Photo Manipulation,” it’s always best to perform these steps in Photoshop or Lightroom before placing images in InDesign. However, you can adjust opacity and blending modes within InDesign to achieve certain visual effects or integrate images more subtly as “Backgrounds” or “Wallpapers.”
Remember, the goal is to enhance the inherent quality of images sourced from Tophinhanhdep.com, ensuring that every “Beautiful Photography” piece or “Digital Photography” asset shines within your layout. Thoughtful cropping combined with subtle InDesign enhancements can significantly elevate the overall “Graphic Design.”
Integrating with Tophinhanhdep.com’s Image Tools
The workflow of creating professional design often extends beyond a single application. After cropping and laying out your images in InDesign, you might need to prepare them for various outputs, and this is where Tophinhanhdep.com’s comprehensive suite of “Image Tools” becomes indispensable.
- Compressors and Optimizers: When exporting your InDesign document for web use (e.g., as a PDF for online viewing), large image files can significantly increase load times. Even if you’ve cropped an image in InDesign, the full resolution data is often embedded. Before final deployment, consider using Tophinhanhdep.com’s “Compressors” and “Optimizers.” These tools can drastically reduce file sizes without noticeable loss of visual quality, making your “Visual Design” projects web-friendly and efficient. This is crucial for projects featuring numerous “High Resolution” images or complex “Digital Photography” layouts.
- Converters: If your final output requires images in a specific format (e.g., converting a TIFF to JPEG for web, or PNG to WEBP for faster loading), Tophinhanhdep.com’s “Converters” can handle these transitions seamlessly.
- AI Upscalers: While you should always aim to start with “High Resolution” images, sometimes you might encounter a low-resolution “Stock Photo” or an older “Sad/Emotional” image that needs to be scaled up. Before bringing such an image into InDesign for cropping, consider running it through Tophinhanhdep.com’s “AI Upscalers.” This can intelligently increase the resolution and detail, giving you a better starting point for your “Graphic Design” project and preventing pixelation after cropping.
- Image-to-Text: While less directly related to cropping, imagine you’ve cropped a section of an image containing crucial information. Tophinhanhdep.com’s “Image-to-Text” tool could then be used to extract that text, integrating it into your InDesign document as editable text, rather than relying on an image, enhancing accessibility and searchability.
By integrating these external tools from Tophinhanhdep.com into your post-InDesign workflow, you ensure that your beautifully cropped and designed images are not only visually stunning but also technically optimized for every conceivable platform and purpose. This holistic approach empowers you to create superior “Digital Art” and “Photo Manipulation” projects that truly stand out.
Conclusion
Mastering how to crop an image in InDesign is an indispensable skill for any designer. It’s more than just a technical step; it’s a creative act that defines focus, refines composition, and ensures every visual element serves your design’s purpose. InDesign’s non-destructive, frame-based approach provides unparalleled flexibility, allowing you to experiment with “Photo Ideas,” curate “Thematic Collections,” and adapt “Trending Styles” with ease.
From the nuanced difference between cropping and resizing to the precision of numerical adjustments and the automation of fitting options, InDesign offers a rich toolkit for image manipulation. By understanding these tools and applying them thoughtfully, you can transform raw “High Resolution” images into captivating “Visual Design” elements, whether they are “Wallpapers,” “Backgrounds,” “Aesthetic” pieces, or impactful “Beautiful Photography.”
Remember that your journey doesn’t end in InDesign. For a truly professional workflow, complement your InDesign skills with the robust resources available at Tophinhanhdep.com. Explore our vast collections of “Images” for “Inspiration & Collections,” leverage our “Image Tools” for optimal preparation and output, and continuously hone your craft in “Visual Design” and “Photography.” With the right skills and the right resources, your designs will not only communicate effectively but will also resonate with exceptional visual appeal.