How to Master Image Flattening in Photoshop for Optimized Visual Content on Tophinhanhdep.com

In the dynamic world of digital imagery, where every pixel contributes to the overall impact, understanding fundamental image manipulation techniques is paramount. Among these, “flattening an image” in Adobe Photoshop stands out as a crucial skill, often misunderstood but vital for optimizing digital assets. For creators and enthusiasts utilizing platforms like Tophinhanhdep.com, which specializes in a vast array of visual content from Wallpapers and Backgrounds to Beautiful Photography and Digital Art, mastering image flattening is not just a technicality; it’s a strategic move that enhances efficiency, compatibility, and the overall presentation of visual content.
Imagine a stunning high-resolution nature photograph or a meticulously crafted piece of abstract digital art. During its creation, this image likely accumulated numerous layers, each representing a distinct element, adjustment, or effect. While these layers are indispensable for flexible photo manipulation and iterative graphic design, they also contribute to a larger, more complex file size. When it comes time to share these creations—whether as a compelling wallpaper, a background for a presentation, or for professional commercial printing—these multi-layered files can become cumbersome. Flattening offers a solution, streamlining your image into a single, cohesive layer, thereby reducing its footprint and increasing its usability across various platforms and purposes.
This comprehensive guide will demystify the process of flattening an image in Photoshop, delving into its significance, the various contexts in which it’s applied, and the best practices to ensure your visual content is perfectly optimized for Tophinhanhdep.com and beyond.
Understanding Image Layers and the Essence of Flattening
Before diving into the “how-to,” it’s essential to grasp the core concept of image layers and what “flattening” truly entails. Photoshop, a powerhouse for digital photography and visual design, operates on a layer-based system. Each layer is like a transparent sheet on which different parts of your image are placed.
What Does ‘Flatten’ Truly Mean in Digital Imaging?
At its heart, flattening an image means consolidating all visible layers into a single background layer. Think of it like taking all the transparent sheets of your artwork, stacking them perfectly, and then permanently fusing them into one solid piece. In Photoshop terms, this merges your numerous adjustment layers, text layers, shape layers, and pixel layers into one unified rasterized image. This process effectively “locks in” all your edits and transformations, turning what was a complex, editable file into a simplified, final output.

The immediate consequence of this consolidation is a significant reduction in file size. A file with dozens or hundreds of layers carries a lot of data, enabling individual layer editing. Once flattened, this granular data is discarded, leaving only the visual composite.
The Critical Role of Layers in Photography and Visual Design
Layers are the cornerstone of non-destructive editing, a principle highly valued in digital photography and photo manipulation. They allow artists to experiment freely, make changes, and revert to previous states without permanently altering the original pixels. For instance, a beautiful landscape photograph might have layers for sky replacement, color grading, sharpening, and dodging/burning. Each of these modifications exists on its own layer, offering unparalleled flexibility during the creative process.
In graphic design and digital art, layers enable the precise arrangement of text, shapes, textures, and effects. A designer creating an aesthetic background or a thematic collection for Tophinhanhdep.com might use layers to manage different elements of their composition, ensuring every detail is perfect before finalization. This multi-layered structure is the “master file,” crucial for any future revisions or adaptations, embodying the full spectrum of creative ideas and editing styles.
Why Flatten Your Images? Unlocking Efficiency and Versatility
While layers are invaluable for creation, there are numerous compelling reasons why flattening an image becomes a necessary and advantageous step, especially when preparing content for distribution or for platforms that prioritize efficiency.
Streamlining File Size for Performance and Storage
The most immediate and obvious benefit of flattening an image is the dramatic reduction in file size. Multi-layered Photoshop Document (PSD) files can be enormous, sometimes hundreds of megabytes or even gigabytes for complex, high-resolution projects. When flattened, these files can shrink to a fraction of their original size.
- Faster Uploads and Downloads: For contributing wallpapers or backgrounds to Tophinhanhdep.com, or sharing stock photos with clients, smaller files translate to quicker uploads and downloads. This improves the user experience significantly, preventing frustrating delays.
- Optimized Web Performance: Websites, including Tophinhanhdep.com, thrive on speed. Large, unoptimized images can bog down page loading times, negatively impacting SEO and user engagement. Flattened images, especially when further processed with image compressors and optimizers (like those found on Tophinhanhdep.com’s Image Tools section), ensure your visuals load quickly, whether they are aesthetic backgrounds or stunning nature photography.
- Efficient Storage: Photographers and designers often deal with vast libraries of images. Flattening helps conserve valuable storage space on local drives and cloud services, making asset management more efficient, particularly for archiving thematic collections or photo ideas.
Ensuring Print-Readiness and Cross-Platform Compatibility
Flattening is a critical step for preparing images for print and ensuring consistent display across diverse digital environments.
- Commercial Printing Requirements: Professional print houses, when handling projects like high-resolution photography for magazines or large-format digital art prints, almost universally prefer flattened files. Unflattened layers can lead to unpredictable rendering, font issues, color shifts, or missing elements during the RIP (Raster Image Processor) process. A flattened file acts as a singular, consistent image, guaranteeing that what you see on your screen is precisely what will be reproduced in print. This is especially true for wide-format printing, where the complexity of layered files can overwhelm print production equipment.
- Universal Compatibility: Different software programs and operating systems interpret complex Photoshop layers differently. A flattened image, typically saved as a JPG or PNG, is a universally recognized format that will display consistently across web browsers, email clients, and various image viewers. This is essential for ensuring that the beautiful photography you meticulously curated for a mood board on Tophinhanhdep.com looks exactly as intended to every viewer.
- Protection Against Alteration: When you deliver a flattened image, you’re essentially providing a final, non-editable version of your work. This helps protect your intellectual property from unauthorized or unintended modifications by recipients, an important consideration for stock photos and commercial digital art.
Protecting Your Creative Work and Expediting Workflow
Beyond technicalities, flattening also plays a role in workflow management and safeguarding your creative output.
- Finalizing Deliverables: For graphic designers and photo retouchers offering services like photo editing or photo retouching, flattening marks the completion of a stage in the project. It creates a ready-to-deliver file that represents the approved final artwork.
- Preventing Editing Issues: When a file is shared with collaborators or clients who may not have Photoshop or the specific fonts and assets used, layers can become problematic. Flattening eliminates these dependencies, presenting a self-contained image.
- Boosting Workflow for Specific Tasks: For tasks like creating thumbnails, previews for image inspiration galleries, or optimizing images for trending styles on Tophinhanhdep.com, a quick flattened export is much faster than dealing with a layered file.
Step-by-Step Guide: How to Flatten an Image in Photoshop
Flattening an image in Photoshop is a straightforward process, though it’s crucial to follow a vital preparatory step to avoid losing your editable work. Here are the two primary methods:
Method 1: Utilizing the Layers Panel for Precise Control
This method provides a visual confirmation of your layers before flattening.
-
Save Your Master File (Crucial First Step): Before flattening, always save your current, multi-layered Photoshop file as a PSD (Photoshop Document). This serves as your editable backup. If you need to make changes later, you can return to this PSD file and adjust individual layers. Skipping this step means you might have to start from scratch if revisions are needed, which can be a significant setback for complex photo manipulation or detailed digital photography projects.
-
Access the Layers Panel: Ensure your Layers panel is visible. If not, go to
Window > Layersin the top menu bar (or press F7). This panel lists all the layers in your image. -
Select All Relevant Layers (Optional, but good practice): While flattening usually applies to all visible layers, you can selectively flatten a subset of layers by selecting them. Hold
Shiftto select multiple consecutive layers orCtrl(Cmd on Mac) to select non-consecutive layers. For a full flatten, simply ensure all desired layers are visible. -
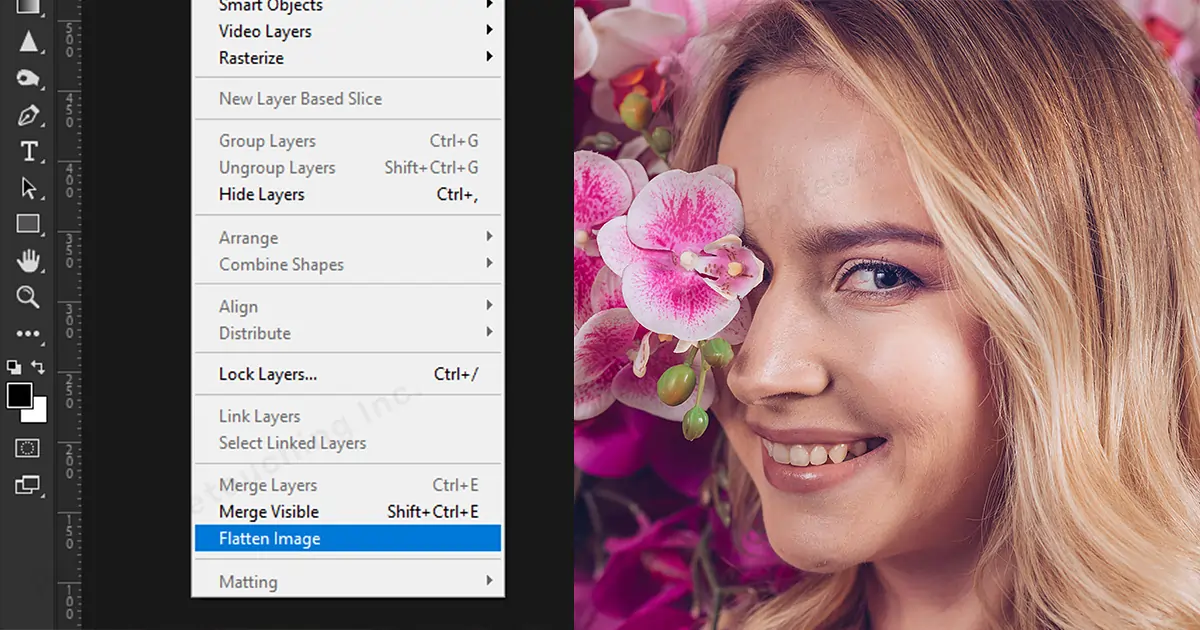
Right-Click and Flatten: Right-click anywhere within the Layers panel (not on a specific layer, but in the empty space, or on any selected layer). From the contextual menu that appears, select
Flatten Image. -
Observe the Change: Instantly, all your visible layers will merge into a single
Backgroundlayer. Any hidden layers will be discarded. -
Save Your Flattened File: Now, save this flattened image in your desired output format (e.g., JPG, PNG, or TIFF) by going to
File > Save As...orFile > Export > Export As.... Remember to give it a distinct name to differentiate it from your original PSD master file (e.g., “myimage_flattened.jpg”).
Method 2: The Quick Menu Shortcut for Rapid Flattening
This method is even faster, ideal when you’re confident all visible layers should be merged.
-
Save Your Master File (Again, This Cannot Be Stressed Enough): Just like in Method 1, always start by saving your multi-layered PSD file as a backup. This prevents irreversible loss of editing capabilities.
-
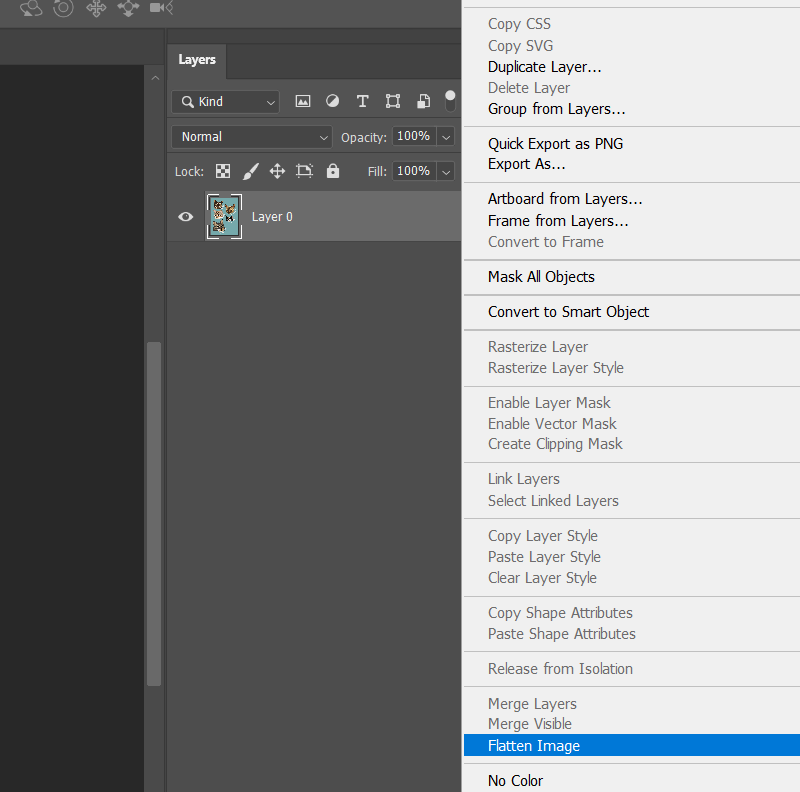
Navigate to the Layer Menu: Go to the top menu bar in Photoshop and click on
Layer. -
Select Flatten Image: From the dropdown menu, scroll down and select
Flatten Image. -
Confirmation and Saving: The layers will immediately merge. Proceed to save your flattened image using
File > Save As...orFile > Export > Export As..., choosing an appropriate file format and filename.
Essential Considerations Before Flattening: Saving a Master File
The single most important rule when flattening an image is to always save a version of your file with all its layers intact (typically as a .PSD file) before flattening. This layered file is your master file or backup.
Why is this critical? Flattening is generally an irreversible process for the individual layers. Once flattened, you cannot go back and adjust a specific text layer’s font, move a particular graphic element, or tweak a single adjustment layer’s effect without recreating those elements. For complex projects, this could mean starting the entire photo manipulation or digital art process from the beginning.
Platforms like Tophinhanhdep.com encourage creative ideas and diverse editing styles. Preserving your layered files allows you to revisit your work, apply new trending styles, or adapt your images for different contexts without losing the integrity of your initial design. It’s the digital equivalent of keeping your original negatives in photography.
Choosing the Optimal File Format for Your Flattened Image
The choice of file format for your flattened image is just as crucial as the act of flattening itself. Each format has distinct characteristics that make it suitable for different applications, from wallpapers to commercial printing. Tophinhanhdep.com benefits from understanding these nuances to serve its diverse content categories.
PSD: The Unrivaled Master for Continuous Editing
While a flattened image is a single layer, it’s worth reiterating the role of PSD files. PSD is Photoshop’s native format, designed to retain all layers, masks, smart objects, and other editable features. It is not a format for delivering flattened images (unless the recipient explicitly needs a layered file for further editing). Instead, it’s the working file, the “master copy” that allows for future photo retouching, graphic design, and digital photography adjustments without starting over.
JPG: The Universal Standard for Web and Sharing
JPG (or JPEG) is arguably the most common image file format, celebrated for its efficiency and widespread compatibility.
- Convenience and Small File Size: JPGs use a “lossy” compression method, meaning some image data is permanently discarded to achieve significantly smaller file sizes. This makes them ideal for web use, fast uploads, and casual sharing. For wallpapers, backgrounds, and general image collections on Tophinhanhdep.com, JPG is often the go-to format due to its balance of quality and file size.
- Best for Photographs: It excels with photographic images and high-resolution photography where smooth color gradients are prevalent.
- No Transparency: A key limitation is that JPG does not support transparency. When a multi-layered image with transparent elements is saved as a JPG, Photoshop will automatically fill the transparent areas with white (or the background color).
PNG: Retaining Quality and Transparency for Modern Aesthetics
PNG (Portable Network Graphics) offers a powerful alternative to JPG, particularly when image quality and transparency are paramount.
- Lossless Compression: Unlike JPG, PNG uses “lossless” compression. This means that while the file size is reduced, no original image data is discarded, preserving the visual quality perfectly. This is a significant advantage for aesthetic images, digital art, and elements where intricate details are critical for display on Tophinhanhdep.com.
- Supports Transparency: PNG’s most celebrated feature is its ability to retain transparency. This is indispensable for images with cut-out elements, logos, or sophisticated overlays in graphic design and photo manipulation, allowing them to blend seamlessly with various backgrounds.
- Larger Files than JPG: Due to its lossless nature, PNG files are typically larger than equivalent JPG files, though still much smaller than layered PSDs. This trade-off is often acceptable for high-quality web graphics or elements that require transparency.
TIFF: The Professional’s Choice for Archiving and High-Quality Print
TIFF (Tagged Image File Format) is a robust and highly versatile format often favored in professional workflows for its uncompromised quality and extensive feature support.
- Uncompressed or Lossless Compression: TIFF files can be saved either uncompressed or with lossless compression, ensuring maximum image fidelity. This makes them an excellent choice for archiving high-resolution photography and stock photos where every detail must be preserved for long-term use.
- Supports All Photoshop Features: TIFF is one of the few formats that can maintain nearly all of Photoshop’s features, including layers, paths, and alpha channels (though saving with layers will result in larger files, so flattening is often done for print-ready TIFFs).
- Commercial Printing Standard: Due to their reliability and quality, flattened TIFF files are a preferred standard for commercial printing of everything from beautiful photography to intricate visual designs. Print professionals appreciate TIFFs for their consistent output and robust handling of color profiles.
- Very Large File Sizes: The trade-off for this fidelity and versatility is typically very large file sizes, making them less suitable for web display but perfect for print masters or archival copies.
The Downside and Best Practices for Tophinhanhdep.com Content Creators
The primary drawback of flattening an image is the loss of individual layer editability. Once you flatten a file, you cannot go back and adjust a single element as you could with the original layered PSD. This is why the emphasis on saving a master PSD file before flattening is non-negotiable for any serious photographer or graphic designer.
For content creators contributing to Tophinhanhdep.com, a platform that prides itself on high-resolution images and diverse editing styles, this means:
- Strategic Workflow: Always integrate flattening as a final step in your image preparation process, after all creative decisions for a particular output are finalized. Keep your layered files organized for any future updates or adaptations.
- Quality Control for Image Tools: While Tophinhanhdep.com offers various image tools including compressors and optimizers, and some general-purpose design platforms may offer basic flattening functions, be cautious of inherent quality compromises. For critical applications, such as preparing high-resolution photography or intricate digital art for professional presentation or print, dedicated software like Adobe Photoshop offers superior control over the flattening process, ensuring the final output retains the highest possible fidelity. Simpler tools might aggressively compress, leading to a reduction in overall resolution or color quality, which could detract from the impact of your beautiful images.
- Diverse Output Needs: Recognize that a single flattened image might not serve all purposes. You might need different flattened versions: a high-quality TIFF for print, a compressed JPG for a website thumbnail, and a PNG with transparency for a graphic element.
Conclusion
Flattening an image in Photoshop is a fundamental skill that transforms complex, layered artwork into optimized, universally compatible files. From reducing file sizes for faster web loading to ensuring print-readiness and protecting your creative integrity, the benefits are clear. For the vibrant community and extensive image collections on Tophinhanhdep.com, mastering this technique is an invaluable asset. By consistently saving your layered master files and strategically choosing the appropriate flattened file format, you can confidently prepare your wallpapers, backgrounds, aesthetic designs, and beautiful photography for seamless sharing, display, and professional use, enhancing both your workflow and the impact of your visual content.