Mastering Image Manipulation: How to Flip an Image in PowerPoint for Stunning Visuals

In the dynamic world of presentations, visuals are paramount. A well-placed image can convey more information, evoke stronger emotions, and command greater attention than paragraphs of text. PowerPoint, as a leading presentation software, offers a robust suite of tools for manipulating these visuals, and among the most fundamental yet powerful is the ability to flip an image. Whether you’re aiming for aesthetic balance, a striking mirror effect, or simply correcting an image’s orientation to better suit your slide’s flow, knowing how to flip an image in PowerPoint is an indispensable skill.
At Tophinhanhdep.com, we understand the critical role high-quality images and effective visual design play in communication. Our extensive collections of wallpapers, backgrounds, aesthetic, nature, abstract, sad/emotional, and beautiful photography, coupled with advanced image tools and visual design insights, are designed to empower creators like you. This comprehensive guide will walk you through the precise steps to flip images, shapes, and even text in PowerPoint, transforming your presentations from ordinary to extraordinary, and demonstrating how Tophinhanhdep.com can further enhance your creative journey.
The Fundamentals: Flipping Images in PowerPoint with Ease
Flipping an image in PowerPoint involves creating a mirror image or turning it upside down, distinct from rotating, which changes its angle. This simple action can dramatically alter the perception and direction of your visual elements, making it a cornerstone of effective presentation design. PowerPoint provides straightforward methods to achieve this, catering to both quick adjustments and precise manipulations.
Method 1: Utilizing the Picture Format Tab (Recommended)
This is the most common and precise way to flip an image, shape, WordArt, or even a text box. It ensures consistent results and is accessible across newer Windows and Mac versions of PowerPoint.
Step-by-Step Guide:
- Select Your Object: Open your PowerPoint presentation and navigate to the slide containing the image, shape, WordArt, or text box you wish to flip. Click on the object once to select it. You’ll know it’s selected when resizing handles appear around its perimeter.
- Access the Format Tab: Once the object is selected, a contextual tab will appear in the ribbon at the top of your screen.
- For pictures, this will typically be “Picture Tools” > “Format” (Windows) or “Picture Format” (Mac).
- For shapes, WordArt, or text boxes, it will be “Drawing Tools” > “Format” (Windows) or “Shape Format” (Mac).
- Pro Tip: If these tabs don’t appear, try double-clicking the object to ensure it’s properly selected. Sometimes, on smaller screens, the “Rotate” button might be hidden. If so, look for an “Arrange” button which might reveal hidden options in the group.
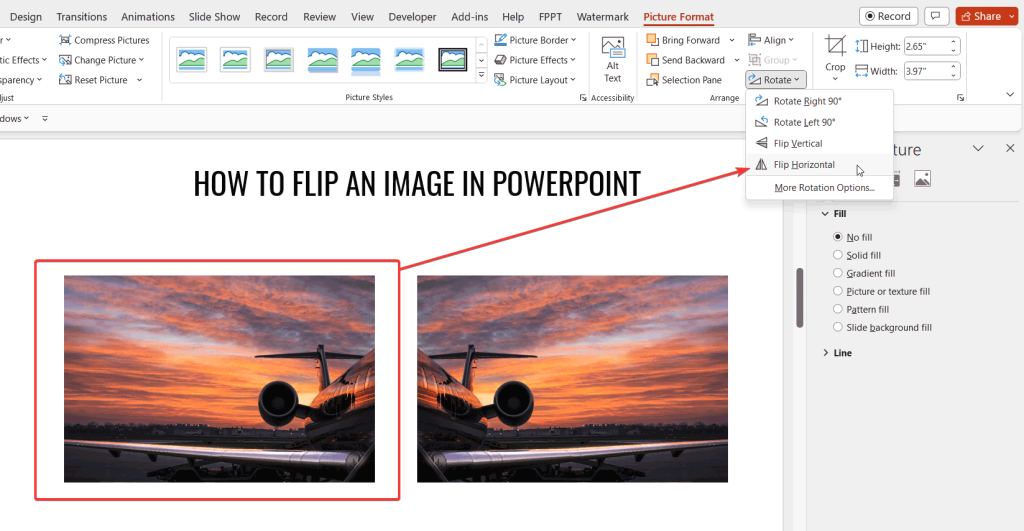
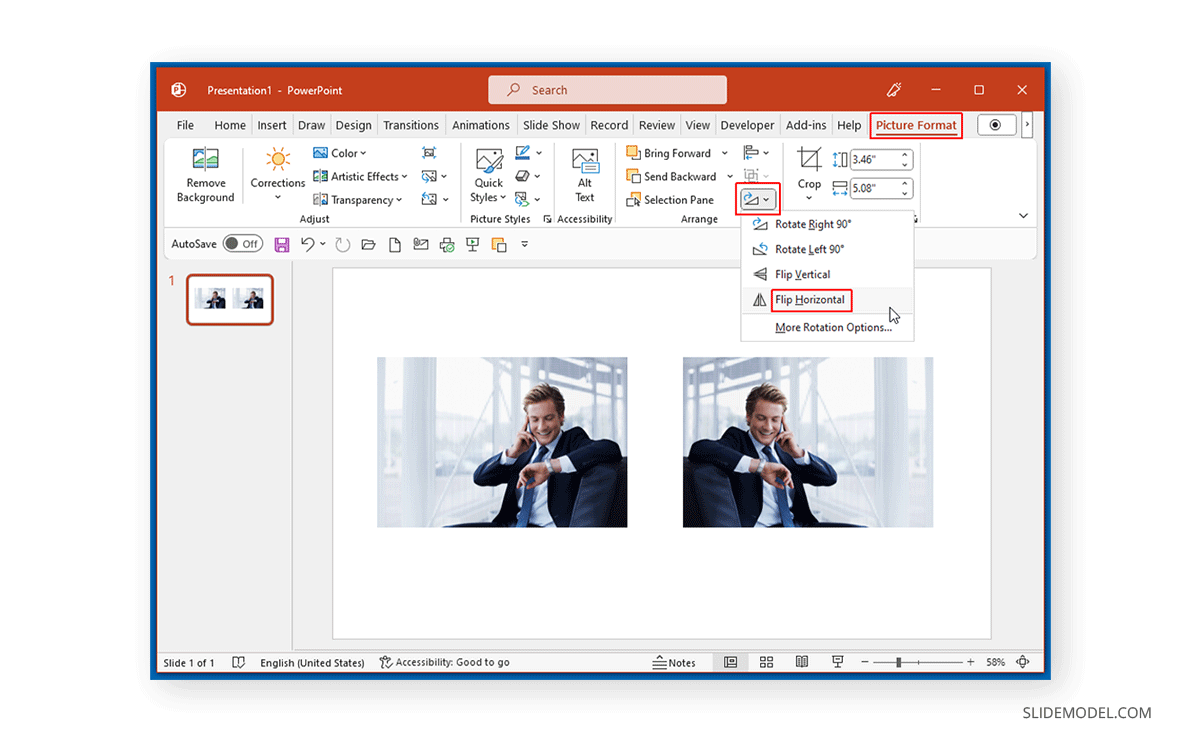
- Locate the Rotate Button: Within the “Format” tab, find the “Arrange” group. Here, you will see a “Rotate” button. Click on it to reveal a dropdown menu.
- Choose Your Flip Option: The dropdown menu offers various rotation and flipping options.
- To create a mirror image (flipping left-to-right), click “Flip Horizontal.”
- To turn an object upside-down (flipping top-to-bottom), click “Flip Vertical.”

Your selected object will instantly transform according to your chosen flip direction. This method is ideal for precise, controlled flipping and is the go-to for most design needs.
Method 2: Manual Flipping for Quick Adjustments
For those who prefer a more intuitive, direct interaction with their visuals, PowerPoint also allows for manual flipping using the object’s resizing handles. While less precise for exact angles, it’s incredibly fast for visual adjustments.
Step-by-Step Guide:
- Select Your Image: Click on the image you want to flip in your PowerPoint slide.
- Locate a Corner Handle: Hover your mouse cursor over one of the corner resizing handles (the small circles or squares) until the cursor changes to a double-headed arrow.
- Drag Across:
- To flip horizontally, click and drag one of the side-middle resizing handles (not a corner) across the image to the opposite side. As you drag, the image will appear to “fold over” itself, becoming a mirror image when you release the mouse button on the other side.
- To flip vertically, similarly, drag a top or bottom middle resizing handle across the image to the opposite side.
This manual method gives you a real-time visual of the flip, making it excellent for quick aesthetic adjustments or when you want to achieve a specific visual effect by eye.
Flipping Other Objects: Shapes, WordArt, and Icons
The beauty of PowerPoint’s design interface is its consistency. The methods described above for images apply equally to other graphical elements you might use in your presentation:
- Shapes: Whether it’s a simple rectangle, a complex flowchart symbol, or a custom drawing, selecting a shape and using the “Drawing Tools” > “Format” > “Rotate” options will allow you to flip it horizontally or vertically.
- WordArt: Text styled with WordArt can also be flipped directly using the “Drawing Tools” > “Format” > “Rotate” menu.
- Icons: Modern PowerPoint versions include extensive icon libraries. Like shapes, these vector graphics can be easily flipped to point in the desired direction using the “Graphic Format” tab that appears when an icon is selected. For instance, an arrow pointing left can be flipped horizontally to point right, significantly improving visual flow without needing to find a new icon.
This versatility ensures that your entire slide’s visual components can be harmonized and directed to serve your presentation’s message effectively.
Beyond Simple Flipping: Enhancing Your Visual Design
Flipping an image is not merely a corrective action; it’s a powerful creative tool that can dramatically elevate the visual impact of your presentations. By understanding its practical applications and integrating it with other design principles, you can craft truly memorable slides.
Practical Applications and Creative Use Cases
Flipping images can unlock a myriad of design possibilities, transforming ordinary visuals into compelling narratives.
- Symmetrical Design Presentations: Achieve perfect balance and harmony in designs related to art, architecture, or product aesthetics. By duplicating an image and flipping one copy horizontally, you can create a striking symmetrical composition that emphasizes equilibrium. This technique is often used to showcase design principles or highlight reflective qualities.
- Before and After Comparisons: When illustrating transformations, flipping can help create a cohesive layout. Imagine presenting a “before” image on one side and a flipped “after” image on the other, creating a sense of progression or contrast within a unified visual framework. This is invaluable for makeover presentations, renovation projects, or medical treatment outcomes.
- Reflective Effects: Mimic natural reflections like water or glass. By duplicating a landscape or cityscape image, flipping the duplicate vertically, reducing its opacity, and positioning it below the original, you can craft a realistic and artistic water reflection. Tophinhanhdep.com’s collection of nature and abstract images provides excellent starting points for such creative endeavors.
- Educational Illustrations: In STEM presentations, flipped images can demonstrate concepts of symmetry, reflection, or physics principles interactively. Visualize a chemical structure or a biological cell, and then its mirrored counterpart, to explain complex ideas clearly.
- Marketing and Advertisements: Dynamically fill a slide and grab attention by mirroring product images. A product shot, when duplicated and horizontally flipped, can create a broader, more impactful visual footprint that fills the frame compellingly, leading to higher engagement from your audience.
- Fashion and Style Presentations: Present different angles or coordinated outfits side-by-side without needing entirely new photographs. Flipping a model’s pose can illustrate how an item looks from various perspectives or how two complementary pieces can be worn, providing direct visual comparisons.
- Photography Portfolios: Photographers can use mirroring to showcase artistic compositions, create abstract patterns from a single shot, or experiment with visual storytelling. This demonstrates creative skill and a nuanced understanding of image manipulation, aligning perfectly with Tophinhanhdep.com’s focus on beautiful photography and editing styles.
- Storytelling in Slides: Add an interesting visual twist to your narrative. Mirrored images can represent alternate scenarios, parallel universes, or a character’s internal reflection, enriching the storytelling aspect of your presentation.
- Graphical Data Display: While less common, designers can use flipped graphical elements to create more engaging and memorable data visualizations, particularly for abstract or conceptual data.
Flipping Text: A Special Case
While images and shapes flip straightforwardly, text within PowerPoint requires a slightly different approach, especially if you want to achieve a true mirror effect for the text itself.
- Text within Flipped Objects: If you flip a text box, shape, or WordArt object using the standard “Flip Horizontal” or “Flip Vertical” options, the object will flip, but the text content inside it will often retain its original orientation relative to the object. For example, if you flip a text box horizontally, the text will move to the other side of the original position but won’t become a mirror image.
- Achieving a Mirrored Text Effect (3-D Rotation Trick): To truly reverse or mirror text within a text box, you need to use PowerPoint’s 3-D rotation options. This method works best in Outlook, Excel, and PowerPoint.
Steps to Mirror Text:
- Select the Text Box: Click on the text box containing the text you wish to mirror or flip upside down.
- Open Format Shape Pane: Right-click the selected text box and choose “Format Shape.” This will open a pane on the right side of your screen.
- Navigate to Effects: In the “Format Shape” pane, click on the “Effects” icon (it often looks like a pentagon or a shape with a shadow).
- Adjust 3-D Rotation: Expand the “3-D Rotation” section.
- To create a horizontal mirror image of the text, enter 180 in the “Y Rotation” box.
- To turn the text upside-down, enter 180 in the “X Rotation” box.
- You can apply both to achieve a mirrored and upside-down effect.
Note: When you click inside the text box to edit the text, it will temporarily revert to its original appearance. The reversed appearance will be reapplied once you click outside the object. This method uses 3D rendering to achieve the visual flip, offering a powerful way to manipulate text for creative titles or design elements.
Integrating Flipped Images with Tophinhanhdep.com’s Visual Resources
Flipping images is just one piece of the larger visual design puzzle. Tophinhanhdep.com provides a comprehensive ecosystem designed to support your entire creative workflow, from image acquisition to advanced manipulation and inspiration.
Sourcing High-Quality Images for Flipping
The foundation of any stunning visual presentation is the quality of its imagery. Before you even think about flipping, you need the right visual assets. Tophinhanhdep.com offers:
- High Resolution Images: Our platform is a treasure trove of high-resolution images across diverse categories like Wallpapers, Backgrounds, Aesthetic, Nature, Abstract, Sad/Emotional, and Beautiful Photography. These images provide crisp, clear visuals that maintain their quality even after manipulation like flipping and resizing in PowerPoint.
- Stock Photos & Digital Photography: Whether you need professional stock photos for a business presentation or unique digital photography to add an artistic touch, Tophinhanhdep.com has you covered. Sourcing from our collections ensures you have versatile images that can be perfectly adapted through flipping to suit your slide’s composition or thematic direction. Imagine finding a perfect nature shot on Tophinhanhdep.com, and then flipping it to create a stunning symmetrical background or a dramatic reflective effect for your presentation.
Post-Flipping Enhancement with Image Tools
Once you’ve skillfully flipped an image in PowerPoint, you might consider further optimizations. Tophinhanhdep.com’s “Image Tools” section offers valuable utilities that complement your PowerPoint workflow:
- Compressors & Optimizers: After incorporating multiple flipped images, your presentation file size might grow. Our image compressors and optimizers can help reduce file size without significant loss of visual quality, ensuring your presentation loads quickly and runs smoothly.
- AI Upscalers: If you’ve started with a lower-resolution image (perhaps a concept sketch or a historical photo) and need to enlarge it for a prominent display, our AI upscalers can enhance its resolution, making it suitable for flipping and large-screen projection.
- Converters: Sometimes, an image might be in a format not ideally suited for PowerPoint or requires conversion for other uses. Tophinhanhdep.com’s converters can assist in preparing images in the optimal format.
- Image-to-Text: While not directly related to flipping, if your presentation involves analyzing text within images (even flipped ones), our Image-to-Text tools could be beneficial for extracting and processing that information.
Leveraging these tools ensures that your flipped images are not only visually impactful but also technically optimized for your presentation environment.
Flipped Images as Creative Ideas for Graphic Design
Flipping is a core technique in “Visual Design,” “Graphic Design,” and “Photo Manipulation.” It’s a gateway to “Creative Ideas” and generating “Image Inspiration & Collections”:
- Graphic Design Principles: Flipping images allows designers to explore symmetry, asymmetry, balance, and directional flow within their layouts. A horizontally flipped image can guide the viewer’s eye across a slide, aligning perfectly with other elements or text blocks.
- Digital Art & Photo Manipulation: Artists frequently use mirroring and flipping to create abstract compositions, surreal landscapes, or dynamic visual narratives. When combined with other editing styles, a flipped image can become a central element of a unique digital artwork.
- Mood Boards & Thematic Collections: When building mood boards or thematic collections on Tophinhanhdep.com, consider how flipping certain images can enhance the overall aesthetic or convey a particular feeling. For instance, using flipped images can help create a sense of introspection for a “Sad/Emotional” collection or an ethereal quality for “Aesthetic” themes.
- Trending Styles: Many current design trends incorporate mirrored elements or symmetrical layouts. Understanding how to flip effectively in PowerPoint allows you to adopt these “Trending Styles” in your presentations, keeping your content fresh and contemporary.
By combining the practical skill of flipping with the vast resources and design principles available on Tophinhanhdep.com, you empower yourself to produce truly compelling visual content.
Advanced Tips and Troubleshooting for Image Manipulation
While flipping images in PowerPoint is generally straightforward, a few additional tips and considerations can help you master the art of image manipulation and troubleshoot common issues.
Rotating to Exact Angles and 90-Degree Increments
Flipping is often used in conjunction with rotation for comprehensive image control. PowerPoint offers several ways to rotate objects:
- Rotate to Any Angle:
- Select the object.
- Click and drag the rotation handle (the circular arrow at the top of the object).
- Pro Tip: Hold Shift while dragging to constrain the rotation to 15-degree increments for precise, standard angles.
- Rotate 90 Degrees:
- Select the object.
- Go to the “Format” tab (Picture Tools/Drawing Tools).
- In the “Arrange” group, click “Rotate.”
- Choose “Rotate Right 90°” or “Rotate Left 90°.”
- Rotate to an Exact Angle by Degrees:
- Select the object.
- Go to the “Format” tab.
- In the “Arrange” group, click “Rotate,” then “More Rotation Options.”
- In the dialog box or pane that opens, enter the desired number of degrees in the “Rotation” box, or use the up/down arrows for fine-tuning. This offers the highest level of precision for specific rotation needs.
Remember, when you rotate multiple shapes together, they rotate individually around their own centers, not as a single grouped unit. This is an important distinction to consider for complex layouts.
Grouping Multiple Objects for Consistent Flipping
If you have a complex arrangement of images, shapes, and text boxes that you want to flip or rotate as a single cohesive unit, grouping them is essential.
Steps to Group Objects:
- Select Multiple Objects: Hold down the Ctrl key (or Cmd on Mac) and click on each object you want to group.
- Access Grouping Option: Depending on the type of objects selected, a “Picture Format” or “Shape Format” tab will appear.
- Group Objects: In the “Arrange” group, click the “Group” icon (often looks like two overlapping rectangles), then select “Group.”
Once grouped, you can flip, rotate, move, or resize all the selected objects as if they were a single image, ensuring their relative positions remain intact. If “Group” appears dimmed, ensure you have at least two objects selected.
Dealing with Hidden Tabs and Screen Size Adjustments
Occasionally, users might struggle to find the “Format” tabs or “Rotate” button. Here’s why and what to do:
- Contextual Tabs: The “Picture Tools,” “Drawing Tools,” “Shape Format,” or “Graphic Format” tabs are contextual. They only appear when an appropriate object (picture, shape, WordArt, icon) is selected. If you don’t see them, double-check that your object is indeed selected.
- Screen Resolution/Window Size: On smaller screens or when your PowerPoint window is not maximized, some ribbon buttons might be condensed or hidden to save space. If you don’t see the “Rotate” button directly, look for a general “Arrange” button in the “Arrange” group. Clicking “Arrange” might reveal the hidden “Rotate” and other options.
By understanding these nuances, you can navigate PowerPoint’s interface more effectively and ensure you always have access to the tools you need for optimal visual manipulation.
Conclusion: Unlocking Your Creative Potential with PowerPoint and Tophinhanhdep.com
Flipping an image in PowerPoint is more than just a technical skill; it’s a fundamental aspect of visual communication and creative design. From correcting orientations and achieving symmetrical layouts to creating dramatic reflective effects and enhancing storytelling, the ability to flip empowers you to craft presentations that are not only informative but also visually captivating.
This guide has walked you through the simple yet powerful steps to flip images, shapes, and text, offering practical applications that span various fields, from marketing and education to artistic portfolios. Remember the distinction between basic flipping and the 3-D rotation trick for text, and how grouping objects can streamline complex manipulations.
As you embark on your journey to create stunning presentations, remember that Tophinhanhdep.com stands as your ultimate partner in visual excellence. Our vast libraries of high-resolution images—covering everything from aesthetic wallpapers and inspiring nature shots to abstract art and poignant emotional photography—provide the perfect foundation for your designs. Coupled with our suite of powerful image tools like compressors, optimizers, and AI upscalers, Tophinhanhdep.com ensures that every visual element, whether original or meticulously flipped, contributes to a polished and impactful presentation.
So, go forth and experiment! Explore the endless possibilities that image manipulation offers, knowing that with PowerPoint’s capabilities and Tophinhanhdep.com’s comprehensive resources, you have everything you need to transform your creative ideas into visually stunning realities. Elevate your presentations, tell your stories more effectively, and leave a lasting impression with every flip.