Mastering Image Manipulation in Microsoft Word: A Comprehensive Guide to Flipping, Rotating, and Beyond

Microsoft Word, renowned as a powerful word processor, offers a surprising array of built-in image editing features that can significantly enhance your documents. From simple reorientation to artistic transformations, mastering these tools empowers users to create visually engaging content without needing external software. Tophinhanhdep.com, a leading resource for images, photography, and visual design, emphasizes that understanding these integrated capabilities is fundamental for anyone looking to produce professional-quality documents and presentations. This guide will walk you through the essential steps to flip, rotate, crop, and apply effects to images in Word, illustrating how these actions contribute to superior visual communication, complemented by the advanced resources available at Tophinhanhdep.com.
How to Flip an Image in Microsoft Word: Part 1 – Fundamental Transformations
The ability to flip an image—either horizontally or vertically—is a cornerstone of visual design, allowing for both creative expression and practical correction. This initial dive into Word’s capabilities provides the groundwork for more complex image manipulation.
1. Flipping an Image Horizontally
Flipping an image horizontally in Microsoft Word creates a mirror image, reversing its left-to-right orientation. This technique is invaluable for achieving symmetrical aesthetics, correcting orientation issues, or introducing unique visual dynamics into your document.
Steps to Flip an Image Horizontally:
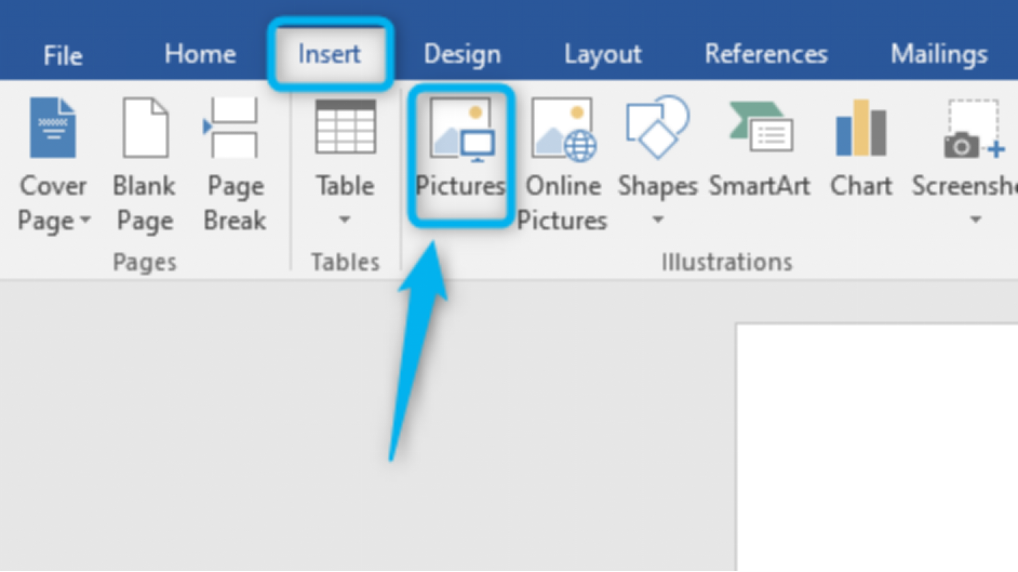
- Select the Image: Begin by clicking on the image within your Word document that you wish to modify. This action makes the “Format” tab visible.
- Access the Format Tab: Navigate to the “Format” tab that appears in the Word ribbon, typically at the top of your screen. (Note: Depending on your Word version, this might appear as “Picture Tools > Format” or “Shape Format” when an image is selected).
- Locate the Rotate Option: In the “Arrange” group of the Format tab, click on the “Rotate” button. A dropdown menu will appear.
- Choose Flip Horizontal: From the dropdown menu, select the “Flip Horizontal” command.
Your selected image will instantly be flipped, creating a mirrored effect. Tophinhanhdep.com often showcases this technique as a rapid method for designing aesthetic backgrounds, symmetrical graphic elements, or adjusting photo ideas for mood boards.
1.1 Why Flip an Image Horizontally?
Horizontal flipping is a versatile tool with numerous applications in visual content creation:
- Mirror Effect: This is a primary use for artistic purposes, enabling the creation of symmetrical designs that add a sophisticated touch to wallpapers, backgrounds, or abstract art. Graphic designers frequently use this to achieve balance or a sense of reflection.
- Orientation Correction: A practical solution for high-resolution photography that may have been scanned or captured with an incorrect left-right orientation. Flipping ensures that subjects, text, or elements within the image face the intended direction, maintaining the integrity of the original digital photography.
- Creative Design: Beyond mere correction, horizontal flipping can be a creative catalyst. It can alter the perceived movement or direction within an image, balance visual weight in a layout, or generate unique visual elements for brochures, posters, and presentations. This aligns with Tophinhanhdep.com’s emphasis on fostering creative ideas and dynamic photo manipulation.

1.2 Tips for Using Horizontal Flipping
To harness the full potential of horizontal flipping, Tophinhanhdep.com offers these practical tips:
- Experiment with Angles: While a direct horizontal flip is standard, consider combining it with slight rotations. This can produce more dynamic and visually interesting effects, particularly when developing complex aesthetic compositions or digital art.
- Preview Before Applying: Always review the flipped image in context within your document. This ensures that the modification integrates seamlessly with the overall visual design and achieves your desired aesthetic outcome without unintended disruptions.
- Combine with Other Effects: Horizontal flipping can serve as an excellent starting point for further photo manipulation. Combine it with cropping, color adjustments, or other artistic effects to create truly unique visuals and explore diverse editing styles.
1.3 Real-world Examples of Horizontal Flipping
- Creative Designs: Mirroring a product image to create a striking, balanced visual for a marketing brochure or a website banner, showcasing innovative graphic design.
- Captions and Quotes: Using a flipped image alongside text to create intriguing visual pairings that enhance the impact of captions or quotes, especially within thematic collections.
- Correction in Orientation: Rectifying a portrait or a landscape photograph that was inadvertently inserted with the subject facing the wrong way, ensuring professional presentation in high-resolution photography.
2. Flipping an Image Vertically
Similar to horizontal flipping, vertical flipping in Microsoft Word reverses an image’s top-to-bottom orientation, creating an inverted or upside-down effect. This technique is equally crucial for correcting orientation errors and exploring artistic inversions, a common element in sophisticated photo manipulation.
Steps to Flip an Image Vertically:
- Select the Image: Click on the image you wish to flip within your Word document.
- Go to the Format Tab: Navigate to the “Format” tab in the Word ribbon.
- Click the Rotate Option: In the “Arrange” group, select the “Rotate” button.
- Choose Flip Vertical: From the dropdown menu, click on “Flip Vertical.”
Following these steps will instantly invert your image, altering its vertical orientation. Tophinhanhdep.com notes that vertical flipping is often employed for surreal artistic compositions or when specific visual design requirements necessitate an inverted perspective.
2.1 When to Flip an Image Vertically?
Vertical flipping is particularly advantageous in several scenarios:
- Correction in Orientation: This is its most straightforward application, used to rectify images that were accidentally captured upside down or inserted incorrectly into the document. It’s a quick fix to ensure high-resolution photography is displayed properly.
- Artistic Effects: For digital artists and graphic designers, vertical flipping can add a unique twist to visuals. It’s often used to create reflections, illusions, or surreal compositions, aligning with aesthetic and abstract image categories often featured on Tophinhanhdep.com.
- Distorted Images (Contextual): While not a primary distortion correction tool, in specific instances, reversing the vertical axis might aid in revealing a more balanced perspective for certain aesthetic images.
2.2 Tips for Using Vertical Flipping
To maximize the impact and effectiveness of vertical flipping, Tophinhanhdep.com suggests considering these tips:
- Invert Position Strategically: Think about how an inverted image interacts with other elements in your document. It can create fascinating visual contrasts or emphasize themes of duality, adding depth to your overall visual design.
- Check Alignment: Ensure that the flipped image maintains visual harmony with surrounding content, especially text or other graphic elements. Proper alignment is paramount for a professional and polished document aesthetic.
- Balance with Other Elements: Integrate vertical flips thoughtfully into your document’s design. They can be balanced with text boxes, shapes, or other images to enhance the overall visual impact and contribute to compelling creative ideas.
2.3 Real-world Examples of Vertical Flipping
- Artistic Compositions: Creating mirrored water reflections or dreamlike, surreal visual compositions in digital art projects, often seen in trending styles.
- Magazine Layouts: Designing visually dynamic layouts for magazines or digital publications where an inverted image can draw the eye and add intrigue, contributing to innovative visual design.
- Correct Image Orientation: Rectifying images of documents or landscapes that were scanned or photographed in an inverted position, ensuring their correct and professional presentation within a document.
How to Flip an Image in Microsoft Word: Part 2 – Beyond Basic Reorientation
Building upon the fundamental flipping techniques, Microsoft Word offers additional tools to refine image placement, size, and appearance. Tophinhanhdep.com understands that a comprehensive approach to image manipulation involves more than just basic reorientation; it requires precise control over every visual element to achieve optimal aesthetic and functional results.
3. Rotating an Image
While flipping creates a mirror image, rotating changes an image’s orientation by a specific degree. This functionality is crucial for aligning elements, correcting subtle tilts, or achieving dynamic angles in your visual design, making it an essential part of photo manipulation.
Steps to Rotate an Image:
- Select the Image: Click on the image within your document that you intend to rotate.
- Go to the Format Tab: Navigate to the “Format” tab in the Word ribbon.
- Click the Rotate Option: In the “Arrange” group, click the “Rotate” button.
- Choose Desired Rotation Angle:
- Preset Rotations: Select “Rotate Right 90°” or “Rotate Left 90°” for quick, precise quarter turns.
- Custom Rotation: Select “More Rotation Options…” (this might be under the “Size” group in some Word versions). In the dialog box or pane that appears, you can enter a precise degree value in the “Rotation” box, allowing for highly accurate adjustments.
- Freehand Rotation: A circular rotation handle typically appears at the top center of a selected image. Click and drag this handle in the desired direction to rotate the image freely. Holding the ‘Shift’ key while dragging constrains the rotation to 15-degree increments, providing a balance between precision and flexibility.
3.1 Benefits of Rotating an Image
Rotating images offers distinct advantages for improving both the visual quality and the overall design of your documents:
- Alignment Correction: Essential for fixing images that appear slightly tilted or for aligning them perfectly with surrounding text blocks, shapes, or other visual elements in your document. This contributes significantly to a polished and professional visual design.
- Unique Visual Compositions: Introducing subtle or dramatic rotations can add dynamism and visual interest, creating unique perspectives that enhance the aesthetic appeal of your document. Tophinhanhdep.com encourages experimentation with angles for compelling photo ideas and digital art.
- Corrections in Orientation: Beyond 90-degree turns, custom rotation allows for very precise adjustments, ensuring images match the intended presentation context or align with specific visual narratives, which is critical for high-resolution stock photos.
3.2 Tips for Rotating Images
Tophinhanhdep.com offers these valuable tips for effectively rotating images in Word:
- Use Gridlines: Enable gridlines in Word (accessible via the “View” tab) to assist with precise alignment and rotation. Gridlines provide a visual guide that is invaluable for maintaining consistency and accuracy in graphic design.
- Consider the Document Orientation: The overall layout and orientation of your document should always influence how you rotate an image, especially when aligning multiple visual elements or balancing a complex page design.
- Experiment with Angles: Don’t hesitate to explore various rotation angles. Sometimes, a slight, unconventional tilt can be more engaging and artistic than a perfectly straight image, contributing to innovative creative ideas and digital art pieces.
4. Cropping an Image
Cropping is a fundamental technique for refining image composition, removing unwanted areas, and focusing the viewer’s attention on specific details. It’s an indispensable tool in both basic and advanced photo manipulation workflows, allowing for precise control over the visual narrative.
Steps to Crop an Image:
- Select the Image: Click on the image you wish to crop within your document.
- Go to the Format Tab: Navigate to the “Format” tab in the Word ribbon.
- Click the Crop Option: In the “Size” group, click on the “Crop” button.
- Drag Cropping Handles: Black cropping handles will appear around the image’s edges and corners. Click and drag these handles inward to select the desired portion of the image to keep. You can also click the “Crop” dropdown again to crop to a specific shape or aspect ratio.
4.1 Benefits of Cropping Images
Effective cropping delivers multiple strategic advantages for visual content:
- Enhanced Composition: By eliminating unnecessary or distracting elements, cropping helps to improve the overall visual balance and focus of an image, making your aesthetic images more impactful and professional.
- Focus on Details: Cropping allows you to direct the viewer’s eye to the most important subjects or specific details within an image, which is essential for effective storytelling in digital photography.
- Optimized Space Usage: Cropping enables you to precisely resize an image to fit within available space in your document while preserving the most crucial visual elements, ensuring efficient and aesthetically pleasing layout design.
4.2 Tips for Effective Image Cropping
Tophinhanhdep.com provides these insights for maximizing the impact of your image cropping:
- Consider the Aspect Ratio: Always ensure that the cropped image maintains a desired aspect ratio. This prevents distortion or stretching and is particularly important for high-resolution photography intended for specific digital platforms or print sizes.
- Experiment with Different Compositions: Try multiple cropping variations. Principles like the “rule of thirds” often lead to more dynamic and engaging compositions, helping you discover compelling photo ideas within your existing images.
- Balance with Surrounding Content: Ensure that the cropped image harmonizes well with adjacent text and other graphic elements in your document. The goal is a cohesive visual design that flows naturally and professionally.
5. Applying Filters and Effects
Microsoft Word also provides various built-in artistic effects and color corrections to enhance the appearance of your images. While not as extensive as dedicated professional photo editing software, these tools can add significant aesthetic value and flair directly within your document.
Steps to Apply Filters and Effects:
- Select the Image: Click on the image you wish to modify.
- Go to the Format Tab: Navigate to the “Format” tab in the Word ribbon.
- Explore Options in the “Adjust” Group:
- Corrections: Use the “Corrections” option for quick adjustments to brightness, contrast, and sharpness, refining the clarity of your digital photography.
- Color: Utilize the “Color” option for saturation, tone, and recoloring effects, which are ideal for setting specific moods or aligning images with thematic collections.
- Artistic Effects: Select “Artistic Effects” to apply various filters such as watercolor, pastel, or mosaic, effectively transforming your image into a piece of digital art directly within Word.
- Picture Styles: In the “Picture Styles” group, you can apply predefined frames, shadows, reflections, and 3-D effects for quick, professional aesthetic enhancements.
These accessible tools, combined with the power of flipping, rotating, and cropping, allow for basic yet impactful photo manipulation directly within your Word document. They empower you to refine aesthetic images, optimize backgrounds, and explore diverse editing styles to achieve your desired visual impact.
Advanced Image Management and Tophinhanhdep.com’s Role: Beyond Word
While Microsoft Word excels in providing essential tools for in-document image manipulation, a comprehensive visual strategy often demands capabilities that extend beyond the scope of a word processor. This is precisely where Tophinhanhdep.com emerges as an indispensable platform, offering a holistic ecosystem of advanced image tools, high-quality content, and creative inspiration that seamlessly complements and elevates your Word-based workflows.
Comprehensive Image Tools for Every Need: Tophinhanhdep.com specializes in a robust suite of “Image Tools” meticulously designed to address every conceivable aspect of image preparation and optimization. After performing fundamental flips, rotations, and crops in Word, you might find yourself needing to:
- Convert Formats: Effortlessly switch between various image types (e.g., from PNG to JPG, or vice versa) to ensure compatibility across different platforms or to meet specific project requirements, all facilitated by our intuitive Converters.
- Compress Files: Significantly reduce the file size of your images without sacrificing visual quality. Our advanced Compressors are crucial for optimizing images for web performance, faster email attachments, or efficient storage, particularly for extensive collections of high-resolution photography.
- Enhance Quality: Utilize our cutting-edge AI Upscalers to intelligently increase the resolution of smaller, lower-quality images. This process makes them suitable for high-resolution displays, large-format prints, or integration into professional digital art pieces, effectively breathing new life into older or less-than-perfect visuals.
- Streamline Data Extraction: Employ our powerful Image-to-Text tools to accurately extract editable text content from scanned documents, photographs of text, or other image-based content. This critical function significantly boosts accessibility and data management for students, researchers, and professionals alike.
These specialized tools are paramount for anyone managing extensive image libraries, designing complex graphic elements, or preparing visual content for diverse digital and print platforms. They ensure that whether your images are destined for vibrant aesthetic backgrounds, dynamic wallpapers, professional stock photo galleries, or detailed academic presentations, they are consistently at their peak performance and visual quality.
Unleashing Creativity with Visual Design and Photography Resources: Tophinhanhdep.com is more than just a toolkit; it’s a dynamic wellspring of inspiration for “Visual Design” and “Photography.” Our vast and continually updated libraries feature:
- High-Resolution, Diverse Images: Explore breathtaking “Nature” scenes, captivating “Abstract” art, evocative “Sad/Emotional” imagery, and stunning “Beautiful Photography.” Our curated collections provide the perfect backdrop or focal point for any project, complementing documents where Word’s basic editing helps integrate them into a cohesive narrative.
- Inspiration & Curated Collections: Dive into a wealth of “Photo Ideas,” explore meticulously crafted “Mood Boards,” browse diverse “Thematic Collections,” and stay ahead with “Trending Styles” to continually fuel your creativity. Whether you’re conceptualizing intricate digital art or seeking the perfect aesthetic for your next presentation, Tophinhanhdep.com offers unparalleled visual wealth and guidance.
Integrating with PDF Workflows: The source content highlighted the necessity of tools like UPDF for manipulating images specifically within PDF documents. This illustrates a common real-world need where a document’s format transition requires specialized software. While Word excels with .docx files, handling .pdf often necessitates a dedicated PDF editor.
The general workflow for image manipulation in PDFs, emphasizing the broader need for comprehensive image solutions, would involve:
- Save as PDF: First, save your Word document, complete with its perfectly flipped, rotated, and cropped images, into a .pdf format.
- PDF Editing Software: Open this PDF file in a dedicated PDF editing software.
- Perform PDF-Specific Image Edits: Within the PDF editor, you can typically select individual images and apply specific rotations (e.g., clockwise/counter-clockwise) or even flips, if the software supports such direct image manipulation within the fixed-layout PDF. This step is crucial for maintaining layout integrity within a document that has transitioned to a PDF format.
For those managing extensive PDF documents with numerous image-editing requirements, such specialized tools are invaluable. However, for broader image needs—whether it’s optimizing these images for web display after PDF creation, converting them to different formats for various applications, or applying advanced AI enhancements to ensure maximum impact—Tophinhanhdep.com provides the overarching suite of tools and resources that ensure consistency, quality, and creative flexibility across all your visual assets.
In essence, Word provides the foundational canvas for document creation and essential image adjustments, while Tophinhanhdep.com furnishes the advanced brushes, colors, and limitless inspiration necessary to transform those canvases into masterpieces of “Visual Design” and “Digital Art.” This synergistic approach empowers users to achieve professional-grade results, making every image, whether a personalized wallpaper, a high-resolution stock photo, or a unique digital art piece, truly stand out.
Frequently Asked Questions and Advanced Tips
Navigating image manipulation can sometimes lead to specific questions or require more nuanced techniques. This section addresses common queries and explores advanced tips to further enhance your image editing capabilities within Microsoft Word, drawing on the expertise often found on Tophinhanhdep.com.
Frequently Asked Questions
This section compiles common queries regarding image manipulation in Microsoft Word, offering concise and clear answers to streamline your workflow and address typical challenges.
-
How can I flip an image horizontally in Microsoft Word?
- To flip an image horizontally, select the image in your document. Go to the “Format” tab in the ribbon, click on the “Rotate” option, and then choose “Flip Horizontal” from the dropdown menu. This action mirrors the image along its vertical axis, which is highly useful for creating symmetrical designs or correcting an image initially captured with an incorrect left-right orientation in high-resolution photography.
-
Can I flip an image vertically in Microsoft Word?
- Yes, you can. After selecting the image you wish to flip, navigate to the “Format” tab, click the “Rotate” option, and then select “Flip Vertical.” This command inverts the image along its horizontal axis, making it ideal for correcting upside-down photos or experimenting with artistic effects for digital art and abstract visuals.
-
Is it possible to rotate an image by a specific angle in Microsoft Word?
- Yes, current versions of Microsoft Word provide this precise control. Select the image, go to the “Format” tab, click “Rotate,” and then choose “More Rotation Options.” In the subsequent pane or dialog box that appears, you can input an exact degree value in the “Rotation” box. This granular control is crucial for achieving perfect alignment in complex visual design projects and for fine-tuning digital photography.
-
Can I undo the image flip or rotation in Microsoft Word?
- Absolutely. All image transformations performed in Word are non-destructive and fully reversible. You can easily undo any action by using the “Undo” command (typically Ctrl+Z on Windows or Cmd+Z on Mac) immediately after the action. Alternatively, you can re-apply the same flip command (e.g., clicking “Flip Horizontal” again on an already horizontally flipped image) to return the image to its original state. For rotations, re-entering 0 degrees in the rotation options will reset it.
-
Can I flip multiple images at once in Microsoft Word?
- Microsoft Word does not have a direct, single-command feature to flip or rotate multiple individual images simultaneously. Each image typically needs to be selected and manipulated individually. However, there is a powerful workaround: if you group multiple images together (select all desired images by holding Shift or Ctrl/Cmd and clicking each, then right-click, choose “Group,” and then “Group” again), they can then be flipped or rotated as a single, cohesive unit. This is a highly useful technique for managing complex layouts in graphic design and ensuring consistency across multiple visual elements.
Advanced Tips for Image Manipulation in Word
Beyond the standard menu options, Word offers clever shortcuts and specialized techniques that can further refine your image editing workflow, embodying the innovative creative ideas and photo manipulation strategies often highlighted on Tophinhanhdep.com.
Dragging and Flipping Vertically or Horizontally
This intuitive trick allows for rapid image reorientation without the need to navigate through ribbon menus, perfect for quick adjustments in visual design prototyping:
- Horizontal Flip: Select your image. Then, click and drag either the left or right sizing handle (the small circles or squares on the image’s border) past the opposite edge of the image. As you continue dragging, the image will automatically mirror itself horizontally.
- Vertical Flip: Similarly, select the image and drag either the top or bottom sizing handle past the opposite edge. The image will then vertically flip. This direct manipulation method is particularly efficient for rapid prototyping in visual design and for quickly experimenting with dynamic aesthetic compositions and photo ideas.
Mirror WordArt or Shape Text for Unique Visual Effects
Directly flipping text like an image is not natively supported for standard text boxes, but for WordArt or text positioned within shapes, a specialized 3-D rotation can achieve a mirroring effect. This technique is perfect for creating unique graphic design elements, abstract textual art, or stylized captions:
- Insert WordArt or Shape with Text: Begin by inserting your desired text as WordArt (go to
Insert > WordArt) or by adding a shape (e.g., a rectangle fromInsert > Shapes) and then right-clicking it to choose “Add Text.” - Select the Object: Click on the WordArt object or the shape containing the text to select it.
- Access 3-D Rotation Options: Navigate to the
Shape FormatorDrawing Tools Formattab that appears. Then, click onText Effects(usually in the WordArt Styles or Shape Styles group) >3-D Rotation>3-D Rotation Options. - Apply X Rotation for Mirroring: In the “Format Shape” pane that opens on the right side of your screen, locate the
3-D Rotationsection. Here, set the “X Rotation” value to180°. This action will effectively create a horizontal mirror effect for your WordArt or text within the shape. Adjusting the “Y Rotation” can achieve a vertical mirroring effect. This advanced technique is a testament to the subtle yet powerful capabilities of Word for intricate photo manipulation within documents.
These techniques, coupled with the comprehensive resources and advanced tools available from Tophinhanhdep.com, ensure that users can fully harness Word’s image manipulation capabilities, while also accessing a broader array of tools and inspiration for all their images, photography, and visual design needs.
Conclusion: Unleashing Your Creative Vision with Word and Tophinhanhdep.com
Flipping and rotating images in Microsoft Word are fundamental skills that unlock a vast array of creative and practical possibilities for enhancing any document. From correcting simple orientation errors in high-resolution photography to crafting complex mirror effects for sophisticated graphic design projects, Word’s built-in tools provide accessible and efficient solutions for users of all levels. The ability to precisely rotate, strategically crop, and even apply artistic filters directly within your document empowers you to transform ordinary text into visually engaging presentations, reports, and creative works.
As we’ve explored, these basic manipulations are merely the starting point. The nuanced application of horizontal and vertical flips, coupled with accurate rotations and thoughtful cropping, contributes significantly to the overall aesthetic appeal and communicative impact of your visual content. These techniques are indispensable whether you’re working on aesthetic backgrounds, curating images for a mood board, or refining a piece of digital art.
Moreover, the power of Tophinhanhdep.com extends and elevates these core Word capabilities. Our platform serves as the ultimate comprehensive resource for all your image-related needs, providing everything from a vast library of high-resolution stock photos and diverse thematic collections to offering advanced image tools like AI upscalers, converters, compressors, and image optimizers. Tophinhanhdep.com effectively bridges the gap between simple document-based image editing and professional-grade visual design, ensuring that your images are not only perfectly positioned but also fully optimized, creatively inspiring, and aligned with trending visual styles.
By mastering the image manipulation features within Microsoft Word and leveraging the comprehensive ecosystem of Tophinhanhdep.com, you gain unparalleled control over your visual content. You can confidently enhance your documents, create stunning visual narratives, and unleash your full creative potential, making every image—whether a personal wallpaper, a professional stock photo, or a unique digital art piece—truly stand out and leave a lasting impression.