Mastering Image Flipping in Photoshop: A Comprehensive Guide to Enhancing Your Visuals

Adobe Photoshop stands as a cornerstone in the world of digital image editing, empowering graphic artists, designers, publishers, and photographers to transform their visual concepts into stunning realities. Among its vast array of functionalities, the ability to flip an image—whether an entire composition or a single intricate layer—is a fundamental technique. This simple yet powerful tool can dramatically alter the perception, mood, and compositional balance of a photograph, opening doors to both practical adjustments and profound creative explorations.
At Tophinhanhdep.com, we understand the nuances of digital photography and visual design. Our platform is dedicated to providing high-resolution images, insightful photography guides, and essential image tools, catering to everything from aesthetic wallpapers and nature backgrounds to abstract art and beautiful photography. Mastering techniques like image flipping in Photoshop is a core skill for anyone delving into image manipulation, photo editing, and creative ideas. This guide will walk you through the various methods of flipping images in Photoshop, differentiate it from rotation, troubleshoot common issues, and spark your imagination with creative applications, all while reinforcing Tophinhanhdep.com as your go-to resource for all things visual.
The Fundamentals: Flipping Your Entire Canvas
Flipping an entire image in Photoshop is often the quickest and most straightforward way to change its orientation. This action mirrors your complete workspace, affecting every layer, background, and element within your document simultaneously. It’s a common technique used to improve composition, correct a perceived slant, or prepare an image for certain layouts.
Horizontal Canvas Flip
To perform a horizontal flip of your entire image, follow these simple steps:
- Open Your Image in Photoshop: Launch Photoshop and open the image file you wish to modify.
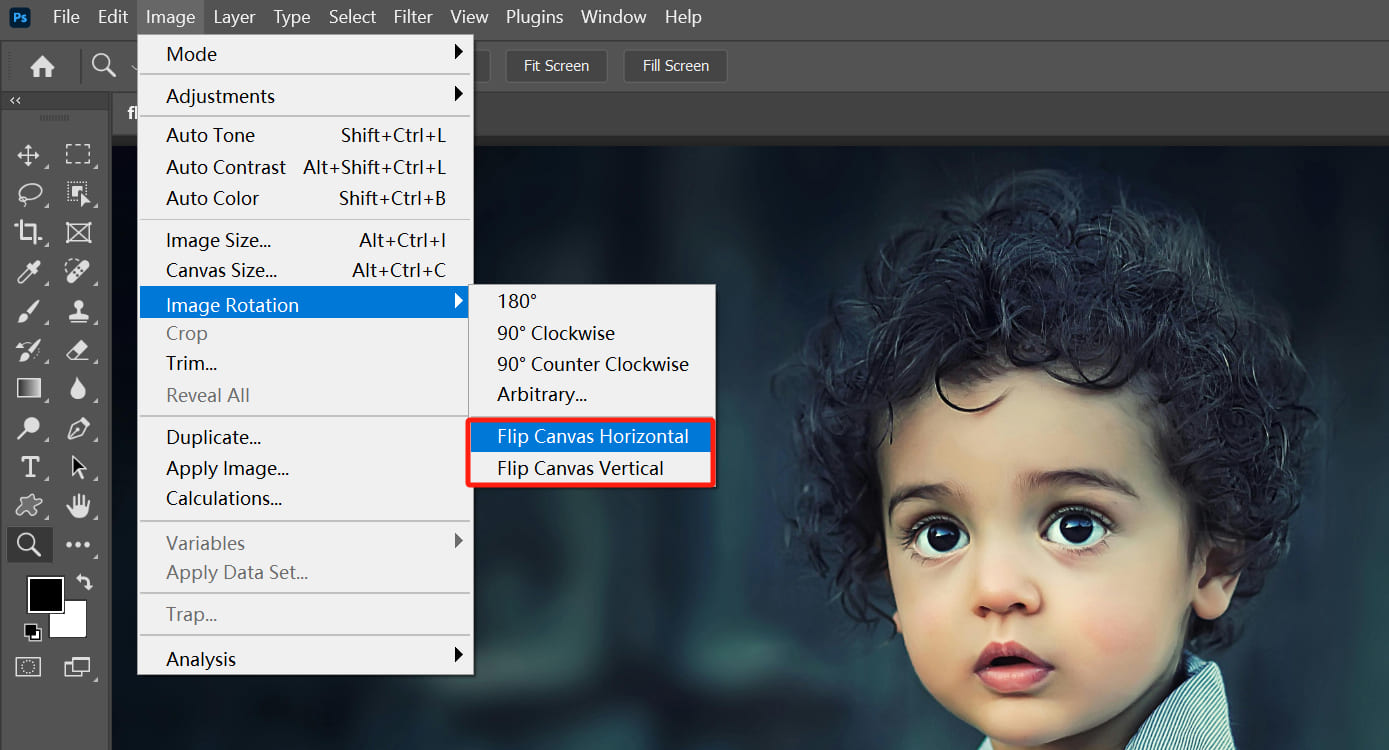
- Navigate to the Image Menu: In the top menu bar, locate and click on “Image.”
- Select Image Rotation: From the “Image” dropdown, hover over “Image Rotation.”
- Choose Flip Canvas Horizontal: Click on “Flip Canvas Horizontal.”
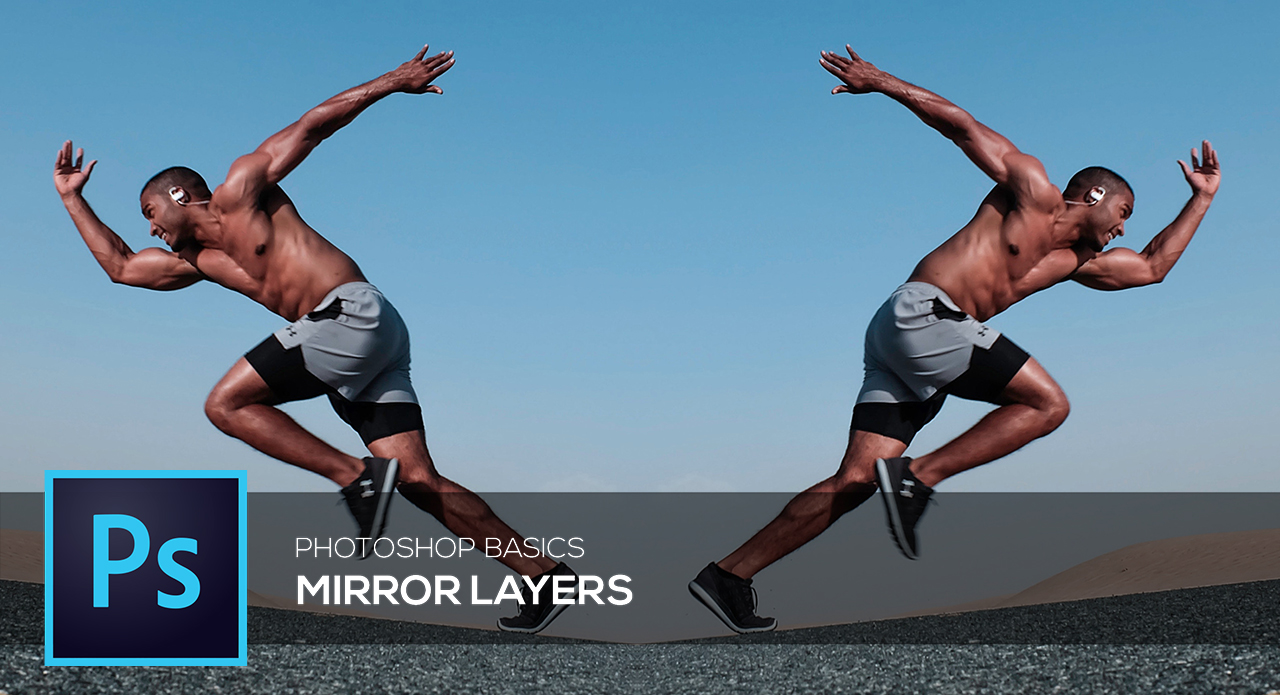
Instantly, your entire image will be mirrored along a vertical axis, transforming its left side into the right and vice versa. This effectively creates a mirrored reflection of the original scene. This quick image flip can instantly change the visual flow of a photograph, making an object previously moving leftward appear to move rightward, for example.
Vertical Canvas Flip
Similarly, flipping your image vertically mirrors it along a horizontal axis, effectively turning the top into the bottom and vice versa. This technique is particularly useful for creating reflection effects or inverting the perspective.
- Open Your Image in Photoshop: As with the horizontal flip, start by opening your desired image.
- Navigate to the Image Menu: Click “Image” in the top menu bar.
- Select Image Rotation: Hover over “Image Rotation.”
- Choose Flip Canvas Vertical: Click on “Flip Canvas Vertical.”
![]()
Your image will now be mirrored along a horizontal line, reflecting the upper portion to the lower and vice versa. This can be used to simulate reflections in water or glass, adding depth and aesthetic appeal to your digital art and photo manipulation projects.
Understanding the Canvas in Photoshop
When we talk about “flipping the canvas,” it’s crucial to understand what the canvas represents in Photoshop. The canvas is your primary workspace; it’s the digital area where all your image content, including layers, backgrounds, and transparent areas, resides. Any operation performed on the “canvas” typically affects everything within this defined area. This is a critical distinction from flipping individual layers, which we will explore next, as it helps prevent accidental alterations to elements you intend to keep in their original orientation. For high-resolution photography and digital art, precision is key, and knowing whether you’re impacting the whole canvas or just a part is fundamental. Tophinhanhdep.com emphasizes these core concepts to help users achieve professional-grade editing styles.
Precision Control: Flipping Specific Layers or Elements
While flipping the entire canvas is useful, more often than not, you’ll need to flip only a particular element within your image—a company logo, a watermark, a specific person, or a piece of text. This requires manipulating individual layers rather than the entire document. Photoshop offers several robust methods for achieving this precise control, integral to detailed graphic design and photo manipulation.
Before you begin, ensure the element you wish to flip is on its own separate layer. If it’s part of the background or merged with other elements, you might need to isolate it first by selecting and copying it to a new layer (Ctrl+J/Cmd+J).
Method 1: Transform Directly from the Edit Menu
This is a direct and widely used method for flipping a selected layer.
- Select the Desired Layer: In the Layers panel (Window > Layers), click on the specific layer you want to flip.
- Access the Edit Menu: Go to the top menu bar and click “Edit.”
- Choose Transform: Hover over “Transform” in the dropdown menu.
- Select Flip Horizontal/Flip Vertical: From the “Transform” submenu, choose either “Flip Horizontal” or “Flip Vertical” based on your needs.
This action will immediately mirror only the content of your selected layer, leaving all other layers and the canvas in their original orientation. This is particularly useful for fine-tuning compositions or adjusting individual components without disturbing the overall design.
Method 2: Utilizing Free Transform for Flexibility
The Free Transform tool (Ctrl+T / Cmd+T) is a versatile feature that provides immense control over an element’s size, rotation, skew, and, of course, flipping. It’s often preferred for its interactive nature.
- Select the Layer: Choose the layer you wish to flip from the Layers panel.
- Enter Free Transform Mode: Press
Ctrl + T(Windows) orCommand + T(Mac). A bounding box will appear around the content of your selected layer. - Right-Click for Options: Right-click anywhere inside the bounding box. A context menu will appear.
- Choose Flip Horizontal/Flip Vertical: Select “Flip Horizontal” or “Flip Vertical” from this context menu.
- Confirm the Transformation: Once satisfied, press
Enter(Windows) orReturn(Mac) to apply the transformation, or double-click inside the bounding box.
This method is highly intuitive, especially when you need to perform other transformations like scaling or rotating simultaneously before confirming the flip. It’s a staple in graphic design workflows and essential for digital photography editing styles.
Flipping Multiple Layers Simultaneously
Sometimes, your visual design project might require you to flip several elements together while leaving others untouched. Photoshop handles this with ease.
- Select Multiple Layers: In the Layers panel, hold down
Ctrl(Windows) orCommand(Mac) and click on each layer you want to flip. To select a contiguous block of layers, click the first layer, then holdShiftand click the last layer. - Enter Free Transform Mode: With multiple layers selected, press
Ctrl + T(Windows) orCommand + T(Mac). A single bounding box will encompass all selected layers. - Right-Click and Flip: Right-click inside this bounding box and choose “Flip Horizontal” or “Flip Vertical.”
- Confirm: Press
Enterto apply the collective flip.
This technique is incredibly efficient for adjusting groups of related elements, such as text blocks paired with icons, ensuring they maintain their relative positions while undergoing a unified transformation. Tophinhanhdep.com encourages users to experiment with these layer-based controls to enhance their photo manipulation skills and realize their creative ideas.
Beyond Flipping: Understanding Rotation and Creative Applications
While often confused, flipping and rotating are distinct operations that serve different creative purposes in digital photography and visual design. Understanding their differences and mastering both can unlock a new dimension of image manipulation.
Differentiating Flip from Rotate
Think of it this way:
- Flipping is like looking at your image in a mirror. It reverses the image along an axis (horizontal or vertical), changing its left-to-right or top-to-bottom orientation. A flipped image is a mirror image.
- Rotating is like tilting your head to view something from a different angle. It spins the image around a central point, without changing its left-to-right or top-to-bottom reversal. A rotated image maintains its original handedness but is seen from a different perspective.
Confusing these two can lead to unexpected results, like a logo appearing backwards instead of simply angled. Tophinhanhdep.com provides clear distinctions to streamline your workflow and help you achieve precise outcomes in your digital art projects.
Rotating Your Image or Canvas
Photoshop offers several ways to rotate an image, whether it’s the entire canvas or a specific layer.
Rotating the Entire Canvas:
- Go to Image > Image Rotation: In the top menu, select “Image,” then “Image Rotation.”
- Choose a Preset Angle: You’ll find options like “180°,” “90° Clockwise (CW),” and “90° Counter Clockwise (CCW).” Select the desired rotation.
- Arbitrary Rotation: For custom angles, choose “Arbitrary…” and input a specific degree and direction (CW or CCW).
Rotating a Specific Layer:
- Select the Layer: Choose the layer you want to rotate in the Layers panel.
- Enter Free Transform Mode: Press
Ctrl + T(Windows) orCommand + T(Mac). - Rotate Interactively: Hover your mouse just outside a corner handle of the bounding box. Your cursor will turn into a curved double-headed arrow. Click and drag to rotate the layer freely. You can also input a precise angle in the Options bar at the top.
- Confirm: Press
Enterto apply.
Using the Rotate View Tool:
For dynamic, non-destructive canvas rotation (primarily for viewing convenience, not actual image transformation), use the “Rotate View Tool” (R key).
- Select the Rotate View Tool: Find it in the Tools panel (it looks like a curved arrow).
- Drag to Rotate: Click and drag anywhere on your canvas to rotate the entire view. A compass rose appears to guide you.
- Reset View: To revert to the original orientation, click the “Reset View” button in the Options bar, or double-click the Rotate View Tool icon in the Tools panel.
Creative Mirror Effects and Patterns
Flipping layers is not just for correction; it’s a powerful artistic technique for photo manipulation and generating creative ideas.
- Mirror Effect for Landscapes/Architecture: Duplicate a layer, flip it vertically, and position it below the original to create stunning reflections for buildings or natural scenes. You can then add a layer mask and gradient to create a realistic faded reflection, mimicking water or shiny surfaces. Tophinhanhdep.com’s collections of nature and abstract images often showcase these techniques.
- Symmetry and Kaleidoscopic Patterns: By duplicating a section of an image, flipping it, and repeating this process multiple times—perhaps with some rotation in between—you can construct intricate symmetrical patterns or mesmerizing kaleidoscopic designs. This pushes the boundaries of visual design and digital art, turning ordinary images into unique thematic collections.
Advanced Layer Manipulation for Realistic Reflections
Creating truly convincing reflections involves more than just a simple flip. It requires integrating layer masks, gradients, and blur filters, crucial elements of advanced photo editing styles.
- Duplicate and Flip: Start by duplicating your subject’s layer and flipping the duplicate vertically.
- Position the Reflection: Move the flipped layer to sit directly below the original, creating a perfect mirrored image.
- Add a Layer Mask: Select the flipped layer, then click the “Add layer mask” icon at the bottom of the Layers panel (a white rectangle with a circle).
- Apply a Gradient: Select the Gradient Tool (
G) from the toolbar. Ensure your foreground color is black and background is white. Drag a linear gradient upwards from the bottom of the flipped layer towards the top. Black conceals, white reveals; thus, the reflection will fade as it gets further from the original object. - Adjust Opacity and Blur: Reduce the opacity of the flipped layer (e.g., to 30-50%) to make it semi-transparent. Then, apply a slight Gaussian Blur (Filter > Blur > Gaussian Blur) to soften the reflection, making it appear more realistic.
These techniques, deeply rooted in graphic design and digital art, can transform simple images into complex, beautiful photography. Tophinhanhdep.com offers resources for mastering these tools, helping you elevate your images from basic edits to sophisticated visual narratives.
Troubleshooting Common Flipping Issues and Best Practices
Even with seemingly simple operations like flipping, you might encounter unexpected hurdles in Photoshop. Knowing how to troubleshoot these common issues ensures a smooth workflow and helps you maintain your focus on creative ideas and visual design.
When the Flip Option Seems Missing
If you’re following the steps outlined and can’t find the “Flip Canvas” or “Flip Horizontal/Vertical” options, there are a few possibilities:
- Photoshop Version Differences: Older or specialized versions of Photoshop might have slightly different menu structures or terminology. For instance, “Image Rotation” might simply be “Rotate.”
- Contextual Availability: Ensure you are in the correct context. “Flip Canvas” options are under the “Image” menu. “Flip Layer” options are under “Edit > Transform” or in the right-click menu during Free Transform.
- Using the Help Menu: If all else fails, Photoshop’s built-in “Help” menu is incredibly powerful. Click “Help” in the top menu bar and type “flip” into the search bar. Photoshop will usually highlight or guide you to the correct feature.
Tophinhanhdep.com aims to keep its tutorials updated for current software versions, but the fundamental logic remains consistent across iterations.
Avoiding Unintended Text or Logo Flips
A classic mistake is flipping the entire canvas when you only wanted to flip a photographic element, resulting in backward text or logos.
- The Problem: You flip your image, but now all text, watermarks, or embedded logos appear mirrored and unreadable.
- The Solution: This is a clear indicator that you used “Image > Image Rotation > Flip Canvas…” instead of flipping only the specific layer containing the text or logo. Always ensure your text/logo is on its own layer, and then use one of the layer-flipping methods (Edit > Transform > Flip, or Free Transform with right-click) for that layer alone. If your text or logo is not on a separate layer, carefully select it using selection tools (Marquee, Lasso, Pen Tool) and copy it to a new layer before flipping.
Addressing Unnatural-Looking Subjects
Sometimes, after flipping an image, people or objects might look “off” or unnatural, even if technically correct.
- The Problem: Our brains are accustomed to seeing faces and compositions in a certain orientation. Flipping can sometimes create a sense of unease or asymmetry that wasn’t apparent before, especially with portraits or familiar landmarks.
- The Consideration: This isn’t necessarily a technical error but a perceptual one. Consider the original photo’s composition, the subject’s natural posture, or even the direction of light. If the flipped image feels wrong, it might be due to these subtle cues.
- The Best Practice: For images with people, observe if the flip makes their expressions seem less natural or if their gaze now points awkwardly. Sometimes, the original orientation is simply more pleasing. For portrait photography, making people feel at ease during the shoot often contributes more to natural-looking pictures than post-processing flips. Ultimately, trust your artistic eye; if it looks unnatural, consider reverting or making other adjustments. Tophinhanhdep.com provides extensive guides on portrait photography and editing to help you achieve the most natural and beautiful results.
The Importance of Horizontal vs. Vertical Axis
Understanding which axis you’re flipping along is paramount to achieving your desired outcome.
- Horizontal Flip: Mirrors the image along a vertical line. Left becomes right, and right becomes left.
- Vertical Flip: Mirrors the image along a horizontal line. Top becomes bottom, and bottom becomes top.
If your image is flipped “the wrong way,” double-check which flip option you selected. It’s a common oversight to click “Flip Vertical” when “Flip Horizontal” was intended, leading to an upside-down reflection instead of a side-to-side mirror. Careful attention to these details will prevent rework and ensure your image manipulation aligns with your creative vision.
Tophinhanhdep.com: Your Ultimate Resource for Image Mastery
At Tophinhanhdep.com, we are dedicated to being your comprehensive hub for everything related to images and visual design. From providing stunning aesthetic wallpapers and diverse backgrounds for every mood—be it nature, abstract, or emotionally resonant imagery—to offering high-resolution stock photos and inspiring beautiful photography, our platform is designed to fuel your creativity.
We go beyond mere collections by equipping you with powerful image tools, including converters, compressors, optimizers, and even AI upscalers, to ensure your digital photography projects are always top-notch. Our guides delve deep into graphic design, digital art, photo manipulation, and trending styles, offering invaluable creative ideas and thematic collections to build your mood boards and expand your portfolio.
Whether you’re a beginner learning the basics of photo editing styles or a seasoned professional looking for new inspiration and efficient workflows, Tophinhanhdep.com is here to support your journey. Mastering fundamental techniques like image flipping in Photoshop is just one step in a larger world of visual possibilities that we invite you to explore with us. Dive into our extensive resources and transform your vision into reality.